


1、FloatingActionButton
我们先来看一张图片,认识一下什么是FloatingActionButton:
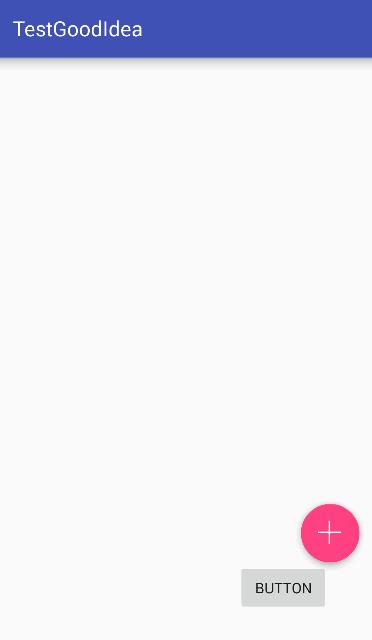
FloatingActionButton一般浮现在右下角,是Material Design的一个控件。
我们可以在gradle中引入该控件:
compile 'com.android.support:design:24.2.1'
然后在布局文件中使用该控件:
 <android.support.design.widget.FloatingActionButton
            android:id="@+id/btn_num1"
            android:src="@drawable/add"
            android:layout_width="wrap_content"
            android:layout_height="wrap_content" />

 <android.support.design.widget.FloatingActionButton
该控件是自带阴影效果的。
我们用Google为我们提供的布局文件以及SnackBar实现如下效果:
下面能够弹出一个SanckBar,然后可以进行一些操作,但是这些不是我们今天要讨论的。
我们想实现下面的这样一个功能:
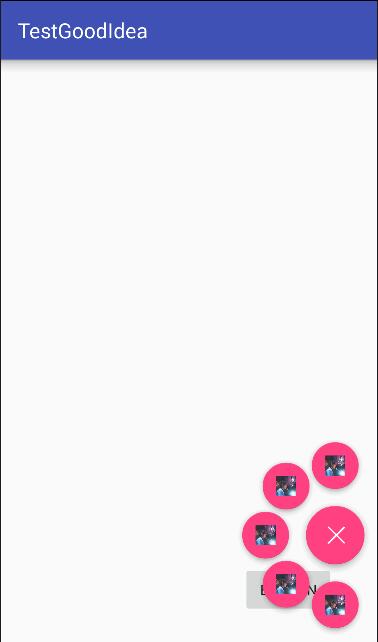
点击按钮,然后展开菜单。
2、展开菜单实现思路:
1、将要显示的菜单按钮都放在与Fab同一位置,然后设置为INVISIBLE不可见。
2、点击Fab的时候,将菜单按钮设置为可见,并且动过动画平移到各个位置。
3、在此点击Fab或者点击菜单之后,将菜单折叠回来,并设置为不可见。
3、展开菜单实现代码:
1、新建一个类:UnfoldViewGroup,继承ViewGroup
我们先定义一些成员变量(下面的代码遇到不懂的再回来看看):
    private static final int DO_ROTATE = 1;//旋转动画
    private static final int RECOVER_ROTATE = -1;//恢复旋转之前的状态
    private static final int UNFOLDING = 2;//菜单展开状态
    private static final int FOLDING = 3;//菜单折叠状态

    private int mWidth=400;//viewGroup的宽
    private int mHeight=620;//ViewGroup的高
    private int length =200;//子view展开的距离
    private int flag = FOLDING ;//菜单展开与折叠的状态
    private float mScale = 0.8f;//展开之后的缩放比例
    private int mDuration=400;//动画时长
    private View mainButton;//在Activity中显示的button
重写onMeasure()方法:
    @Override
    protected void onMeasure(int widthMeasureSpec, int heightMeasureSpec) {
        //测量子view的宽高 这是必不可少的  不然子view会没有宽高
        measureChildren(widthMeasureSpec,heightMeasureSpec);
        //设置该viewGroup的宽高
        setMeasuredDimension(mWidth,mHeight);
    }
重写onLayout方法
在这个方法中,我们要 做的是为子view设置布局位置:
  @Override
    protected void onLayout(boolean changed, int l, int t, int r, int b) {
        final int cCount = getChildCount();
        if(cCount==0){//没有子view  直接返回就好
            return;
        }
        //第一个子view当做显示的button
        mainButton = getChildAt(0);
        //获取宽高
        int width = mainButton.getMeasuredWidth();
        int height = mainButton.getMeasuredHeight();
        //1:相对于父布局  控件的left
        //2:控件的top
        //3:右边缘的left
        //4:底部的top
        //所以后两个直接用left加上宽 以及 top加上height就好
        mainButton.layout(mWidth-width,(mHeight-height)/2,mWidth,(mHeight-height)/2+height);

        //设置子view的初始位置  与mainButton重合  并且设置为不可见
        for(int i=1;i<cCount;i++) {
            final View view = getChildAt(i);
            view.layout(mWidth - width, (mHeight - height) / 2, mWidth, (mHeight - height) / 2 + height);
            view.setVisibility(INVISIBLE);
        }


        //设置主按钮的点击事件
        setMainButtonListener(mainButton);
        //设置子view的点击事件
        setChildrenListener();
    }
mainButton的点击事件:
/**
     * 设置主按钮的点击事件
     * @param mainButton
     */
    private void setMainButtonListener(final View mainButton) {

        //得到子view的个数
        final int cCount = getChildCount();
        mainButton.setOnClickListener(new OnClickListener() {
            @Override
            public void onClick(View v) {
                if(flag==FOLDING) {//折叠状态
                    for (int i = 1; i < cCount; i++) {
                        View view = getChildAt(i);
                        view.setVisibility(VISIBLE);
                        //开始平移  第一个参数是view 第二个是角度
                        setTranslation(view, 180 / (cCount - 2) * (i - 1));
                    }
                    flag = UNFOLDING;//展开状态
                    //开始旋转
                    setRotateAnimation(mainButton,DO_ROTATE);

                }else {
                    setBackTranslation();
                    flag =FOLDING;
                    //开始反向旋转 恢复原来的样子
                    setRotateAnimation(mainButton,RECOVER_ROTATE);
                }
            }
        });

    }
我们设置一个flag来表示菜单的折叠状态,然后点击mianButton的时候做出相应的动画(展开菜单或者折叠菜单)。
平移动画:
我们这里使用的属性动画,也比较简单,大家可以学习学习属性动画。
public void setTranslation(View view,int angle){
        int x  = (int) (length*Math.sin(Math.toRadians(angle)));
        int y = (int) (length*Math.cos(Math.toRadians(angle)));
        Log.d("ICE","angle"+angle +"y:"+y);
        ObjectAnimator tX = ObjectAnimator.ofFloat(view,"translationX",-x);
        ObjectAnimator tY = ObjectAnimator.ofFloat(view,"translationY",-y);
        ObjectAnimator alpha  = ObjectAnimator.ofFloat(view,"alpha",1);
        ObjectAnimator scaleX = ObjectAnimator.ofFloat(view,"scaleX",mScale);
        ObjectAnimator scaleY = ObjectAnimator.ofFloat(view,"scaleY",mScale);

        AnimatorSet set = new AnimatorSet();
        set.play(tX).with(tY).with(alpha);
        set.play(scaleX).with(scaleY).with(tX);
        set.setDuration(mDuration);
        set.setInterpolator(new AccelerateDecelerateInterpolator());
        set.start();
    }
为了理解这个动画,我们要结合一张图:
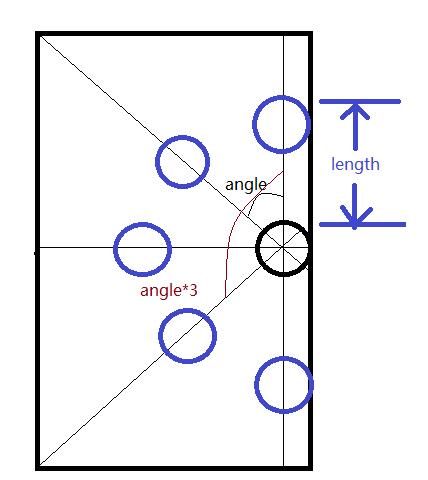
通过length与angle计算出子view的位置,然后通过动画属性进行设置x与y的偏移量就好。
这样就可以实现点击mainButton然后展开菜单了。
折叠动画:
private void setBackTranslation(){
        int cCount =getChildCount();
        for (int i = 1; i < cCount; i++) {
            final View view = getChildAt(i);
            ObjectAnimator tX = ObjectAnimator.ofFloat(view,"translationX",0);
            ObjectAnimator tY = ObjectAnimator.ofFloat(view,"translationY",0);
            ObjectAnimator alpha  = ObjectAnimator.ofFloat(view,"alpha",0);//透明度 0为完全透明
            AnimatorSet set = new AnimatorSet(); //动画集合
            set.play(tX).with(tY).with(alpha);
            set.setDuration(mDuration); //持续时间
            set.setInterpolator(new AccelerateDecelerateInterpolator());
            set.start();
            //动画完成后 设置为不可见
            set.addListener(new AnimatorListenerAdapter() {
                @Override
                public void onAnimationEnd(Animator animation) {
                    view.setVisibility(INVISIBLE);
                }
            });
        }

    }
旋转动画:
public void setRotateAnimation(View view,int flag){
        ObjectAnimator rotate = null;
        if(flag==DO_ROTATE)
            rotate = ObjectAnimator.ofFloat(view,"rotation",135);
        else rotate = ObjectAnimator.ofFloat(view,"rotation",0);
        rotate.setDuration(mDuration);
        rotate.start();
    }
缩放动画:
    public void setRotateAnimation(View view,int flag){
        ObjectAnimator rotate = null;
        if(flag==DO_ROTATE)
            rotate = ObjectAnimator.ofFloat(view,"rotation",135);
        else rotate = ObjectAnimator.ofFloat(view,"rotation",0);
        rotate.setDuration(mDuration);
        rotate.start();
    }
点击子view执行子view的点击事件,并且折叠菜单。
private void setChildrenListener() {
        final int cCount = getChildCount();
        for(int i=1;i<cCount;i++){
            final View view = getChildAt(i);
            //设置点击时候执行点击事件并且缩回原来的位置
            view.setOnTouchListener(new OnTouchListener() {
                int x,y;
                @Override
                public boolean onTouch(View v, MotionEvent event) {

                    switch (event.getAction()){
                        case MotionEvent.ACTION_DOWN:
                            x = (int) event.getX();
                            y = (int) event.getY();
                            break;
                        case MotionEvent.ACTION_UP:
                            if((int)event.getX() == x && (int)event.getY()==y){
                                //如果手指点击时 与抬起时的x y 坐标相等 那么我们认为手指点了该view
                                setBackTranslation();  //折叠菜单
                                setRotateAnimation(mainButton,RECOVER_ROTATE); //旋转mainButton
                                flag = UNFOLDING;//设置为展开状态
                                //执行该view的点击事件
                                view.callOnClick();
                            }
                            break;
                    }
                    return true;
                }
            });
        }
    }
我们不能够重写子view的onClickListener(),因为我们可以在Activity中写点击事件,如果在这里写了,就会覆盖点击事件了。所以我们用触摸监听来间接实现。
这样我们就定义好了我们的ViewGroup了,然后我们要在布局文件中使用我们的ViewGroup。
4、使用:
    <com.ice.testgoodidea.view.UnfoldViewGroup
        android:translationZ="10dp"
        android:id="@+id/viewGroup"
        android:background="#004cafaf"
        android:layout_width="wrap_content"
        android:layout_height="wrap_content"
        android:layout_alignParentBottom="true"
        android:layout_alignParentEnd="true">
        <android.support.design.widget.FloatingActionButton
            android:id="@+id/btn_num1"
            android:src="@drawable/add"
            android:layout_width="wrap_content"
            android:layout_height="wrap_content" />

        <android.support.design.widget.FloatingActionButton
            android:src="@drawable/bestjay"
            android:layout_width="wrap_content"
            android:layout_height="wrap_content" />

        <android.support.design.widget.FloatingActionButton
        android:src="@drawable/bestjay"
        android:layout_width="wrap_content"
        android:layout_height="wrap_content" />
        <android.support.design.widget.FloatingActionButton
        android:src="@drawable/bestjay"
        android:layout_width="wrap_content"
        android:layout_height="wrap_content" />
        <android.support.design.widget.FloatingActionButton
        android:src="@drawable/bestjay"
        android:layout_width="wrap_content"
        android:layout_height="wrap_content" />
        <android.support.design.widget.FloatingActionButton
            android:src="@drawable/bestjay"
            android:layout_width="wrap_content"
            android:layout_height="wrap_content" />
    </com.ice.testgoodidea.view.UnfoldViewGroup>
这样 第一个FloatingActionButton就是展示在Activity的FloatingActionButton了。然后 之后的几个都是菜单了。
我们可以为之后的几个在Activity中加上点击事件,这样就实现了展开菜单了。
注意,我们要把这个ViewGroup当做最顶端的layout的话,那么我们要设置一下
android:translationZ="10dp"这个属性是用在relativeLayout时,可以设置Z轴的高度。值越大,越高。所以我们的展开菜单就可以在重叠的顶端显示了,而不至于被其他控件遮挡。


 523
523

 被折叠的 条评论
为什么被折叠?
被折叠的 条评论
为什么被折叠?
 到【灌水乐园】发言


