


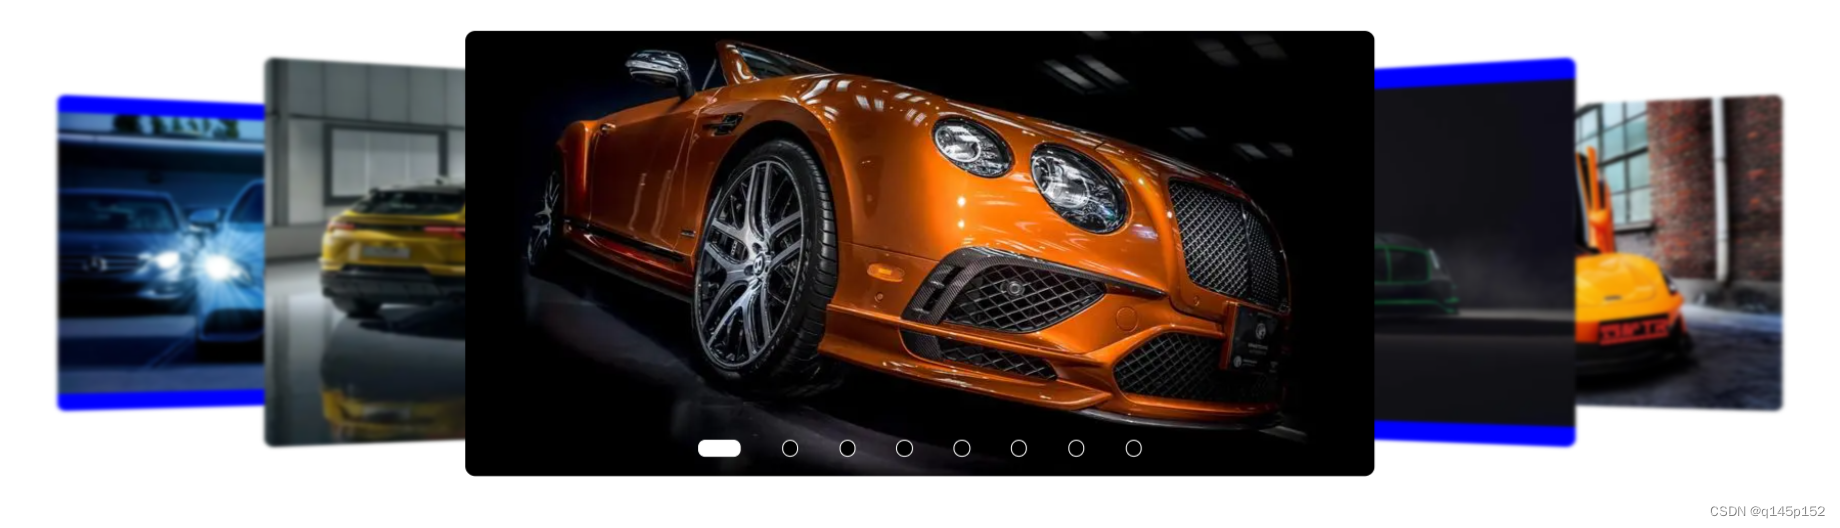
大厂各种花哨轮播图你是措手无策,我的教程你是不屑一顾,相信看完本篇文章,能带你掌握各种花哨的轮播图,先放上之前写好的效果图,代码在文章最后
一、早期常用实现
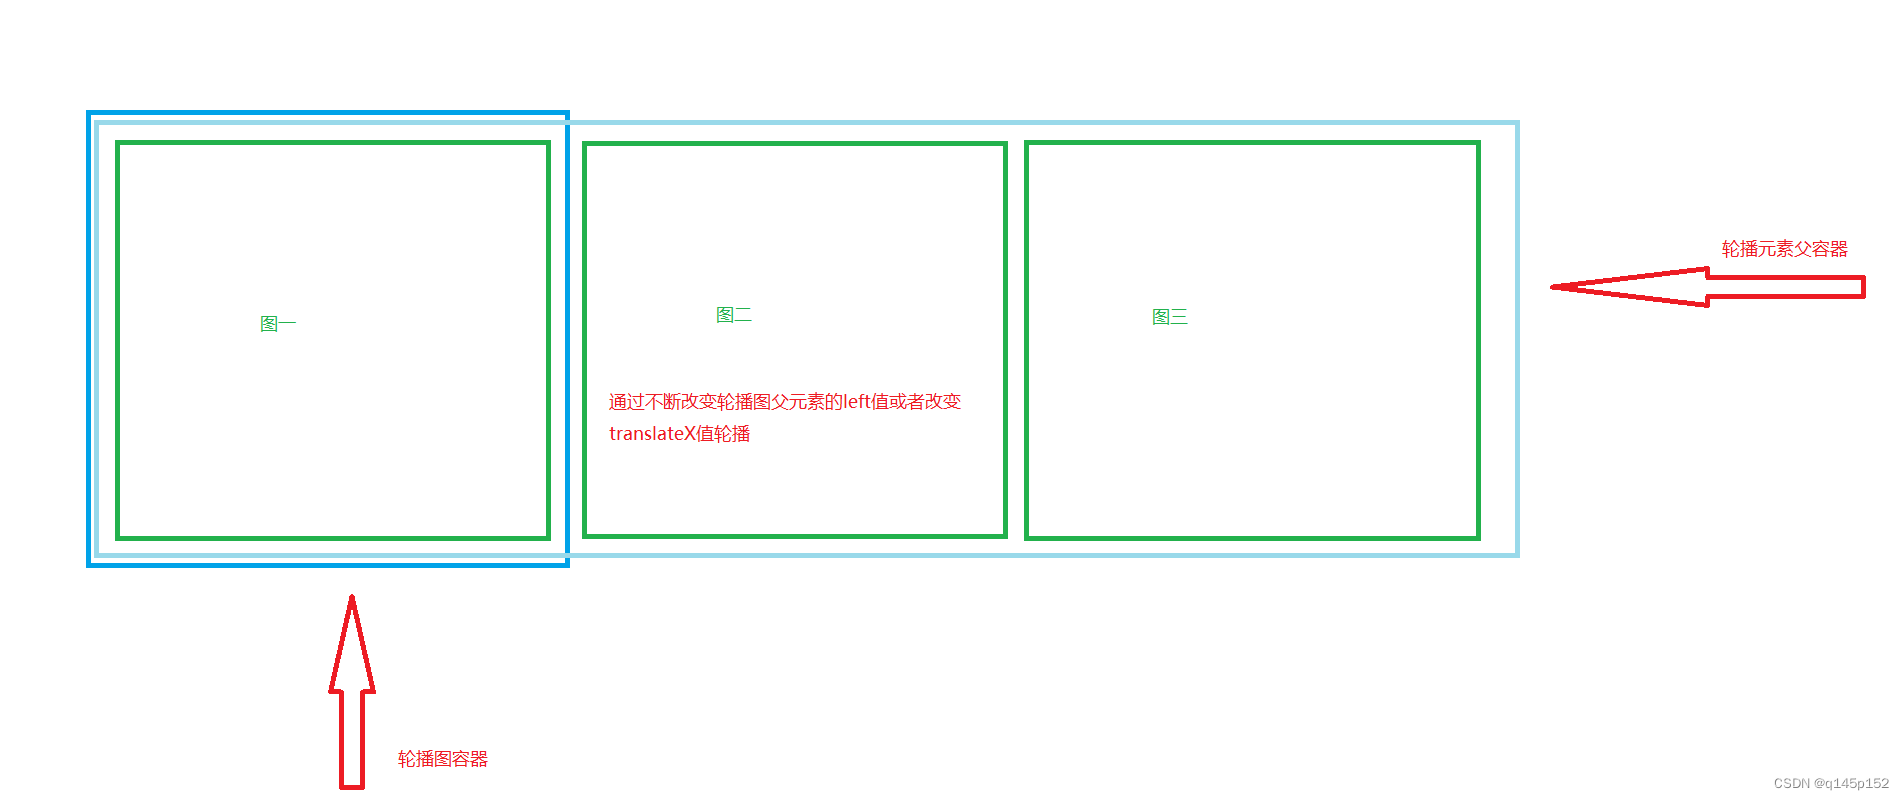
大家在早期实现轮播图时,千篇一律都是采用绝对定位,通过js不断去调整其left或者translateX属性来实现轮播,但已经过时了,为什么过时?
1、先讲述下其原理
需要不断调整left或translateX,然后再给出active激活类区别显示主轮播图
2、缺点
2-1、代码繁多,不易维护和阅读,无缝轮播总有小bug(空白区域、走马灯式回到首图、跳转首图时轮播时间变双倍)
2-2、计算式改变left等值进行移动,有1px左右的像素误差,会导致轮播时出现其他图片
2-3、某些时刻缩放网页时出现错乱,计算没有及时得到调整,导致轮播图轮播时错乱
2-4、不仅要直接操作style,且还要操作class
有很多边界问题需要考虑且难以解决和优化,因此他不是我们本篇文章的主角,只是在这里给大家废话一下
为了杜绝这些迹象,我给大家提供一套通俗易懂的方案,极少的代码极高的质量完成轮播图
二、Class式实现轮播
原理:我们最终都会搭建轮播图的样式,每张图放在该有的位置,就由不同的class去控制,为何还要去操作style?我们直接对其class值进行调换,你就会发现元素位置也会跟着变化,没错,动态有序的对已有元素的class属性进行调换,移动,就可以实现轮播,强大且通俗易懂
class式轮播优点?
1、通俗易懂,代码量少,容易维护
2、天生即可无缝轮播!无需考虑各种繁琐的边界值!
3、完全可替代常规式(操作style去移动)轮播
四、直接开干
先简单搭建一个卡片式轮播图布局

为了突出显示中间的主元素,我们将两边的元素进行了0.9倍的缩放,页面是搭建好了,但是怎么实现呢
<!DOCTYPE html>
<html lang="en">
<head>
  <meta charset="UTF-8">
  <meta http-equiv="X-UA-Compatible" content="IE=edge">
  <meta name="viewport" content="width=device-width, initial-scale=1.0">
  <title>Document</title>
  <style>
    .carousel {
      position: relative;
      height: 500px;
      background: #ccc
    }
    .item-1, .item-2, .item-3 {
      position: absolute;
      top: 2vw;
      width: 400px;
      height: calc(100% - 4vw);
      background: rgb(106, 175, 255)
    }
    .item-1 {
      left: 3vw;
      transform: scale(.9);
      z-index: 1
    }
    .item-2 {
      left: 50%;
      transform: translateX(-50%);
      z-index: 3
    }
    .item-3 {
      left: calc(100% - 3vw - 400px);
      transform: scale(.9);
      z-index: 2
    }
  </style>
</head>
<body>

  <div class="carousel">
    <div class="item-1">ITEM-1</div>
    <div class="item-2">ITEM-2</div>
    <div class="item-3">ITEM-3</div>
  </div>

</body>
</html>
//将写好的样式存入数组
const currentClass = ['item-1', 'item-2', 'item-3']现在我们可以编写一个初始函数和一个功能函数实现class属性的调换,先介绍一下稍后需要使用到的API,以下是操作数组的API
前置条件:请务必在item-1、2、3这三个标签上加上item类名,并只保留item类名方便我们统一收集Dom,加入两个按钮绑定我们的事件触发手动轮播
注意:你应该在你的item类加上过渡样式(transition),这样在轮播时才有动画,这是最重要的一步,此步骤不做演示
<div class="item">ITEM-1</div>
<div class="item">ITEM-2</div>
<div class="item">ITEM-3</div>

<div>
    <button onclick="onMove('left')">向左</button>
    <button onclick="onMove('right')">向右</button>
</div>| 名称 | 作用 | 示例 |
|---|---|---|
| push | 向末尾添加元素,返回当前数组长度 | push('1')、push(() => (['1', '2', '3'])) |
| pop | 从末尾移除一个元素,返回被删除的元素 | pop() |
| unshift | 向头部添加元素,返回当前数组长度 | unshift('1') |
| shift | 从头部移除一个元素 | shift() |
//使用数组保存好写好的class样式名
const currentClass = ['item-1', 'item-2', 'item-3']
//收集所有轮播子元素
const items = Array.form(document.querySelectorAll('.item'))

//我们通过一个参数控制数组的移动 减少相似功能的函数
function onMove(move = 'left') {
    if (move == 'right') {
        //数组依次向右移动一位 将尾部元素添加到头部即实现
        currentClass.unShift(currentClass.pop())
    } else {
        //数组依次向左移动一位 将头部元素添加到末尾即实现
        currentClass.push(currentClass.shift())
    }
    //对数组进行移动之后 我们调用编写好的功能函数 动态对子元素的class进行重新赋值
    resolveClass()
}

//收集dom 对其class重新赋值
function resolveClass() {

    items.forEach((el, index) =>  {
        const classWith = el.className.split(' ')[1]
        //说明已经存在class 如果不对其删除 会造成class共存出现bug
        if(currentClass.findIndex(classed => classed == classWith ) != -1) {
            el.classList.remove(classWith)
        }
        //重新添加class
        el.classList.add(currentClass[index])
    })
}

//立即执行一次函数 自动为轮播图子元素赋与相应class
resolveClass()
接着我们把item子元素的文字换成实打实的图片,并付上动画预览
卡片式轮播
从预览图看出我们的实现已经非常丝滑了,我们再来梳理一下核心原理
五、梳理核心原理
1、首先使用html+css搭建好卡片式轮播图布局
2、使用数组保存好不同位置的类名(左、中、右),通过左右移动数组使其元素顺序发生改变,上表已给出API
3、获取轮播子元素的关键类名(除了item外的item-1、item-2...),这才是决定位置的关键类名,然后依次删除位置(item-1、item-2...)类名、重新赋与所有轮播子元素决定位置的类名(也就是将item-1、item-2、item-3从原来的位置进行调换,依次调换给上一个dom元素)
4、将第2步与第3步操作进行绑定,通过第2步对数组改变顺序后调用第3步编写的函数使其同步,达到轮播的效果
六、细节问题
1、图片少于3张时?不用考虑图少的问题,3张图都不够用什么轮播,那图片大于3张呢?这才是问题的考虑
解决方案:
直接在样式表加一个隐藏类名('.none'),层级设置最低,可以调整位置被主图遮住,看个人喜好,举个例子,假如我有10张图需要轮播,我们只固定了3张图的位置,剩下7张图需要统一添加none类名实现隐藏,那如何动态计算这个none类名的添加?通过合并数组,轮播图正常也是显示前三张图,完美隐藏多余的图
/**

const currentClass = ['item-1', 'item-2', 'item-3']

//收集所有轮播子元素
const items = Array.from(document.querySelectorAll('.item'))

*/
//需要用到上面两个收集好的变量,const不会被向上引用 因此我们要调换两行代码位置

//收集所有轮播子元素
const items = Array.from(document.querySelectorAll('.item'))

//通过items的长度减去固定的三个轮播样式再合并none 刚好得到10个类名供渲染
//通过...运算符合并数组 fill方法填充重复元素
const currentClass = ['item-1', 'item-2', 'item-3'
...Array.form(items.length - 3).fill('none')
]
注意:none实现隐藏请不要使用display: none,虽然使用display控制隐藏会提升性能,但我们悉知,一个元素设置display:none之后,再到显示的过程,任何过渡动画都将失效!
2、动态生成小圆点
//生成小圆点
function createDot() {
    const root = document.querySelector('.carousel')

    root.insertAdjacentHTML('beforeend', `
        <ul class="carousel-dot-container">
            ${ items.map((elment, index) => `
                <li class="${ index == currentCss.indexOf('item-2') ? 'carousel-dot dot-active' : 'carousel-dot' }" onclick="onDotMove(${ index })"></li>
            `).join('') }
        </ul>
    `)
}
3、小圆点绑定的点击事件
点击对应的小圆点切换主图
//小圆点点击事件
function onDotMove(index) {
    const dots = Array.form(document.querySelectorAll('.carousel-dot'))

    //计算主图类名的位置 item-2为主显示图 indexOf返回下标
    const isActive = currentCss.indexOf('item-2')

    //排他思想清除当前小圆点样式
    dots.forEach(el => el.classList.remove('dot-active'))

    //当前点击的小圆点得到激活样式
    dots[index].classList.add('dot-active')

    if(index > isActive) {
        //此条件成立 表示向左轮播 数组元素需要往左依次移动 使用splice方法
        currentCss.push(currentCss.splice(0, index - isActive))
    } else {
        //向右轮播 数组元素往右移动

        //应该移动的距离
        const isSteep = isActive - index
        currentCss.unshift(currentCss.splice(items.length - isSteep, items.length))
    }

    //调用之前编写好的class赋值函数
    resolveCss()
}
4、编写定时方法自动轮播
//自动轮播
function autoMove(steep = 3000) {
    setInterval(() => {
        onMove('left')
    }, steep)
}

autoMove()
七、现成代码即粘即用
上述代码比较简陋,要使用的话请自行组合,本人比较懒,下面提供一份已经写好的全自动堆叠轮播图,感兴趣的可以直接复制过去用
index.html
<!DOCTYPE html>
<html lang="en">
<head>
  <meta charset="UTF-8">
  <meta http-equiv="X-UA-Compatible" content="IE=edge">
  <meta name="viewport" content="width=device-width, initial-scale=1.0">
  <title>卡片式轮播图</title>
  <style>
    *{
      padding: 0;
      margin: 0
    }
    .carousel-card {
      margin-top: 50px;
      height: 400px
    }
    .carousel-card-item {
      background: blue;
      border-radius: .5vw;
      overflow: hidden
    }
    .carousel-card-item img {
      width: 100%
    }
  </style>
</head>
<body>

  <div class="carousel-card">
    <div class="carousel-card-item">
      <img src="https://img0.baidu.com/it/u=3798955928,4058999457&fm=253&fmt=auto&app=138&f=JPEG?w=889&h=500">
    </div>
    <div class="carousel-card-item">
      <img src="https://img2.baidu.com/it/u=3619185720,2241707230&fm=253&fmt=auto&app=138&f=JPEG?w=889&h=500">
    </div>
    <div class="carousel-card-item">
      <img src="https://img1.baidu.com/it/u=2695548791,2852480012&fm=253&fmt=auto&app=138&f=JPEG?w=750&h=500">
    </div>
    <div class="carousel-card-item">
      <img src="https://img0.baidu.com/it/u=1311709305,4030987719&fm=253&fmt=auto&app=138&f=JPEG?w=888&h=500">
    </div>
    <div class="carousel-card-item">
      <img src="https://img1.baidu.com/it/u=897637806,689703833&fm=253&fmt=auto&app=120&f=JPEG?w=800&h=500">
    </div>

    <!-- 多余的图片 需要隐藏起来 -->
    <div class="carousel-card-item">
      <img src="https://img2.baidu.com/it/u=1283117790,2359032005&fm=253&fmt=auto&app=138&f=JPEG?w=812&h=500">
    </div>
    <div class="carousel-card-item">
      <img src="https://img1.baidu.com/it/u=545794128,261263758&fm=253&fmt=auto&app=138&f=JPEG?w=890&h=500">
    </div>
    <div class="carousel-card-item">
      <img src="https://img1.baidu.com/it/u=3043799943,3338472581&fm=253&fmt=auto&app=120&f=JPEG?w=750&h=500">
    </div>
  </div>

  <div>
    <button onclick="cd.onMove('left')">向左</button>
    <button onclick="cd.onMove('right')">向右</button>
  </div>

  <script src="/carousel_card.js"></script>
</body>
</html>
carousel-card.js
//样式
const resolveStyle = () => {
  const head = document.querySelector('head')

  if(head.querySelector('[carousel-card]')) {
    return
  } else {
    const styleCss = document.createElement('style') ; styleCss.setAttribute('carousel-card', true)
    styleCss.innerHTML = `
    .carousel-card {
      position: relative;
      transform-style: preserve-3d;
      min-height: 50vh;
      perspective: 1000px
    }
    .carousel-card > .carousel-card-item {
      position: absolute;
      width   : 35%;
      height  : calc(100% - 4vw);
      display : flex;
      justify-content : center;
      align-items : center;
      transition : .8s cubic-bezier(0.075, 0.82, 0.165, 1)
    }
    .carousel-card > .carousel-card-item.c-left {
      left: 15vw;
      z-index: 3;
      transform: rotateY(20deg) scale(.85);
      filter: blur(1.5px)
    }
    .carousel-card > .carousel-card-item.c-lefted {
      left: 2vw;
      z-index: 2;
      transform: rotateY(20deg) scale(.7);
      filter: blur(2px)
    }
    .carousel-card > .carousel-card-item.c-active {
      width: 45%;
      left: 50%;
      transform: translateX(-50%) translateZ(50px);
      z-index: 4
    }
    .carousel-card > .carousel-card-item.c-right {
      right: 15vw;
      z-index: 3;
      transform: rotateY(-20deg) scale(.85);
      filter: blur(1.5px)
    }
    .carousel-card > .carousel-card-item.c-righted {
      right: 2vw;
      z-index: 2;
      transform: rotateY(-20deg) scale(.7);
      filter: blur(2px)
    }
    .carousel-card-item.c-more {
      width: 45%;
      left: 50%;
      transform: translateX(-50%)
    }
    .carousel-card ul {
      position: absolute;
      bottom: 5vw;
      left: 50%;
      padding: .05vw;
      list-style: none;
      display: flex;
      justify-content: center;
      align-items: center;
      gap: 2vw;
      transform: translateX(-50%) translateZ(60px)
    }
    .carousel-card ul > li {
      width: .7vw;
      height: .7vw;
      background: black;
      border: solid .05vw white;
      border-radius: 50%;
      cursor: pointer;
      transition: .4s cubic-bezier(0.175, 0.885, 0.32, 1.275)
    }
    .carousel-card ul > li.dot-active, .carousel-card ul > li:hover {
      width: 2vw;
      height: .7vw;
      border-radius: .35vw;
      background: white
    }`
    //遍历其他属性 如浮动布局轮播图容器
    head.insertAdjacentElement('beforeend', styleCss)
  }
}

/** 轮播图类
 * 核心思想: 先使用css布置好堆叠式轮播图布局 使用js依次切换其class 是下一个卡片替换到上一个卡片即可
 * 前提是得附加transition过渡效果 否则很生硬导致没动画
 * **/
class CarouselCard {
  constructor() {
    //构造时先渲染样式
    resolveStyle()

    //先获取Dom
    this.cardItem = Array.from(document.querySelectorAll('.carousel-card>.carousel-card-item'))

    //初始化排序
    this.cardArray = ['c-lefted', 'c-left', 'c-active', 'c-right', 'c-righted',
      ...new Array(this.cardItem.length - 5).fill('c-more')
    ]

    //执行某些事件
    this.init()
  }
  /**
   * 初始化函数 需要执行的一些前置操作
   */
  init() {
    //依次赋予class属性
    const length = this.cardArray.length

    this.cardItem.forEach((element, index) => {
      element.classList.add(this.cardArray[index])
    })

    this.createDot()

    this.clickDot()

    this.clickImg()
  }

  /**
   * 指定向轮播
   */
  onMove(orange = 'right') {
    //使用数组特性 向末尾添加被移除的头部元素 以此达成轮播原理 再重新赋予class属性
    if (orange == 'left') {
      this.cardArray.push(this.cardArray.shift())
    } else {
      this.cardArray.unshift(this.cardArray.pop())
    }
    //调用class切换事件重新轮播
    this.checkedClass()
  }

  /**
   * 重新赋予class属性 实现轮播核心方法
   */
  checkedClass() {
    const length = this.cardArray.length

    this.cardItem.forEach((element, index) => {
      const className = element.className.split(' ')[1]

      if (this.cardArray.findIndex(cless => cless == className) != -1) {
        element.classList.remove(className)
      }
      element.classList.add(this.cardArray[index])
    })

    //绑定小圆点事件
    checkedDot(this.cardArray.indexOf('c-active'))
  }

  /**
   * 生成小圆点
   */
  createDot() {
    const cardRoot = document.querySelector('.carousel-card')
    const dotTools = document.createElement('ul')

    dotTools.insertAdjacentHTML('beforeend', `
    ${ this.cardArray.map((className) =>
      `
        <li class="${ className == 'c-active' ? 'card-dot dot-active' : 'card-dot' }"></li>
      `).join('') }
    `)

    cardRoot.appendChild(dotTools)
  }

  /**
   * 小圆点 点击事件
   */
  clickDot() {
    const mirroDot = Array.from(document.querySelectorAll('.card-dot'))

    mirroDot.forEach((dot, index) => {
      dot.onclick = () => {
        const beforeSteep = this.cardArray.indexOf('c-active'), length = this.cardArray.length
        //向左轮播 需要记录上一个小圆点位置和当前点击位置 相减得出应该移动的距离 实际上是计算应当从数组第几位开始
        //到末尾的元素往头部添加 再运行class属性重新赋值函数实现向左轮播
        if (index > beforeSteep) {
          const isSteep = index - beforeSteep //应该移动的距离
          this.cardArray.unshift(...this.cardArray.splice(length - isSteep, length))
        } else {
          const isSteep = beforeSteep - index //应该移动的距离
          this.cardArray.push(...this.cardArray.splice(0, isSteep))
        }

        this.checkedClass()

        checkedDot(index)
      }
    })
  }

  /**
   * 周边图片点击事件 将显示为主图
   */
  clickImg() {
    const imgs = Array.from(document.querySelectorAll('.carousel-card-item'))
    const dots = Array.from(document.querySelectorAll('.card-dot'))

    imgs.forEach((el, index) => el.onclick = () => { dots[index].click() })
  }

  /**
   * 自动轮播 间隔毫秒 默认5秒换一次
   */
  start(steep = 5000) {
    setInterval(() => { this.onMove() }, steep)
  }
  stop() { }
}

/**
 * 切换小圆点事件
 */
function checkedDot(index = 2) {
  const mirroDot = Array.from(document.querySelectorAll('.card-dot'))

  //排它思想
  mirroDot.forEach((dot) => { if (dot.classList.contains('dot-active')) { dot.classList.remove('dot-active') } })

  mirroDot[index].classList.add('dot-active')
}

const cd = new CarouselCard()

cd.start()结尾:顺带一提的是,使用面向对象(class)方式编写比较容易维护和易懂,下一篇文章有空的话给大家带一个用js实现网页抓包的文章


 9240
9240


 被折叠的 条评论
为什么被折叠?
被折叠的 条评论
为什么被折叠?
 到【灌水乐园】发言


