


DOF(景深)
最简单的现象就是当你用眼睛聚焦到前景的地方,后面就会变模糊, 当用眼睛聚焦到远景的地方,前就会变模糊,相机也会有同样的情况,通过调节光圈和焦距就很容易出现景深的效果。如果要说景深形成的原理的话,可以用小孔成像来说一天,但是在图形学里面,要做的就一件事 Faking it!
镜头前的东西被模糊,远离镜头的东西比较清晰
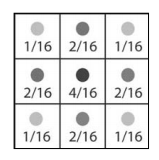
Box filter 过于简单,高斯模糊需要两个pass,这里用一个稍微复杂的filter,一次pass就搞定,滤波器是这样的
具体的pixel shader里面是这样的
float fInverseViewportWidth;
float fInverseViewportHeight;
sampler Texture0;

const float4 samples[9] =
{
-1.0, -1.0, 0, 1.0/16.0,
-1.0, 1.0, 0, 1.0/16.0,
1.0, -1.0, 0, 1.0/16.0,
1.0, 1.0, 0, 1.0/16.0,
-1.0, 0.0, 0, 2.0/16.0,
1.0, 0.0, 0, 2.0/16.0,
0.0, -1.0, 0, 2.0/16.0,
0.0, 1.0, 0, 2.0/16.0,
0.0, 0.0, 0, 4.0/16.0
};

float4 ps_main(float2 texCoord: TEXCOORD0) : COLOR
{
   float4 col = float4(0,0,0,0);
// Sample and output the averaged colors
   for(int i=0;i<9;i++)
   col += samples[i].w*tex2D(Texture0,texCoord+
   float2(samples[i].x*fInverseViewportWidth,
   samples[i].y*fInverseViewportHeight));
   return col;
}
基于Depth Impostor的DOF
基本的原理就是首先渲染一个模糊的RT,这个模糊的RT可能会用到很多种pass,比如之前的高斯模糊,还有上面所说的filter,进行多次叠加。然后根据之前rt里的alpha通道的值进行blend。
在RenderMonkey中具体的做法首先添加一个下面几个变量
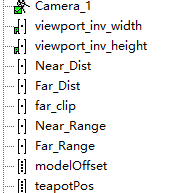
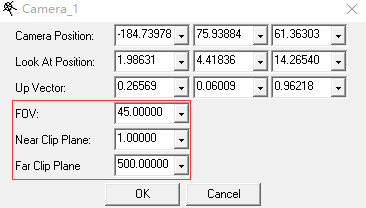
相机的几个参数
在绘制模型的时候,要把对应的深度存储到alpha中
VS
float4x4 view_proj_matrix;
float far_clip;
struct VS_OUTPUT
{
   float4 Pos:     POSITION;
   float2 Txr1:    TEXCOORD0;
   float1 Depth:   TEXCOORD1;
};

VS_OUTPUT vs_main(
   float4 inPos: POSITION,
   float2 Txr1: TEXCOORD0
)
{
   VS_OUTPUT Out;
   float4 OutPos;
   float4 offset;
   offset.x = 200;
   offset.y = 0;
   offset.z = 0;
   offset.w = 0;
   // Compute the position of the vertex
   Out.Pos = OutPos = mul(view_proj_matrix, inPos + offset);
   Out.Txr1 = Txr1;

   // Send the depth to the pixel shader for encoding
   Out.Depth = OutPos.w/far_clip;

   return Out;
}
pixel shader
float Near_Range;
float Far_Range;
float Near_Dist;
float Far_Dist;
sampler Texture0;
float4 ps_main(
   float4 inDiffuse: COLOR0,
   float2 inTxr1: TEXCOORD0,
   float1 Depth: TEXCOORD1
) : COLOR0
{
  // Compute blur factor based on   near and far focus planes
  float Blur = max(clamp(0,1, 1 - (Depth-Near_Dist)/Near_Range),
                clamp(0,1, (Depth-(Far_Dist-Far_Range))/Far_Range));

  //  Output constant color:
  return float4(tex2D(Texture0,inTxr1).rgb,Blur);
}
注意,Shader中所有的运算都是行主序!
注意,Shader中所有的运算都是行主序!
注意,Shader中所有的运算都是行主序!

具体来看下这个运算流程,
在VS中
Out.Pos = OutPos = mul(view_proj_matrix, inPos + offset);Out.Depth = OutPos.w/far_clip;这一步将深度映射到0到1.
再看ps
float Blur = max(clamp(0,1, 1 - (Depth-Near_Dist)/Near_Range), clamp(0,1,(Depth-(Far_Dist-Far_Range))/Far_Range));这里是计算Blur值,也是后面进行blend的参数。Blend的取值范围如下
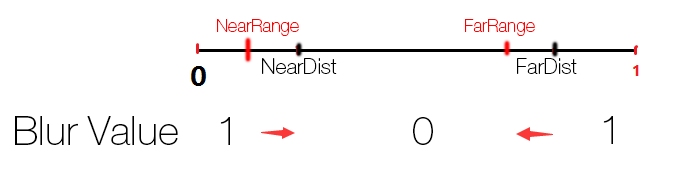
在nearRange之前和FarDist之后,取值都是1,中间部分是0,其余的部分是在0到1之前线性变化。根据NearRange,NearDis,FarRange,FarDist这几个值,就可以获得不同的景深效果。
模糊的rt处理这里就不说了,最好叠加个两三次。
最后在present的时候,只需要根据alpha值进行两张rt的Blend就可以了
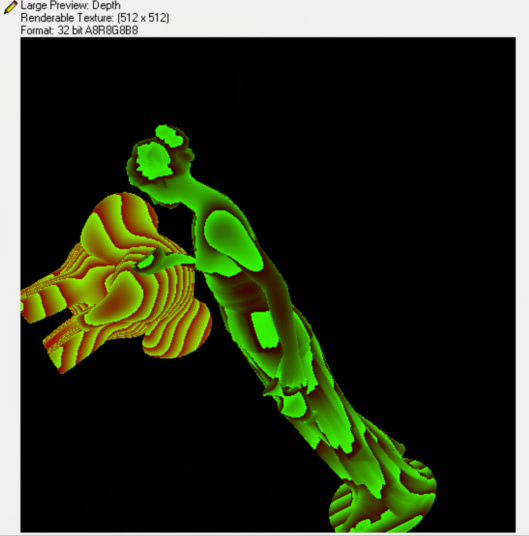
看一下深度的Texture
这种做法的效果是可以接受的,但是有一个问题,它占用了常规渲染的alpha通道,通常屏幕空间的效果应该是可以随意地进行开关,跟主渲染耦合没那么大才是最好的,而且这也意味着其他的effect没法用alpha通道了。
一种解决办法是渲染两次,就是下面将要介绍的
在常规渲染的同时开一张rt去把深度记录起来,专门用来给后面的effect用,比如热雾效果等。
Two Pass DOF
为了不干扰常规的渲染流程,新开一张Depth的rt来存储深度信息,每一个drawcall都要对DepthRT进行一次写入,所以drawcall多的话,也会很耗费性能。
对于深度信息的写入,
float4 ps_main(
   float4 inDepth: TEXCOORD0
) : COLOR0
{
   //  Output the depth as computed by
   //  the vertex shader
   float4 Depth;
   Depth.w = 1.0;
   Depth.x = floor(inDepth.x*127)/127;
   Depth.y = floor((inDepth.x-Depth.x)*127*127)/127;
   Depth.z = 0;

   return Depth;
}
在最后的present阶段,Ps
float viewport_inv_width;
float viewport_inv_height;
float Near_Dist;
float Far_Dist;
float Near_Range;
float Far_Range;
sampler Texture0;
sampler Texture1;
sampler Texture2;
float4 ps_main(float2 texCoord: TEXCOORD0) : COLOR
{
   // Sample and decode our depth value
   float4 DepthValue = tex2D(Texture2,texCoord);
   float Depth = DepthValue.r + DepthValue.g/127
                 + DepthValue.b/(127*127);

   // Sample our regular and blurred scene
   float4 BlurColor = tex2D(Texture1,texCoord);
   float4 SceneColor = tex2D(Texture0,texCoord);

   // Use the defined ranges to determine the proper
   // combination of both render targets based on
   // the distance.
   float Blur = max(clamp(0,1, 1 - (Depth-Near_Dist)/Near_Range),
          clamp(0,1, (Depth-(Far_Dist-Far_Range))/Far_Range));

   return lerp(SceneColor,BlurColor,clamp(0,1,Blur));
}
读取深度信息,读取模糊的颜色,读取常规渲染的颜色,计算混合参数,最后进行混合。
打完收工。
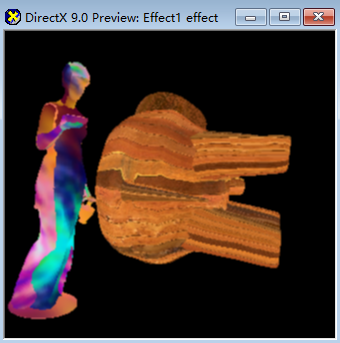
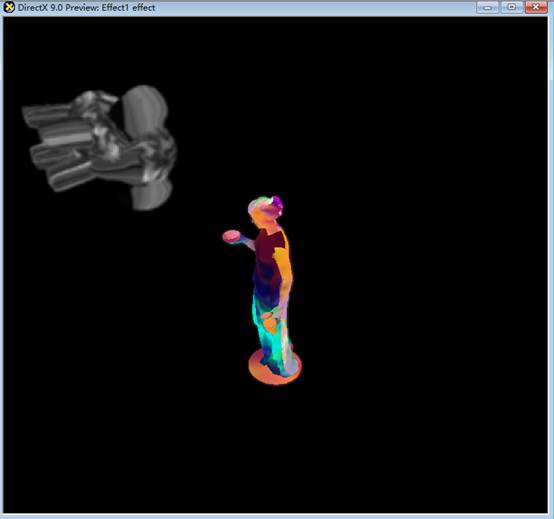
看下结果,首先是远景的虚化
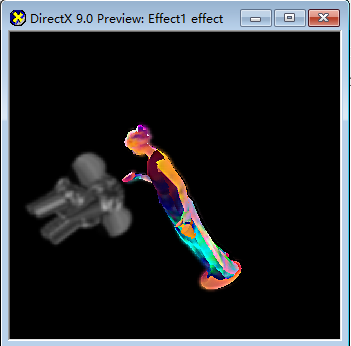
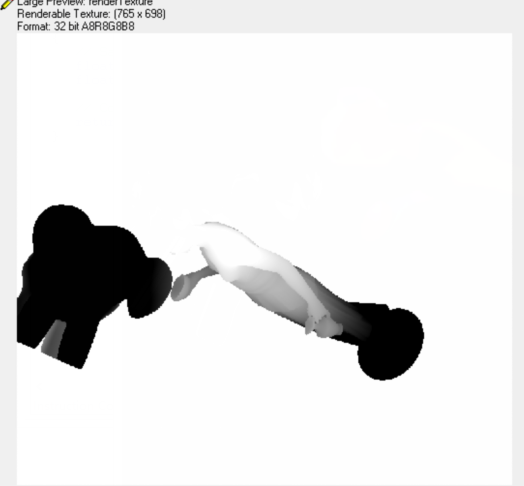
Depth buff是这样的

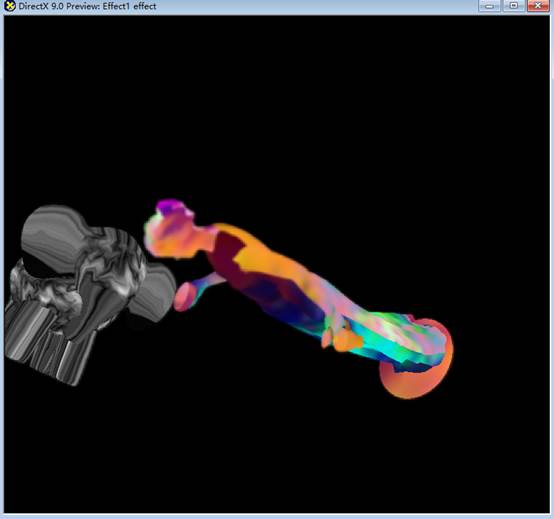
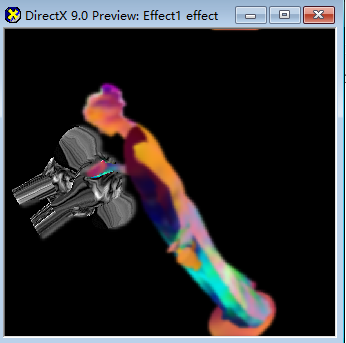
近景的虚化,效果是这样
每一个pass
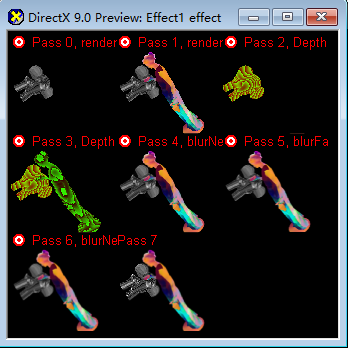
效果基本没有变化,但是流程显得更加干净,不过多了一张rt,多了两个pass。
如果想做到多层次比较平滑的虚化效果,那就要再加rt来存储不同程度的模糊程度图像,在最后根据blur值来进行不同的blend。
一点优化
将Blur的取值渲染到一个一维rt里面,每次去查询blur值得时候只要采样一下这个纹理就可以了。
Vs
float4x4 view_proj_matrix;
struct VS_OUTPUT {
   float4 Pos: POSITION;
   float2 texCoord: TEXCOORD0;
};

VS_OUTPUT vs_main(float4 Pos: POSITION){
   VS_OUTPUT Out;

   // Simply output the position without transforming it
   Out.Pos = float4(Pos.xy, 0, 1);

   // Texture coordinates are setup so that the full texture
   // is mapped completeley onto the screen
   Out.texCoord.x = 0.5 * (1 + Pos.x);
   Out.texCoord.y = 0.5 * (1 - Pos.y);

   return Out;
}
Ps
float viewport_inv_width;
float viewport_inv_height;
float Near_Dist;
float Far_Dist;
float Near_Range;
float Far_Range;
sampler Texture0;
sampler Texture1;
sampler Texture2;
float4 ps_main(float2 texCoord: TEXCOORD0) : COLOR
{
   float Depth = texCoord.x;
   float Blur = max(clamp(0,1, 1 - (Depth-Near_Dist)/Near_Range),
                clamp(0,1, (Depth-(Far_Dist-Far_Range))/Far_Range));

   return Blur;
}
取Blur值
return float4(tex2D(Texture0,inTxr1).rgb,tex1D(Texture1,Depth).a);这样就省去了每次都去计算一遍算式的成本,特别是当blur的计算特别复杂的时候。


 122
122


 被折叠的 条评论
为什么被折叠?
被折叠的 条评论
为什么被折叠?
 到【灌水乐园】发言


