


学习资源:狂神说
Docker
1. 概述
Docker的思想来自于集装箱!
基于Go语言开发
官网:https://www.docker.com
仓库:https://hub.docker.com
容器技术
比较Docker和虚拟机技术:
- 传统虚拟机:虚拟出一套硬件,运行一个完整的操作系统,然后在这个系统上安装和运行软件;
- 容器:容器内的应用程序直接运行在宿主机的内核,容器没有独自的内核,无需虚拟硬件更轻便;
- 容器:每个容器相互隔离,每个容器都有一个属于自己的文件系统,互不影响。
DevOps(开发、运维):
-
应用可以更快速的交付和部署:
打包docker镜像发布测试,一键运行。
-
更便捷的升级和扩容
-
更简单的系统运维:
开发环境和测试环境高度一致。
-
更高效的计算资源利用:
Docker是内核级别的虚拟化,可以在一个物理机上运行很多的容器实例!充分利用物理机的性能。
1.1 Docker基本组成
镜像(image):
docker镜像类似于一个模版,可以通过这个模版来创建容器:
tomcat容器=>run=>tomcat01容器(提供服务)
通过镜像可以创建多个容器。
容器(container):
Doker利用容器技术,独立运行一个或者一组应用。
服务最终是运行在容器中的。
仓库(repository):
仓库就是存放镜像的地方,分为公有仓库和私有仓库。
- Docker Hub(默认的,国外)
- 阿里云…
网络资料:

2. 安装和原理
我的系统环境:
[root@ct7_1 ~]# cat /etc/os-release
NAME="CentOS Linux"
VERSION="7 (Core)"
ID="centos"
官网安装指引:https://docs.docker.com/engine/install/centos/
更新yum信息缓存:
yum makecache install
2.1 安装步骤
- 卸载旧版本
yum remove docker \
                  docker-client \
                  docker-client-latest \
                  docker-common \
                  docker-latest \
                  docker-latest-logrotate \
                  docker-logrotate \
                  docker-engine
- 下载安装yum工具
yum install -y yum-utils
- 设置docker镜像仓库的位置
国外的docker镜像仓库地址:
yum-config-manager \
    --add-repo \
    https://download.docker.com/linux/centos/docker-ce.repo
阿里云的docker镜像仓库地址:
yum-config-manager \
    --add-repo \
    http://mirrors.aliyun.com/docker-ce/linux/centos/docker-ce.repo
- 安装docker
ce社区版 ee企业版
通常都是使用社区版
yum install docker-ce docker-ce-cli containerd.io
指定版本安装:
yum install docker-ce-<VERSION_STRING> docker-ce-cli-<VERSION_STRING> containerd.io
- 查看docker版本
检查docker是否安装成功
[root@ct7_1 ~]# docker --version
Docker version 19.03.13, build 4484c46d9d
我也直接安装了当前最新版本的docker
- 启动docker
systemctl start docker
- 运行hello-world镜像
[root@ct7_1 ~]# docker run hello-world	# 运行hello-world
Unable to find image 'hello-world:latest' locally # 提示本地没有这个镜像
latest: Pulling from library/hello-world # 去仓库拉取hello-world
0e03bdcc26d7: Pull complete # 拉取完毕
Digest: sha256:8c5aeeb6a5f3ba4883347d3747a7249f491766ca1caa47e5da5dfcf6b9b717c0
Status: Downloaded newer image for hello-world:latest

Hello from Docker!
This message shows that your installation appears to be working correctly.

To generate this message, Docker took the following steps:
 1. The Docker client contacted the Docker daemon.
 2. The Docker daemon pulled the "hello-world" image from the Docker Hub.
    (amd64)
 3. The Docker daemon created a new container from that image which runs the
    executable that produces the output you are currently reading.
 4. The Docker daemon streamed that output to the Docker client, which sent it
    to your terminal.

To try something more ambitious, you can run an Ubuntu container with:
 $ docker run -it ubuntu bash

Share images, automate workflows, and more with a free Docker ID:
 https://hub.docker.com/

For more examples and ideas, visit:
 https://docs.docker.com/get-started/
- 查看当前docker中的镜像
[root@ct7_1 ~]# docker images
REPOSITORY          TAG                 IMAGE ID            CREATED             SIZE
hello-world         latest              bf756fb1ae65        9 months ago        13.3kB
- 卸载docker
卸载docker程序
yum remove docker-ce docker-ce-cli containerd.io
删除目录
rm -rf /var/lib/docker
/var/lib/docker是docker默认的工作目录
- 配置镜像加速
我也没有阿里云服务器,这里做个记录吧。
官方手册,直接执行:
sudo mkdir -p /etc/docker

sudo tee /etc/docker/daemon.json <<- 'EOF'
{
	"registry-mirros":["https://qiyb9988.mirror.aliyuncs.com"]
}
EOF

sudo systemctl daemon-reload

sudo systemctl restart docker
2.2 Run流程
docker run hello-world举例:

2.3 Docker原理
工作原理:
docker是一个CS结构的系统,docker的守护进程运行在主机上。docker-client通过socket访问docker-server,docker-server接收到对应指令并执行。

容器跟linux相互隔离,容器中拥有自己的端口号。所以外部访问容器需要linux于容器建立好连接。
2.4 Docker和虚拟机的区别
- docker比虚拟机少了一层抽象层;
- docker利用的是宿主机的内核,虚拟机需要虚拟一套主机硬件。

新建容器的时候,docker不需要获取操作系统内核,无需引导,主要以此加快了容器的运行速度。
3. Docker常用命令
帮助命令:
docker version	# docker版本信息
docker info		# docker系统信息
docker [命令] --help
官方命令生态图:

3.1 镜像命令
3.1.1 查看镜像列表 docker images
官网教程:https://docs.docker.com/engine/reference/commandline/images/
[root@ct7_1 ~]# docker images
REPOSITORY          TAG                 IMAGE ID            CREATED             SIZE
hello-world         latest              bf756fb1ae65        9 months ago        13.3kB
说明:
REPOSITORY 镜像的仓库源
TAG 镜像标签
IMAGE ID 镜像ID
选项:
[root@ct7_1 ~]# docker images --help

Usage:	docker images [OPTIONS] [REPOSITORY[:TAG]]

List images

Options:
  -a, --all             Show all images (default hides intermediate images)
      --digests         Show digests
  -f, --filter filter   Filter output based on conditions provided
      --format string   Pretty-print images using a Go template
      --no-trunc        Don't truncate output
  -q, --quiet           Only show numeric IDs
-a, --all 查看全部
-q, --quiet 只显示ID
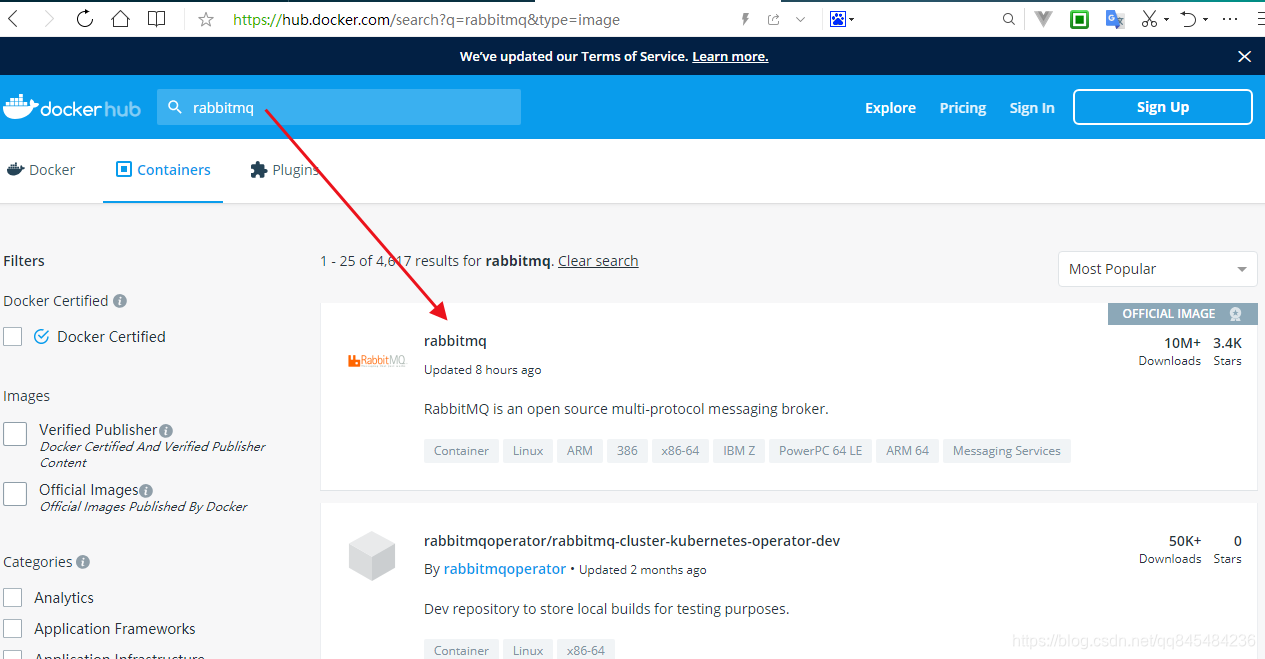
3.1.2 镜像搜索 docker search
[root@ct7_1 ~]# docker search rabbitmq
NAME                                        DESCRIPTION                                     STARS               OFFICIAL            AUTOMATED
rabbitmq                                    RabbitMQ is an open source multi-protocol me…   3402                [OK]
bitnami/rabbitmq                            Bitnami Docker Image for RabbitMQ               54                                      [OK]
......
搜索rabbitmq相关镜像
选项:
-f, --filter 过滤
例如:搜索start数300以上的redis镜像
[root@ct7_1 ~]# docker search redis -f stars=300
NAME                DESCRIPTION                                     STARS               OFFICIAL            AUTOMATED
redis               Redis is an open source key-value store that…   8653                [OK]
在官方仓库搜索rabbitmq
3.1.3 下载/拉取 镜像 docker pull
演示:
[root@ct7_1 ~]# docker pull --help
Usage:	docker pull [OPTIONS] NAME[:TAG|@DIGEST]
Pull an image or a repository from a registry
Options:
  -a, --all-tags                Download all tagged images in the repository
      --disable-content-trust   Skip image verification (default true)
      --platform string         Set platform if server is multi-platform capable
  -q, --quiet                   Suppress verbose output

[root@ct7_1 ~]# docker pull mysql
Using default tag: latest	# 没写tag,则使用最后一个版本
latest: Pulling from library/mysql
bb79b6b2107f: Pull complete # 分层下载,docker image的核心技术,应用linux的联合文件系统
49e22f6fb9f7: Pull complete
842b1255668c: Pull complete
9f48d1f43000: Pull complete
c693f0615bce: Pull complete
8a621b9dbed2: Pull complete
0807d32aef13: Pull complete
9eb4355ba450: Pull complete
6879faad3b6c: Pull complete
164ef92f3887: Pull complete
6e4a6e666228: Pull complete
d45dea7731ad: Pull complete
Digest: sha256:86b7c83e24c824163927db1016d5ab153a9a04358951be8b236171286e3289a4		# 镜像签名
Status: Downloaded newer image for mysql:latest
docker.io/library/mysql:latest	# 镜像真实地址
也可以用真实地址进行下载:
docker pull docker.io/library/mysql:latest
指定版本:
[root@ct7_1 ~]# docker pull mysql:5.7
5.7: Pulling from library/mysql
bb79b6b2107f: Already exists 	# 已经存在的文件无需下载,实现复用,节约空间
49e22f6fb9f7: Already exists
842b1255668c: Already exists
9f48d1f43000: Already exists
c693f0615bce: Already exists
8a621b9dbed2: Already exists
0807d32aef13: Already exists
6d2fc69dfa35: Pull complete
56153548dd2c: Pull complete
3bb6ba940303: Pull complete
3e1888da91a7: Pull complete
Digest: sha256:b3dc8d10307ab7b9ca1a7981b1601a67e176408be618fc4216d137be37dae10b
Status: Downloaded newer image for mysql:5.7
docker.io/library/mysql:5.7
3.1.4 删除镜像 docker rmi
docker rmi -f 镜像id
docker rmi -f 镜像id 镜像id 镜像id .......
docker rmi -f $(docker images -aq)	# 删除全部镜像
演示:指定删除 mysql 5.7
[root@ct7_1 ~]# docker rmi -f 42cdba9f1b08
Untagged: mysql:5.7
Untagged: mysql@sha256:b3dc8d10307ab7b9ca1a7981b1601a67e176408be618fc4216d137be37dae10b	# 仅仅删除了5.7应用的分层,最新版mysql不受影响
Deleted: sha256:42cdba9f1b0840cd63254898edeaf6def81a503a6a53d57301c3b38e69cd8f15
Deleted: sha256:d163436e5e1e8180feaf30af2ecbfd3b6a2e86a66b805dcd1e6e0e9ba26be92f
Deleted: sha256:eae434fad508aeec80daf1a0fc16ba89f65707f76a31db7f63883bebf208b743
Deleted: sha256:78b3fc624268ff3cf2ff6558e8c9d47babda61033966f4443e2430dd2607163b
Deleted: sha256:10a3c92754ac4860a385e2095dbe35a1486b4aa2109421a58f3c91f3ce6dbfce
演示:删除全部镜像
# $(docker images -aq) 查询images列表,只返回id

[root@ct7_1 ~]# docker rmi -f $(docker images -aq)
Untagged: mysql:latest
Untagged: mysql@sha256:86b7c83e24c824163927db1016d5ab153a9a04358951be8b236171286e3289a4
Deleted: sha256:8e85dd5c32558ea5c22cc4786cff512c1940270a50e7dbc21ad2df42f0637de4
Deleted: sha256:d34d6911b98a793cb85471491a0e7050b648fb6352ce0514da14dfee3e278437
Deleted: sha256:a8fb61bcfe3163415d7b912fa63adcd80faaa3c635dc03b1a78d63e61b6c9976
Deleted: sha256:f90e56318179ee9771109d224a84dc5acb6b659706219ba6dfefc8c955d9918b
Deleted: sha256:ca8b8d4e1e06d73cf2d30e23d7d0f0eeb532e2ed5f0d0e8b571e2195127c7733
Deleted: sha256:f1ca5278cba221a11962bb664de4128301d03d2c00ac9414fc8cf63f1ac26013
Deleted: sha256:33134afe9e842a2898e36966f222fcddcdb2ab42e65dcdc581a4b38b2852c2e0
Deleted: sha256:dd053ec71039c3646324372061452778609b9ba42d1501f6a72c0272c94f8965
Deleted: sha256:2d4c647f875f6256f210459e5c401aad27ad223d0fa3bada7c4088a6040f8ba4
Deleted: sha256:4bded7e9aa769cb0560e60da97421e2314fa896c719179b926318640324d7932
Deleted: sha256:5fd9447ef700dfe5975c4cba51d3c9f2e757b34782fe145c1d7a12dfbee1da2f
Deleted: sha256:5ee7cbb203f3a7e90fe67330905c28e394e595ea2f4aa23b5d3a06534a960553
Deleted: sha256:d0fe97fa8b8cefdffcef1d62b65aba51a6c87b6679628a2b50fc6a7a579f764c
Untagged: hello-world:latest
Untagged: hello-world@sha256:8c5aeeb6a5f3ba4883347d3747a7249f491766ca1caa47e5da5dfcf6b9b717c0
Deleted: sha256:bf756fb1ae65adf866bd8c456593cd24beb6a0a061dedf42b26a993176745f6b
3.2 容器命令
3.2.1 创建并启动容器 docker run
docker run [options] image
options:
--name="Name"	# 容器名称
-d				# 后台运行
-it				# 使用交互方式运行,进入容器查看内容
-p				# 指定容器端口
	-p ip:主机端口:容器端口
	-p 主机端口:容器端口
	-p 容器端口
-P				# 随机端口
演示:在docker中安装了centos,启动centos容器并进入
[root@ct7_1 ~]# docker run -it centos /bin/bash
[root@1af2875a5dcf /]# ls
bin  dev  etc  home  lib  lib64  lost+found  media  mnt  opt  proc  root  run  sbin  srv  sys  tmp  usr  var
[root@1af2875a5dcf /]#
3.2.2 退出容器 exit
退出并关闭容器:
[root@1af2875a5dcf /]# exit
exit
[root@ct7_1 ~]#
退出容器,容器保持运行状态:
# 快捷键,顺序不能换 :
Ctrl + p + q
3.2.3 查看容器列表 docker ps
docker ps [options]
options:
noOption	# 列出正在运行的容器
-a			# 列出全部容器,无论是否在运行状态
-n=?		# 显示最近创建的容器
-q			# 只显示容器的编号
演示:
[root@ct7_1 ~]# docker ps
CONTAINER ID        IMAGE               COMMAND             CREATED             STATUS              PORTS               NAMES
[root@ct7_1 ~]# docker ps -a
CONTAINER ID        IMAGE               COMMAND             CREATED             STATUS                     PORTS               NAMES
1af2875a5dcf        centos              "/bin/bash"         9 minutes ago       Exited (0) 7 minutes ago                       crazy_stonebraker
55b3e85d5433        bf756fb1ae65        "/hello"            3 hours ago         Exited (0) 3 hours ago                         mystifying_nobel
[root@ct7_1 ~]# docker ps -n=1
CONTAINER ID        IMAGE               COMMAND             CREATED             STATUS                     PORTS               NAMES
1af2875a5dcf        centos              "/bin/bash"         9 minutes ago       Exited (0) 7 minutes ago                       crazy_stonebraker
3.2.4 删除容器 docker rm
docker rm 容器id					# 删除指定容器
docker rm -f 容器id				# 强制删除指定容器
docker rm -f $(docker ps -aq)	 # 删除全部容器
docker ps -a -q|xargs docker rm  # 删除全部容器
演示:
[root@ct7_1 ~]# docker rm -f 1af2875a5dcf
1af2875a5dcf
[root@ct7_1 ~]# docker rm -f $(docker ps -aq)
34edc4eda46c
617f0194925c
19069dca334e
55b3e85d5433
[root@ct7_1 ~]# docker ps -a
CONTAINER ID        IMAGE               COMMAND             CREATED             STATUS              PORTS               NAMES
3.2.5 启动、停止容器
docker start 容器id		# 启动容器
docker restart 容器id		# 重启容器
docker stop 容器id		# 停止容器
docker kill 容器id		# 强制停止
3.3 常用命令
3.3.1 查看日志 docker logs
docker logs [options] 容器
options:
-f		# 跟踪模式,一直打印
-t		# 格式化显示
	--tail number # 查看具体条数的日志
编写shell脚本:每隔一秒打印一次jesse
[root@ct7_1 ~]# docker run -d centos /bin/sh -c "while true;do echo jesse;sleep 1;done"
c54484a5335bab89a450898a18e2762bbdfd99a7ae6df23399a28f7dd89a7678
[root@ct7_1 ~]# docker ps
CONTAINER ID        IMAGE               COMMAND                  CREATED             STATUS              PORTS               NAMES
c54484a5335b        centos              "/bin/sh -c 'while t…"   5 seconds ago       Up 4 seconds                            sharp_shannon
[root@ct7_1 ~]# docker logs -tf c54484a5335b
2020-10-17T09:39:31.860165117Z jesse
2020-10-17T09:39:32.882301501Z jesse
2020-10-17T09:39:33.887338028Z jesse
2020-10-17T09:39:34.892555217Z jesse
2020-10-17T09:39:35.898567896Z jesse
2020-10-17T09:39:36.903500703Z jesse
3.3.2 查看容器内进程信息 docker top
[root@ct7_1 ~]# docker top c54484a5335b
UID                 PID                 PPID                C                   STIME               TTY                 TIME                CMD
root                9908                9892                0                   02:39               ?                   00:00:00            /bin/sh -c while true;do echo jesse;sleep 1;done
root                10444               9908                0                   02:45               ?                   00:00:00            /usr/bin/coreutils --coreutils-prog-shebang=sleep /usr/bin/sleep 1
3.3.3 查看容器系统信息 docker inspect
查看容器的系统信息
[root@ct7_1 ~]# docker inspect c54484a5335b
[
    {
        "Id": "c54484a5335bab89a450898a18e2762bbdfd99a7ae6df23399a28f7dd89a7678",
        "Created": "2020-10-17T09:39:31.499334702Z",
        "Path": "/bin/sh",
        "Args": [
            "-c",
            "while true;do echo jesse;sleep 1;done"
        ],
        "State": {
            "Status": "running",
            "Running": true,
            "Paused": false,
            "Restarting": false,
            "OOMKilled": false,
            "Dead": false,
            "Pid": 9908,
            "ExitCode": 0,
            "Error": "",
            "StartedAt": "2020-10-17T09:39:31.861868191Z",
            "FinishedAt": "0001-01-01T00:00:00Z"
        },
        "Image": "sha256:0d120b6ccaa8c5e149176798b3501d4dd1885f961922497cd0abef155c869566",
        "ResolvConfPath": "/var/lib/docker/containers/c54484a5335bab89a450898a18e2762bbdfd99a7ae6df23399a28f7dd89a7678/resolv.conf",
        "HostnamePath": "/var/lib/docker/containers/c54484a5335bab89a450898a18e2762bbdfd99a7ae6df23399a28f7dd89a7678/hostname",
        "HostsPath": "/var/lib/docker/containers/c54484a5335bab89a450898a18e2762bbdfd99a7ae6df23399a28f7dd89a7678/hosts",
        "LogPath": "/var/lib/docker/containers/c54484a5335bab89a450898a18e2762bbdfd99a7ae6df23399a28f7dd89a7678/c54484a5335bab89a450898a18e2762bbdfd99a7ae6df23399a28f7dd89a7678-json.log",
        "Name": "/sharp_shannon",
        "RestartCount": 0,
        "Driver": "devicemapper",
        "Platform": "linux",
        "MountLabel": "",
        "ProcessLabel": "",
        "AppArmorProfile": "",
        "ExecIDs": null,
        "HostConfig": {
            "Binds": null,
            "ContainerIDFile": "",
            "LogConfig": {
                "Type": "json-file",
                "Config": {}
            },
            "NetworkMode": "default",
            "PortBindings": {},
            "RestartPolicy": {
                "Name": "no",
                "MaximumRetryCount": 0
            },
            "AutoRemove": false,
            "VolumeDriver": "",
            "VolumesFrom": null,
            "CapAdd": null,
            "CapDrop": null,
            "Capabilities": null,
            "Dns": [],
            "DnsOptions": [],
            "DnsSearch": [],
            "ExtraHosts": null,
            "GroupAdd": null,
            "IpcMode": "private",
            "Cgroup": "",
            "Links": null,
            "OomScoreAdj": 0,
            "PidMode": "",
            "Privileged": false,
            "PublishAllPorts": false,
            "ReadonlyRootfs": false,
            "SecurityOpt": null,
            "UTSMode": "",
            "UsernsMode": "",
            "ShmSize": 67108864,
            "Runtime": "runc",
            "ConsoleSize": [
                0,
                0
            ],
            "Isolation": "",
            "CpuShares": 0,
            "Memory": 0,
            "NanoCpus": 0,
            "CgroupParent": "",
            "BlkioWeight": 0,
            "BlkioWeightDevice": [],
            "BlkioDeviceReadBps": null,
            "BlkioDeviceWriteBps": null,
            "BlkioDeviceReadIOps": null,
            "BlkioDeviceWriteIOps": null,
            "CpuPeriod": 0,
            "CpuQuota": 0,
            "CpuRealtimePeriod": 0,
            "CpuRealtimeRuntime": 0,
            "CpusetCpus": "",
            "CpusetMems": "",
            "Devices": [],
            "DeviceCgroupRules": null,
            "DeviceRequests": null,
            "KernelMemory": 0,
            "KernelMemoryTCP": 0,
            "MemoryReservation": 0,
            "MemorySwap": 0,
            "MemorySwappiness": null,
            "OomKillDisable": false,
            "PidsLimit": null,
            "Ulimits": null,
            "CpuCount": 0,
            "CpuPercent": 0,
            "IOMaximumIOps": 0,
            "IOMaximumBandwidth": 0,
            "MaskedPaths": [
                "/proc/asound",
                "/proc/acpi",
                "/proc/kcore",
                "/proc/keys",
                "/proc/latency_stats",
                "/proc/timer_list",
                "/proc/timer_stats",
                "/proc/sched_debug",
                "/proc/scsi",
                "/sys/firmware"
            ],
            "ReadonlyPaths": [
                "/proc/bus",
                "/proc/fs",
                "/proc/irq",
                "/proc/sys",
                "/proc/sysrq-trigger"
            ]
        },
        "GraphDriver": {
            "Data": {
                "DeviceId": "35",
                "DeviceName": "docker-8:3-2624881-0504bf98d0e49130127d4812a8fc78d42c91e610e6b1290526d805ab1dd8d229",
                "DeviceSize": "10737418240"
            },
            "Name": "devicemapper"
        },
        "Mounts": [],
        "Config": {
            "Hostname": "c54484a5335b",
            "Domainname": "",
            "User": "",
            "AttachStdin": false,
            "AttachStdout": false,
            "AttachStderr": false,
            "Tty": false,
            "OpenStdin": false,
            "StdinOnce": false,
            "Env": [
                "PATH=/usr/local/sbin:/usr/local/bin:/usr/sbin:/usr/bin:/sbin:/bin"
            ],
            "Cmd": [
                "/bin/sh",
                "-c",
                "while true;do echo jesse;sleep 1;done"
            ],
            "Image": "centos",
            "Volumes": null,
            "WorkingDir": "",
            "Entrypoint": null,
            "OnBuild": null,
            "Labels": {
                "org.label-schema.build-date": "20200809",
                "org.label-schema.license": "GPLv2",
                "org.label-schema.name": "CentOS Base Image",
                "org.label-schema.schema-version": "1.0",
                "org.label-schema.vendor": "CentOS"
            }
        },
        "NetworkSettings": {
            "Bridge": "",
            "SandboxID": "db662012ad4dc813fea899c707c83664cc431aa3eb08d0fd76cab557233d653f",
            "HairpinMode": false,
            "LinkLocalIPv6Address": "",
            "LinkLocalIPv6PrefixLen": 0,
            "Ports": {},
            "SandboxKey": "/var/run/docker/netns/db662012ad4d",
            "SecondaryIPAddresses": null,
            "SecondaryIPv6Addresses": null,
            "EndpointID": "6dba1cde1a2753c02ff2b3c1ce1c694c270dbd2b7215b67716b685895766c356",
            "Gateway": "172.17.0.1",
            "GlobalIPv6Address": "",
            "GlobalIPv6PrefixLen": 0,
            "IPAddress": "172.17.0.3",
            "IPPrefixLen": 16,
            "IPv6Gateway": "",
            "MacAddress": "02:42:ac:11:00:03",
            "Networks": {
                "bridge": {
                    "IPAMConfig": null,
                    "Links": null,
                    "Aliases": null,
                    "NetworkID": "d3df46c7d321b93027887f548368b2084652fbf575e573df87b8fd3ed9acaf7f",
                    "EndpointID": "6dba1cde1a2753c02ff2b3c1ce1c694c270dbd2b7215b67716b685895766c356",
                    "Gateway": "172.17.0.1",
                    "IPAddress": "172.17.0.3",
                    "IPPrefixLen": 16,
                    "IPv6Gateway": "",
                    "GlobalIPv6Address": "",
                    "GlobalIPv6PrefixLen": 0,
                    "MacAddress": "02:42:ac:11:00:03",
                    "DriverOpts": null
                }
            }
        }
    }
]
3.3.4 进入正在运行的容器
-
docker exec -it 容器id bashShell
进入容器中并新建一个终端
-
docker attach 容器id
进入容器当前执行中的终端
[root@ct7_1 ~]# docker exec -it c54484a5335b /bin/bash
[root@c54484a5335b /]#


[root@ct7_1 ~]# docker attach c54484a5335b
jesse
jesse
jesse
.....。
3.3.5 容器内拷贝到主机
docker cp 容器id:容器内路径 目的路径
创建并进入容器,然后在容器中新建文件ssx.java。然后回到主机上使用拷贝命令将文件拷贝出来。
演示:
[root@ct7_1 ~]# docker run -it centos /bin/bash
[root@08487a4e43e2 /]# ls
bin  dev  etc  home  lib  lib64  lost+found  media  mnt  opt  proc  root  run  sbin  srv  sys  tmp  usr  var
[root@08487a4e43e2 /]# cd home
[root@08487a4e43e2 home]# touch ssx.java
[root@08487a4e43e2 home]# ls
ssx.java
[root@ct7_1 ~]# docker cp 08487a4e43e2:/home/ssx.java /home
[root@ct7_1 ~]# cd /home
[root@ct7_1 home]# ls
ssx.java  user
3.4 命令小结
docker命令生态

  attach      Attach local standard input, output, and error streams to a running container
  #当前shell下 attach连接指定运行的镜像
  build       Build an image from a Dockerfile # 通过Dockerfile定制镜像
  commit      Create a new image from a container's changes #提交当前容器为新的镜像
  cp          Copy files/folders between a container and the local filesystem #拷贝文件
  create      Create a new container #创建一个新的容器
  diff        Inspect changes to files or directories on a container's filesystem #查看docker容器的变化
  events      Get real time events from the server # 从服务获取容器实时时间
  exec        Run a command in a running container # 在运行中的容器上运行命令
  export      Export a container's filesystem as a tar archive #导出容器文件系统作为一个tar归档文件[对应import]
  history     Show the history of an image # 展示一个镜像形成历史
  images      List images #列出系统当前的镜像
  import      Import the contents from a tarball to create a filesystem image #从tar包中导入内容创建一个文件系统镜像
  info        Display system-wide information # 显示全系统信息
  inspect     Return low-level information on Docker objects #查看容器详细信息
  kill        Kill one or more running containers # kill指定docker容器
  load        Load an image from a tar archive or STDIN #从一个tar包或标准输入中加载一个镜像[对应save]
  login       Log in to a Docker registry #
  logout      Log out from a Docker registry
  logs        Fetch the logs of a container
  pause       Pause all processes within one or more containers
  port        List port mappings or a specific mapping for the container
  ps          List containers
  pull        Pull an image or a repository from a registry
  push        Push an image or a repository to a registry
  rename      Rename a container
  restart     Restart one or more containers
  rm          Remove one or more containers
  rmi         Remove one or more images
  run         Run a command in a new container
  save        Save one or more images to a tar archive (streamed to STDOUT by default)
  search      Search the Docker Hub for images
  start       Start one or more stopped containers
  stats       Display a live stream of container(s) resource usage statistics
  stop        Stop one or more running containers
  tag         Create a tag TARGET_IMAGE that refers to SOURCE_IMAGE
  top         Display the running processes of a container
  unpause     Unpause all processes within one or more containers
  update      Update configuration of one or more containers
  version     Show the Docker version information
  wait        Block until one or more containers stop, then print their exit codes
3.5 可视化 portainer
安装一个可视化管理应用来查看docker
-
portainer
docker run -d -p 8088:9000 --restart=always -v /var/run/docker.sock:/var/run/docker.sock --privileged=true portainer/portainer -
Rancher(CI/CD)
# docker重启时自动重启该容器
--restart=always
Portainer
Docker图形化界面管理工具,提供可视化后台面板。
-
启动容器
docker run -d -p 8088:9000 --restart=always -v /var/run/docker.sock:/var/run/docker.sock --privileged=true portainer/portainer -
访问页面
首先是注册页面,第一次访问输入用户名密码;
选择连接服务器的方式,一般是locally;
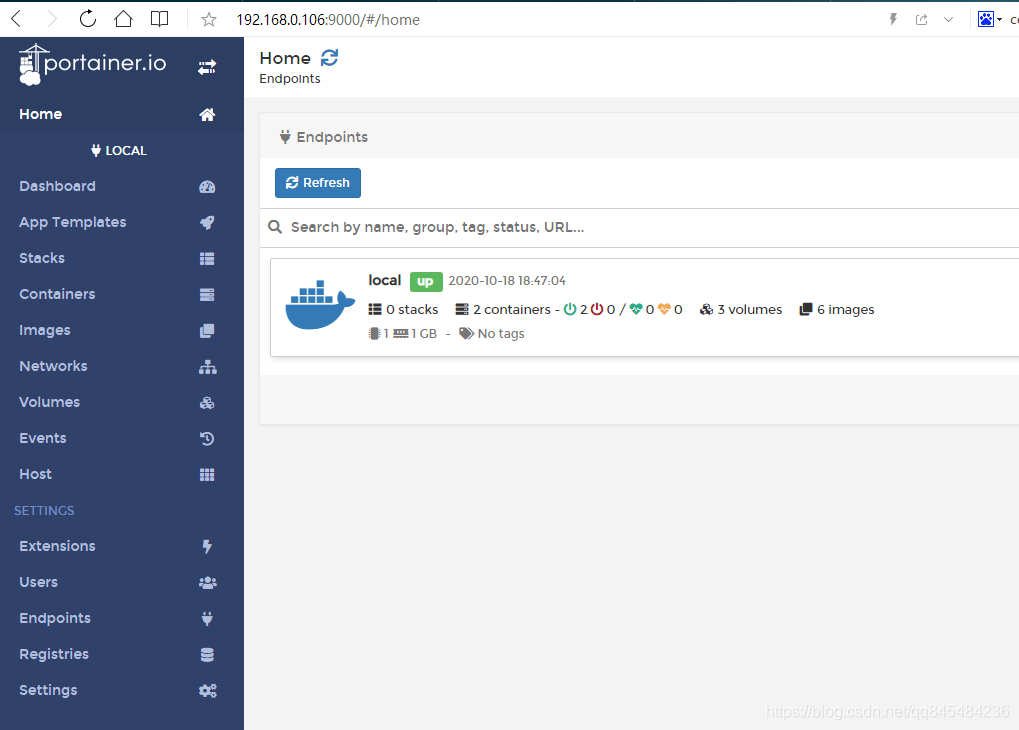
docker整个生态都能看到,,,还是蛮强大的,虽然是英文,慢慢熟悉就好。
4. Docker镜像
镜像是一种轻量级、可执行的独立软件包。
用来打包软件运行环境和基于运行环境开发的软件,它包含了运行某个软件所需的所有内容:代码、运行时包、库、环境变量、配置文件…
4.1 UnionFS 联合文件系统
Union File System 联合文件系统
UnionFS是一种分层、轻量级且高性能的文件系统,它将对文件系统的修改划分为一层一层的叠加形式实现,同时可以将不同目录的文件挂在到同一个虚拟文件系统下(unite several directories into a single virtual filesystem)。
UnionFS是Docker镜像的基础,镜像可以通过分层来继承。
docker的镜像实际上由一层一层的文件系统组成,也就是UnionFS。
4.2 bootfs 引导文件系统
boot file system 引导文件系统
bootfs(boot file system)主要包含bootloader和kernel(内核)。BootLoader主要是引导加载kernel,Linux刚启动时会首先加载bootfs。
4.3 rootfs 根文件系统
root file system 根文件系统
rootfs在bootfs之上,rootfs包含的是Linux系统中:/dev /proc /bin /etc /opt 等标准目录和文件。
rootfs有各种不同的发行版本:Ubuntu、Centos、RedHat等等
对于一个精简的os来说(docker镜像),rootfs可以很小,只包含最基本的命令、工具包和程序库,而且底层直接使用Host(宿主机)的kernel,本身只需要提供rootfs,所以docker镜像可以很小。
在不同版本的linux中,bootfs基本一致,rootfs会有差别,因此不同的发行版可以共用bootfs,只需提供rootfs。
4.4 Docker镜像加载原理
在docker镜像的最底层也是bootfs,并且和linux的bootfs是一样的,也包含bootloader和kernel。
首先加载bootfs,然后当bootloader执行完之后,由bootfs将内存的使用权交给kernel,最后将bootfs卸载掉。
画个图好理解:

4.5 Docker镜像分层原理
镜像内的文件分层,执行命令查看tomcat系统信息:
docker image inspect tomcat
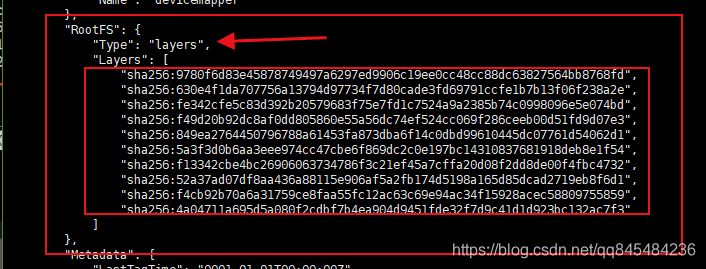
就是把tomcat分成了十层,高层依赖底层,底层不受高层影响。
- 图例:一个具有三层的镜像
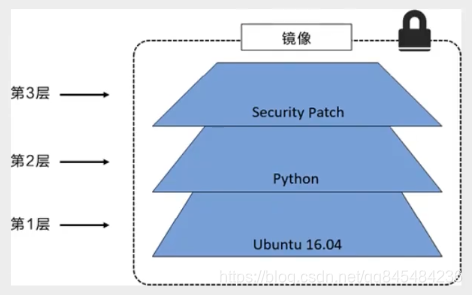
- 把镜像层在深入展示:这个例子拥有两个镜像层,每层拥有3个文件,外部看起来整个镜像层有6个文件。

- 图例:下图展示的是一个三层镜像层的镜像,但文件7是文件5的更新版(版本号),所以这个镜像外部看来只有6个文件。

也就是说,更新某个底层的文件,需要打包一个新的镜像层包含新版文件,添加到原来的镜像中,作为高层存在。
Docker通过存储引擎(新版本采用快照机制)的方式来实现镜像层堆栈,并保证多镜像层对外展示为统一的文件系统。
Linux上可用的存储引擎有AUFS、Overlay2、Device Mapper、Btrfs以及ZFS。每种存储引擎都基于Linux中对应的文件系统或块设备技术,并且具有各自独特的性能特点。
Docker在windows上仅支持windowsfilter一种存储引擎,该存储引擎基于NTFS文件系统之上实现了分层和Cow。
4.6 容器层概念
如果把整个镜像看成一个镜像层,那么在这个镜像run起来的容器,就可以成为容器层。
而所有的操作都是在这个容器层之内的,对镜像层没有任何影响。
那么就是说,当你要制作一个镜像的时候,可以将镜像层和容器层共同打包,组成一个新的镜像!

4.7 提交镜像 docker commit
docker commit 提交容器成为一个新的副本
docker commit -m="描述信息" -a="作者" 容器id 目标镜像名:[TAG]
保存当前容器的状态,可以理解为快照。
测试打包一个可以访问有首页的tomcat:
-
使用tomcat 9.0创建容器,在webapps中拷入ROOT文件夹,并且可以实现访问:
[root@ct7_1 ~]# docker exec -it t1 bash root@ct7_1:/usr/local/tomcat# cp -r /usr/local/tomcat/webapps.dist/* /usr/local/tomcat/webapps/ root@ct7_1:/usr/local/tomcat# read escape sequence [root@ct7_1 ~]# curl localhost:8080 <!DOCTYPE html> <html lang="en"> <head> ...... -
将此容器t1(tomcat)打包成新的镜像
我使用了容器名称 t1。
[root@ct7_1 ~]# docker commit -m="new tomcat" -a="ssx" t1 tomcat_new
sha256:1590647f912a323b5cc69b9150a195abf8c2c09a7993758268b95508ef17a717
[root@ct7_1 ~]# docker images
REPOSITORY            TAG                 IMAGE ID            CREATED             SIZE
tomcat_new            latest              1590647f912a        6 seconds ago       652MB
tomcat                9.0                 891fcd9c5b3a        4 days ago          647MB


 913
913


 被折叠的 条评论
为什么被折叠?
被折叠的 条评论
为什么被折叠?
 到【灌水乐园】发言


