


1、创建ThemePicker.vue组件
<template>
  <el-tooltip effect="dark" content="主题设置" placement="bottom">
    <el-color-picker
    v-model="theme"
    class="theme-picker"
    size="mini"
    popper-class="theme-picker-dropdown"/>
  </el-tooltip>
</template>

<script>
const version = require("element-ui/package.json").version; // element-ui version from node_modules
const ORIGINAL_THEME = "#409EFF"; // default color
var indexCss = require('../../assets/common/css/index.css');

export default {
  data() {
    return {
      chalk: "", // content of theme-chalk css
      theme: ORIGINAL_THEME
    };
  },
  watch: {
    theme(val, oldVal) {
      if (typeof val !== "string") return;
      const themeCluster = this.getThemeCluster(val.replace("#", ""));
      const originalCluster = this.getThemeCluster(oldVal.replace("#", ""));
      // console.log(themeCluster, originalCluster);
      const getHandler = (variable, id) => {
        return () => {
          const originalCluster = this.getThemeCluster(
            ORIGINAL_THEME.replace("#", "")
          );
          const newStyle = this.updateStyle(
            this[variable],
            originalCluster,
            themeCluster
          );

          let styleTag = document.getElementById(id);
          if (!styleTag) {
            styleTag = document.createElement("style");
            styleTag.setAttribute("id", id);
            document.head.appendChild(styleTag);
          }
          styleTag.innerText = newStyle;
        };
      };

      const chalkHandler = getHandler("chalk", "chalk-style");

      if (!this.chalk) {
        this.getCSSString(chalkHandler, "chalk");
      } else {
        chalkHandler();
      }

      const styles = [].slice
        .call(document.querySelectorAll("style"))
        .filter(style => {
          const text = style.innerText;
          return (
            new RegExp(oldVal, "i").test(text) && !/Chalk Variables/.test(text)
          );
        });
      styles.forEach(style => {
        const { innerText } = style;
        if (typeof innerText !== "string") return;
        style.innerText = this.updateStyle(
          innerText,
          originalCluster,
          themeCluster
        );
      });
    }
  },

  methods: {
    updateStyle(style, oldCluster, newCluster) {
      let newStyle = style;
      oldCluster.forEach((color, index) => {
        newStyle = newStyle.replace(new RegExp(color, "ig"), newCluster[index]);
      });
      return newStyle;
    },

    getCSSString(callback, variable) {
      let selft = this;
      selft
        .$axios({
          method: "post",
          url: selft.$api.pumpValveAPI.readThemeFileURl,
          data: {}
        })
        .then(r => {
          if (r.model.status === 200) {
            this[variable] = r.model.data.replace(/@font-face{[^}]+}/, "");
            callback();
          }
        })
        .catch(function(err) {});
    },

    getThemeCluster(theme) {
      const tintColor = (color, tint) => {
        let red = parseInt(color.slice(0, 2), 16);
        let green = parseInt(color.slice(2, 4), 16);
        let blue = parseInt(color.slice(4, 6), 16);

        if (tint === 0) {
          // when primary color is in its rgb space
          return [red, green, blue].join(",");
        } else {
          red += Math.round(tint * (255 - red));
          green += Math.round(tint * (255 - green));
          blue += Math.round(tint * (255 - blue));

          red = red.toString(16);
          green = green.toString(16);
          blue = blue.toString(16);

          return `#${red}${green}${blue}`;
        }
      };

      const shadeColor = (color, shade) => {
        let red = parseInt(color.slice(0, 2), 16);
        let green = parseInt(color.slice(2, 4), 16);
        let blue = parseInt(color.slice(4, 6), 16);

        red = Math.round((1 - shade) * red);
        green = Math.round((1 - shade) * green);
        blue = Math.round((1 - shade) * blue);

        red = red.toString(16);
        green = green.toString(16);
        blue = blue.toString(16);

        return `#${red}${green}${blue}`;
      };

      const clusters = [theme];
      for (let i = 0; i <= 9; i++) {
        clusters.push(tintColor(theme, Number((i / 10).toFixed(2))));
      }
      clusters.push(shadeColor(theme, 0.1));
      return clusters;
    }
  }
};
</script>
2、后台请求获取的index.css
spring boot里面正确读取index.css的正确姿势是:
private byte[] readInputStream(InputStream inputStream) throws IOException {
byte[] buffer = new byte[1024];
int len = 0;
ByteArrayOutputStream bos = new ByteArrayOutputStream();
while((len = inputStream.read(buffer)) != -1) {
bos.write(buffer, 0, len);
}
bos.close();
return bos.toByteArray();
}
@PostMapping("/readThemeFile")
private ServerResponse<String> readThemeFile() {
String line = null;
BufferedReader bufferedReader = null;
FileReader fileReader = null;
try {
// String serverpath = ResourceUtils.getURL("classpath:static").getPath().replace("%20"," ").replace('/', '\\');
// path=serverpath.substring(1);//从路径字符串中取出工程路径
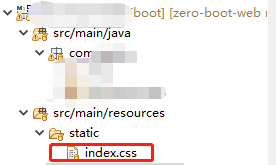
ClassPathResource classPathResource = new ClassPathResource("static/index.css");
InputStream inputStream = classPathResource.getInputStream();
byte[] getData = readInputStream(inputStream);
inputStream.read(getData);
line = new String(getData);
} catch (Exception e) {
e.printStackTrace();
} finally {
try {
if(bufferedReader != null)
bufferedReader.close();
if(fileReader != null)
fileReader.close();
} catch (IOException e) {
e.printStackTrace();
}
}
return ServerResponse.createBySuccess(line);
}
3、index.css
index.css中必须包含你要修改的的样式,也就是说你项目要改变肤色的样式都放在这里面


 1532
1532


 被折叠的 条评论
为什么被折叠?
被折叠的 条评论
为什么被折叠?
 到【灌水乐园】发言


