


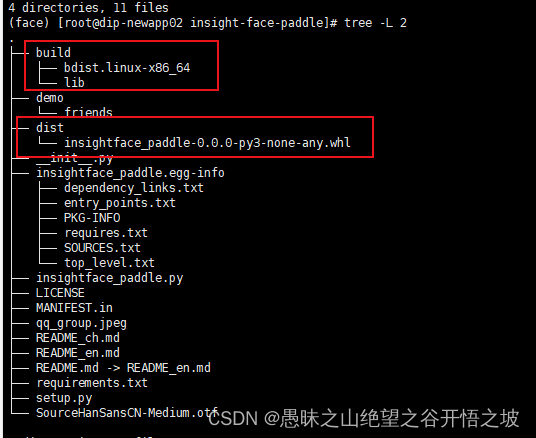
1、insight-face-paddle
1.1、源码安装包
cd ./InsightFacePaddle
python3 setup.py bdist_wheel
pip3 install dist/*
源码编译后会生成安装包whl,用setuptool操作,源码编译利于定制相应的依赖包,这个本质上就是github开源的rep,然后打包成了whl
2、笔记
2.1、pycharm编译器会优先去虚拟环境里面去掉包,虚拟环境没有才会掉当前目录同名的包,如果当前目录有,可以不安装方便跳转调试,如果安装了可以卸载
2.2、NumPy
NumPy(Numerical Python) 是 Python 语言的一个扩展程序库
一个强大的N维数组对象 ndarray
广播功能函数
整合 C/C++/Fortran 代码的工具
线性代数、傅里叶变换、随机数生成等功能
官方文档:https://numpy.org/
numpy高级索引:https://www.runoob.com/numpy/numpy-advanced-indexing.html
整数数组索引
import numpy as np

x = np.array([[1,  2],  [3,  4],  [5,  6]])
y = x[[0,1,2],  [0,1,0]]
print (y)

[1  4  5]
import numpy as np

x = np.array([[  0,  1,  2],[  3,  4,  5],[  6,  7,  8],[  9,  10,  11]])
print ('我们的数组是:' )
print (x)
print ('\n')
rows = np.array([[0,0],[3,3]])
cols = np.array([[0,2],[0,2]])
y = x[rows,cols]
print  ('这个数组的四个角元素是:')
print (y)

我们的数组是:
[[ 0  1  2]
 [ 3  4  5]
 [ 6  7  8]
 [ 9 10 11]]


这个数组的四个角元素是:
[[ 0  2]
 [ 9 11]]
import numpy as np

a = np.array([[1,2,3], [4,5,6],[7,8,9]])
b = a[1:3, 1:3]
c = a[1:3,[1,2]]
d = a[...,1:]
print(b)
print(c)
print(d)
输出结果为:

[[5 6]
 [8 9]]
[[5 6]
 [8 9]]
[[2 3]
 [5 6]
 [8 9]]
2.3、pickle,python对象持久化
建议直接看官方文档:https://docs.python.org/zh-cn/3/library/pickle.html?highlight=pickle#module-interface
参考:https://blog.csdn.net/m0_61899108/article/details/124472448
dumps():将 Python 中的对象序列化成二进制对象,并返回,不需要写入文件;
loads():读取给定的二进制对象数据,并将其转换为 Python 对象;
dump():将 Python 中的对象序列化成二进制对象,并写入文件;
load():读取指定的序列化数据文件,并返回对象。
pickle 不支持并发地访问持久性对象,在复杂的系统环境下,尤其是读取海量数据时,使用 pickle 会使整个系统的I/O读取性能成为瓶颈。这种情况下,可以使用 ZODB。
2.4、Numpy中排序操作partition,argpartition使用
参考: https://blog.csdn.net/qq_15821487/article/details/125643395?spm=1001.2014.3001.5502
3、 insightface
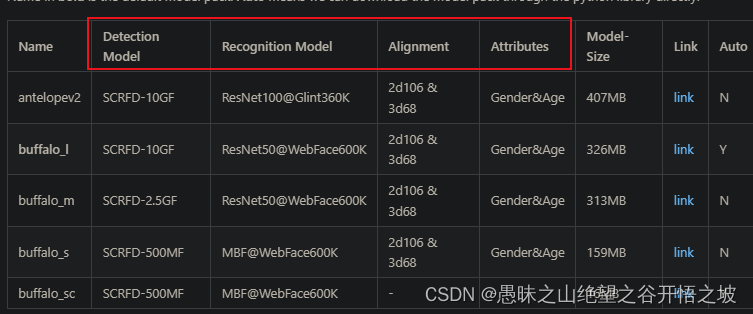
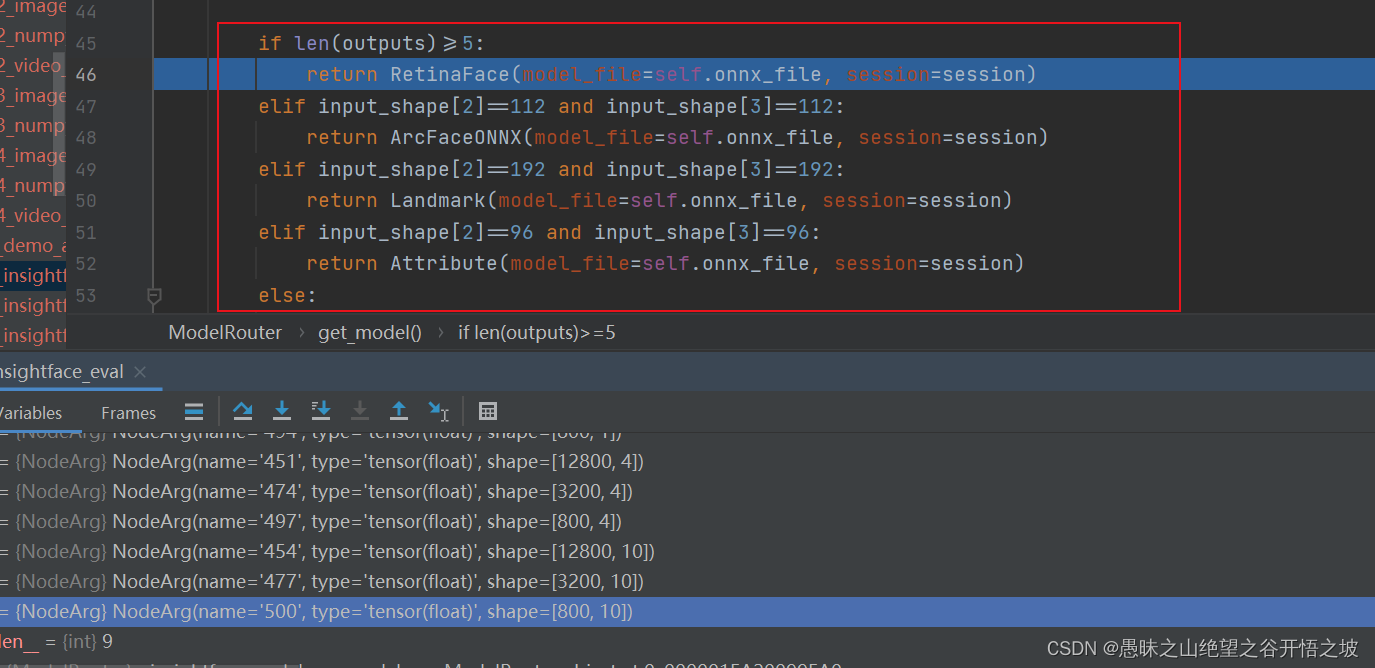
3.1模型类型
检测(包括5个关键点检测)、识别、校准(标记,landmark)、属性,,分别如下一一对应
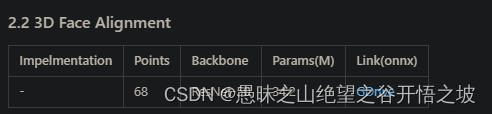
3.1.1、3D校准
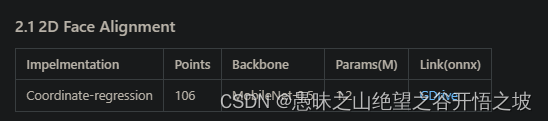
3.1.2、2D校准
3.1.3、目标检测,关键点检测

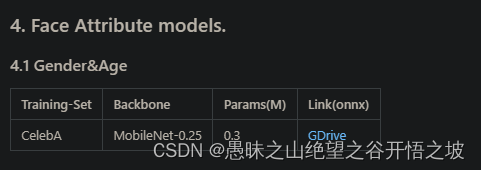
3.1.4、属性,性别年龄
3.1.5、识别
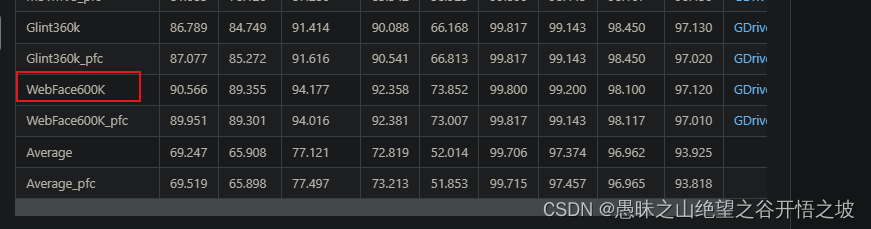
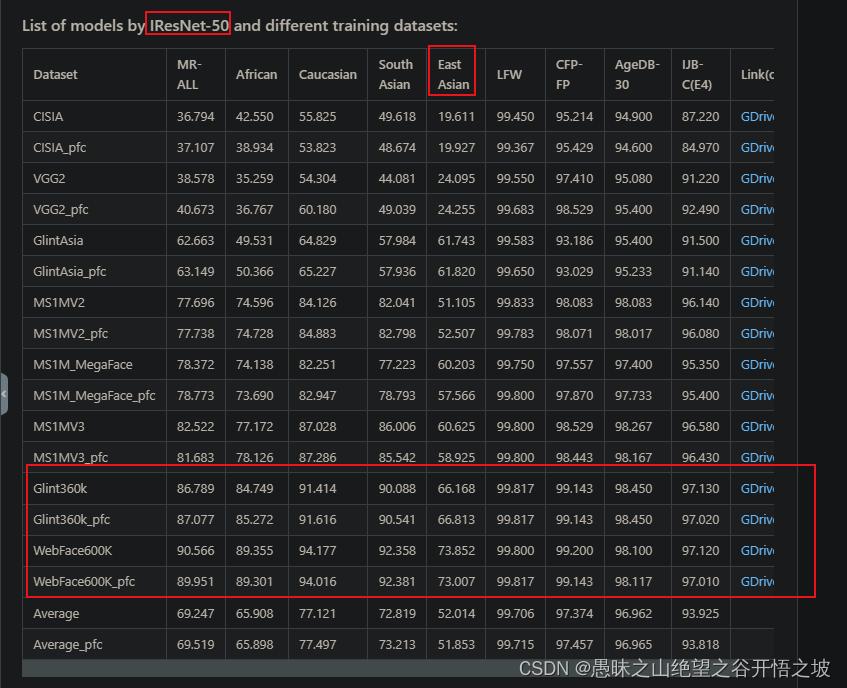
模型类型:https://gitee.com/AI-Mart/insightface/tree/master/model_zoo
效果比对:
3.2、 win10测试安装
安装包地址:https://pypi.org/project/insightface/#modal-close
pip install insightface-0.6.2.tar.gz
pip install -U Cython cmake numpy
pip install -U insightface
pip install onnxruntime
pip install onnxruntime-gpu
3.3、原始代码参考,检测识别
import argparse
import cv2
import sys
import numpy as np
import insightface
from insightface.app import FaceAnalysis
from insightface.data import get_image as ins_get_image

assert insightface.__version__>='0.3'

parser = argparse.ArgumentParser(description='insightface app test')
# general
parser.add_argument('--ctx', default=0, type=int, help='ctx id, <0 means using cpu')
parser.add_argument('--det-size', default=640, type=int, help='detection size')
args = parser.parse_args()

app = FaceAnalysis()
app.prepare(ctx_id=args.ctx, det_size=(args.det_size,args.det_size))

img = ins_get_image('t1')
faces = app.get(img)
assert len(faces)==6
rimg = app.draw_on(img, faces)
cv2.imwrite("./t1_output.jpg", rimg)

# then print all-to-all face similarity
feats = []
for face in faces:
    feats.append(face.normed_embedding)
feats = np.array(feats, dtype=np.float32)
sims = np.dot(feats, feats.T)
print(sims)
3.4、定制代码测试,只保留检测和识别模型

根据模型结构的判断,来适配相应的功能模型
import cv2
import os
import numpy as np
import insightface
from insightface.app import FaceAnalysis
from insightface.data import get_image as ins_get_image
feats = []
root_path = os.path.abspath(os.path.dirname(__file__))
im_path = os.path.join(root_path, './demo/friends/query/xx.jpg')
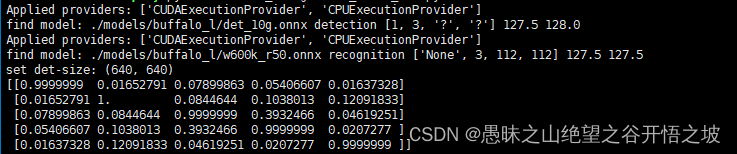
app = FaceAnalysis(name='buffalo_l', root='./',
providers=['CUDAExecutionProvider', 'CPUExecutionProvider'])
app.prepare(ctx_id=0, det_size=(640, 640))
img = cv2.imread(im_path)
faces = app.get(img)
rimg = app.draw_on(img, faces)
cv2.imwrite("./xx.jpg", rimg)
for face in faces:
feats.append(face.normed_embedding)
im_path = os.path.join(root_path, './demo/friends/query/xx.jpg')
img = cv2.imread(im_path)
faces = app.get(img)
for face in faces:
feats.append(face.normed_embedding)
# then print all-to-all face similarity
feats = np.array(feats, dtype=np.float32)
sims = np.dot(feats, feats.T)
print(sims)
# 默认效果 buffalo_l
# [[ 1.0000001 -0.00459651 0.092874 0.13607457 0.0582962 ]
# [-0.00459651 1.0000002 0.01789408 0.0068289 0.6607633 ]
# [ 0.092874 0.01789408 0.9999999 -0.02108541 -0.0273571 ]
# [ 0.13607457 0.0068289 -0.02108541 1.0000001 0.03346727]
# [ 0.0582962 0.6607633 -0.0273571 0.03346727 1. ]]
# 默认效果 只保留检测和识别
# [[ 1.0000001 -0.00459651 0.092874 0.13607457 0.0582962 ]
# [-0.00459651 1.0000002 0.01789408 0.0068289 0.6607633 ]
# [ 0.092874 0.01789408 0.9999999 -0.02108541 -0.0273571 ]
# [ 0.13607457 0.0068289 -0.02108541 1.0000001 0.03346727]
# [ 0.0582962 0.6607633 -0.0273571 0.03346727 1. ]]
# 效果 antelopev2
# [[ 1. 0.02707312 0.14592879 0.10815699 0.06624305]
# [ 0.02707312 1. -0.02565647 -0.03638272 0.6633105 ]
# [ 0.14592879 -0.02565647 0.9999997 0.09916884 -0.04620208]
# [ 0.10815699 -0.03638272 0.09916884 0.99999976 -0.04978609]
# [ 0.06624305 0.6633105 -0.04620208 -0.04978609 0.9999998 ]]
3.5、onnxruntime引擎镜像化部署
通用的模型文件格式,官网:https://onnx.ai/
部署引擎官网:https://onnxruntime.ai/
微软官网:https://github.com/microsoft/onnxruntime
onnxruntime部署案例笔记:https://github.com/microsoft/onnxruntime
以上镜像方案,下载较慢,暂时不推荐
3.6、PaddlePaddle镜像,onnxruntime引擎镜像化部署
3.6.1 dockerfile
FROM registry.baidubce.com/paddlepaddle/paddle:latest-gpu-cuda10.1-cudnn7-gcc54-dev


COPY . /deploy
WORKDIR /deploy

RUN pip config set global.index-url https://mirror.baidu.com/pypi/simple \
    && python3.7 -m pip install --upgrade setuptools \
    && python3.7 -m pip install --upgrade pip \
    && pip3.7 install -r requirements.txt \
    && pip3.7 install insightface-0.6.2.tar.gz


ENTRYPOINT python3.7 mart_insightface_model_zoo.py
3.6.2 requirements.txt
opencv-python==4.6.0.66
opencv-python-headless==4.6.0.66
onnxruntime-gpu==1.4
numpy==1.21.6
cmake==3.22.5
Cython==0.29.30
3.6.3 版本匹配和验证
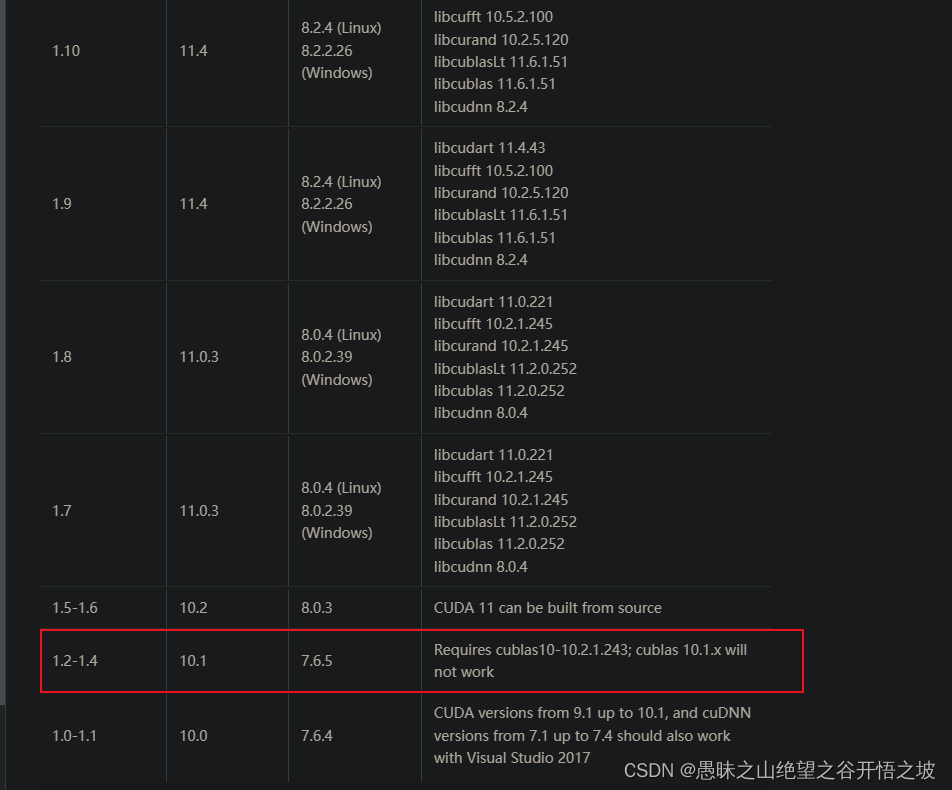
注意onnxruntime-gpu版本的匹配参考:https://onnxruntime.ai/docs/execution-providers/CUDA-ExecutionProvider.html
确认下onnxruntime是否真的能用到你的GPU,如果能获取 TensorrtExecutionProvider 和 CUDAExecutionProvider,
 import onnxruntime
 onnxruntime.get_device()
‘GPU’
onnxruntime.get_available_providers()
[‘CUDAExecutionProvider’, ‘CPUExecutionProvider’]
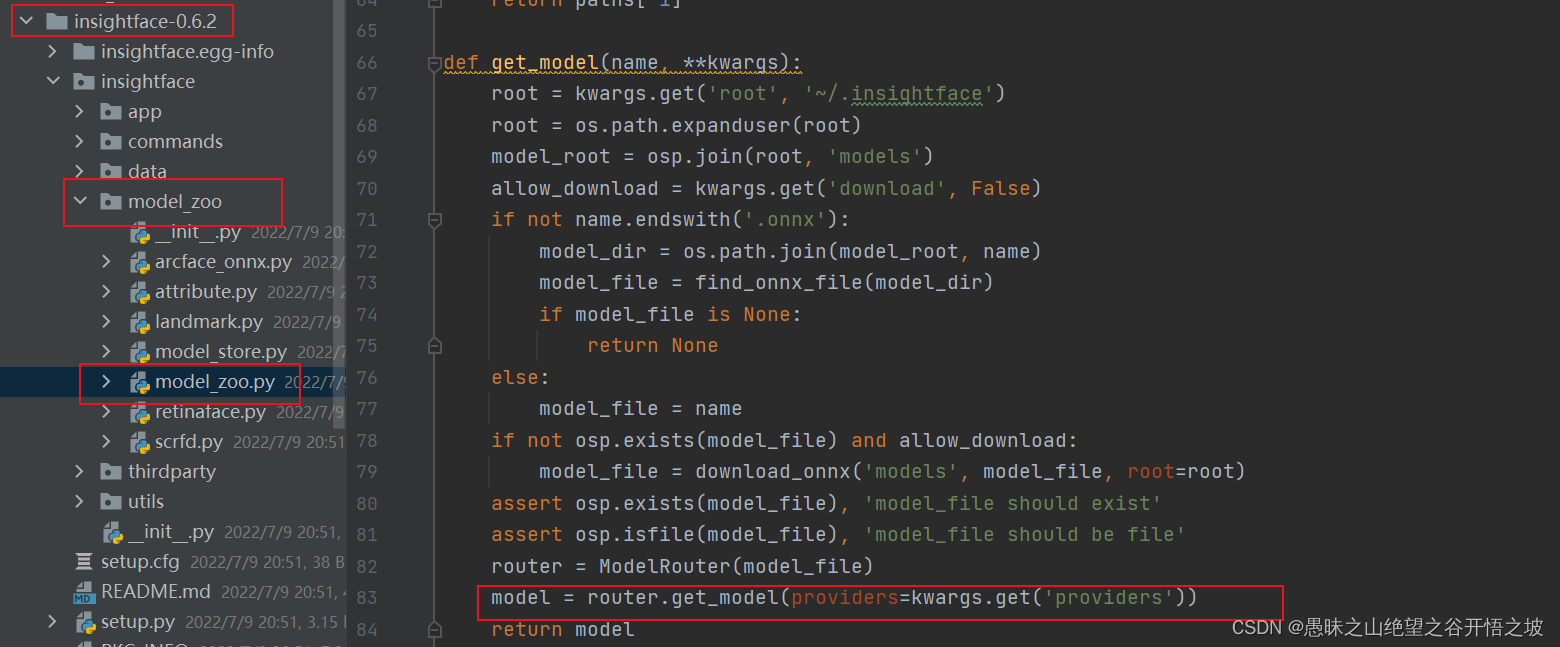
3.6.4 insightface报错更改重新打包
app = FaceAnalysis(name='buffalo_l', root='./')
File "/usr/local/python3.7.0/lib/python3.7/site-packages/insightface/app/face_analysis.py", line 31, in __init__
model = model_zoo.get_model(onnx_file, **kwargs)
File "/usr/local/python3.7.0/lib/python3.7/site-packages/insightface/model_zoo/model_zoo.py", line 83, in get_model
model = router.get_model(providers=kwargs.get('providers'), provider_options=kwargs.get('provider_options'))
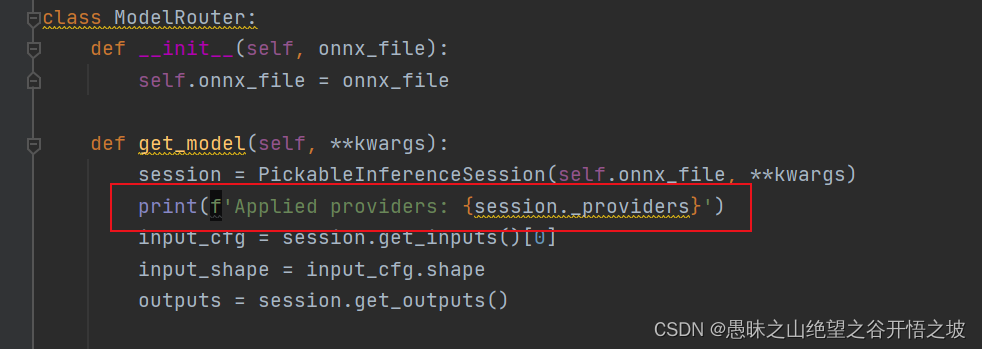
File "/usr/local/python3.7.0/lib/python3.7/site-packages/insightface/model_zoo/model_zoo.py", line 39, in get_model
session = PickableInferenceSession(self.onnx_file, **kwargs)
File "/usr/local/python3.7.0/lib/python3.7/site-packages/insightface/model_zoo/model_zoo.py", line 24, in __init__
super().__init__(model_path, **kwargs)
TypeError: __init__() got an unexpected keyword argument 'provider_options'
删除相关的provider_options属性字段
1、压缩命令:
命令格式:
tar -zcvf 压缩文件名 .tar.gz 被压缩文件名
可先切换到当前目录下,压缩文件名和被压缩文件名都可加入路径。
2、解压缩命令:
命令格式:
tar -zxvf 压缩文件名.tar.gz
解压缩后的文件只能放在当前的目录。
tar -zcvf insightface-0.6.2.tar.gz insightface-0.6.2
pip3.7 install insightface-0.6.2.tar.gz
3.6.5 insightface更改源码后重新制作安装包即可,下载安装包后定制,重新编译生成安装即可
cd insightface-0.6.2
python setup.py build
python setup.py sdist
pip install insightface-0.6.2.tar.gz
3.6.6 GPU运行正常
4、 insightface/ detection / scrfd模型训练
4.1、安装
不同的cuda版本用不同的安装方式,查找历史版本:pytorch安装参考
git clone https://gitee.com/AI-Mart/insightface.git
cd insightface/detection/scrfd
或者
cd /data/mart/face_insightface/insightface/detection/scrfd
pip install torch==1.7.1+cu101 torchvision==0.8.2+cu101 torchaudio==0.7.2 -f https://download.pytorch.org/whl/torch_stable.html
import torch
print(torch.__version__)  # '1.7.0'
print(torch.version.cuda)  # 10.2
torch.cuda.is_available() # False
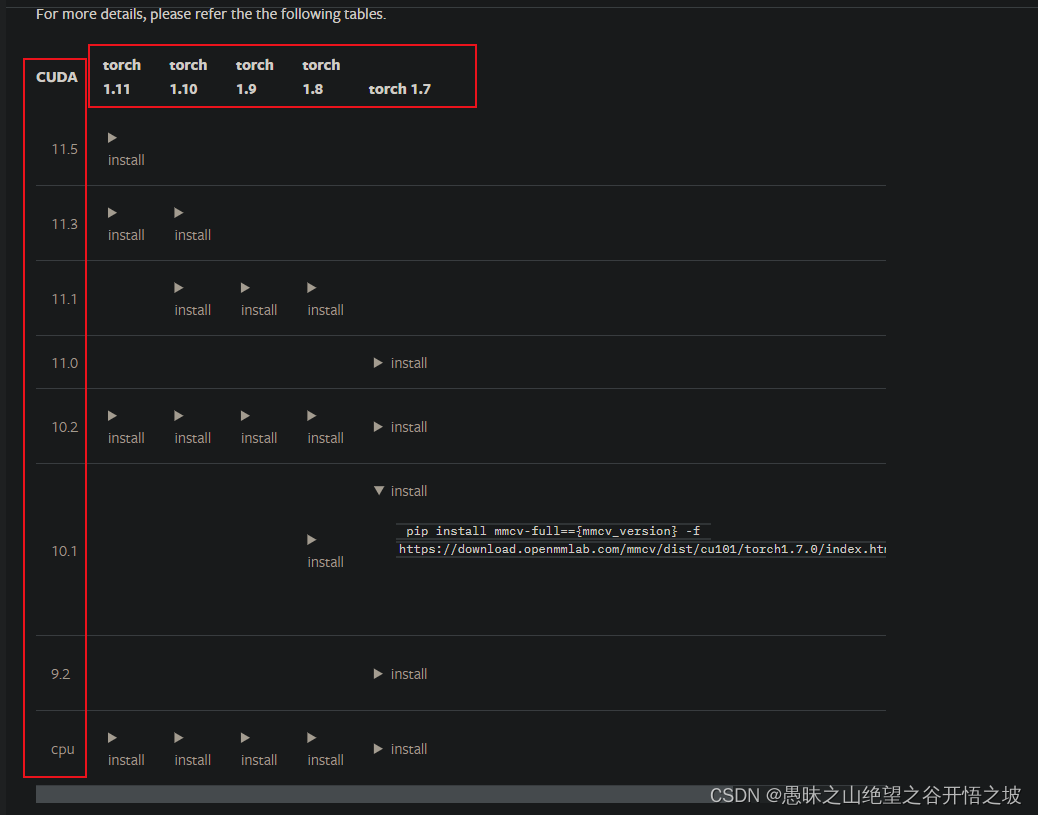
mmcv安装参考和cuda以及pytorch相匹配:https://mmcv.readthedocs.io/en/latest/get_started/installation.html
pip install -U openmim
mim install mmcv-full==1.3.17 -f https://download.openmmlab.com/mmcv/dist/cu101/torch1.7.0/index.html
pip install mmdet -f https://download.openmmlab.com/mmcv/dist/cu101/torch1.7.0/index.html
pip install -r requirements/build.txt
pip install -v -e .  # or "python setup.py develop"
pip install scipy
python ./tools/train.py ./configs/scrfd/scrfd_1g.py --gpus=1
nohup python ./tools/train.py ./configs/scrfd/scrfd_1g.py --gpus=1 2>&1 &
tail -f nohup.out
4.2、报错解决
Python——报错解决: KeyError: ‘XXXX is not in the models registry‘
解决方案:https://blog.csdn.net/qq_45779334/article/details/122897201
ImportError: /usr/local/anaconda3/envs/py38/lib/python3.8/site-packages/mmcv/_ext.cpython-38-x86_64-
解决方案:https://blog.csdn.net/weixin_42130300/article/details/121616567https://blog.csdn.net/weixin_42130300/article/details/121616567
mmcv官方:https://mmcv.readthedocs.io/en/latest/get_started/installation.html
安装包报错,python3.7的最高pandas版本只能是1.1.5
ERROR: Could not find a version that satisfies the requirement pandas==1.3.3 (from versions: 0.1, 0.2, 0.3.0, 0.4.0, 0.4.1, 0.4.2, 0.4.3, 0.5.0, 0.6.0, 0.6.1, 0.7.0, 0.7.1, 0.7.2, 0.7.3, 0.8.0, 0.8.1, 0.9.0, 0.9.1, 0.10.0, 0.10.1, 0.11.0, 0.12.0, 0.13.0, 0.13.1, 0.14.0, 0.14.1, 0.15.0, 0.15.1, 0.15.2, 0.16.0, 0.16.1, 0.16.2, 0.17.0, 0.17.1, 0.18.0, 0.18.1, 0.19.0, 0.19.1, 0.19.2, 0.20.0, 0.20.1, 0.20.2, 0.20.3, 0.21.0, 0.21.1, 0.22.0, 0.23.0, 0.23.1, 0.23.2, 0.23.3, 0.23.4, 0.24.0, 0.24.1, 0.24.2, 0.25.0, 0.25.1, 0.25.2, 0.25.3, 1.0.0, 1.0.1, 1.0.2, 1.0.3, 1.0.4, 1.0.5, 1.1.0, 1.1.1, 1.1.2, 1.1.3, 1.1.4, 1.1.5)
ERROR: No matching distribution found for pandas==1.3.3
解决方案:
切换到python3.8来整体执行
FROM registry.baidubce.com/paddlepaddle/paddle:latest-gpu-cuda10.1-cudnn7-gcc54-dev


COPY . /deploy
WORKDIR /deploy

RUN pip config set global.index-url https://mirror.baidu.com/pypi/simple \
    && python3.8 -m pip install --upgrade setuptools \
    && python3.8 -m pip install --upgrade pip \
    && pip3.8 install -r requirements.txt \
    && pip3.8 install insightface-0.6.2.tar.gz


ENTRYPOINT ["gunicorn", "-c", "gunicorn_cfg.py", "main_api:app"]
数据格式报错
解决方案:原始官方文档和python本身的底层依赖包是第一手最佳学习资料
post传输的数据格式和headers = {“Content-type”: “application/json”}这个定义有关,看是json还是表格还是文件
data = {'image': cv2_to_base64(cv2.imread("./js.jpg")),
        'image_type': 'BASE64',
        'group_id_list': 'qt',
        'max_face_num': 10,
        'match_threshold': 50,
        'max_user_num': 5}

headers = {"Content-type": "application/json"}
url = "http://127.0.0.1:5000/nlp/v1/face_petition/res"
time_now = time.time()
r = requests.post(url=url, headers=headers, data=json.dumps(data))
print(time.time() - time_now)
print(r.json())
flask传输的是json,python读取后自动转换成了dict,注意传送的数据类型都变成字符串格式了
flask传输参数的相关理解


 1万+
1万+

 被折叠的 条评论
为什么被折叠?
被折叠的 条评论
为什么被折叠?
 到【灌水乐园】发言


