


点击下方卡片,关注“小白玩转Python”公众号
概述
我将使用InsightFace,这是一个以其在复杂面部分析任务中的卓越表现而闻名的开源AI工具包。该工具包可以帮助完成诸如人脸检测、关键点识别、情感识别、年龄和性别估算以及属性分析等任务。
示例
!pip install tqdm
!pip install numpy
!pip install insightface
!pip install opencv-python
!pip install onnxruntime
!pip install pandas
存储 embeddings
#@title Iterate and create embeddings
#@markdown iterate through the directory and foldername will be name of the person
#@markdown create a directory called pics and add files there
import os
from tqdm import tqdm
from glob import glob
import numpy as np
import cv2 as cv2
import insightface
from insightface.app import FaceAnalysis
from insightface.data  import get_image as ins_get_image
app = FaceAnalysis(name='buffalo_l')
app.prepare(ctx_id=0, det_size=(640, 640))
names = []
embeddings = []
folders = os.listdir(f'sample_data/pics')
for folder in tqdm(folders):
if ".ipynb_checkpoints" in folder: continue
print(folder)
img_paths = glob(f'sample_data/pics/{folder}/*')
for img_path in img_paths:
img = cv2.imread(img_path)
if img is None: continue
faces = app.get(img)
if len(faces) != 1: continue
face = faces[0]
names.append(folder)
embeddings.append(face.normed_embedding)
embeddings = np.stack(embeddings, axis=0)这段代码遍历包含以个人命名的文件夹的目录,每个文件夹代表一个人。假设目录结构包括一个存储个人图像文件的‘pics’子目录。使用InsightFace库,它初始化一个名为‘buffalo_l’的人脸分析应用程序,准备进行检测,并定义列表以存储姓名和人脸embeddings。代码然后遍历每个文件夹,从‘pics’子目录读取图像,并使用InsightFace进行人脸分析。如果成功检测到一张人脸且仅有一张人脸,个人的名字(文件夹名)将被添加到‘names’列表中,相应的人脸embeddings被附加到‘embeddings’列表中。最后,将人脸embeddings堆叠成一个NumPy数组。此代码本质上处理一组图像,使用InsightFace提取人脸embeddings,并将其与相应的个人关联,以便于人脸识别或分析任务。我为我的朋友和自己创建了embeddings,以便稍后可以使用该工具识别他们。
你可以使用这个数据集来尝试识别宝莱坞(印度电影业)名人。或者从HuggingFace获取这个数据集。数据集链接:https://huggingface.co/datasets/amitpuri/bollywood-celebs
识别人脸
#@title Match Face to the embeddings
#@markdown this code will match the existing embeddings and provide a score
import cv2
import numpy as np
from insightface.app import FaceAnalysis
def recognize_face(input_img, known_embeddings, app):
# Perform face analysis on the input image
faces = app.get(input_img)
# Check if exactly one face is detected
if len(faces) != 1:
return "No face or multiple faces detected"
# Retrieve the embedding for the detected face
detected_embedding = faces[0].normed_embedding
# Calculate similarity scores with known embeddings
scores = np.dot(detected_embedding, np.array(known_embeddings).T)
scores = np.clip(scores, 0., 1.)
# Find the index with the highest score
idx = np.argmax(scores)
max_score = scores[idx]
# Check if the maximum score is above a certain threshold (adjust as needed)
threshold = 0.7
if max_score >= threshold:
recognized_name = names[idx]
return f"Face recognized as {recognized_name} with a confidence score of {max_score:.2f}"
else:
return "Face not recognized"
# Assuming 'input_img_path' is the path to the input face image
input_img = cv2.imread("sample_data/pics/vishal/vishal.jpg")
# Call the recognize_face function
result = recognize_face(input_img, embeddings, app)
print(result)这个函数recognize_face接受一个输入图像、一组已知人脸embeddings(known_embeddings)和一个InsightFace应用实例(app)。它利用InsightFace的人脸分析功能检测输入图像中的人脸。如果检测到恰好一张人脸,它会检索该人脸的归一化embeddings。随后,计算检测到的人脸embeddings已知embeddings之间的相似度分数,并应用阈值来确定匹配是否足够可信。如果最大相似度分数超过指定阈值,它会返回一个带有识别名称和置信度分数的识别消息。否则,它会指示该人脸未被识别。此函数设计用于人脸识别任务,通过比较embeddings来识别给定图像中的已知人脸。可以根据所需的置信水平调整阈值。
我用几张我的照片创建了embeddings,并能够匹配我的新照片。
检测人物
有时,检测照片中是否有实际人物存在是有用的。接下来的两段代码旨在实现这一点。
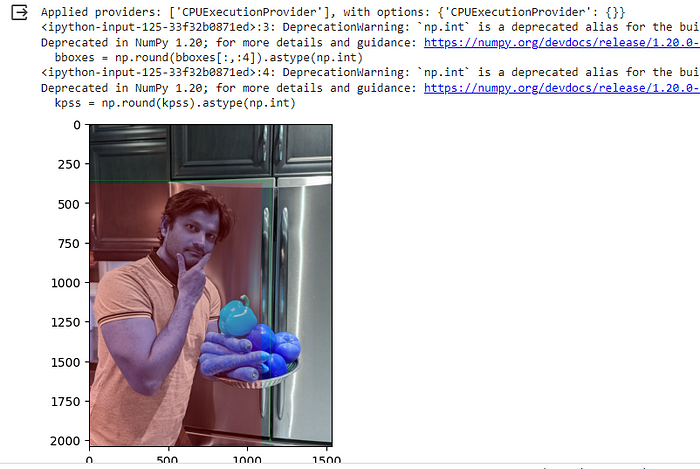
def detect_person(img, detector):
    bboxes, kpss = detector.detect(img)
    bboxes = np.round(bboxes[:,:4]).astype(np.int)
    kpss = np.round(kpss).astype(np.int)
    kpss[:,:,0] = np.clip(kpss[:,:,0], 0, img.shape[1])
    kpss[:,:,1] = np.clip(kpss[:,:,1], 0, img.shape[0])
    vbboxes = bboxes.copy()
    vbboxes[:,0] = kpss[:, 0, 0]
    vbboxes[:,1] = kpss[:, 0, 1]
    vbboxes[:,2] = kpss[:, 4, 0]
    vbboxes[:,3] = kpss[:, 4, 1]
    return bboxes, vbboxes
#@title Detect if there is person in the image
import glob
import matplotlib.pyplot as plt
detector = insightface.model_zoo.get_model('scrfd_person_2.5g.onnx', download=True)
detector.prepare(0, nms_thresh=0.5, input_size=(640, 640))
img_paths = glob.glob('sample_data/pics/vishal/*.jpg')
for img_path in img_paths:
img = cv2.imread(img_path)
bboxes, vbboxes = detect_person(img, detector)
for i in range(bboxes.shape[0]):
bbox = bboxes[i]
vbbox = vbboxes[i]
x1,y1,x2,y2 = bbox
vx1,vy1,vx2,vy2 = vbbox
cv2.rectangle(img, (x1,y1) , (x2,y2) , (0,255,0) , 1)
alpha = 0.8
color = (255, 0, 0)
for c in range(3):
img[vy1:vy2,vx1:vx2,c] = img[vy1:vy2, vx1:vx2, c]*alpha + color[c]*(1.0-alpha)
cv2.circle(img, (vx1,vy1) , 1, color , 2)
cv2.circle(img, (vx1,vy2) , 1, color , 2)
cv2.circle(img, (vx2,vy1) , 1, color , 2)
cv2.circle(img, (vx2,vy2) , 1, color , 2)
filename = img_path.split('/')[-1]
plt.imshow(img)
img它首先导入必要的库并获取一个人物检测模型(scrfd_person_2.5g.onnx)实例。然后,代码准备检测器,指定GPU设备(0)、非最大抑制阈值(0.5)和输入图像大小(640x640)。使用glob获取图像路径,对于每张图像,代码调用detect_person函数以获取边界框(bboxes)和可见边界框(vbboxes)。然后,通过在检测到的人物周围绘制矩形并添加颜色突出显示来在图像上可视化边界框。最后,使用Matplotlib显示修改后的图像。此代码对于快速评估一组图像中是否存在人物以及可视化检测结果非常有用。
结果如下,它能够识别出照片中有一个人。
你可以在此处尝试现场演示。链接:
https://huggingface.co/spaces/hysts/insightface-person-detection
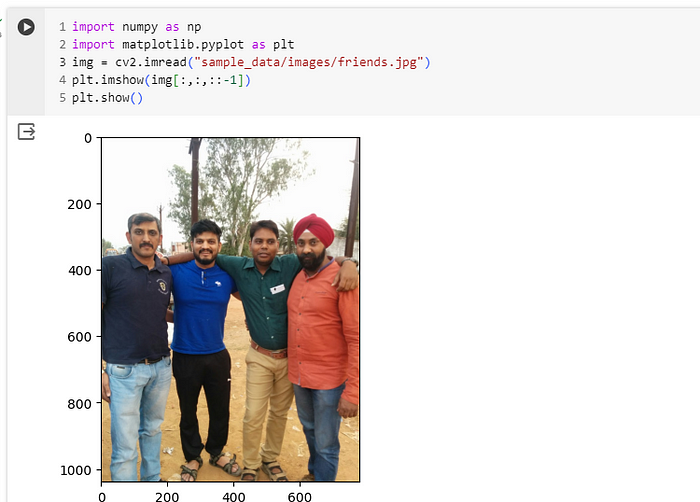
#@title annotate multiple faces
#@markdown upload a file named firends.jpg in the folder sample_data/images/
import cv2
import numpy as np
from insightface.app import FaceAnalysis
from google.colab.patches import cv2_imshow
def annotate_faces(input_img, app):
    # Perform face analysis on the input image
    faces = app.get(input_img)
# Draw rectangles around detected faces
annotated_img = input_img.copy()
for face in faces:
bbox = face.bbox.astype(int)
cv2.rectangle(annotated_img, (bbox[0], bbox[1]), (bbox[2], bbox[3]), (0, 255, 0), 2)
# Display or save the annotated image
cv2_imshow(annotated_img)
cv2.waitKey(0)
cv2.destroyAllWindows()
# Assuming 'input_img_path' is the path to the input image
input_img = cv2.imread("sample_data/images/friends.jpg")
# Call the annotate_faces function
annotate_faces(input_img, app)annotate_faces函数接受一个输入图像和一个InsightFace应用实例(app)。它对输入图像进行人脸分析,使用app.get方法检测人脸,然后使用OpenCV在每个检测到的人脸周围绘制矩形。使用cv2_imshow函数显示带注释的图像。在这个特定示例中,假设有一个名为‘friends.jpg’的图像文件位于‘sample_data/images/’文件夹中。可以相应地调整实际的图像路径。此代码提供了指定图像中检测到的人脸的可视化表示。
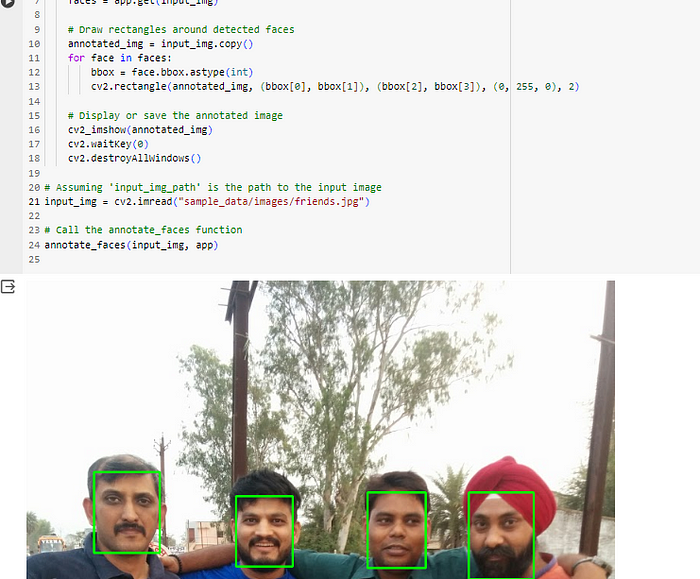
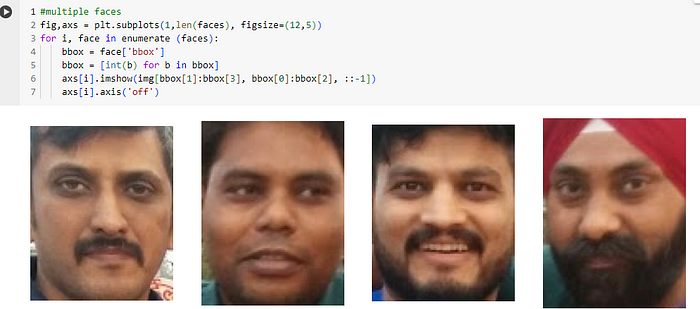
最后的代码创建了一个单行的子图,列数等于检测到的人脸数量(len(faces))。对于每张人脸,它提取边界框坐标(bbox)并将其转换为整数。然后使用Matplotlib将每张人脸显示为一个单独的子图,其中面部区域是根据边界框坐标从原始图像(img)中提取的。::1用于在图像索引中反转颜色通道的顺序,从BGR到RGB。子图水平排列,每个子图关闭坐标轴以获得更清晰的可视化。此代码使用Matplotlib提供了指定图像中每个检测到的人脸的可视化表示。
· END ·
HAPPY LIFE

本文仅供学习交流使用,如有侵权请联系作者删除


 1万+
1万+

 被折叠的 条评论
为什么被折叠?
被折叠的 条评论
为什么被折叠?
 到【灌水乐园】发言


