textview
android中的颜色格式有RGB、ARGB、RRGGBB、AARRGGBB,前面必须加#号
在values下定义颜色。
<?xml version="1.0" encoding="utf-8"?>
<resources>
    <color name="red">#fff</color>
</resources>
两种定义颜色的方法
1.textView.setTextColor(Color.argb(0xff,0xff,0x00,0x00));
 2. getResources().getColor(R.color.red);
"*********************************************"
在java文件中直接使用text.setTextSize(50);设置的为像素。
设置文本的内容样式:
    android:autoLink="";
    如果在代码中设置
    text.setAutoLinkMask();
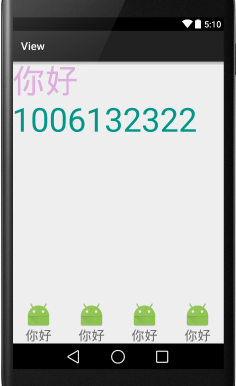
文本填充必须在其语句的后面 <RelativeLayout xmlns:android="http://schemas.android.com/apk/res/android"
xmlns:tools="http://schemas.android.com/tools"
android:layout_width="match_parent"
android:layout_height="match_parent">
<TextView
android:id="@+id/textview"
android:layout_width="wrap_content"
android:layout_height="wrap_content"
android:textSize="@dimen/sp"
<!--可以直接以电话形式打出-->
android:text="你好1006122322"
android:textColor="#fdad"
android:autoLink="phone"
/>
<LinearLayout
android:layout_width="match_parent"
android:layout_height="wrap_content"
android:orientation="horizontal"
android:layout_alignParentBottom="true">
<TextView
android:layout_width="0dp"
android:layout_weight="1"
android:layout_height="wrap_content"
android:drawableTop="@mipmap/ic_launcher"
android:textSize="24sp"
android:text="你好"
android:gravity="center_horizontal"/>
<TextView
android:layout_width="0dp"
android:layout_weight="1"
android:layout_height="wrap_content"
android:drawableTop="@mipmap/ic_launcher"
android:textSize="24sp"
<!--设置文本的居中方式-->
android:gravity="center_horizontal"
android:text="你好"/>
<TextView
android:layout_width="0dp"
android:layout_weight="1"
android:layout_height="wrap_content"
android:drawableTop="@mipmap/ic_launcher"
android:gravity="center_horizontal"
android:textSize="24sp"
android:text="你好"/>
<TextView
android:layout_width="0dp"
android:layout_weight="1"
android:layout_height="wrap_content"
<!--在文本上添加图片-->
android:drawableTop="@mipmap/ic_launcher"
android:gravity="center_horizontal"
android:textSize="24sp"
android:text="你好"/>
</LinearLayout>
</RelativeLayout>
富文本CharSequence
CharSequence可以支持一部分的html格式
  textView = (TextView) findViewById(R.id.textView);
  "*****************************************************"
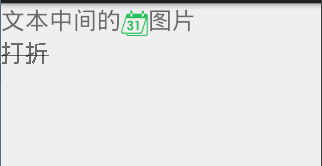
      Spanned spanned1= Html.fromHtml("文本中间的<img src = 'a_calendar'>图片 ", new Html.ImageGetter() {
            @Override
            public Drawable getDrawable(String source) {
                int id = R.mipmap.ic_launcher;
                Class clazz = R.mipmap.class;
                try {
                    Field field=clazz.getDeclaredField(source);
                    id=field.getInt(clazz);
                } catch (NoSuchFieldException e) {
                    e.printStackTrace();
                } catch (IllegalAccessException e) {
                    e.printStackTrace();
                }
                Drawable drawable = getResources().getDrawable(id);
                drawable.setBounds(0,0,drawable.getIntrinsicWidth(),drawable.getIntrinsicHeight());
                return drawable;
            }
        },null);
        textView.setText(spanned1);
中划线
        textView2 = (TextView) findViewById(R.id.textView2);
        textView2.setPaintFlags(Paint.STRIKE_THRU_TEXT_FLAG);
跑马灯的效果
    android:ellipsize="end"//在结尾处省略
    android:lines="1"//使用时必须对行数进行限制

    "******滚动********"
    android:sigleline
    android:ellipsize="marquee"//必须设置文字的滚动次数
    android:marqueeRepeatLimit=""
    android:focusable=""
    android:focusableInTouchMode=""
输入框
hint
hintTextColor
password
inputType
digits
//设置密码是否可见,当在布局文件中设置了 android:password="true"后。在代码中如下设置是密码可见
     editText.setTransformationMethod(null);
    //设置密码是否可见,当在布局文件中未设置 android:password="true"时。在代码中如下设置是密码不可见
                    editText.setTransformationMethod(new PasswordTransformationMethod());
digits
限制输入的内容
android:digits="1234567890xX"9patch
上左代表拉伸的区域
下右代表内容的填写区域
button
     <Button
        android:layout_width="match_parent"
        android:layout_height="wrap_content"
        android:layout_below="@+id/linearLayout"
        android:text="密码可见"
        android:background="@drawable/btn_background"
        android:id="@+id/button"
         />
 "**************************************************"
 Drawable->new Drawable Resource File->填入
 <?xml version="1.0" encoding="utf-8"?>
<selector xmlns:android="http://schemas.android.com/apk/res/android">
<item android:drawable="@mipmap/sd" android:state_pressed="true"/>
    <!--没有加状态的放在后面-->
<item android:drawable="@mipmap/beijing1"/>
</selector>
RadioButton
    <?xml version="1.0" encoding="utf-8"?>
<LinearLayout xmlns:android="http://schemas.android.com/apk/res/android"
    android:layout_width="match_parent"
    android:layout_height="match_parent"
    android:orientation="vertical">

    <LinearLayout
        android:layout_width="match_parent"
        android:layout_height="wrap_content"
        android:orientation="horizontal">
        <TextView
            android:layout_width="wrap_content"
            android:layout_height="wrap_content"
            android:textSize="24sp"
            android:text="按钮选择"/>
        <RadioGroup
            android:layout_width="wrap_content"
            android:layout_height="wrap_content"
            android:checkedButton="@id/w"
            android:orientation="horizontal">
            <RadioButton
                android:id="@+id/w"
                android:layout_width="wrap_content"
                android:layout_height="wrap_content"
                android:button="@null"
                android:text="男"/>
            <RadioButton
                android:layout_width="wrap_content"
                android:layout_height="wrap_content"
                android:text="女"/>
        </RadioGroup>

    </LinearLayout>
</LinearLayout>
<!--android:button="@null"-->特别注意该行,可以清除radioButton原有的背景图片设置自己的背景图片
"设置选择状态时,先得到madioGroup对象,对象.setOnCheckedChangeListener(
new Ridio.onCheckedChangeListener),然后实现未实现的方法,用id获取到ridiobutton的id。"CheckButton
    1.在drawable中创建文件checkbox_selector.xml:


<?xml version="1.0" encoding="utf-8"?>
<selector xmlns:android="http://schemas.android.com/apk/res/android">
    <item android:state_checked="true"
        android:drawable="@drawable/checkbox_ok" /><!--设置选中图片-->
    <item android:state_checked="false"
        android:drawable="@drawable/checkbox_empty" /><!--设置未选中图片-->
</selector>

2. 在values中创建styles.xml:


<?xml version="1.0" encoding="utf-8"?>

<resources>

    <style name="MyCheckBox" parent="@android:style/Widget.CompoundButton.CheckBox">

     <item name="android:button">@drawable/checkbox_selector</item>

     <item name="android:paddingLeft">25.0dip</item>

     <item name="android:maxHeight">10.0dip</item>

    </style>

</resources>

3. 在你的CheckBox中添加属性:


<CheckBox
        android:id="@+id/check"
        android:layout_width="20dp"
        android:layout_height="20dp"
        android:layout_marginLeft="5dp"
        style="@style/MyCheckBox"
        />

搞定!这样就把你的checkbox换成你设置的那两张图片了
"********************************************************"
mCheckBoxIsShowPasswodr.setOnCheckedChangeListener(new OnCheckedChangeListener() {

            @Override
            public void onCheckedChanged(CompoundButton buttonView, boolean isChecked) {
                if(isChecked){
                    passwordEdit.setTransformationMethod(null);
                }else{
                    passwordEdit.setTransformationMethod(new PasswordTransformationMethod());
                }

            }
        });
"******************************************************"
checkBox.isCheck();返回boolean类型的值判断是否被选中
ImageView(ImageButton)
src不会被拉伸
    android:id=""
    android:layout_width=""
    android
    android:layout_heiht=""
    android:src=""
"**********************scaleType**************************"
<ScrollView >只允许有一个子控件。
 <ImageView
            android:layout_width="match_parent"
            android:layout_height="wrap_content"
            android:src="@drawable/tu"
            //选择放大方式,可以改变图片的显示
            android:scaleType="matrix"/>
            matrix  0
fitXY   填满x,y区域
fitStart    从左边开始填充图片
fitCenter   在中间填充图片
fitEnd  在右边填充图片
center  5
centerCrop  先填充横向,竖向的图片会缺失
centerInside    不怎么改变图片
int code
 @TargetApi(Build.VERSION_CODES.JELLY_BEAN)
    @Override
    public void onClick(View v) {
        int code = Build.VERSION.SDK_INT;
        switch (v.getId()){
            case R.id.add_alpha:
                apa+=5;
                if(code >16){
                    mImageTu.setAlpha(apa);
                }else {
                    mImageTu.setImageAlpha(apa);
                }
                break;
            case R.id.sub_alpha:
                apa+=5;
                if(code >16){
                    mImageTu.setAlpha(apa);
                }else {
                    mImageTu.setImageAlpha(apa);
                }
                break;
            default:
                break;
        }
    }
随时修改图片
版本控制
 version = Integer.valueOf(android.os.Build.VERSION.SDK);
或者
int code = android.os.Builder.Version.SDK_INT;获得版本号
添加一条竖线
<View
    android:layout_width="1dip"
    android:layout_height="fill_parent"
    android:background="#EEEFFF"
    android:layout_gravity="center_horizontal"
    />


 3453
3453

 被折叠的 条评论
为什么被折叠?


