


1:基础概念
1.1:渲染管线
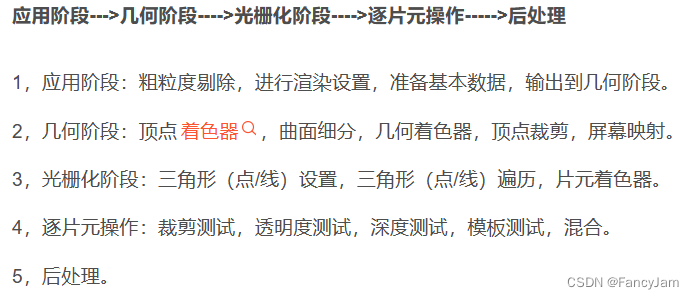
具体详细内容还要是看一下的,下面给出链接【_Humex_FiDOo的博客-CSDN博客】。
1.2:为什么要用Gpu Instance?
性能优化!目的就是降低DrawCall,什么是DrawCall,渲染管线中分为几个阶段,其中只有第一阶段是由cpu完成,剩下的都是Gpu去做,但是cpu和Gpu之间的数据传输速度比Cpu,Gpu内部传输要慢很多。
一次交互为一个DrawCall,我们要做的就是减少数据交互次数。数据量其实可以不太重要,因为大部分时间都是Cpu在准备数据。
1.3:什么是Gpu Instance?
大概就是将一些数据或信息(比如位置,缩放,旋转)等,转化为像素点float4(x,y,z,w),最终变为一张texture2D图的过程,将此图传入shader后就可以一次性渲染多个物体,大概就是1*10变为10*1的过程,具体GPU 实例化 - Unity 手册。
2.实现流程
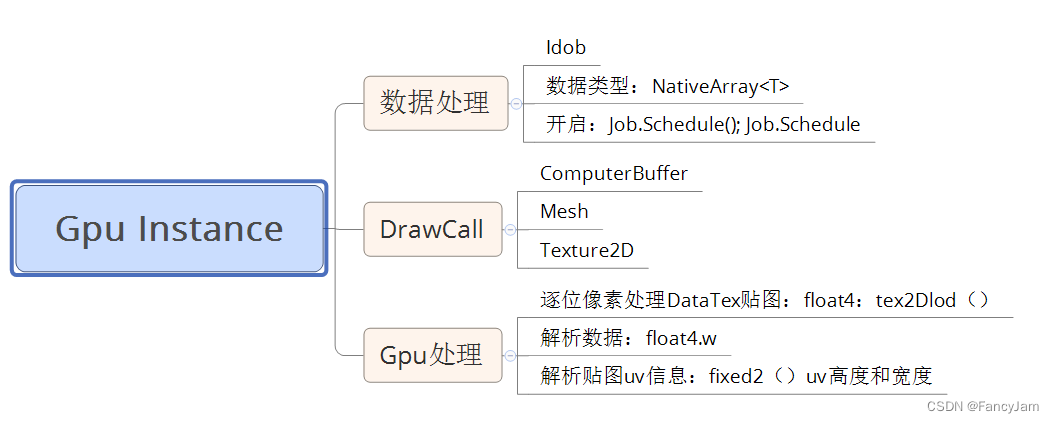
大概就是配合Job系统进行处理,Job系统不懂。关于Unity Dots 1.0版本的学习研究(二)之JobSystem - 知乎 (zhihu.com)。
简单shader语句也得懂一些,比如顶点和片元,如果不懂先收藏,继续补一下其他知识。
3.开始实现
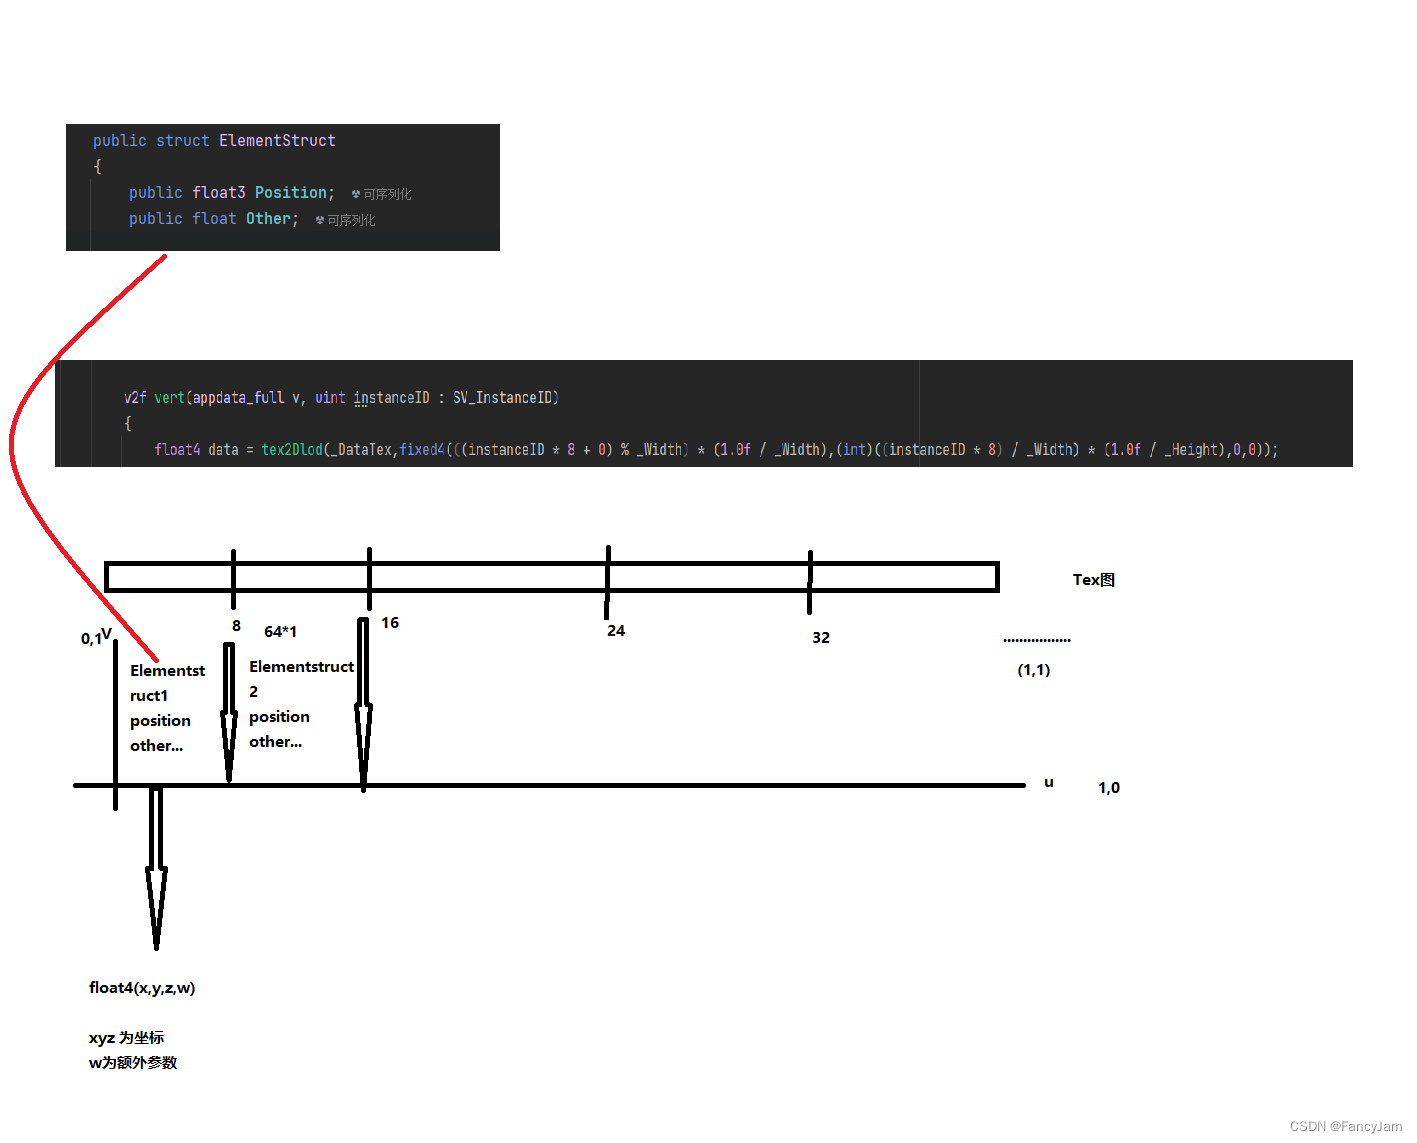
1.首先定义数据结构,就是Gpu负责解析读取的数据。
  /// <summary>
    /// GPu数据结构
    /// </summary>
    public struct GpuData
    {
        public float3 Position;
        public float Other;
        public float Element1;
        public float Element2;
        public float Element3;
    }
2.其次定义数据处理以及数据初始化,这次要利用Job系统,大概就是随机位置吧,other就是额外信息比如贴图uv,缩放等等
//数据处理
    public struct PointJob : IJob
    {
        public NativeArray<GpuData> data;
        public NativeArray<Random> _Randoms;
        public int Width;
        public int Height;
       // public Unity.Mathematics.Random _random;
       private Random _random;
        //xyzw

        public void Execute()
        {
            _random = _Randoms[0];
            for (int i = 0; i < data.Length; i++)
            {
                GpuData temp = new GpuData()
                {
                    Position = new float3(_random.NextFloat(-10000, 10000), _random.NextFloat(-10000, 10000), 0),
                    Other = 150055
                };
                data[i] = temp;
            }
        }
    }
3. 创建mesh,mesh就是材质展示的实体。
'''
 //创建Mesh
            Mesh = new Mesh();
            CreateMeshData(Mesh);
'''
 /// <summary>
        /// 创建Mesh
        /// </summary>
        /// <param name="mesh"></param>
        private void CreateMeshData(Mesh mesh)
        {
            var vertices = new Vector3[5];
            int[] tris = { 0, 1, 2, 2, 1, 3 };

            Vector2[] newUVs = new Vector2[vertices.Length];
            newUVs[0] = new Vector2(0, 0);
            newUVs[1] = new Vector2(0, 1);
            newUVs[2] = new Vector2(1, 0);
            newUVs[3] = new Vector2(1, 1);

            vertices[0] = new Vector2(-0.5f, -0.5f);
            vertices[1] = new Vector2(-0.5f, 0.5f);
            vertices[2] = new Vector2(0.5f, -0.5f);
            vertices[3] = new Vector2(0.5f, 0.5f);


            mesh.vertices = vertices;
            mesh.triangles = tris;
            mesh.uv = newUVs;
        }
4.将数据转化为2D贴图,像素点颜色就是数据信息。

'''
 pixelData = new NativeArray<GpuData>(TexWidth * TexWidth, Allocator.Persistent);
m_Random = new NativeArray<Unity.Mathematics.Random>(1,Allocator.Persistent);
m_Random[0] = Unity.Mathematics.Random.CreateFromIndex((uint)Random.Range(0, uint.MaxValue));

 dateTex = new Texture2D(TexWidth, TexWidth, TextureFormat.RGBAFloat, false, false);
 dateTex.filterMode = FilterMode.Point;

'''

            PointJob job1 = new PointJob()
            {
                data = pixelData,
                Width = TexWidth,
                Height = TexWidth,
                _Randoms = m_Random
            };
            var handler = job1.Schedule();
            handler.Complete();
5.计算数据ComputerBuffer,大概就是绘制Mesh以及绘制场景的核心步骤,一般流程写法都不会变。
'''
   public int PointNum = 1000000;
        private ComputeBuffer itemArgsBuffer;
        private uint[] itemArgs = new uint[5] { 0, 0, 0, 0, 0 };
        private int m_ItmeSubMeshIndex = 0;
        public int TexWidth;
        private int itmeSubMeshIndex = 0;
        private Bounds m_Bounds = new Bounds(Vector3.zero, new Vector3(10000.0f, 10000.0f, 0));

'''

void TextureInit()
        {
            //NativeArray<GpuData>.Copy(pos, pixelData, Mathf.Min(pos.Length, TexWidth * TexWidth));
            dateTex.SetPixelData(pixelData, 0, 0);
            dateTex.Apply();
            //itmeSubMeshIndex
            itmeSubMeshIndex = Mathf.Clamp(itmeSubMeshIndex, 0, Mesh.subMeshCount - 1);
            //获取给定 sub-mesh 的索引计数。
            itemArgs[0] = (uint)Mesh.GetIndexCount(itmeSubMeshIndex);
            //顶点数量
            itemArgs[1] = (uint)PointNum;
            //对于给定 /sub-mesh/,获取网格索引缓冲区中的起始索引位置。
            itemArgs[2] = (uint)Mesh.GetIndexStart(itmeSubMeshIndex);
            //获取给定 sub-mesh 的基顶点索引。
            itemArgs[3] = (uint)Mesh.GetBaseVertex(itmeSubMeshIndex);

            itemArgsBuffer.SetData(itemArgs);
            Graphics.DrawMeshInstancedIndirect(Mesh, itmeSubMeshIndex, Material, m_Bounds, itemArgsBuffer, 0);
        }
6.shader 相关。
v2f vert(appdata_full v, uint instanceID : SV_InstanceID)
				{
					int wideh=1;
					float4 data = tex2Dlod(_DataTex,fixed4(((instanceID * wideh + 0) % _Width) * (1.0f / _Width),(int)((instanceID *wideh ) / _Width) * (1.0f / _Height),0,0));

					//xyzw
					int uvId = data.w / 10000;
					v2f o;
					o.pos = mul(UNITY_MATRIX_VP, fixed4(worldPosition, 1.0f));
						float4 uvData = tex2Dlod(_Tex0Uv, fixed4(14 / _Tex0Num, 0,0,0));
						o.uv_MainTex = v.texcoord.xy * fixed2(uvData.z,uvData.w) + float2(uvData.x, uvData.y);
					}

					o.index = textureIndex;
					return o;
				}
大概意思就是一个数据占Texture_0-8像素(8*1),一个像素是一个float4数据(一个数据结构最多为4*8=32个数据),如果默认只要第一个数据比如图中的那个(pos+other ),就会定义在(id=0*8+0)第一个像素点float4,读取4个数据。
uv 一个像素的float4,xy为左下坐标,zw为右上坐标,解析id对应像素id/64。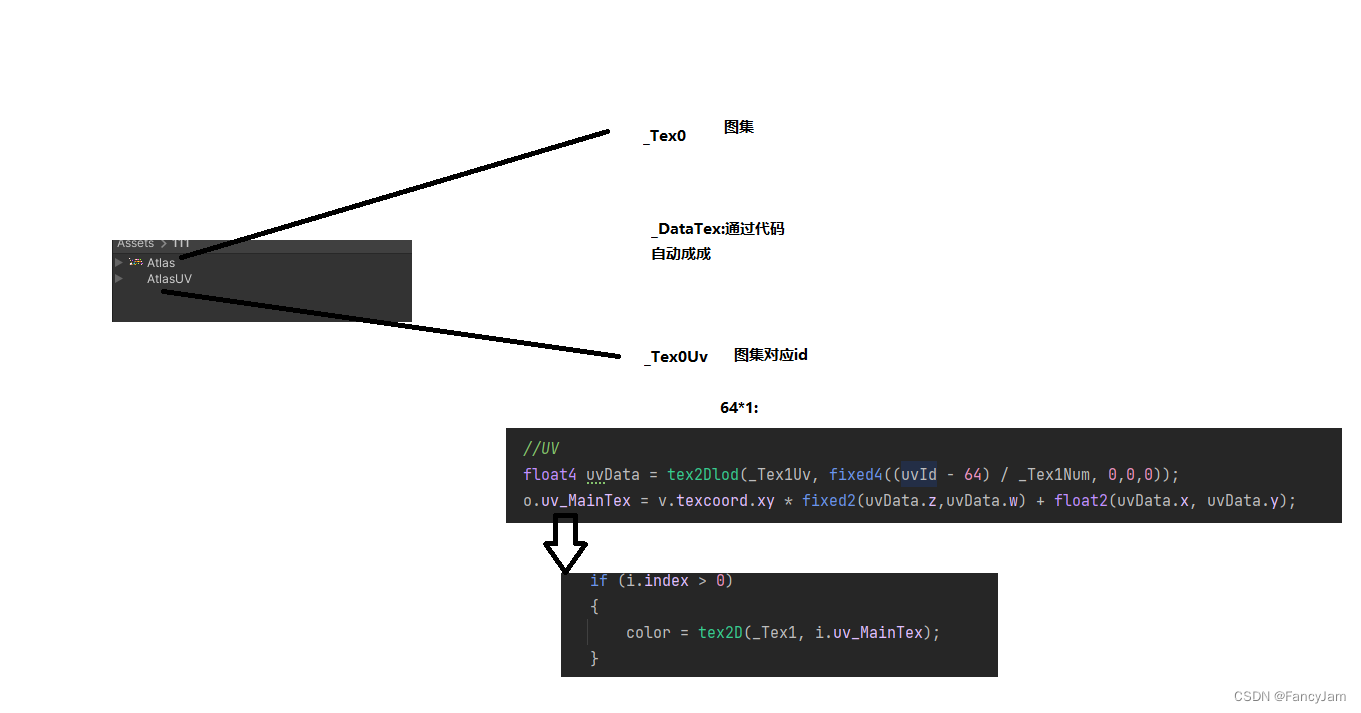
7.结果

4.总结
其实项目很简单,应用场景很广泛,比如 草地渲染,树木渲染,等等需要很多类似的大量渲染时非常有效。


 572
572


 被折叠的 条评论
为什么被折叠?
被折叠的 条评论
为什么被折叠?
 到【灌水乐园】发言


