


FastChat 是一个开放平台,用于训练、服务和评估基于大型语言模型的聊天机器人。核心功能包括:
- 最先进模型(例如,Vicuna)的权重、训练代码和评估代码。
- 具有 Web UI 和 OpenAI 兼容 RESTful API 的分布式多模型服务系统。
Fastchat项目持续更新中,后续还未跟进,有兴趣请参看项目地址
项目地址:GitHub - lm-sys/FastChat: An open platform for training, serving, and evaluating large language models. Release repo for Vicuna and FastChat-T5.
体验地址:https://chat.lmsys.org/
下载文件:(可以网络下载,也可以下载到本地)
fastchat
transformers
Vicuna-v1.1匹配transformers>=4.28.0 ,fschat >= 0.2.0.
LLaMA-7B OriginalModelWeights
这是MetaAI官方放出的LLaMA模型中7B规模的参数
原申请地址:https://forms.gle/jk851eBVbX1m5TAv5
github:https://github.com/facebookresearch/llama
LLaMA-7B OriginalModelWeights - 飞桨AI Studio(用的这个)
vicuna-7b-delta-v1.1(小羊驼)
https://huggingface.co/lmsys/vicuna-7b-delta-v1.1/tree/main
下载转换后的模型(vicuna-7b-v1.1、vicuna-13b-v1.1)
7b-v1.1: 小羊驼模型7b-v1.1 (访问码:aj2u)(用的这个)
13b-v1.1:小羊驼模型13b-v1.1 (访问码:p3nk)
下载转换后的模型(vicuna-7b-v1.3)
请注意:下载保存后要修改名称,去掉特殊符号【.】
环境:Ubuntu18.04+torch1.13.1+cuda11.6+python3.9
8核CPU,系统RAM32G
时间:2023年7月
使用毕昇平台请注意:
CPU 32GRAM
vGPU 1个-8G显存
单卡V100套餐(CPU 8核、内存32G、V100 1个-32G显存)
下载到本地后压缩成zip文件格式,在数据管理中上传,上传时注意停留在当前页面,关闭单机,选择编辑,添加数据,重新启动。添加后的数据位置/data/user,安装pip install unzip,解压zip文件。
一、环境搭建:
创建虚拟环境fastchat,系统已经装有anaconda,输入conda命令
#创建fastchat虚拟环境,安装python3.9
conda create -n fastchat python=3.9   #  官网要求Python版本要>= 3.8
重新打开一个终端,激活fastchat环境
conda activate fastchat
环境创建好了,我们可以开始安装依赖包、软件FastChat使用的pytorch框架,建议安装pytorch
可以使用conda和pip,conda有时候会找不到包,这里使用pip
# 方法1
# 使用这个命令安装torch1.131,cuda11.6,torchvision0.14,试了下,下载大概十几个小时,我用了方法2
pip install torch==1.13.1+cu116 torchvision==0.14.1+cu116 torchaudio==0.13.1 --extra-index-url https://download.pytorch.org/whl/cu116
# 方法2
安装cuda11.6
pip install torch==1.13.1 torchvision==0.14.1 torchaudio==0.13.1
安装cuda11.6切换
pip install torch==1.13.1 torchvision==0.14.1 torchaudio==0.13.1
二、将llama模型转换为HF格式
创建文件夹transformer_model_7b存放转换后的LLaMA,进到convert_llama_weights_to_hf.py同级目录
# 创建文件夹LLaMA
mkdir LLaMA

# 创建文件夹transformer_model_7b
mkdir transformer_model_7b

# 进入transformers目录transformers/main/src/transformers/models/llama/
cd /root/transformers/main/src/transformers/models/llama/

# 使用python运行convert_llama_weights_to_hf.py文件,
# 将/root/LLaMA下llama权重文件转换为HF格式,输出到/root/transformer_model_7b目录
python convert_llama_weights_to_hf.py \
       --input_dir /root/LLaMA \
       --model_size 7B \
       --output_dir /root/transformer_model_7b
执行convert_llama_weights_to_hf.py转换llama
参数:--input_dir指下载LLama的文件夹,包含tokenizer.model文件,请仔细核对
参数:--model_size是指定哪个参数级的模型,7B是70亿参数模型,还有13B/30B/65B的模型
参数:--output_dir是转换后文件的地址,等下还要用来合并权重
三、合并权重,生成FastChat对应的模型Vicuna(更新后的vicuna-7b-v1.3跳过此步)
发布的vicuna-7b-v1.3是合并权重版本,您不需要应用delta
Vicuna基于LLaMA,应在LLaMA的型号许可证下使用
友情提示:这个过程消耗大量CPU内存,保证内存充足!
Vicuna-7B 需要大约30 GB的CPU RAM
Vicuna-13B 需要大约60 GB的CPU RAM
# python执行apply_delta文件
# 将上一步转换好的LLama权重与vicuna-7b-delta-v11权重合并,生成到/root/vicuna-7b
python -m apply_delta \
      --base /root/transformer_model_7b \
      --target /root/vicuna-7b \
--delta /root/vicuna-7b/vicuna-7b-delta-v11参数:--base指定的是上一步,我们转换好的LLaMA 文件路径,
参数:--target是接下来生成的Vicuna文件要存放的位置,稍后启动FastChat要用
参数:--delta是下载好的vicuna-7b模型的地址,本地路径/root/vicuna-7b/vicuna-7b-delta-v11(lmsys/vicuna-7b-delta-v1.1意思是联网下载vicuna-7b-delta-v1.1)
如果内存不够,可以加上--low-cpu-mem,它可以让消耗的内存低于16GB
需要等待几分钟
控制台输出:
python -m apply_delta --base /root/transformer_model_7b --target /root/vicuna-7b-fastchat --delta /root/vicuna-7b/vicuna-7b-delta-v11
Loading the delta weights from /root/vicuna-7b/vicuna-7b-delta-v11
Loading checkpoint shards: 100%|████████████████████████████████████████████████████████████| 2/2 [03:01<00:00, 90.81s/it]
Loading the base model from /root/transformer_model_7b
Loading checkpoint shards: 100%|████████████████████████████████████████████████████████████| 2/2 [02:25<00:00, 72.95s/it]
Applying the delta
Applying delta: 100%|███████████████████████████████████████████████████████████████████| 323/323 [00:29<00:00, 11.00it/s]
Saving the target model to /root/vicuna-7b-fastchat
四、启动FastChat的命令行交互
手动进入FastChat-main/fastchat/serve目录,包含cli.py文件,请注意
# python执行cli文件,开始推理
python3 -m cli --model-path /root/vicuna-7b-v13 --device cpu参数:--model-path 是指上一步生成的模型
参数:--device cpu 是指使用CPU运行
如果有多张显卡,可通过--num-gpus 2来指定多张显卡
官方给出的参考值如下
使用CPU的情况下:Vicuna-7B大概需要30GB内存,Vicuna-13B大概需要60GB内存
使用显卡的情况下:Vicuna-7B大概需要14GB显存,Vicuna-13B大概需要28GB显存
添加--load-8bit试试,内存可能会降低到16G
这个过程CPU拉满,需要等待几分钟,过一会出来几个词
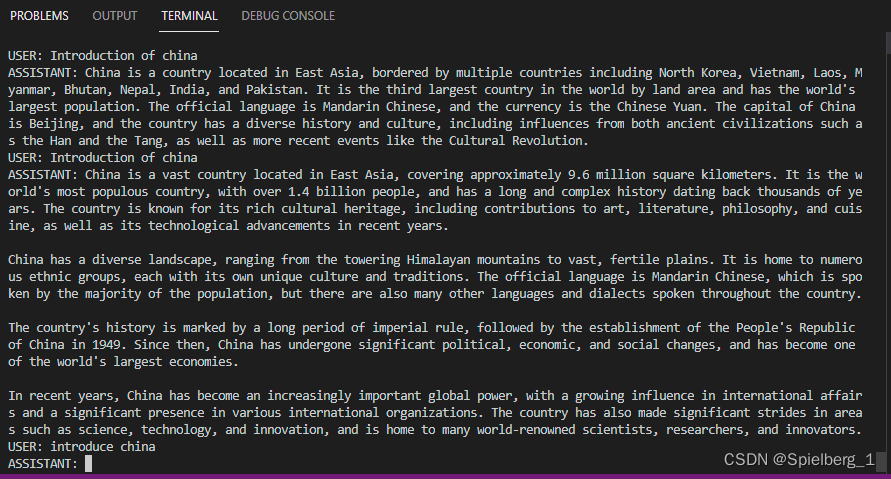
python3 -m fastchat.serve.cli --model-path /root//vicuna-7b-v13 --device cpu
Loading checkpoint shards: 100%|███████████████████████████████████████████████████████████| 2/2 [03:22<00:00, 101.10s/it]
USER: Introduction of china
ASSISTANT: China is a country located in East Asia, bordered by multiple countries including North Korea, Vietnam, Laos, Myanmar, Bhutan, Nepal, India, and Pakistan. It is the third largest country in the world by land area and has the world's largest population. The official language is Mandarin Chinese, and the currency is the Chinese Yuan. The capital of China is Beijing, and the country has a diverse history and culture, including influences from both ancient civilizations such as the Han and the Tang, as well as more recent events like the Cultural Revolution.
USER: Introduction of china
ASSISTANT: China is a vast country located in East Asia, covering approximately 9.6 million square kilometers. It is the world's most populous country, with over 1.4 billion people, and has a long and complex history dating back thousands of years. The country is known for its rich cultural heritage, including contributions to art, literature, philosophy, and cuisine, as well as its technological advancements in recent years.
China has a diverse landscape, ranging from the towering Himalayan mountains to vast, fertile plains. It is home to numerous ethnic groups, each with its own unique culture and traditions. The official language is Mandarin Chinese, which is spoken by the majority of the population, but there are also many other languages and dialects spoken throughout the country.
The country's history is marked by a long period of imperial rule, followed by the establishment of the People's Republic of China in 1949. Since then, China has undergone significant political, economic, and social changes, and has become one of the world's largest economies.
In recent years, China has become an increasingly important global power, with a growing influence in international affairs and a significant presence in various international organizations. The country has also made significant strides in areas such as science, technology, and innovation, and is home to many world-renowned scientists, researchers, and innovators.
总结:LLM模型拥有十亿级别的参数,进行推理要大量的计算,目前仅需32G系统RAM就可以问答聊天,还是让人比较振奋的事情。
后续展望:
尝试使用中文数据集微调,进行中文对话
进一步提高推理速度
遇到的问题:(期待有兴趣的朋友答复)
SSLError: TLS/SSL connection has been closed (EOF) (_ssl.c:1129)(待解决,请多指教)
(3) TypeError: Descriptors cannot not be created directly.
If this call came from a _pb2.py file, your generated code is out of date and must be regenerated with protoc >= 3.19.0.
If you cannot immediately regenerate your protos, some other possible workarounds are:
1. Downgrade the protobuf package to 3.20.x or lower.
2. Set PROTOCOL_BUFFERS_PYTHON_IMPLEMENTATION=python (but this will use pure-Python parsing and will be much slower).
意思是你的代码过期了,要使用一个新版本。要怎么解决?很简单,重新安装新版本
pip3 install --upgrade protobuf #直接安装最新版本提示说protobuf版本2.20.x或者更低,安装了3.20.1,安装你自己的版本就可以啦
# 更新protobuf
pip3 install --upgrade protobuf==3.20.1 # 3.20.1表示指定版本号
'HTTPSConnectionPool(host='huggingface.co', port=443): Max retries exceeded with url: /lmsys/vicuna-7b-delta-v1.1/resolve/main/tokenizer_config.json (Caused by ProxyError('Cannot connect to proxy.', timeout('timed out')))'
requests.exceptions.ProxyError: HTTPSConnectionPool(host='huggingface.co', port=443): Max retries exceeded with url: /lmsys/vicuna-7b-delta-v1.1/resolve/main/tokenizer_config.json (Caused by ProxyError('Cannot connect to proxy.', timeout('timed out')))
意思是访问https://huggingface.co/lmsys/vicuna-7b-delta-v1.1/resolve/main/tokenizer_config.json超过最大次数,访问hugggingface.co下载vicuna-7b-delta-v1.1可能会掉线
怎么解决? 很简单开启魔法或者下载到本地
官网下载地址:https://huggingface.co/lmsys/vicuna-7b-delta-v1.1/tree/main
这里是电信云下载 vicuna-7b-delta-v1.1到本地,
7b-v1.1: 小羊驼模型7b-v1.1 (访问码:aj2u) 用的这个,13G左右
13b-v1.1:小羊驼模型13b-v1.1 (访问码:p3nk)
使用LLama-7b和vicuna-7b-v1.1合并生成的模型,输出乱码(等待更好的方法)

报错:RuntimeError: probability tensor contains either `inf`, `nan` or element < 0
使用LLama-7b和vicuna-7b-v1.3合并生成的模型,依旧输出乱码
单独测试LLama-7b、vicuna-7b-v1.1、vicuna-7b-v1.3,都可以推理出相关的英文
RuntimeError: CUDA out of memory. Tried to allocate 384.00 MiB (GPU 0; 31.75 GiB total capacity; 20.64 GiB already allocated; 265.75 MiB free; 20.75 GiB reserved in total by PyTorch) If reserved memory is >> allocated memory try setting max_split_size_mb to avoid fragmentation. See documentation for Memory Management and PYTORCH_CUDA_ALLOC_CONF
换用v100带有32G显存,推理需要14G显存,明明足够使用,却报错。
查看:nvidia-smi显示GPU上没有进程在进行,显存却被大量占用
原因:可能存在僵尸进程,已经运行完毕或者卡死,但是内存没有释放,处于挂起状态
解决:
方法1: 重启电脑
方法2:如果不能重启电脑,选择方法2
找到GPU上运行的进程
fuser -v /dev/nvidia*使用kill杀死进程,释放资源
kill -9 183 # 杀死183进程stderr [Errno 99] error while attempting to bind on address ('::1', 21001, 0, 0): cannot assign requested address (待解决)
用到的指令
pip3 install --upgrade pip 更新pip
cat /proc/version 查看linux内核版本
lsb_release -a 查看当前Ubuntu系统版本

nvcc -V 查看系统CUDA版本
conda create -n fastchat python=3.9 创建虚拟环境fastchat,安装python3.9
conda info--env 查看当前虚拟环境
conda activate fastchat 切换到fastchat环境
pip install ipykernel ipython 安装ipykernel ipython
ipython kernel install --user --name fastchat 将fastchat虚拟环境添加到jupyter notebook
cd cuda/ 打开进入cuda文件夹
mkdir fastchat 新建fastchat文件夹
ls -a 查看当前目录内容
rm -rf vicuna-7b 删除vicuna-7b文件夹,-f, --force 强制删除,不需要确认
rm -r * 强制删除当前文件夹下所有文件,-r递归地删除子目录中的内容,* 表示匹配当前目录下的所有文件和子文件夹
echo "This is a second line!" >> output.txt 将字符串【This is a second line!】写到output.txt末尾
pip install unzip 安装unzip
unzip file.zip -d /data/user file.zip文件解压到/data/user
mv 原始文件夹名 修改之后的文件夹名字 修改文件夹名称
source ~/.bashrc 环境变量立刻生效
export PATH=$PATH:/usr/local/cuda-11.6/bin 将/usr/local/cuda-11.6/bin添加到环境变量
ln -snf /usr/local/cuda-11.6 /usr/local/cuda 软链接cuda重新链接到cuda-11.6
python3 -m fastchat.model.apply_delta \
--base-model-path /path/to/llama-7b \ [\]续行符,命令太长,一行写不下,分割成两行
pip list 查看安装的包
git clone https://github.com/lm-sys/FastChat.git 克隆FastChat项目源码到当前目录
cd FastChat/ 进入FastChat文件夹
pip install -e 执行当前目录下setup.py文件,安装完成pip list查看
pip list 查看安装的包
pip install -r requirements.txt 下载安装requirements.txt中的依赖包
python -m apply_delta 执行apply_delta.py文件,不用写.py。-m参数增加了python的搜索路径,除了当前路径,再加上了标准库的路径
peft库用于帮助使用LoRA
transformers库用于加载、训练、保存模型
du -sh 查看当前所处的文件夹的整个大小(不包括具体内容,只看当前文件夹大小)
ls -lh 查看当前文件夹中各个文件的大小
ifconfig 查看ip地址
import torch
print(torch.version.cuda) 查看cuda版本
import torch
torch.cuda.is_available() 查看cuda是否安装成功,有gpu返回True,没有gpu返回False
free -h 查看内存使用情况

total:总物理内存大小
used:内存使用量
free:剩余可用内存
lscpu 查看cpu信息概要
top 查看系统cpu使用情况
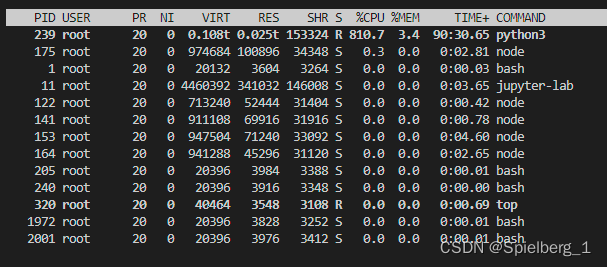
PID 进程id
USER 进程所有者的用户名
PR 优先级
NI nice值,负值表示高优先级,正值表示低优先级
VIRT 进程使用的虚拟内存总量,单位kb,VIRT=SWAP+RES
RES 进程使用的,未被换出的物理内存大小,单位kb,RES=CODE+DATA
SHR 共享内存大小,单位kb
%CPU 上次更新到现在的CPU时间占用百分比
%MEM 进程使用的物理内存百分比
TIME+ 进程使用的CPU时间总计,单位1/100秒
COMMAND 命令名/命令行
top中内存大小和free -h中显示的一样
lspci | grep VGA:这条命令可以列出系统中所有的显卡设备
nvidia-smi -L 列出系统中的每个 NVIDIA GPU 及其 UUID
nvidia-smi 查看GPU使用情况

第一栏的Fan:N/A是风扇转速,从0到100%之间变动,这个速度是计算机期望的风扇转速,实际情况下如果风扇堵转,可能打不到显示的转速。有的设备不会返回转速,因为它不依赖风扇冷却而是通过其他外设保持低温(比如我们实验室的服务器是常年放在空调房间里的)。
第二栏的Temp:是温度,单位摄氏度。
第三栏的Perf:是性能状态,从P0到P12,P0表示最大性能,P12表示状态最小性能。
第四栏下方的Pwr:是能耗,上方的Persistence-M:是持续模式的状态,持续模式虽然耗能大,但是在新的GPU应用启动时,花费的时间更少,这里显示的是off的状态。
第五栏的Bus-Id是涉及GPU总线的东西
第六栏的Disp.A是Display Active,表示GPU的显示是否初始化。
第五第六栏下方的Memory Usage是显存使用率。
第七栏是浮动的GPU利用率。
第八栏上方是关于ECC的东西。
第八栏下方Compute M是计算模式。
判断torch.device是是GPU还是CPU
import torch
device=torch.device('cuda:0')
if device.type != "cpu":
    print("GPU,&&&&")
else:
    print("CPU,&&&&")
参考:
FastChat(小羊驼模型)部署体验_kuokay的博客-CSDN博客
FastChat-Vicuna开放,媲美ChatGPT的90%能力——从下载到安装、部署_ChatGPT_蒋含竹-重庆城市开发者社区
python3 -m 原理分析和实现_小强强-游泳的鱼的博客-CSDN博客
python的虚拟环境图文详解(虚拟环境作用以及虚拟环境搭建,切换,退出,迁移打包)代码演示_python 切换虚拟环境_Rebecca_yanhan的博客-CSDN博客
【Linux】在一台机器上同时安装多个版本的CUDA(切换CUDA版本)_linux安装多个cuda_TangPlusHPC的博客-CSDN博客
在ubuntu上安装多个版本的CUDA,并实现CUDA版本的自由切换_能重命名cuda马_史蒂夫卡的博客-CSDN博客
llama.cpp一种在本地CPU上部署的量化模型(超低配推理llama)_god_Zeo的博客-CSDN博客
LLaMA-7B OriginalModelWeights - 飞桨AI Studio
[大模型] 搭建llama主流大模型训练环境_晨阳2023的博客-CSDN博客
Vicuna 模型学习与实战_桂花很香,旭很美的博客-CSDN博客
centos7系统安装Vicuna(小羊驼)聊天机器人_大哈哥的博客-CSDN博客
九天毕昇深度学习平台常见环境问题及解决最新发布 | Python大全
ubuntu查看内存使用情况_ubuntu查看内存占用情况_眼底流转天上月的博客-CSDN博客
Ubuntu下硬件信息的查看_ubuntu查看硬件信息_星火(star&fire)的博客-CSDN博客
https://blog.csdn.net/weixin_44861214/article/details/114532801
Ubuntu服务器上监控内存、磁盘和cpu使用率shell脚本_shell脚本获取cpu使用率_夜半子时的博客-CSDN博客
Linux-ubuntu系统查看显卡型号、显卡信息详解、显卡天梯图_ubuntu查看显卡型号_TFATS的博客-CSDN博客
Linux(Ubuntu)之top命令_ubuntu安装top_WZ18810463869的博客-CSDN博客
The conversation replied with garbled code · Issue #1269 · lm-sys/FastChat · GitHub
docs/model_support.md · main · mirrors / lm-sys / fastchat · GitCode


 932
932

 被折叠的 条评论
为什么被折叠?
被折叠的 条评论
为什么被折叠?
 到【灌水乐园】发言


