


1.配置环境变量
a.配置java环境变量
虽然现在的JDK版本版本不需要再手动的配置环境变量也能正常运行,但是,为了防止出现未知的错误,还是配置一下吧。
-->“我的电脑”右键->“属性”->“高级”->“环境变量”
1、“新建”->变量名:"JAVA_HOME",
变量值:"C:\Program Files\Java\jdk1.6.0_37"(java jdk安装的文件路径)->“确定”
2、选择path->“编辑”
->在最前面加上"%JAVA_HOME%\bin;%JAVA_HOME%\jre\bin;"->"确定"
3、“新建”->变量名:"CLASSPATH",
变量值:".;%JAVA_HOME%\lib\dt.jar;%JAVA_HOME%\lib\tools.jar"->“确定”
b、 android SDK 环境变量:
1. 新建 变量名:android_home 变量值 C:\android\platform-tools; C:\android\tools;(以本机的android sdk安装路径为准)
2. 编辑变量名Path, 变量值添加:%android_home%;
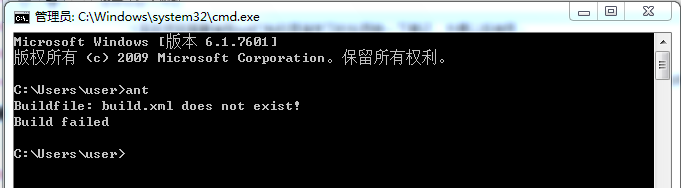
c.配置Ant环境:
我是是在E:\apache-ant-1.8.4目录下,
配置: 新建变量名"ANT_HOME" 变量值"E:\apache-ant-1.8.4" ,然后,在Path中添加 ;%ANT_HOME%/bin;%ANT_HOME%/lib;
配置完成之后,打开Dos窗口,输入命令ant,若如下所示,则配置成功
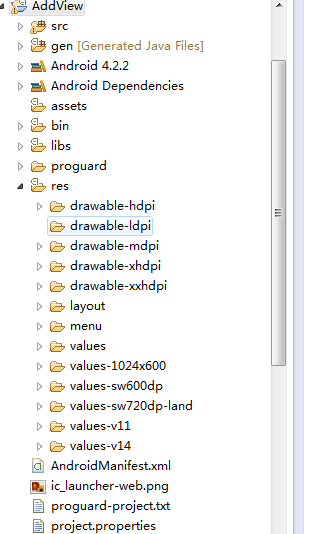
2.创建实例工程,并创建build.xml配置文件
首先,我们建立一个测试工程,目录结构如下,我只是创建了一个简单的工程,什么都没动哦
打开dos命令窗口,使用cd /d path 的命令,到达我们工程的根目录,然后使用 android update project --path . 命令,在当前目录下面创建我们的build.xml文件,我的运行过程如下,大家按照自己的实际情况修改下目录即可,注意不要忘掉后面的 .
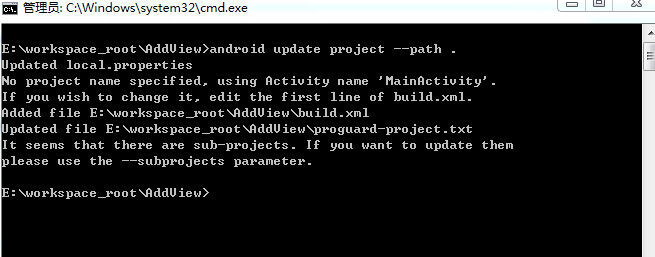
我们的build.xml文件就创建完成了. 生成的文件在工程项目下。
3.创建并修改配置文件
创建完build.xml文件之后,我们首先在AndroidManifest.xml文件中,添加一个数据元,代码如下

后面的name属性根据不同的平台各有差异,我们要做的,就是替代前面的value,并实现打包
修改好之后,我们复制清单文件,然后改名为AndroidManifest.xml.temp,之后修改AndroidManifest.xml.temp文件内容,将数据源换成我们的替换符,如下所示<meta-data android:value="@market@" android:name="UMENG_CHANNEL"/> 在之后的代码中,我们会将@market@替换成我们的渠道名称创建好之后,我们在创建一个名为 的文件,暂时不需要加什么东西。
在这一步结束之后,你的文件结构应该是这样的。

4.创建keystore密钥,并修改相关属性配置文件
如果要发布我们的应用,我们肯定需要一个签名的密钥,首先使用Android Tools创建一个keystore,具体怎么创建我就不详说了创建好之后,保存在一个位置,比如,我的在桌面:C:\Users\user\Desktop\lzjkey Alias是keyzz 密码都是123456
这一些都完成之后,我们需要对配置对配置文件进行修改。
首先,打开我们的build.xml文件,将project属性修改为我们要打包的项目的名字,比如,我们这里就是AddView

修改后,保存。然后打开ant.properties文件,填入以下内容
分别代表keystore保存路径,密码,别名,别名密码,修改后保存
key.store=C:\\Users\\user\\Desktop\\lzjkey
key.store.password=123456
key.alias=keyzz
key.alias.password=123456
到此为止,我们已经完成了Android端的配置信息,下面,我们就要完成Ant自动打包程序的编写了
首先,Ant自动打包程序程序结构如下所示

我们创建一个纯Java工程,然后创建lib文件夹,并加入两个外部导入包。这两个外部导入包,可以在我们ant的解压目录的lib找到,比如我的就在E:\apache-ant-1.8.4\lib下
market.txt是一个纯txt文本,里面写入的是我们要进行替换的字符串,比如,我的里面写的就是

一会,程序将对这里面的字符串进行一行一行的遍历,替换到对应的位置之后,打包完成对应的apk安装包。
6.完成Ant自动打包程序
准备好这一切之后,我们就可以开始Ant打包程序的编写了.
public class AntTest {
	    private Project project;
	    private final static String projectBasePath = "E:\\workspace_root\\AddView";// 要打包的项目根目录
	    private final static String copyApkPath = "E:\\";// 保存打包之后的apk的根目录
	    private final static String signApk = "AddView-release.apk";// 这里的文件名必须是准确的项目名!就是AddView工程的bin目录下面的apk安装包的名字
	    private final static String reNameApk = "Project_";// 重命名之后的项目名称前缀(地图项目不用改)
	    private final static String placeHolder = "@market@";// 需要修改manifest文件的地方(占位符)

	    public static void main(String[] args) {
	    	 long startTime = 0L;
	         long endTime = 0L;
	         long totalTime = 0L;
	         Calendar date = Calendar.getInstance();
	         SimpleDateFormat sdf = new SimpleDateFormat("yyyy-MM-dd:HH:mm:ss");
	         try {
	             System.out.println("---------ant批量自动化打包开始----------");
	             startTime = System.currentTimeMillis();
	             date.setTimeInMillis(startTime);
	             System.out.println("开始时间为:" + sdf.format(date.getTime()));
	             BufferedReader br = new BufferedReader(new FileReader("market.txt"));
	             String flag = null;
	             while ((flag = br.readLine()) != null) {
	                 // 先修改manifest文件:读取临时文件中的@market@修改为市场标识,然后写入manifest.xml中
	                 String tempFilePath = projectBasePath + File.separator
	                         + "AndroidManifest.xml.temp";
	                 String filePath = projectBasePath + File.separator
	                         + "AndroidManifest.xml";
	                 write(filePath, read(tempFilePath, flag.trim()));
	                 // 执行打包命令
	                 AntTest mytest = new AntTest();
	                 mytest.init(projectBasePath + File.separator + "build.xml",
	                         projectBasePath);
	                 mytest.runTarget("clean");
	                 mytest.runTarget("release");
	                 // 打完包后执行重命名加拷贝操作
	                 File file = new File(projectBasePath + File.separator + "bin"
	                         + File.separator + signApk);// bin目录下签名的apk文件

	                 File renameFile = new File(copyApkPath + File.separator
	                         + reNameApk + flag + ".apk");
	                 // 将打包好的apk重命名后移动到copyApkPath位置
	                 boolean renametag = file.renameTo(renameFile);
	                 System.out.println("rename------>" + renametag);
	                 System.out.println("file ------>" + file.getAbsolutePath());
	                 System.out.println("rename------>"
	                         + renameFile.getAbsolutePath());
	             }
	             System.out.println("---------ant批量自动化打包结束----------");
	             endTime = System.currentTimeMillis();
	             date.setTimeInMillis(endTime);
	             System.out.println("结束时间为:" + sdf.format(date.getTime()));
	             totalTime = endTime - startTime;
	             System.out.println("耗费时间为:" + getBeapartDate(totalTime));

	         } catch (Exception e) {
	             e.printStackTrace();
	             System.out.println("---------ant批量自动化打包中发生异常----------");
	             endTime = System.currentTimeMillis();
	             date.setTimeInMillis(endTime);
	             System.out.println("发生异常时间为:" + sdf.format(date.getTime()));
	             totalTime = endTime - startTime;
	             System.out.println("耗费时间为:" + getBeapartDate(totalTime));
	         }
	     }

	     public void init(String _buildFile, String _baseDir) throws Exception {
	         project = new Project();
	         project.init();
	         DefaultLogger consoleLogger = new DefaultLogger();
	         consoleLogger.setErrorPrintStream(System.err);
	         consoleLogger.setOutputPrintStream(System.out);
	         consoleLogger.setMessageOutputLevel(Project.MSG_INFO);
	         project.addBuildListener(consoleLogger);
	         if (_baseDir == null)
	             _baseDir = new String(".");
	         project.setBasedir(_baseDir);
	         if (_buildFile == null)
	             _buildFile = new String(projectBasePath + File.separator
	                     + "build.xml");
	         ProjectHelper.configureProject(project, new File(_buildFile));
	     }

	     public void runTarget(String _target) throws Exception {
	         if (project == null)
	             throw new Exception(
	                     "No target can be launched because the project has not been initialized. Please call the 'init' method first !");
	         if (_target == null)
	             _target = project.getDefaultTarget();
	         project.executeTarget(_target);
	     }

	     /**
	      * 根据所秒数,计算相差的时间并以**时**分**秒返回
	      *
	      * @param d1
	      * @param d2
	      * @return
	      */
	     public static String getBeapartDate(long m) {
	         m = m / 1000;
	         String beapartdate = "";
	         int nDay = (int) m / (24 * 60 * 60);
	         int nHour = (int) (m - nDay * 24 * 60 * 60) / (60 * 60);
	         int nMinute = (int) (m - nDay * 24 * 60 * 60 - nHour * 60 * 60) / 60;
	         int nSecond = (int) m - nDay * 24 * 60 * 60 - nHour * 60 * 60 - nMinute
	                 * 60;
	         beapartdate = nDay + "天" + nHour + "小时" + nMinute + "分" + nSecond + "秒";

	         return beapartdate;
	     }

	     public static String read(String filePath, String replaceStr) {
	         BufferedReader br = null;
	         String line = null;
	         StringBuffer buf = new StringBuffer();

	         try {
	             // 根据文件路径创建缓冲输入流
	             br = new BufferedReader(new FileReader(filePath));
	             // 循环读取文件的每一行, 对需要修改的行进行修改, 放入缓冲对象中
	             while ((line = br.readLine()) != null) {
	                 // 此处根据实际需要修改某些行的内容
	                 if (line.contains(placeHolder)) {
	                     line = line.replace(placeHolder, replaceStr);
	                     buf.append(line);
	                 } else {
	                     buf.append(line);
	                 }
	                 buf.append(System.getProperty("line.separator"));
	             }
	         } catch (Exception e) {
	             e.printStackTrace();
	         } finally {
	             if (br != null) {
	                 try {
	                     br.close();
	                 } catch (IOException e) {
	                     br = null;
	                 }
	             }
	         }

	         return buf.toString();
	     }

	     /**
	      * 将内容回写到文件中
	      *
	      * @param filePath
	      * @param content
	      */
	     public static void write(String filePath, String content) {
	         BufferedWriter bw = null;

	         try {
	             // 根据文件路径创建缓冲输出流
	             bw = new BufferedWriter(new FileWriter(filePath));
	             // 将内容写入文件中
	             bw.write(content);
	         } catch (Exception e) {
	             e.printStackTrace();
	         } finally {
	             // 关闭流
	             if (bw != null) {
	                 try {
	                     bw.close();
	                 } catch (IOException e) {
	                     bw = null;
	                 }
	             }
	         }
	     }

}
这里大家需要修改的位置就是

可能会出错的地方就是signApk这个值,一般来说,我们的工程名是Project的时候,包的名字也应该是Project.apk。但是使用Ant进行打包的时候,后面会添加一个-release 后缀,因此,我们还需要把这里写成AddView-release.apk 如果我们的这个属性设置错误,我们就不能在我们设置的目标位置获取到我们的apk文件。
7.在这之后,我们就可以运行我们的AntTest程序,进行打包了,如果运行结果和我下面的结果差不多,那么恭喜你,打包成功!

10.验证是否替换成功
得到我们的安装包之后,为了验证是否在清单文件中实现了替换,我们可以反编译一下我们的工程,
下面,我们打开清单文件,看看对应的数据元是否改变了

这是个我的代码和反编译工具。


 647
647

 被折叠的 条评论
为什么被折叠?
被折叠的 条评论
为什么被折叠?
 到【灌水乐园】发言


