


一般金融公司用rabbmitMq比较多,但是性能上较rocketMq,kafka要低点
一、helloworld模式
helloworld模式很简单,看我上篇的博客一步一步教你用rabbitMQ------Linux环境安装rabbitMQ及客户端简单使用

以天气预报为例,中心平台为生产者,百度和新浪平台为接收者
常量类:
public class RabbitConstant {
    public static final String QUEUE_HELLOWORLD = "helloworld";
    public static final String QUEUE_SMS = "sms";
    public static final String EXCHANGE_WEATHER = "weather";
    public static final String EXCHANGE_WEATHER_ROUTING = "weather_routing";
    public static final String QUEUE_BAIDU = "baidu";
    public static final String QUEUE_SINA = "sina";
    public static final String EXCHANGE_WEATHER_TOPIC = "weather_topic";
}
工作队列模式


小结
- 在一个队列中如果有多个消费者,那么消费者之间对于同一个消息的关系是竞争的关系
- Work Queues 对于任务过重或任务较多情况使用工作队列可以提高任务处理的速度。例如:短信服务部署多个,只需要有一个节点成功发送即可。
二、发布订阅模式


代码:
生产者:
/**
 * 发布者,发布订阅模式
 */
public class WeatherBureau {
    public static void main(String[] args) throws Exception {
        Connection connection = RabbitUtils.getConnection();
        String input=new Scanner(System.in).next();
        Channel channel = connection.createChannel();

        channel.basicPublish(RabbitConstant.EXCHANGE_WEATHER,"",null, input.getBytes());
        channel.close();
        connection.close();
    }

}
百度天气接收平台:
/**
 * 消费者,发布订阅模式
 */
public class Baidu {
    public static void main(String[] args) throws Exception {
        //获取tcp长连接
        Connection connection = RabbitUtils.getConnection();
        //获取虚拟连接
        final Channel channel = connection.createChannel();
        channel.queueDeclare(RabbitConstant.QUEUE_BAIDU,false,false,false,null);

        //队列绑定交换机,第3个路由key,发布订阅模式用不上
        channel.queueBind(RabbitConstant.QUEUE_BAIDU,RabbitConstant.EXCHANGE_WEATHER,"");
        channel.basicQos(1);
        channel.basicConsume(RabbitConstant.QUEUE_BAIDU , false , new DefaultConsumer(channel){
            @Override
            public void handleDelivery(String consumerTag, Envelope envelope, AMQP.BasicProperties properties, byte[] body) throws IOException {
                System.out.println("新浪天气接收天气信息:" + new String(body));
                channel.basicAck(envelope.getDeliveryTag() , false);
            }
        });
    }
}
新浪天气预报平台
/**
 * 消费者,发布订阅模式
 */
public class Sina {
    public static void main(String[] args) throws Exception {
        //获取tcp长连接
        Connection connection = RabbitUtils.getConnection();
        //获取虚拟连接
        final Channel channel = connection.createChannel();
        channel.queueDeclare(RabbitConstant.QUEUE_SINA,false,false,false,null);

        //队列绑定交换机,第3个路由key,发布订阅模式用不上
        channel.queueBind(RabbitConstant.QUEUE_SINA,RabbitConstant.EXCHANGE_WEATHER,"");
        channel.basicQos(1);
        channel.basicConsume(RabbitConstant.QUEUE_SINA , false , new DefaultConsumer(channel){
            @Override
            public void handleDelivery(String consumerTag, Envelope envelope, AMQP.BasicProperties properties, byte[] body) throws IOException {
                System.out.println("新浪天气接收天气信息:" + new String(body));
                channel.basicAck(envelope.getDeliveryTag() , false);
            }
        });
    }
}
添加个交换机:

fanout为广播模式,这也是发布订阅的精髓
小结
- 交换机需要与队列进行绑定,绑定之后;一个消息可以被多个消费者都收到。
- 发布订阅模式与工作队列模式的区别:
工作队列模式不用定义交换机,而发布/订阅模式需要定义交换机
发布/订阅模式的生产方是面向交换机发送消息,工作队列模式的生产方是面向队列发送消息(底层使用默认交换机)
发布/订阅模式需要设置队列和交换机的绑定,工作队列模式不需要设置,实际上工作队列模式会将队列绑 定到默认的交换机
三、路由模式


代码如下:
/**
 * 发布者,交换机类型为direct为路由模式
 */
public class WeatherBureau {
    public static void main(String[] args) throws Exception {
        Map map=new LinkedHashMap<String,String>();
        map.put("20201126qhd","-11度");
        map.put("20201126sy","-15度");
        map.put("20201126bj","3度");
        map.put("20201126tj","0度");
        map.put("20201126gd","26度");

        Connection connection = RabbitUtils.getConnection();
        Channel channel = connection.createChannel();

        Iterator<Map.Entry<String,String>> iterator = map.entrySet().iterator();

        while (iterator.hasNext()){
            Map.Entry<String,String> me = iterator.next();
            //第2个参数为routering key
            String msg=me.getKey()+":" +me.getValue();
            channel.basicPublish(RabbitConstant.EXCHANGE_WEATHER_ROUTING,me.getKey(),null, msg.getBytes());
        }
        System.out.println("消息发送完毕");
        channel.close();
        connection.close();
    }

}
/**
 * 消费者,路由模式
 */
public class Baidu {
    public static void main(String[] args) throws Exception {

        //获取tcp长连接
        Connection connection = RabbitUtils.getConnection();
        //获取虚拟连接
        final Channel channel = connection.createChannel();
        channel.queueDeclare(RabbitConstant.QUEUE_BAIDU,false,false,false,null);

        //指定队列与交换机的关系。routing key之间的关系
        channel.queueBind(RabbitConstant.QUEUE_BAIDU,RabbitConstant.EXCHANGE_WEATHER_ROUTING,"20201126bj");
        channel.queueBind(RabbitConstant.QUEUE_BAIDU,RabbitConstant.EXCHANGE_WEATHER_ROUTING,"20201126tj");
        channel.queueBind(RabbitConstant.QUEUE_BAIDU,RabbitConstant.EXCHANGE_WEATHER_ROUTING,"20201126gd");
        channel.basicQos(1);
        channel.basicConsume(RabbitConstant.QUEUE_BAIDU , false , new DefaultConsumer(channel){
            @Override
            public void handleDelivery(String consumerTag, Envelope envelope, AMQP.BasicProperties properties, byte[] body) throws IOException {
                System.out.println("百度天气接收天气信息:" + new String(body));
                channel.basicAck(envelope.getDeliveryTag() , false);
            }
        });


    }
}
/**
 * 消费者,路由模式,记住先启动消费者
 */
public class Sina {
    public static void main(String[] args) throws Exception {
        //获取tcp长连接
        Connection connection = RabbitUtils.getConnection();
        //获取虚拟连接
        final Channel channel = connection.createChannel();
        channel.queueDeclare(RabbitConstant.QUEUE_SINA,false,false,false,null);

        //指定队列与交换机的关系。routing key之间的关系
        channel.queueBind(RabbitConstant.QUEUE_SINA,RabbitConstant.EXCHANGE_WEATHER_ROUTING,"20201126qhd");
        channel.queueBind(RabbitConstant.QUEUE_SINA,RabbitConstant.EXCHANGE_WEATHER_ROUTING,"20201126sy");

        channel.basicQos(1);
        channel.basicConsume(RabbitConstant.QUEUE_SINA , false , new DefaultConsumer(channel){
            @Override
            public void handleDelivery(String consumerTag, Envelope envelope, AMQP.BasicProperties properties, byte[] body) throws IOException {
                System.out.println("新浪天气接收天气信息:" + new String(body));
                channel.basicAck(envelope.getDeliveryTag() , false);
            }
        });
    }
}
给大家看看效果:


路由模式是生产者和交换机中间的路由key和交换机与消费者的路由key必须一致。才能收到消息

这里如果指定个不存在的key是不行的,那么我们难道要写很多这种冗余代码吗?通配符模式来了
小结:Routing 模式要求队列在绑定交换机时要指定 routing key,消息会转发到符合 routing key 的队列。
四、通配符模式

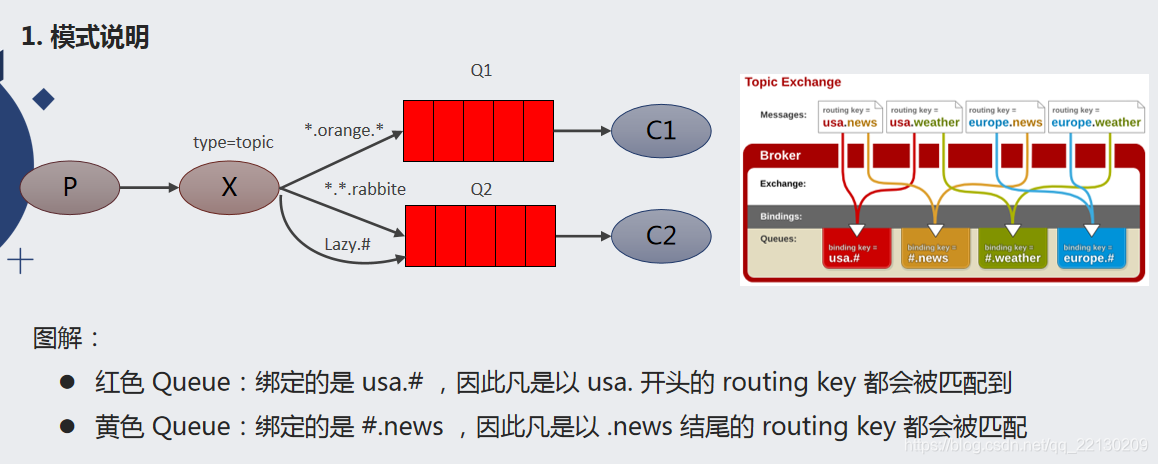
Topic 主题模式可以实现 Pub/Sub 发布与订阅模式和 Routing 路由模式的功能,
只是 Topic 在配置routing key 的时候可以使用通配符,显得更加灵活。

代码如下
/**
 * 发布者,交换机类型为topic,通配符模式
 */
public class WeatherBureau {
    public static void main(String[] args) throws Exception {
        Map map=new LinkedHashMap<String,String>();
        map.put("20201126.qhd","-11度");
        map.put("20201127.sy","-15度");
        map.put("20201128.bj","3度");
        map.put("20201126.tj","0度");
        map.put("20201126.gd","26度");

        Connection connection = RabbitUtils.getConnection();
        Channel channel = connection.createChannel();

        Iterator<Map.Entry<String,String>> iterator = map.entrySet().iterator();

        while (iterator.hasNext()){
            Map.Entry<String,String> me = iterator.next();
            //第2个参数为routering key
            String msg=me.getKey()+":" +me.getValue();
            channel.basicPublish(RabbitConstant.EXCHANGE_WEATHER_TOPIC,me.getKey(),null, msg.getBytes());
        }
        System.out.println("消息发送完毕");
        channel.close();
        connection.close();
    }

}
/**
 * 消费者,通配符模式,记住先启动消费者
 */
public class Sina {
    public static void main(String[] args) throws Exception {
        //获取tcp长连接
        Connection connection = RabbitUtils.getConnection();
        //获取虚拟连接
        final Channel channel = connection.createChannel();
        channel.queueDeclare(RabbitConstant.QUEUE_SINA,false,false,false,null);

        //指定队列与交换机的关系。routing key之间的关系
        channel.queueBind(RabbitConstant.QUEUE_SINA,RabbitConstant.EXCHANGE_WEATHER_TOPIC,"20201127.*");

        channel.basicQos(1);
        channel.basicConsume(RabbitConstant.QUEUE_SINA , false , new DefaultConsumer(channel){
            @Override
            public void handleDelivery(String consumerTag, Envelope envelope, AMQP.BasicProperties properties, byte[] body) throws IOException {
                System.out.println("新浪天气接收天气信息:" + new String(body));
                channel.basicAck(envelope.getDeliveryTag() , false);
            }
        });
    }
}
/**
 * 消费者,通配符模式
 */
public class Baidu {
    public static void main(String[] args) throws Exception {

        //获取tcp长连接
        Connection connection = RabbitUtils.getConnection();
        //获取虚拟连接
        final Channel channel = connection.createChannel();
        channel.queueDeclare(RabbitConstant.QUEUE_BAIDU,false,false,false,null);

        //指定队列与交换机的关系。routing key之间的关系
        channel.queueBind(RabbitConstant.QUEUE_BAIDU,RabbitConstant.EXCHANGE_WEATHER_TOPIC,"20201126."+"*");
        channel.basicQos(1);
        channel.basicConsume(RabbitConstant.QUEUE_BAIDU , false , new DefaultConsumer(channel){
            @Override
            public void handleDelivery(String consumerTag, Envelope envelope, AMQP.BasicProperties properties, byte[] body) throws IOException {
                System.out.println("百度天气接收天气信息:" + new String(body));
                channel.basicAck(envelope.getDeliveryTag() , false);
            }
        });


    }
}


这里的*匹配到符合后面的1个单词,#是匹配符合后的任意
五、与Spring的简单整合
生产者消费者公共rabbitmq配置:
rabbitmq.host=192.168.43.238
rabbitmq.port=5672
rabbitmq.username=admin
rabbitmq.password=123456
rabbitmq.virtual-host=tianz
生产者项目:

<?xml version="1.0" encoding="UTF-8"?>
<beans xmlns="http://www.springframework.org/schema/beans"
       xmlns:xsi="http://www.w3.org/2001/XMLSchema-instance"
       xmlns:context="http://www.springframework.org/schema/context"
       xmlns:rabbit="http://www.springframework.org/schema/rabbit"
       xsi:schemaLocation="http://www.springframework.org/schema/beans
       http://www.springframework.org/schema/beans/spring-beans.xsd
       http://www.springframework.org/schema/context
       https://www.springframework.org/schema/context/spring-context.xsd
       http://www.springframework.org/schema/rabbit
       http://www.springframework.org/schema/rabbit/spring-rabbit.xsd">
    <!--加载配置文件-->
    <context:property-placeholder location="classpath:rabbitmq.properties"/>

    <!-- 定义rabbitmq connectionFactory -->
    <rabbit:connection-factory id="connectionFactory" host="${rabbitmq.host}"
                               port="${rabbitmq.port}"
                               username="${rabbitmq.username}"
                               password="${rabbitmq.password}"
                               virtual-host="${rabbitmq.virtual-host}"/>
    <!--定义管理交换机、队列-->
    <rabbit:admin connection-factory="connectionFactory"/>

    <!--定义持久化队列,不存在则自动创建;不绑定到交换机则绑定到默认交换机
    默认交换机类型为direct,名字为:"",路由键为队列的名称
    -->
    <!--
        id:bean的名称
        name:queue的名称
        auto-declare:自动创建
        auto-delete:自动删除。 最后一个消费者和该队列断开连接后,自动删除队列
        durable:是否持久化
    -->

    <rabbit:queue id="spring_queue" name="spring_queue"    auto-declare="true"/>

    <!-- ~~~~~~~~~~~~~~~~~~~~~~~~~~~~广播;所有队列都能收到消息~~~~~~~~~~~~~~~~~~~~~~~~~~~~ -->
    <!--定义广播交换机中的持久化队列,不存在则自动创建-->
    <rabbit:queue id="spring_fanout_queue_1" name="spring_fanout_queue_1" auto-declare="true"/>

    <!--定义广播交换机中的持久化队列,不存在则自动创建-->
    <rabbit:queue id="spring_fanout_queue_2" name="spring_fanout_queue_2" auto-declare="true"/>

    <!--定义广播类型交换机;并绑定上述两个队列-->
    <rabbit:fanout-exchange id="spring_fanout_exchange" name="spring_fanout_exchange"  auto-declare="true">
        <rabbit:bindings>
            <rabbit:binding  queue="spring_fanout_queue_1"  />
            <rabbit:binding queue="spring_fanout_queue_2"/>
        </rabbit:bindings>
    </rabbit:fanout-exchange>


    <!-- 定义队列-->
    <rabbit:queue id="spring_direct_queue" name="spring_direct_queue"  auto-declare="true"/>

    <!--
      定义 Routing  路由模式 交互机
    -->
    <rabbit:direct-exchange name="spring_direct_exchange" >
        <rabbit:bindings>
            <!--direct 类型的交换机绑定队列  key :路由key  queue:队列名称-->
            <rabbit:binding queue="spring_direct_queue" key="info"></rabbit:binding>
        </rabbit:bindings>

    </rabbit:direct-exchange>

    <!-- ~~~~~~~~~~~~~~~~~~~~~~~~~~~~通配符;*匹配一个单词,#匹配多个单词 ~~~~~~~~~~~~~~~~~~~~~~~~~~~~ -->
    <!--定义广播交换机中的持久化队列,不存在则自动创建-->
    <rabbit:queue id="spring_topic_queue_star" name="spring_topic_queue_star"  auto-declare="true"/>
    <!--定义广播交换机中的持久化队列,不存在则自动创建-->
    <rabbit:queue id="spring_topic_queue_well" name="spring_topic_queue_well" auto-declare="true"/>
    <!--定义广播交换机中的持久化队列,不存在则自动创建-->
    <rabbit:queue id="spring_topic_queue_well2" name="spring_topic_queue_well2" auto-declare="true"/>

    <!--
      声明  topic 类型的交换机
    -->
    <rabbit:topic-exchange id="spring_topic_exchange"  name="spring_topic_exchange" auto-declare="true">
        <rabbit:bindings>
            <rabbit:binding pattern="baiqi.*"  queue="spring_topic_queue_star"/>
            <rabbit:binding pattern="baiqi.#" queue="spring_topic_queue_well"/>
            <rabbit:binding pattern="itcast.#" queue="spring_topic_queue_well2"/>
        </rabbit:bindings>
    </rabbit:topic-exchange>

    <!--定义rabbitTemplate对象操作可以在代码中方便发送消息-->
    <rabbit:template id="rabbitTemplate" connection-factory="connectionFactory"/>
</beans>
单元测试代码:
@RunWith(SpringJUnit4ClassRunner.class)
@ContextConfiguration(locations = "classpath:spring-rabbitmq-producer.xml")
public class ProducerTest {

    //1.注入 RabbitTemplate
    @Autowired
    private RabbitTemplate rabbitTemplate;


    @Test
    public void testHelloWorld(){
        //2.发送消息

        rabbitTemplate.convertAndSend("spring_queue","hello world spring....");
    }


    /**
     * 发送fanout消息
     */
    @Test
    public void testFanout(){
        //2.发送消息
         rabbitTemplate.convertAndSend("spring_fanout_exchange","","spring fanout....");
    }


    @Test
    public void testDirect(){
        //2.发送消息
         rabbitTemplate.convertAndSend("spring_direct_exchange","info","spring Direct....");
    }

    /**
     * 发送topic消息
     */
    @Test
    public void testTopics(){
        //2.发送消息

        rabbitTemplate.convertAndSend("spring_topic_exchange","baiqi.hehe","spring topic....");
    }
}
消费者项目:初始化Springioc容器,注入。

监听生产者的消息。
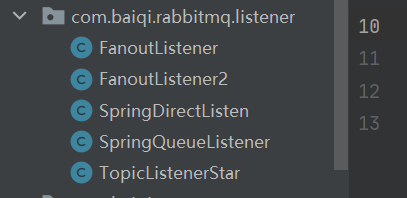
每个类都实现了MessageListener接口

那么什么时候调用什么类,在配置文件里声明
<?xml version="1.0" encoding="UTF-8"?>
<beans xmlns="http://www.springframework.org/schema/beans"
       xmlns:xsi="http://www.w3.org/2001/XMLSchema-instance"
       xmlns:context="http://www.springframework.org/schema/context"
       xmlns:rabbit="http://www.springframework.org/schema/rabbit"
       xsi:schemaLocation="http://www.springframework.org/schema/beans
       http://www.springframework.org/schema/beans/spring-beans.xsd
       http://www.springframework.org/schema/context
       https://www.springframework.org/schema/context/spring-context.xsd
       http://www.springframework.org/schema/rabbit
       http://www.springframework.org/schema/rabbit/spring-rabbit.xsd">
    <!--加载配置文件-->
    <context:property-placeholder location="classpath:rabbitmq.properties"/>

    <!-- 定义rabbitmq connectionFactory -->
    <rabbit:connection-factory id="connectionFactory" host="${rabbitmq.host}"
                               port="${rabbitmq.port}"
                               username="${rabbitmq.username}"
                               password="${rabbitmq.password}"
                               virtual-host="${rabbitmq.virtual-host}"/>

    <bean id="springQueueListener" class="com.baiqi.rabbitmq.listener.SpringQueueListener"/>
    <bean id="fanoutListener1" class="com.baiqi.rabbitmq.listener.FanoutListener"/>
    <bean id="topicListenerStar" class="com.baiqi.rabbitmq.listener.TopicListenerStar"/>
    <bean id="fanoutListener2" class="com.baiqi.rabbitmq.listener.FanoutListener2"/>
    <bean id="spring_direct_queue" class="com.baiqi.rabbitmq.listener.SpringDirectListen"/>
    <!--

    <bean id="topicListenerWell" class="com.baiqi.rabbitmq.listener.TopicListenerWell"/>
    <bean id="topicListenerWell2" class="com.baiqi.rabbitmq.listener.TopicListenerWell2"/>
-->
    <rabbit:listener-container connection-factory="connectionFactory" auto-declare="true">
       <rabbit:listener ref="springQueueListener" queue-names="spring_queue"/>
        <rabbit:listener ref="fanoutListener1" queue-names="spring_fanout_queue_1"/>
        <rabbit:listener ref="fanoutListener2" queue-names="spring_fanout_queue_2"/>

        <rabbit:listener ref="spring_direct_queue" queue-names="spring_direct_queue"/>
        <rabbit:listener ref="topicListenerStar" queue-names="spring_topic_queue_star"/>
        <!--
        <rabbit:listener ref="topicListenerWell" queue-names="spring_topic_queue_well"/>
        <rabbit:listener ref="topicListenerWell2" queue-names="spring_topic_queue_well2"/>-->
    </rabbit:listener-container>
</beans>


总结
工作模式总结

简单说就是类与生产者的相应队列做关联,就能收到生产者的消息了,而生产者生产消息的几种工作模式就是上面提到的4个,Spring帮我们做了优化,那么下篇文章将在SpringBoot里做成零配置的模式


 2916
2916


 被折叠的 条评论
为什么被折叠?
被折叠的 条评论
为什么被折叠?
 到【灌水乐园】发言


