


【为便于日后管理交换机,则需要在交换机上启用远程登录功能,并配置登录密码加强安全性
(注:由于三台交换机的操作近乎相同,因此代码注释仅做了SW1部分)】
一、配置交换机SW1
1.修改设备名,并配置本地登录密码
<Huawei>system-view    //进入系统视图
Enter system view, return user view with Ctrl+Z.
[Huawei]sysname SW1    //修改设备名

[SW1]user-interface console 0
[SW1-ui-console0]authentication-mode password    //修改身份认证模式为password
[SW1-ui-console0]set authentication password cipher 123456    //本地登录password认证模式的认证密码为123456
[SW1-ui-console0]quit
2.配置SSH远程登录
[SW1]telnet server enable    //开启设备的SSH服务
Info: The Telnet server has been enabled.
[SW1]ssh authentication-type default password

[SW1]aaa    //远程登录的身份认证方式为AAA认证
[SW1-aaa]local-user root password cipher 111111    //SSH账号为root,密码为111111
Info: Add a new user.
[SW1-aaa]local-user root service-type ssh
[SW1-aaa]local-user root privilege level 3    //用户基本为3,管理级
[SW1-aaa]qui

[SW1]rsa local-key-pair create    //在交换机上生成本地密钥对
The key name will be: SW1_Host
The range of public key size is (512 ~ 2048).
NOTES: If the key modulus is greater than 512,
       it will take a few minutes.
Input the bits in the modulus[default = 512]:
Generating keys...
..............++++++++++++
................++++++++++++
.........++++++++
.......................++++++++

[SW1]user-interface vty 0 4    //配置0~4的5个虚拟终端用户
[SW1-ui-vty0-4]authentication-mode aaa    //配置VTY认证方式为AAA认证
[SW1-ui-vty0-4]protocol inbound ssh    //允许用户以SSH方式接入
[SW1-ui-vty0-4]qui
3.配置交换机远程管理的IP地址
[SW1]int vlanif 1 //进入交换机默认VLAN1的接口视图
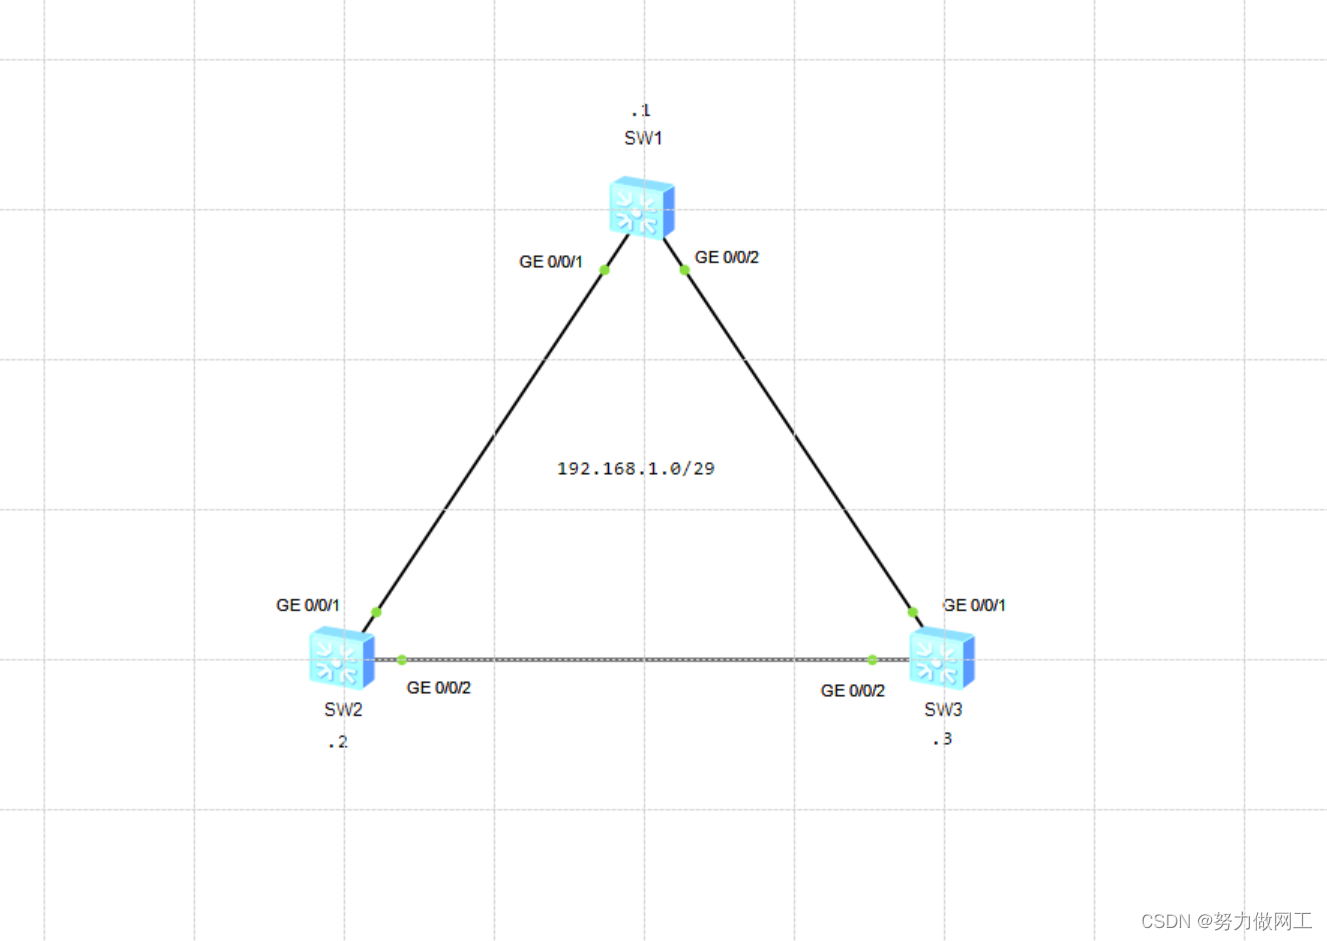
[SW1-Vlanif1]ip address 192.168.1.1 29
[SW1-Vlanif1]quit二、配置交换机SW2
1.修改设备名,并配置本地登录密码
<Huawei>system-view
Enter system view, return user view with Ctrl+Z.
[Huawei]sysname SW2

[SW2]user-interface console 0
[SW2-ui-console0]authentication-mode password
[SW2-ui-console0]set authentication password cipher 123456
[SW2-ui-console0]qui
2.配置SSH远程登录
[SW2]telnet server enable
Info: The Telnet server has been enabled.
[SW2]ssh authentication-type default password

[SW2]aaa
[SW2-aaa]local-user root password cipher 111111
Info: Add a new user.
[SW2-aaa]local-user root service-type ssh
[SW2-aaa]local-user root privilege level 3
[SW2-aaa]qui

[SW2]rsa local-key-pair create
The key name will be: SW2_Host
The range of public key size is (512 ~ 2048).
NOTES: If the key modulus is greater than 512,
       it will take a few minutes.
Input the bits in the modulus[default = 512]:
Generating keys...
.........++++++++++++
..++++++++++++
........++++++++
..++++++++

[SW2]user-interface vty 0 4
[SW2-ui-vty0-4]authentication-mode aaa
[SW2-ui-vty0-4]protocol inbound ssh
[SW2-ui-vty0-4]qui
3.配置交换机远程管理的IP地址
[SW2]interface Vlanif 1
[SW2-Vlanif1]ip ad 192.168.1.2 29
[SW2-Vlanif1]qui
三、配置交换机SW3
1.修改设备名,并配置本地登录密码
<Huawei>system-view
Enter system view, return user view with Ctrl+Z.
[Huawei]sysname SW3

[SW3]user-interface console 0
[SW3-ui-console0]authentication-mode password
[SW3-ui-console0]set authentication password cipher 123456
[SW3-ui-console0]qui
2.配置SSH远程登录
[SW3]telnet server enable
Info: The Telnet server has been enabled.
[SW3]ssh authentication-type default password
[SW3]aaa
[SW3-aaa]local-user root password cipher 111111
Info: Add a new user.
[SW3-aaa]local-user root service-type ssh
[SW3-aaa]local-user root privilege level 3
[SW3-aaa]quit

[SW3]rsa local-key-pair create
The key name will be: SW3_Host
The range of public key size is (512 ~ 2048).
NOTES: If the key modulus is greater than 512,
       it will take a few minutes.
Input the bits in the modulus[default = 512]:
Generating keys...
........++++++++++++
...++++++++++++
......................++++++++
..................++++++++

[SW3]user-interface  vty 0 4
[SW3-ui-vty0-4]authentication-mode aaa
[SW3-ui-vty0-4]protocol inbound ssh
[SW3-ui-vty0-4]qui
3.配置交换机远程管理的IP地址
[SW3]interface vlanif 1
[SW3-Vlanif1]ip address 192.168.1.3 29
[SW3-Vlanif1]qui
四、验证操作:
[SW1]ssh client first-time enable
[SW1]stelnet 192.168.1.2


 1058
1058

 被折叠的 条评论
为什么被折叠?
被折叠的 条评论
为什么被折叠?
 到【灌水乐园】发言


