【UC/OS-II】一、STM32平台移植教程

因为一开始就讲STM32的UC/OS-ii的移植对于不了解系统的小白来说可能看不懂,但我的开发平台是基于STM32的,所以又不得不先说明移植教程,所以在这里建议不懂的可以去网上先下个可运行的STM32的移植环境进行开发,等熟悉系统后回来再看!我是先看系统的整个代码框架,这样我可以不开发也会搭建了!也可以学我的流程,买本书先看看UC/OS操作系统的整个框架!说白了,其实操作系统就是个“库”!


在搭建环境之前,我们必须要有一个正常的STM32的开发环境,就是通过编译的STM32开发环境,我也是基于我上面说过的环境进行移植的,可以参考我上面的文章--STM32之MDK(Keil)环境搭建!


下面我们开始移植!

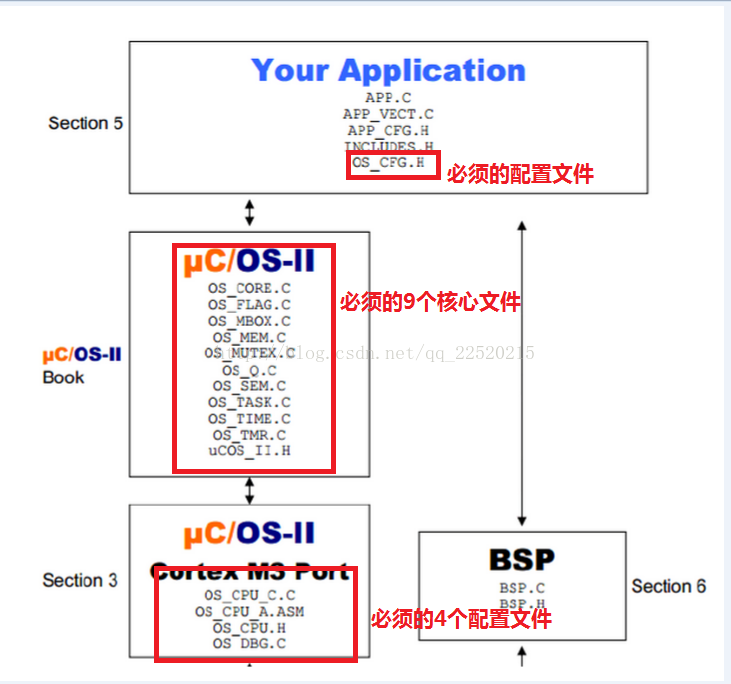
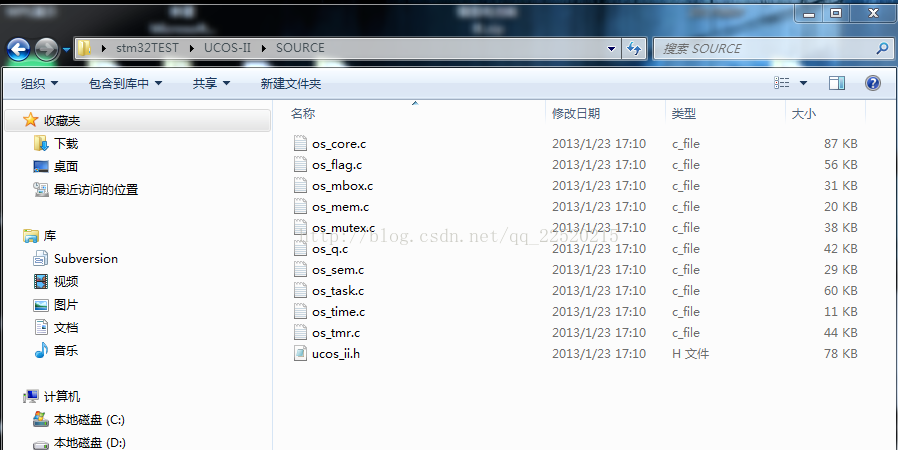
先来看UC/OS的代码结构,我们必须需要的就是图中红色的框,网上很多对于文件的个数可能不同,其实只是功能多少和环境不同决定的,但都是在这个几个基础上添加的(这里不讨论代码的剪裁操作)!还有注意,网上下载的代码中,Section3可能没有,所以你去网上下载就可以了,到处都是!


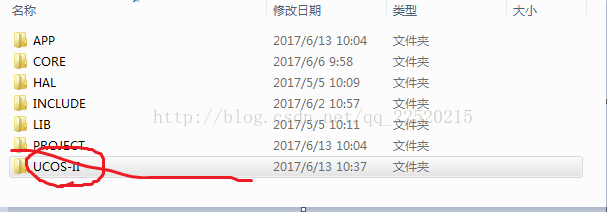
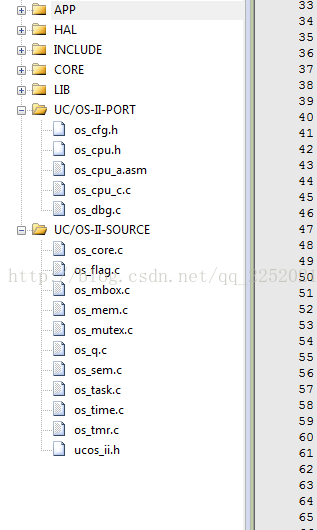
第一步:打开搭建好编译通过的Keil开发环境,创建如下文件夹,在相应的工程文件夹下也创建如下文件,


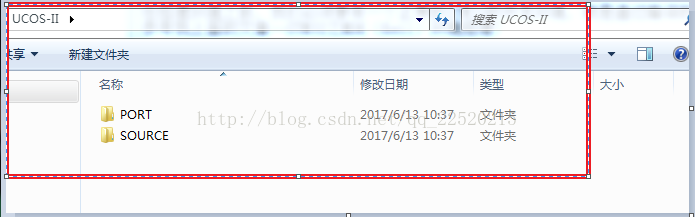
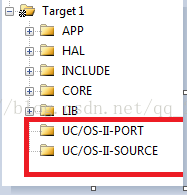
第二步:把下载的相应文件复制到文件下,并添加在工程里。


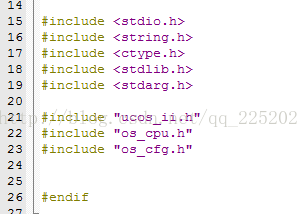
第三步:因为这些文件没有关联到stm32,所以我们建立一个h文件includes.h使他们关联,includes.h根据自己的环境搭建的头文件引用来编写!我这里因为定义了一个config.h的全局头文件,所以我就把下面的代码放进这个文件!


#include <stdio.h>
#include <string.h>
#include <ctype.h>
#include <stdlib.h>
#include <stdarg.h>


#include "ucos_ii.h"
#include "os_cpu.h"

#include "os_cfg.h"


这样我们这个操作系统的代码框架已经搞定了,接下来就是配置代码了,其实就是中断的改名字和时钟的设置!

这里我删除了 OS_DBG.C这个文件,为了减少错误就直接删除,不影响!


下面开始修改文件:


第一步:打开os_cfg.h,
 

#define OS_APP_HOOKS_EN           1u 
改成
#define OS_APP_HOOKS_EN           0u 


第二步 :打开os_cpu_a.asm  


    PUBLIC   OS_CPU_SR_Save                                      ; Functions declared in this file
    PUBLIC   OS_CPU_SR_Restore
    PUBLIC   OSStartHighRdy
    PUBLIC   OSCtxSw
    PUBLIC   OSIntCtxSw
    PUBLIC   OS_CPU_PendSVHandler
改成
    EXPORT   OS_CPU_SR_Save                                      ; Functions declared in this file
    EXPORT   OS_CPU_SR_Restore
    EXPORT   OSStartHighRdy
    EXPORT   OSCtxSw
    EXPORT   OSIntCtxSw
    EXPORT   OS_CPU_PendSVHandler


     RSEG CODE:CODE:NOROOT(2)
     THUMB
改成
     AREA |.text|, CODE, READONLY, ALIGN=2
     THUMB 
     REQUIRE8 
     PRESERVE8 


第三步:打开startup_stm32f10x_md.s


把所有的
PendSV_Handler
替换为
OS_CPU_PendSVHandler

把所有的
SysTick_Handler
替换为
OS_CPU_SysTickHandler


这样就完成了移植了!


最后我随便编了一个PB5口1s高低电平变化的程序,代码如下:


#include "config.h"


#define START_TASK_PRIO       10
#define START_STK_SIZE          64
OS_STK START_TASK_STK[START_STK_SIZE];
void start_task(void *pdata);
    
#define LED0_TASK_PRIO      
#define LED0_STK_SIZE      64
OS_STK LED0_TASK_STK[LED0_STK_SIZE];


void led0_task(void *pdata);

void start_task(void *pdata)
{
  OS_CPU_SR cpu_sr=0;
  pdata = pdata; 
  OS_ENTER_CRITICAL();    
  OSTaskCreate(led0_task,(void *)0,(OS_STK*)&LED0_TASK_STK[LED0_STK_SIZE-1],LED0_TASK_PRIO);     
  OSTaskSuspend(START_TASK_PRIO);
  OS_EXIT_CRITICAL();
}

void led0_task(void *pdata)
{  
unsigned int i=2000,j=2000;
while(1)
{
GPIO_ResetBits(GPIOB,GPIO_Pin_5);
Delay_ms(1000);

GPIO_SetBits(GPIOB,GPIO_Pin_5); 
                Delay_ms(1000);
};
}


int main (void)
{
        SysTick_Init();

NVIC_PriorityGroupConfig(NVIC_PriorityGroup_2);

LED_Init();

OSInit();   
  OSTaskCreate(start_task,(void *)0,(OS_STK *)&START_TASK_STK[START_STK_SIZE-1],START_TASK_PRIO );
OSStart();
}

编译烧写入单片机,运行,PB5端口输出周期为2s,占空比为50%的矩形波!

  • 2
    点赞
  • 40
    收藏
    觉得还不错? 一键收藏
  • 0
    评论
/*********************** (C) COPYLEFT 2010 Leafgrass *************************/ This project runs on uC/OS-II V2.52 and is based on STM32F103RBT6(ARM Cortex-M3 Core) Take care of the configuration of project. There're some Include Paths while linking which cannot be modified. Procedure of driving a device(IMPORTANT!!!): 1.Connect hardware correctly. 2.Prepare DEVICE_NAME.h and DEVICE_NAME.c. 3.Enable clock of related components. 4.Enable related interrupt while configure NVIC. 5.Configure related IO pins. 6.Finish test code and begin testing. 2010-06-10( original ): Sucessfully port uCOS-II V2.52. 2010-06-11: Add code "SysTick_CounterCmd(SysTick_Counter_Enable);" in SysTick_Configuration(), solve the problem that the program can't get into SysTickHandler(), as below: /******************************************************************************* * Function Name : SysTick_Config * Description : Configures SysTick * Input : None * Output : None * Return : None *******************************************************************************/ void SysTick_Configuration(void) { NVIC_SystemHandlerPriorityConfig(SystemHandler_SysTick, 0, 1); /* Configure HCLK clock as SysTick clock source */ SysTick_CLKSourceConfig(SysTick_CLKSource_HCLK_Div8); /* SysTick interrupt each 1000 Hz with HCLK equal to 72MHz */ SysTick_SetReload(9000); /* Enable the SysTick Interrupt */ SysTick_ITConfig(ENABLE); SysTick_CounterCmd(SysTick_Counter_Enable); //Important!! Solve "the program can't get into SysTickHandler()!! } 2010-06-12( updates to V1.0 ): 1. Add EXTI8, EXTI9 on PC8, PC9, only for EXTI test. 2. Modify some comments in LCD5110_lib. 3. (in main.c) Modifiy tasks' priority LED_TASK_Prio 1 -> 5 START_TASK_Prio 2 -> 10 4. (in main.c) Modify code "OSTaskDel(START_TASK_Prio);" to "OSTaskSuspend(START_TASK_Prio);" 2010-07-13 1.Drive LTM022A69B LCD ok. Just use I/O to imitate SPI. Still cannot use internal SPI to drive it. 2.Move LCD library of LTM022A69B into "LCD_lib.c". 2010-07-15: Add color bar display in LCD_test(). 2010-07-16( updates to V1.1 ): 1.Solve problem about position error and color error, when display a set of 16-bit color data. Mainly resulted from CPU type, big endian or little endian. STM32F103RBT6 is little endian while in default set. 2.Add Draw_img(); 3.Add colorful characters and strings, add parameters about colors in display functions.(colors are defined in LTM022A69B.h) 2010-07-17: 1.Add comments in LCD_Init(). 2.Add parameter "color" to function Draw_dot(). 3.Add function SetCursor(). 4.Unify LCD related functions' name. Add prefix "LCD_". 2010-07-19: Modify data type in LCD_Lib. normal --> const. At one time, modify the pointers type to const. 2010-07-20: 1.Correct the error that OSTimeDlyHMSM() can't delay an accurate time, by modifying SysTick_Configuration() to get an correct clock frequency. 2010-07-31: Add STM32_Init.c but is not referenced, for future use of Configuration Wizard. 2010-08-01: Configure SPI ok, and do some test(SPI2 tx -> SPI1 rx, display on LCD). 2010-08-03: 1.Add SPI test code in main.c, SPI2 send data, SPI1 receive data , display info on LCD, use soft SPI. 2.Add exported macro "USESPI" to choose if use SPI to drive LCD or not. 3.After several days researching about hard SPI to drive LCD, failed. So switch to use a faster GPIO method, as below: Replace "#define LCD_RST_H() GPIO_SetBits(LCD_CTRL_PORT, LCD_RST)" in ST library with "#define LCD_RST_H() ( LCD_CTRL_PORT->BSRR = LCD_RST )" for a faster LCD refresh speed. 4.Modify name "LCD_SCI" to "LCD_SI", 'cause it means Serial Interface. 5.Modify function name "LCD_test()" to "LCD_Test()". 2010-08-06: Comment off "typedef enum {FALSE = 0, TRUE = !FALSE} bool;" in stm32f10x.type.h in order to avoid warning. 2010-08-09: Prepare to update to v2.0. 2010-08-10( Update to v2.0, use ST's FWLib3.1.2 ): 1. Set project(Keil RealView MDK). (1) RO memory area : IROM1 -- start at 0x08000000, size 0x20000. (2) RW memory area : IRAM1 -- start at 0x20000000, size 0x5000. (3) Output setup. (4) Listing setup, no assembler list. (5) C/C++ setup. Preprocessor Symbols : Define -- USE_STDPERIPH_DRIVER, STM32F10X_MD. Include Paths : ..\; ..\..\Libraries\CMSIS\Core\CM3; ..\..\Libraries\STM32F10x_StdPeriph_Driver\inc; ..\..\App; ..\..\Driver; ..\..\OS; ..\..\OS\port (6) Linker, Use memory layout from target dialog. (7) Debug and Utilities, Cortex-M/R J-Link/J-Trace. Disable Trace. 2. Modify code in "includes.h". 3. Modify startup code, did not use the st original one. Port those used in FWLib2.0 instead. Of course, some code are revised for FWLib3.1.2(StdPeriph_Driver and CMSIS). Mainly rewrite the names of the ISR. The most important two are : "PendSV_Handler" and "SysTick_Handler". ---> "OSPendSV" and "SysTick_Handler". (in "os_cpu_a.asm") (in "stm32f10x_it.c") 4. Modify initial code for SysTick in "SysTick_Configuration()" in "CPU_Init.c" because of the changing of library. Note : A general problem is that program always go into "B OSStartHang" in "OSStartHighRdy" in "os_cpu_a.asm", and will die in there... That's caused by program hasn't step into the correct ISR yet. Enable the SysTick interrupt, check if the name of Interrupt Service Routines are right, then all will be OK. 5. Still some problem with retargeting "printf()". If use "printf()" in program, system wouldn't run. 6. Change Project name to "RTOS_STM32". 2010-08-11( Update to v2.1, use ST's FWLib3.3.0 ): 1. Modify Include Path in Target Options. 2. Comment "typedef enum {FALSE = 0, TRUE = !FALSE} bool;" off in order to avoid error: "..\stm32f10x.h(454): error: #40: expected an identifier". 2010-08-12( Update to v2.2 ): 1. Remove the incorrect use of SPI in LCD display, add a new schedule( maily used SPI busy flag ). 2. Commen off code "assert_param(IS_SPI_ALL_PERIPH(SPIx));" in "SPI_I2S_SendData()", "SPI_I2S_ReceiveData()", and "SPI_I2S_GetFlagStatus" in "stm32f10x_spi.h", in order to improve LCD refresh frequency. 3. Finish to retarget C library printf() to UART. As a foundation, change the setup of KEIL in "Target Options" --> "Code Generation" --> tick "Use MicroLIB". There are still some problem with building, modify a few lines in "stm32f10x_startup.s" : ================================ IF :DEF:__MICROLIB EXPORT __initial_sp EXPORT __heap_base EXPORT __heap_limit ELSE IMPORT __use_two_region_memory EXPORT __user_initial_stackheap ================================ Then rebuild. Add retarget code in main.c : ================================================================ #ifdef __GNUC__ // With GCC/RAISONANCE, small printf // (option LD Linker->Libraries->Small printf set to 'Yes') // calls __io_putchar() #define PUTCHAR_PROTOTYPE int __io_putchar(int ch) #else #define PUTCHAR_PROTOTYPE int fputc(int ch, FILE *f) #endif // __GNUC__ ---------------------------------------------------------------- PUTCHAR_PROTOTYPE { // Place your implementation of fputc here // e.g. write a character to the USART USART_SendData(USARTx, (u8)ch); // Loop until the end of transmission while (USART_GetFlagStatus(USART1, USART_FLAG_TC) == RESET) {} return ch; } ================================================================ 2010-08-14(update to v2.3): 1. Rewrite the different part of code into its C file. 2. Drive TIM3 output PWM wave successfully. 3. Add "servo" file, for servo control. 2010-08-19(update to v2.4, GPS data receive ok): 1. Add "gps" file. 2. Add code in "USART3_IRQHandler()", mainly to receive data from GPS. But there's still someting confusing, that the pair "USART_ITConfig(USART3, USART_IT_RXNE, DISABLE);" and "USART_ITConfig(USART3, USART_IT_RXNE, ENABLE);" cannot work well. Because once use them, some data will be lost. 2010-08-22: Refresh firmware of GPS, modify to Baudrate 9600, China timezone, WGS-84 coordinate. 2010-09-02: Replace those two old startup files "cortexm3_macro.s" and "stm32f10x_startup.s" with the one "startup_stm32f10x_md.s" which is created by MCD Application Team in FWLib3.3.0. 2010-09-13: 1. Add general_task.h and .c for miscellaneous experimental purpose. 2. Add uart output infomation in booting stage. 3. Add macro "LED_TOGGLE()" use "(GPIO_ReadOutputDataBit(GPIOA, GPIO_Pin_1))" 4. Create Logo: _ _ / / | | ___ __ _ _| |_ __ _ _ __ __ _ _ _ | | / _ \/ _` |_ _/ _` | \/ _)/ _` | / / / / | |_ _ __( (_| | | | (_| | | | ( (_| | \ \ \ \ |_ _ _\___|\__,_| | | \__, / | | \__,_| /_/ /_/ /_/ \_ _/ 5. EXTI again. setup procedure: GPIO IN FLOATING -> NVIC IRQ -> EXTI Config -> _it.c /*********************** (C) COPYLEFT 2010 Leafgrass *************************/
评论
添加红包

请填写红包祝福语或标题

红包个数最小为10个

红包金额最低5元

当前余额3.43前往充值 >
需支付:10.00
成就一亿技术人!
领取后你会自动成为博主和红包主的粉丝 规则
hope_wisdom
发出的红包
实付
使用余额支付
点击重新获取
扫码支付
钱包余额 0

抵扣说明:

1.余额是钱包充值的虚拟货币,按照1:1的比例进行支付金额的抵扣。
2.余额无法直接购买下载,可以购买VIP、付费专栏及课程。

余额充值