


在上一篇文章中,我们进行了对ListView的简单应用,是不是觉得有点小儿科,只能显示一段文本的ListView 实在是太单调了,我们现在就来对ListView 的界面进行定制,让它可以显示更加丰富的内容。
话不多说,Let us try it for a while…
1.首先新建一个项目,就取名为ListViewTest2吧, 并让ADT 自动帮我们创建好活动。然后修改activity_main.xml 中的代码,如下所示:
<?xml version="1.0" encoding="utf-8"?>
<LinearLayout xmlns:android="http://schemas.android.com/apk/res/android"
    android:layout_width="match_parent"
    android:layout_height="match_parent" >

    <ListView
        android:id="@+id/list_view"
        android:layout_width="match_parent"
        android:layout_height="match_parent" >
    </ListView>

</LinearLayout>
这里的布局没有什么变化,就不做解释了。
2.然后需要准备好一组图片,分别对应前一篇说过的每一种水果,待会我们要让这些水果名称的旁边都有一个图样。(至于图片,等下在最下面我会上传这次项目的代码,如果想亲自尝试的,可以去里面复制即可)。
接着定义一个实体类,作为ListView 适配器的适配类型。新建类Fruit,代码如下所示:
public class Fruit {
    private String name;
    private int imageId;

    public Fruit(String name, int imageId) {
        this.name = name;
        this.imageId = imageId;
    }

    public String getName() {
        return name;
    }

    public int getImageId() {
        return imageId;
    }
}
Fruit 类中只有两个字段,name 表示水果的名字,imageId 表示水果对应图片的资源id。
3.然后需要为ListView 的子项指定一个我们自定义的布局, 在layout 目录下新建
fruit_item.xml,代码如下所示:
<LinearLayout xmlns:android="http://schemas.android.com/apk/res/android"
    android:layout_width="match_parent"
    android:layout_height="match_parent" >

    <ImageView
        android:id="@+id/fruit_image"
        android:layout_width="wrap_content"
        android:layout_height="wrap_content" />

    <TextView
        android:id="@+id/fruit_name"
        android:layout_width="wrap_content"
        android:layout_height="wrap_content"
        android:layout_gravity="center"
        android:layout_marginLeft="10dip" />

</LinearLayout>
在这个布局中,我们定义了一个ImageView 用于显示水果的图片,又定义了一个TextView 用于显示水果的名称。
4.这里,就是重头戏了,因为我们要创建一个自定义的适配器,这个适配器继承自ArrayAdapter,并将泛型指定为Fruit 类(听起来是不是很酷@_@)。新建类FruitAdapter,代码如下所示:
public class FruitAdapter extends ArrayAdapter<Fruit> {
    private int resourceId;

    public FruitAdapter(Context context, int textViewResourceId,
            List<Fruit> objects) {
        super(context, textViewResourceId, objects);
        /* 上一篇文章不是有使用android.R.layout.simple_list_item_1 作为ListView 子项布局的id吗?,这是一个Android 内置的布局文件,里面只有一个TextView,可用于简单地显示一段文本,textViewResourceId这个参数就是我们定制ListView的关键点,因为textView这个参数代表的是ListView中子项的布局,简单的说,就像上一篇文章中演示的,每个水果的名字会占单独的一行,实际上,每一个水果名所占的就是一个子项,在这里,我们可以通过传入自定义的布局,从而达到自己想要的显示效果 */
        resourceId = textViewResourceId;
    }

    @Override
    public View getView(int position, View convertView, ViewGroup parent) {
        //position:The position of the item within the adapter's data set of the item whose view we want.
        Fruit fruit = getItem(position); // 获取当前项的Fruit实例
        View view = LayoutInflater.from(getContext()).inflate(resourceId, null);
        /* inflate(int resource, ViewGroup root)方法有两个参数:一个就是传入的子项布局的id,至于另一项,由于小编我的英语不是特别的好,在引用API文档的原话,大家自己去体会吧*_*,"root:Optional view to be the parent of the generated hierarchy." */
        ImageView fruitImage = (ImageView) view.findViewById(R.id.fruit_image);
        TextView fruitName = (TextView) view.findViewById(R.id.fruit_name);
        fruitImage.setImageResource(fruit.getImageId());
        fruitName.setText(fruit.getName());
        return view;
    }
}
FruitAdapter 重写了父类的一组构造函数,用于将上下文、ListView 子项布局的id 和数据都传递进来。另外又重写了getView()方法,这个方法在每个子项被滚动到屏幕内的时候会被调用。在getView 方法中,首先通过getItem()方法得到当前项的Fruit 实例,然后使用LayoutInflater 来为这个子项加载我们传入的布局,接着调用View 的findViewById()方法分别获取到ImageView 和TextView 的实例,并分别调用它们的setImageResource()和setText()方法来设置显示的图片和文字,最后将布局返回,这样我们自定义的适配器就完成了。
5.最后,修改MainActivity 中的代码,如下所示:
public class MainActivity extends Activity {

    private List<Fruit> fruitList = new ArrayList<Fruit>();

    @Override
    protected void onCreate(Bundle savedInstanceState) {
        super.onCreate(savedInstanceState);
        setContentView(R.layout.activity_main);
        initFruits(); // 初始化水果数据
        FruitAdapter adapter = new FruitAdapter(MainActivity.this,R.layout.fruit_item, fruitList);
        ListView listView = (ListView) findViewBy
(R.id.list_view);
        listView.setAdapter(adapter);
    }

    private void initFruits() {
        Fruit apple = new Fruit("Apple", R.drawable.apple_pic);
        fruitList.add(apple);
        Fruit banana = new Fruit("Banana", R.drawable.banana_pic);
        fruitList.add(banana);
        Fruit orange = new Fruit("Orange", R.drawable.orange_pic);
        fruitList.add(orange);
        Fruit watermelon = new Fruit("Watermelon", R.drawable.watermelon_pic);
        fruitList.add(watermelon);
        Fruit pear = new Fruit("Pear", R.drawable.pear_pic);
        fruitList.add(pear);
        Fruit grape = new Fruit("Grape", R.drawable.grape_pic);
        fruitList.add(grape);
        Fruit pineapple = new Fruit("Pineapple", R.drawable.pineapple_pic);
        fruitList.add(pineapple);
        Fruit strawberry = new Fruit("Strawberry", R.drawable.strawberry_pic);
        fruitList.add(strawberry);
        Fruit cherry = new Fruit("Cherry", R.drawable.cherry_pic);
        fruitList.add(cherry);
        Fruit mango = new Fruit("Mango", R.drawable.mango_pic);
        fruitList.add(mango);
    }
}
可以看到,这里添加了一个initFruits()方法,用于初始化所有的水果数据。在Fruit 类的构造函数中将水果的名字和对应的图片id 传入,然后把创建好的对象添加到水果列表中。接着我们在onCreate()方法中创建了FruitAdapter 对象,并将FruitAdapter 作为适配器传递给了ListView。这样定制ListView 界面的任务就完成了。
就让我们来看看显示的效果吧:
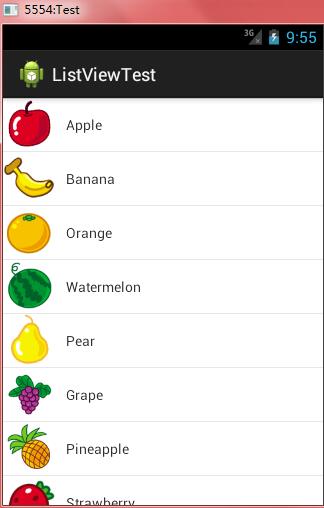
虽然目前我们定制的界面还是很简单,但是相信聪明的你已经领悟到了诀窍,只要修改fruit_item.xml 中的内容,就可以定制出各种复杂的界面了。如果觉得刚才的还不够刺激,那就尽情的发挥你的想象力,在代码王国里尽情的遨游吧!
本次源代码实例:
http://download.csdn.net/detail/qq_22804827/9214581


 4952
4952

 被折叠的 条评论
为什么被折叠?
被折叠的 条评论
为什么被折叠?
 到【灌水乐园】发言


