


此内容为原创,转载请注明出处。
环境
Ubuntu18.04 或 Window 10
python 3.8.5
pyqt 5.9.2
Qt Remote Object简称QtRO,可以用来不同进程间使用信号槽进行通信。
不多说了,直接干。
我会用Qt和Python分别创建客户端和服务器,依次连接。
文章有点长,如果没耐心看的小伙纸可以直接下载代码来看,我上传到百度网盘啦。
链接:https://pan.baidu.com/s/1uEetEpMG-aEfzfccBCTEwQ
提取码:m0ss
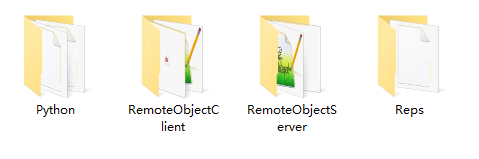
第一步 创建路径
因为我打算分别写QT和python的服务器和客户端,所以会有好几个文件,所以多建几个文件夹把他们隔开。
Reps文件夹会放.rep文件,之所以单独建立一个文件夹放置,是因为Qt的服务器和客户端必须引用同一个rep文件,提到项目外面来比较方便。
Python文件夹里分别是客户端和服务器的两个py文件。
另外两个文件夹分别是Qt的服务器和客户端项目。
第二步 Qt创建服务器
首先我们先写一个CommonInterface.rep文件放在Reps文件夹内,里面写入一个信号和一个槽函数。
其它类型的函数写法可以看看Qt的官方文档:https://doc.qt.io/qt-5/qtremoteobjects-repc.html
#include <QtCore>

class CommonInterface
{
    SIGNAL(sigMessage(QString msg));
    SLOT(void onMessage(QString msg));
};
然后我们新建一个qml的Qt项目,名称为RemoteObjectServer。
我们打开RemoteObjectServer.pro文件,先添加Remote的模块,然后再引入CommonInterface.rep文件。
QT += remoteobjects
REPC_SOURCE += \
    ../Reps/CommonInterface.rep
好了,然后我们构建运行项目,运行成功后我们会在构建目录下得到一个叫做rep_CommonInterface_source.h的头文件,这是Qt自动生成的。
我们把这个头文件复制到server的项目中,这样就方便引用了。
现在我们来创建一个信号槽类,用来服务器接收和发送信号的。
创建c++ class,输入类名CommonInterface,这样我们就得到了文件commoninterface.h和commoninterface.cpp,开始写代码。
commoninterface.h中:
#ifndef COMMONINTERFACE_H
#define COMMONINTERFACE_H

#include <QObject>
#include "rep_CommonInterface_source.h"

class CommonInterface : public CommonInterfaceSource
{
    Q_OBJECT
public:
    CommonInterface(QObject * parent = nullptr);
    virtual void onMessage(QString msg);
    void sendMsg(const QString &msg);
signals:
    void sigReceiveMsg(const QString &msg);
};

#endif // COMMONINTERFACE_H
commoninterface.cpp 中:
#include "commoninterface.h"


CommonInterface::CommonInterface(QObject *parent): CommonInterfaceSource(parent)
{

}

/**
 * @brief CommonInterface::onMessage
 * @param msg
 * 接收客户端的消息
 */
void CommonInterface::onMessage(QString msg)
{
    emit sigReceiveMsg(msg);
}

/**
 * @brief CommonInterface::sendMsg
 * @param msg
 * 发送消息给客户端
 */
void CommonInterface::sendMsg(const QString &msg)
{
    emit sigMessage(msg);
}
是不是有点眼熟,sigMessage和onMessage不就是我们在rep文件中写的信号和槽嘛,如果你有兴趣去翻一下Qt自动生成的rep_CommonInterface_source.h文件,还能看到它们的身影。
其实到这一步我们已经可以在Qt中接收和发送信息了,但我还是把整个项目写完吧。
我们再新建一个类,用来跟qml做通信,widget也是可以的,但我更喜欢用qml。
创建c++ class,输入类名MyQmlFunction,这样我们就得到了文件MyQmlFunction.h和MyQmlFunction.cpp,开始写代码。
MyQmlFunction.h中:
#ifndef MYQMLFUNCTION_H
#define MYQMLFUNCTION_H

#include <QObject>
#include <QDebug>
#include <QRemoteObjectHost>
#include "commoninterface.h"

class MyQmlFunction : public QObject
{
    Q_OBJECT
public:
    explicit MyQmlFunction(QObject *parent = nullptr);
    Q_INVOKABLE void sendToClient(QString information);

private:
    CommonInterface *remoteObj = nullptr;
    QRemoteObjectHost *remoteHost = nullptr;

signals:
    Q_INVOKABLE void recvMessage(QString message);

public slots:
};

#endif // MYQMLFUNCTION_H
MyQmlFunction.cpp中:
#include "MyQmlFunction.h"

MyQmlFunction::MyQmlFunction(QObject *parent) : QObject(parent)
{
    remoteHost = new QRemoteObjectHost(this);
    remoteHost->setHostUrl(QUrl("local:interfaces"));
    remoteObj = new CommonInterface(this);
    remoteHost->enableRemoting(remoteObj, "CommonInterfaceSource");
    connect(remoteObj, SIGNAL(sigReceiveMsg(QString)), this, SIGNAL(recvMessage(QString)));
}

void MyQmlFunction::sendToClient(QString information)
{
    remoteObj->sendMsg(information);
}
要跟QML对接,定义函数时要添加Q_INVOKABLE,这些我就不多说了,我说一说创建服务器的几行代码。

就这么简单的几句话,需要注意的是,“local:interfaces"一定要跟客户端保持一致,否则会找不到服务器。
另外,在enableRemoting时,可以不指定名字"CommonInterfaceSource”,但如果不指定的话就只能跟Qt的客户端连接,不能跟python进行连接,这个后面也会讲到,客观请接着往下看。
设置一下MyQmlFunction跟qml的连接。
main.cpp:
#include <QGuiApplication>
#include <QQmlApplicationEngine>
#include <QQmlContext>
#include "MyQmlFunction.h"

int main(int argc, char *argv[])
{
    QGuiApplication app(argc, argv);
    QQmlApplicationEngine engine;
    MyQmlFunction demo;
    engine.rootContext()->setContextProperty("QML",&demo);
    engine.load(QUrl(QStringLiteral("qrc:/main.qml")));
    if (engine.rootObjects().isEmpty())
        return -1;
    return app.exec();
}
我们再接着写qml文件做做界面。
main.qml:
import QtQuick 2.6
import QtQuick.Controls 1.4
import QtQuick.Window 2.2

Window {
    visible: true
    width: 640
    height: 480
    title: qsTr("Qt Remote Server")

    Rectangle{
        anchors.fill: parent
        TextArea{
            id: textArea
            width: parent.width - 4
            height: parent.height - 46
            anchors.horizontalCenter: parent.horizontalCenter
            y: 2
            readOnly: true
            selectByMouse: true
        }
        TextField{
            id: inforText
            anchors.bottom: parent.bottom
            anchors.bottomMargin: 2
            x: 2
            width: parent.width-86
            height: 40
        }
        Button{
            anchors.bottom: parent.bottom
            anchors.bottomMargin: 2
            width: 80
            height: 40
            anchors.right: parent.right
            anchors.rightMargin: 2
            text: qsTr("发送")
            onClicked: {
                if(inforText.text !== "") QML.sendToClient(inforText.text)
            }
        }
    }

    Connections{
        target: QML
        onRecvMessage:{
            textArea.append(message)
        }
    }
}
运行一下看看界面。

第三步 Qt创建客户端
上一步咱已经创建好服务器了,但没有客户端也看不到效果啊,现在来做个客户端试试看。
rep文件还是用的上一步做好的CommonInterface.rep。
同样的,我们用Qt来创建一个qml项目,命名为RemoteObjectClient。
打开pro文件写入:
QT += remoteobjects
REPC_REPLICA += \
    ../Reps/CommonInterface.rep
注意啊,这里用的是REPC_REPLICA,跟服务器的可不一样,写错了找不到头文件可别怪我啊。
编译运行,这样我们再构建目录下得到一个Qt自动生成的头文件rep_CommonInterface_replica.h,把它复制到项目底下来。
客户端不需要跟服务器一样专门创建一个类来接收发送信息了,我们直接创建一个跟qml连接的类,取名为MyQmlFunction,开始写代码。
MyQmlFunction.h中:
#ifndef MYQMLFUNCTION_H
#define MYQMLFUNCTION_H

#include <QObject>
#include <QRemoteObjectNode>
#include "rep_CommonInterface_replica.h"

class MyQmlFunction : public QObject
{
    Q_OBJECT
public:
    explicit MyQmlFunction(QObject *parent = nullptr);
    Q_INVOKABLE void sendToServer(QString information);

private:
    QRemoteObjectNode remoteNode;
    CommonInterfaceReplica *remoteObj = nullptr;

signals:
    Q_INVOKABLE void recvMessage(QString message);

public slots:
};

#endif // MYQMLFUNCTION_H
MyQmlFunction.cpp中:
#include "MyQmlFunction.h"


MyQmlFunction::MyQmlFunction(QObject *parent) : QObject(parent)
{
    remoteNode.connectToNode(QUrl("local:interfaces"));
    remoteObj = remoteNode.acquire<CommonInterfaceReplica>("CommonInterfaceSource");
    connect(remoteObj, SIGNAL(sigMessage(QString)), this, SIGNAL(recvMessage(QString)));
}

void MyQmlFunction::sendToServer(QString information)
{
    remoteObj->onMessage(information); //调用槽发送消息给服务器
}
我说一下连接服务器的代码。

connectToNode服务器的时候,后面的QUrl一定一定要跟服务器一致,不然就连不上。
remoteNode.acquire<>()尖括号里的CommonInterfaceReplica是Qt自动生成的头文件中的类,圆括号中的"CommonInterfaceSource"是资源名字,也要跟服务器保持一致。
写一下连接QML的代码,其实这部分跟服务器是一样的。
main.cpp:
#include <QGuiApplication>
#include <QQmlApplicationEngine>
#include <QQmlContext>
#include "MyQmlFunction.h"

int main(int argc, char *argv[])
{
    QGuiApplication app(argc, argv);
    QQmlApplicationEngine engine;
    MyQmlFunction demo;
    engine.rootContext()->setContextProperty("QML",&demo);
    engine.load(QUrl(QStringLiteral("qrc:/main.qml")));
    if (engine.rootObjects().isEmpty())
        return -1;
    return app.exec();
}
main.qml:
import QtQuick 2.6
import QtQuick.Controls 1.4
import QtQuick.Window 2.2

Window {
    visible: true
    width: 640
    height: 480
    title: qsTr("Qt Remote Client")

    Rectangle{
        anchors.fill: parent
        TextArea{
            id: textArea
            width: parent.width - 4
            height: parent.height - 46
            anchors.horizontalCenter: parent.horizontalCenter
            y: 2
            readOnly: true
            selectByMouse: true
        }
        TextField{
            id: inforText
            anchors.bottom: parent.bottom
            anchors.bottomMargin: 2
            x: 2
            width: parent.width-86
            height: 40
        }
        Button{
            anchors.bottom: parent.bottom
            anchors.bottomMargin: 2
            width: 80
            height: 40
            anchors.right: parent.right
            anchors.rightMargin: 2
            text: qsTr("发送")
            onClicked: {
                if(inforText.text !== "") QML.sendToServer(inforText.text)
            }
        }
    }

    Connections{
        target: QML
        onRecvMessage:{
            textArea.append(message)
        }
    }
}
好,我们先把服务器运行起来,再运行客户端,相互发送一下信息看看。

是不是成功啦,服务器发送的消息客户端能成功接收并显示。客户端发送的消息服务器也能成功接收并显示。
第四步 Python创建客户端
好,我们再用Python创建一个客户端,用来跟Qt的服务器连接。
创建一个Client.py文件,写入代码:
import sys
from PyQt5.QtCore import QUrl, QTimer, QObject, pyqtSlot, pyqtSignal
from PyQt5.QtWidgets import QApplication
from PyQt5.QtRemoteObjects import QRemoteObjectNode


class DynamicClient(QObject):
    def __init__(self, remoteObj, parent=None):
        super().__init__(parent)
        self._remoteObj = remoteObj
        self._remoteObj.initialized.connect(self.initConnection)    # 必须要在initialized初始化成功后才有用。

        self.timerCount = 0
        self.timer = QTimer(self)
        self.timer.timeout.connect(self.slotTimeOut)
        self.timer.start(1000)

    sendMessage = pyqtSignal(str, name="sigMessage")    # 创建一个名为sigMessage的信号,用来给服务器发送信息

    @pyqtSlot()
    def initConnection(self):
        self._remoteObj.sigMessage.connect(self.slotRecvMessage)
        self.sendMessage.connect(self._remoteObj.onMessage)

    @pyqtSlot(str)
    def slotRecvMessage(self, msg):     # 创建一个槽函数,用来接收服务器发送过来的信息
        print("python get message:", msg)

    @pyqtSlot()
    def slotTimeOut(self):
        self.timerCount += 1
        self.sendMessage.emit("client start times: " + str(self.timerCount))


def main():
    app = QApplication(sys.argv)
    remoteNode = QRemoteObjectNode()
    remoteNode.connectToNode(QUrl("local:interfaces"))
    remoteObj = remoteNode.acquireDynamic('CommonInterfaceSource')
    dy = DynamicClient(remoteObj=remoteObj)
    return app.exec()


if __name__ == "__main__":
    main()
我就稍微讲一下下,pyqt大致上与Qt的语法是差不离的,开通客户端的方式也差不多,但需要注意的是,remoteNode.acquireDynamic(‘CommonInterfaceSource’)。
我们再qt上的语法是remoteNode.acquire< CommonInterfaceReplica >(“CommonInterfaceSource”);还记得吧,python里没有acquire的方法,python只有acquireDynamic,所以这里必须输入一个名字。那如果我们在Qt创建服务器的时候没有指定名字的话,在python这里肯定是不行的。
另外,我是把RemoteObject当作参数传入DynamicClient这个类了,在调用DynamicClient类的时候,一定千万要记住必须要引出一个对象,dy = DynamicClient(remoteObj=remoteObj)。你可以不叫dy,叫其他的都可以,但千万要记得有这么一个参数,否则不能用,别问我为什么会知道。
QUrl一致这个也不要说了,跟Qt客户端是一致的,另外我们看看信号和槽函数。
信号sigMessage和 槽函数onMessage一定要跟Qt保持一致,不然就会导致接不到消息的。python虽然不需要那个rep文件和头文件,但这里定义的信号和槽其实就是起到了一样的作用。
还有一点需要注意,因为python中使用的是acquireDynamic,所以连接槽函数必须要在initialized之后才有用。因为我没有在python中做界面,所以开了一个定时器QTimer给服务器定时发送消息。
那我们运行一下,打开Qt的服务器和客户端,再打开python的客户端。

看到了吧,python定时发送的信息Qt服务器有收到,Qt服务器发送的消息,Qt客户端和python客户端都有收到。
第五步 Python创建服务器
最后,我们再用Python创建一个服务器,用python的客户端和Qt的客户端同时连接试试。
创建一个文件Server.py,写入代码:
import sys
from PyQt5.QtCore import QUrl, QTimer, QObject, pyqtSlot, pyqtSignal
from PyQt5.QtWidgets import QApplication
from PyQt5.QtRemoteObjects import QRemoteObjectHost, QRemoteObjectNode, QRemoteObjectDynamicReplica


class MyServerRemote(QObject):
    def __init__(self, parent=None):
        super().__init__(parent)
        self.timerCount = 0
        self.timer = QTimer()

    sendMessage = pyqtSignal(str, name="sigMessage")

    @pyqtSlot(str)
    def onMessage(self, msg):
        print("server get message:", msg)


    def startTimer(self):
        self.timer.timeout.connect(self.slotTimeOut)
        self.timer.start(1000)

    @pyqtSlot()
    def slotTimeOut(self):
        self.timerCount += 1
        self.sendMessage.emit("server start times: " + str(self.timerCount))


def main():
    app = QApplication(sys.argv)
    serverRemote = MyServerRemote()
    remoteHost = QRemoteObjectHost(QUrl('local:interfaces'))
    remoteHost.enableRemoting(serverRemote, "CommonInterfaceSource")
    serverRemote.startTimer()
    return app.exec()


if __name__ == "__main__":
    main()
创建服务器没什么好讲的了,跟Qt服务器一样的。也需要单独写一个类,用作服务器发送和接收信号。python这边我写了一个MyServerRemote,信号和槽也是一样的创建,也开了一个定时器定时发送消息。
没什么好讲的,直接运行试试吧。

运行可以看到,python的客户端和qt的客户端都能收到来自python服务器定时发送的消息,再来看看python的服务器。

python服务器也能收到来自python客户端的定时消息,也能收到来自Qt客户端点击按钮发送的消息。
是不是很棒!


 9882
9882


 被折叠的 条评论
为什么被折叠?
被折叠的 条评论
为什么被折叠?
 到【灌水乐园】发言


