


图像边缘是定义图像内容的基本元素,其在空间域的变现形式为:一系列具有梯度局部极大性质的像素点构成的线性结构。因此,我们检测边缘的最朴素的方法便是对梯度大小进行阈值化。
1、梯度阈值化检测边缘
Sobel算子和Laplacian算子作为高通滤波器,它们具有去除图像中低频成分,保留高频成分的特性,因此常用于图像的边缘检测,具体原理及API介绍见上一篇博客。由于Sobel算子是Canny算子边缘检测的基础,所以在这里展示一下Sobel算子检测边缘的效果。
#include <iostream>
#include <cstring>
#include "opencv2/core/core.hpp"
#include "opencv2/highgui/highgui.hpp"
#include "opencv2/imgproc/imgproc.hpp"

using namespace std;
using namespace cv;

int threshold_value = 0;
char *window_name = "dst";
char *trackbar_value = "value";
Mat sobel, dst;

void Threshold( int, void* );

int main()
{
    Mat xSobel, ySobel, dst;
    Mat src = imread("test.jpg");

    double threshold = 110;
    if(!src.data)
    {
        cout<<"image is not built!"<<endl;
        return -1;
    }
    cvtColor( src, src, CV_RGB2GRAY );
    imshow("src",src);
    //水平方向的Sobel算子
    Sobel(src, xSobel, CV_8U, 1, 0, 3, 0.4, 128);
    //imshow("xSobel", dst);
    //垂直方向的Sobel算子
    Sobel(src, ySobel, CV_8U, 0, 1, 3, 0.4, 128);
    //imshow("ySobel", dst);

    //计算梯度大小,计算过程中用L1范数代替L2范数
    sobel = abs(xSobel)+abs(ySobel);

    //阈值化Sobel
    namedWindow( window_name, CV_WINDOW_AUTOSIZE );
    createTrackbar(trackbar_value,
                  window_name,
                  &threshold_value,
                  255, Threshold );

    // 初始化自定义的阈值函数
    Threshold( 0, 0 );

    // 等待用户按键。如果是ESC健则退出等待过程。
    while(true)
    {
        int c;
        c = waitKey( 20 );
        if( (char)c == 27 )
            break;
    }
}

void Threshold( int, void* )
{

  threshold(sobel, dst, threshold_value, 255, THRESH_BINARY_INV);
  imshow( window_name, dst );
}
运行结果:
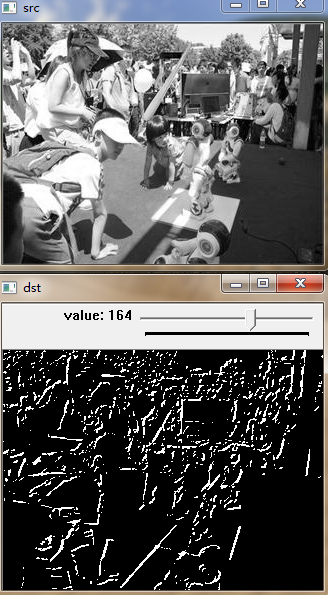
可以看到,通过这种方法检测边缘的难点在于如何选择合适的阈值,使得边缘在保留连续性的同时又不至于太厚,这一想法也是Canny算子边缘检测产生的初衷。
2、Canny算子检测边缘
Canny算子检测边缘是从优化梯度阈值化检测边缘的角度出发的,主要在此基础上进行了非极大值抑制和滞后阈值化的优化。
非极大值抑制主要是用来得到“薄”的边缘的操作,其具体想法是梯度的方向总是与边缘的切向垂直,因此沿该方向得到的局部梯度极大值对应的像素点最有可能构成边缘,所以移除所有梯度非局部极大的像素点即可得到薄边(候选边缘)。
滞后阈值通过两个阈值(高阈值和低阈值)对像素点的梯度大小(幅值)进行阈值化,具体操作为:如果某一像素位置的幅值超过 高阈值, 该像素被保留为边缘像素;如果某一像素位置的幅值小于 低 阈值, 该像素被排除;
如果某一像素位置的幅值在两个阈值之间,该像素仅仅在连接到一个高于 高 阈值的像素时被保留。Canny 推荐的 高:低 阈值比在 2:1 到3:1之间。
OpenCV中Canny算子边缘检测的API函数为Canny,其用法为:
void Canny(InputArray image,
           OutputArray edges,
           double threshold1,
           double threshold2,
           int apertureSize=3,
           bool L2gradient=false )
Parameters:
image – 输入图像(单通道8位);
edges – 输出图像 ;
threshold1 – 滞后阈值化的第一个参数;
threshold2 – 滞后阈值化的第二个参数;
apertureSize – Sobel算子过程中kernel的大小;
L2gradient – 计算梯度大小过程中是否用L2范数,默认L1;
使用过程中需要注意的是Canny算子的第一个阈值和第二个阈值在 1:2 到1:3之间,下面是一段例程:
#include <iostream>
#include <cstring>
#include "opencv2/core/core.hpp"
#include "opencv2/highgui/highgui.hpp"
#include "opencv2/imgproc/imgproc.hpp"
using namespace std;
using namespace cv;
Mat src;
Mat dst, canny_edges;
int edgeThresh = 1;
int lowThreshold;
int const max_lowThreshold = 100;
int ratio = 3;
int kernel_size = 3;
char *window_name = "Canny";
void CannyThreshold(int, void*);
int main( )
{
src = imread("test.jpg");
if( !src.data )
{
cout<<"The image is not built!"<<endl;
return -1;
}
dst.create( src.size(), src.type() );
// 原图像转换为灰度图像
cvtColor( src, src, CV_BGR2GRAY );
namedWindow( window_name, CV_WINDOW_AUTOSIZE );
createTrackbar( "Min Threshold:", window_name, &lowThreshold, max_lowThreshold, CannyThreshold );
CannyThreshold(0, 0);
waitKey(0);
return 0;
}
void CannyThreshold(int, void*)
{
// 平滑降噪
blur( src, canny_edges, Size(3,3) );
// Canny算子检测边缘
Canny( canny_edges, canny_edges, lowThreshold, lowThreshold*ratio, kernel_size );
// 使用 Canny算子输出边缘作为掩码显示原图像
dst = Scalar::all(0);
src.copyTo( dst, canny_edges);
imshow( window_name, dst );
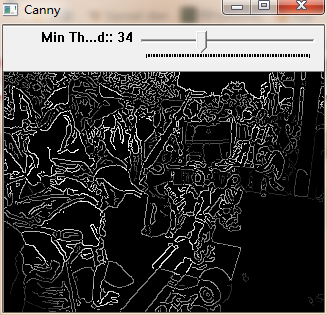
}运行结果:


 437
437


 被折叠的 条评论
为什么被折叠?
被折叠的 条评论
为什么被折叠?
 到【灌水乐园】发言


