


前端笔记之Canvas
一、Canvas基本使用
Canvas是HTML5的画布,Canvas算是“不务正业”的面向对象大总结,将面向对象玩极致。
算法为王!就是说canvas你不会,但是算法好,不怕写业务,不怕代码量,只要稍微学学API就能出活。
Canvas这里是HTML5新标签,直接要了flash的命。
1.1 Canvas简介
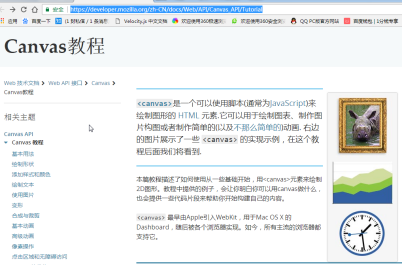
MDN的Canvas在线手册:
https://developer.mozilla.org/zh-CN/docs/Web/API/Canvas_API
了解:
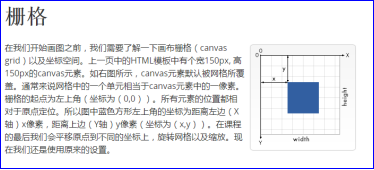
<canvas>是一个可以使用脚本(通常为JavaScript)来绘制图形的 HTML 元素.它可以用于绘制图表、制作图片构图或者制作简单的(以及不那么简单的)动画. 右边的图片展示了一些 <canvas> 的实现示例。
历史:
<canvas> 最早由Apple引入WebKit,用于Mac OS X 的 Dashboard,随后被各个浏览器实现。如今,所有主流的浏览器都支持它。
Mozilla 程序从 Gecko 1.8 (Firefox 1.5) 开始支持 <canvas>。它首先是由 Apple 引入的,用于 OS X Dashboard 和 Safari。Internet Explorer 从IE9开始支持<canvas> ,更旧版本的IE可以引入 Google 的 Explorer Canvas 项目中的脚本来获得<canvas>支持。Chrome和Opera 9+ 也支持 <canvas>。
Canvas兼容到IE9。
1.2 Canvas入门
canvas是HTML5中比较特殊的双标签,可以在body中放:
<html>
<head>
    <meta charset="UTF-8" />
    <title>Document</title>
    <style type="text/css">
        canvas{border:1px solid #000;}
    </style>
</head>
<body>
    <canvas width="600" height="400"></canvas>
</body>
</html>
不能将width、height在CSS中设置,否则画布的像素的会被缩放,画面质量粗糙了。

<canvas>元素可以像任何一个普通的图像一样(有margin,border,background等等属性)被设计。然而,这些样式不会影响在canvas中的实际图像。
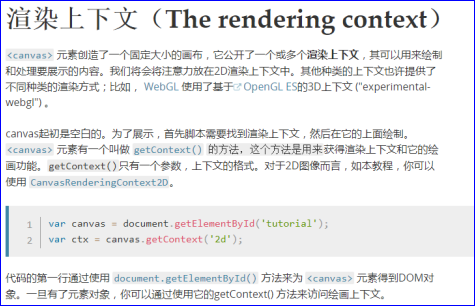
画布没什么用,所有操作都要在“上下文”中进行,这里的上下文是环境的意思,不是面向对象中的this。
<script type="text/javascript">
     //得到画布标签
     var canvas = document.querySelector("canvas");
     //使用上下文,得到一个2D的画布
     var ctx = canvas.getContext("2d");
     //画画
     ctx.fillRect(100, 100, 300, 100);
</script>
Canvas的本质就是用js来画画,所有的绘画函数,都是ctx的方法。

canvas马上开始面对一堆API:
<script type="text/javascript">
//得到画布标签
var canvas = document.querySelector("canvas");
//使用上下文,得到一个2D的画布
var ctx = canvas.getContext("2d");
//绘制矩形
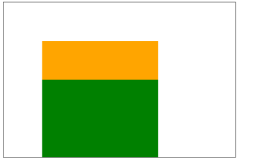
ctx.fillStyle = "orange"; //先提供一个颜色的笔
ctx.fillRect(100, 100, 300, 100); //在根据以上颜色填充
ctx.fillStyle = "green"; //先提供一个颜色的笔
ctx.fillRect(100, 200, 300, 200); //在根据以上颜色填充
</script>
Canvas的坐标系和绝对定位的坐标系是一样的。
二、Canvas绘制形状
2.1绘制形状路径
在Canvas中有两种东西:
l stroke路径【笔触】,也叫描边,就是形状的轮廓
l fill填充,就是里面的颜色
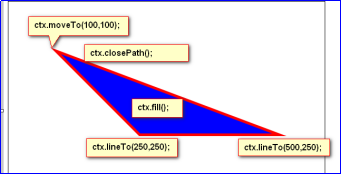
//得到画布标签
var canvas = document.querySelector('canvas');
//使用上下文,得到一个2D画布
var ctx = canvas.getContext("2d");
//画画
ctx.beginPath();     //声明要开始绘制路径
ctx.moveTo(100,100); //移动到绘制点,将“画笔”移动到100,100的位置
ctx.lineTo(250,250); //划线
ctx.lineTo(500,250); //划线
ctx.lineWidth = 10;  //线的粗细
ctx.strokeStyle = "red"; //线的颜色
ctx.fillStyle = "blue"; //准备填充的颜色
ctx.closePath();     //闭合路径(自动补全)
ctx.stroke();        //显示线(绘制线),可以绘制的路径显示出来
ctx.fill();          //填充颜色
只有矩形有快捷方法,比如想绘制多边形,都要用以上这些组合。
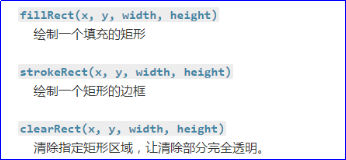
2.2绘制矩形
ctx.fillRect(x,y,w,h);    //绘制填充矩形
ctx.strokeRect(x,y,w,h);   //绘制路径矩形
绘制调色板:
var canvas = document.querySelector('canvas');
var ctx = canvas.getContext("2d");
for (var i = 0;i < 6;i++){
   for (var j = 0;j < 6;j++){
       ctx.fillStyle = 'rgba('+ Math.floor(255-42.5 * i) +','+ Math.floor(255-42.5 * j) +', 200)';
       ctx.fillRect(i * 25, j * 25, 25, 25);
   }
}
记住一句话:Canvas是不可逆,绘制的元素一旦上了屏幕,是无法针对它再次操作。
2.3绘制弧度
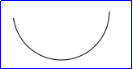
ctx.arc(圆心x, 圆心y, 半径, 开始的弧度, 结束的弧度, 是否逆时针);

ctx.beginPath();  //开始绘制路径
// ctx.arc(100, 100, 60, 0, 6.28, false);
ctx.arc(100, 100, 60, 0, Math.PI * 2, false);
ctx.stroke(); //显示路径线
切一个圆,让切下来的弧边长等于圆的半径,此时弧对应的角度是57.3度左右,此时角度是固定的。


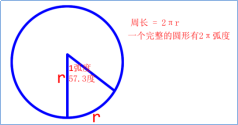
正方向是正右方
在canvas中所有涉及角度的坐标系有两点注意的:
l 0弧度的方向是正右方向。
弧度的顺时针和逆时针:
ctx.arc(100,100,60, 0, 3, false); //绘制圆弧
ctx.arc(100,100,60, 0, 1, true); //绘制圆弧

绘制圆形:
ctx.arc(100,100,60, 0, Math.PI * 2, false);
ctx.arc(100,100,60, 0, 6.28, false);
ctx.arc(100, 100, 60, 0, -6.28, true);
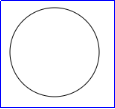
注意:x和y坐标是到圆心的位置,而且圆的大小是半径,后面绘制的形状会覆盖前面的形状。
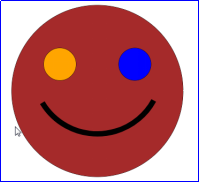
绘制笑脸


<script type="text/javascript">
     var canvas = document.querySelector("canvas");
     var ctx = canvas.getContext("2d");

     //绘制大脸
     ctx.beginPath(); //开始绘制路径
     ctx.arc(300,200, 160, 0, 6.28, false); //绘制圆弧
     ctx.stroke(); //显示路径线
     ctx.fillStyle = "brown";
     ctx.fill();

     //绘制左眼睛
     ctx.beginPath();
     ctx.arc(230,150, 30, 0, 6.28, false);
     ctx.stroke();
     ctx.fillStyle = "orange";
     ctx.fill();

     //绘制右眼睛
     ctx.beginPath();
     ctx.arc(370,150, 30, 0, 6.28, false);
     ctx.stroke();
     ctx.fillStyle = "blue";
     ctx.fill();

     //绘制嘴巴
     ctx.beginPath();
     ctx.arc(300,160, 120, 0.5, 2.6, false);
     ctx.lineWidth = 10;
     ctx.stroke();
</script>
三、使用图片
3.1图片基本使用
canvas中不可能所有形状都自己画,一定是设计师给我们素材,然后使用。
canvas中使用图片的方法:注意,必须等img完全加载后才能呈递图片。
ctx.drawImage();

var canvas = document.querySelector('canvas');
var ctx = canvas.getContext("2d");
//创建一个img标签
var image = new Image()
//设置图片的路径
image.src = "images/baby1.jpg";
//当图片成功加载,就画图(上屏幕)
image.onload = function(){
   //显示图片的API
   ctx.drawImage(image, 100, 100); //表示x和y坐标
}
3.2使用切片
如果2个数字参数,此时表示左上角位置的x和y坐标:
ctx.drawImage(img,100,100);
ctx.drawImage(img图片对象,画布X,画布Y);
如果4个数字参数,此时表示x、y、w、h:
ctx.drawImage(img图片对象, 画布X,画布Y,图片W,图片H);
如果8个数字参数,此时表示:
ctx.drawImage(img,切片X,切片Y,切片W,切片H,画布X,画布Y,图片W,图片H);
//创建一个img标签
var image = new Image()
//设置图片的路径
image.src = "images/baby1.jpg";
//当图片成功加载,就画图(上屏幕)
image.onload = function(){
   //显示图片的API
   // ctx.drawImage(image, 100, 100); //表示x和y坐标
   // ctx.drawImage(image, 100, 100, 150, 150); //表示x和y坐标
   // ctx.drawImage(img,切片X,切片Y,切片W,切片H,画布X,画布Y,图片W,图片H);
   ctx.drawImage(image, 108, 200, 145, 120, 100, 100, 145, 120);
}
图片API:https://developer.mozilla.org/zh-CN/docs/Web/API/Canvas_API/Tutorial/Using_images

3.3简易的图片加载器
var canvas = document.querySelector('canvas');
var ctx = canvas.getContext("2d");
var R = {
   "0":"images/d1.jpg",
   "1":"images/d2.jpg",
   "2":"images/d3.jpg"
}
var arr = [];
for(var k in R){
   arr[k] = new Image(); //创建img对象
   arr[k].src = R[k];    //设置图片地址
   // 当图片成功加载,就画图(上屏幕)
   arr[k].onload = function(){
       ctx.drawImage(arr[k], 50, 50)
   }
}
3.4显示GIF动态图
HTML代码:
<img id="testImg" src="xxx.gif" width="224" height="126">
<p><input type="button" id="testBtn" value="停止"></p>
if ('getContext' in document.createElement('canvas')) {
    HTMLImageElement.prototype.play = function() {
        if (this.storeCanvas) {
            // 移除存储的canvas
            this.storeCanvas.parentElement.removeChild(this.storeCanvas);
            this.storeCanvas = null;
            // 透明度还原
            image.style.opacity = '';
        }
        if (this.storeUrl) {
            this.src = this.storeUrl;
        }
    };
    HTMLImageElement.prototype.stop = function() {
        var canvas = document.createElement('canvas');
        // 尺寸
        var width = this.width, height = this.height;
        if (width && height) {
            // 存储之前的地址
            if (!this.storeUrl) {
                this.storeUrl = this.src;
            }
            // canvas大小
            canvas.width = width;
            canvas.height = height;
            // 绘制图片帧(第一帧)
            canvas.getContext('2d').drawImage(this, 0, 0, width, height);
            // 重置当前图片
            try {
                this.src = canvas.toDataURL("image/gif");
            } catch(e) {
                // 跨域
                this.removeAttribute('src');
                // 载入canvas元素
                canvas.style.position = 'absolute';
                // 前面插入图片
                this.parentElement.insertBefore(canvas, this);
                // 隐藏原图
                this.style.opacity = '0';
                // 存储canvas
                this.storeCanvas = canvas;
            }
        }
    };
}

var image = document.getElementById("testImg"),
    button = document.getElementById("testBtn");

if (image && button) {
    button.onclick = function() {
        if (this.value == '停止') {
            image.stop();
            this.value = '播放';
        } else {
            image.play();
            this.value = '停止';
        }
    };
}
3.5游戏图片资源加载器
//得到画布
var canvas = document.querySelector("canvas");
// 使用上下文,得到一个2D的画布
var ctx = canvas.getContext("2d");
//资源文件
var R = {
   "d1" : "images/d1.jpg",
   "d2" : "images/d2.jpg",
   "d3" : "images/d3.jpg"
}
//遍历这个对象,将他们的地址变为真实图片地址
var count = 0; //已成功加载的图片个数
var length = Object.keys(R).length; //所有图片的总数
for(var k in R){
   //创建image对象
   var image = new Image();
   //设置src图片路径
   image.src = R[k];
   //将R里面的资源文件,变为真正的图片对象
   R[k] = image;
   //当image加载成功后,显示图片在画布上
   image.onload = function(){
       count++; //当某张图片加载成功,给计数器+1
       ctx.clearRect(0,0,600,600)
       //绘制文本,提升用户体验,提示加载的进度
       //填充文字API
       ctx.textAlign = "center";
       ctx.font = "30px 微软雅黑";
       ctx.fillText("正在加载图片:" + count + "/" + length, canvas.width / 2,50)
       //当加载完毕,开始游戏
       if(count == length){
           //开始游戏的回调函数
           ctx.clearRect(0,0,600,600)
           start();
       }
   }
}
// 开始游戏的函数
function start(){
   ctx.drawImage(R["d1"],100,100);
   ctx.drawImage(R["d2"],0,100);
   ctx.drawImage(R["d3"],300,200);
}
四、画布的变形
4.1 translate移动变形
translate()移动画布,rotate()旋转画布。
canvas中不能只移动某一个对象,移动的都是整个画布。
canvas中不能只旋转某一个对象,旋转的都是整个画布。
但是可以用save()、restore()来巧妙设置,实现让某一个元素进行移动和旋转。

var canvas = document.querySelector('canvas');
var ctx = canvas.getContext("2d");
ctx.translate(100, 100); //将画布移动,坐标系就发生变化了
ctx.fillRect(100, 100, 100, 100); //相对于移动后的坐标系开始画画
移动变形、移动的是整个画布、而不是某个元素,在ctx.translate()之后绘制的语句都将被影响。
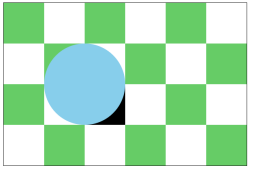
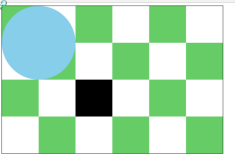
var canvas = document.querySelector('canvas');
var ctx = canvas.getContext("2d");
ctx.translate(100, 100); //将画布移动,坐标系就发生变化了
ctx.fillRect(100, 100, 100, 100); //相对于移动后的坐标系开始画画
ctx.beginPath();
ctx.arc(100,100, 100, 0, 6.28, false);
ctx.fillStyle = 'skyblue';
ctx.fill();
4.2 save()保存和restore()恢复
ctx.save()表示保存上下文的物理性质,ctx.restore()表示恢复最近一次的保存。
save表示保存sava函数之前的状态,restore表示获取save保存的状态。
移动了的元素,会影响不需要移动圆点坐标的元素,所以可以使用以上两个方法保存起来,可以解决让某一个元素移动变形不受影响。
var canvas = document.querySelector('canvas');
var ctx = canvas.getContext("2d");

ctx.save();
ctx.translate(100, 100); //将画布移动,坐标系就发生变化了
ctx.fillRect(100, 100, 100, 100); //相对于移动后的坐标系开始画画
ctx.restore();

ctx.beginPath();
ctx.arc(100,100, 100, 0, 6.28, false);
ctx.fillStyle = 'skyblue';
ctx.fill();
4.3 rotate()旋转变形
旋转的是整个坐标系,坐标系以0,0点为中心点进行旋转。
rotate(1)的参数,是弧度,旋转的也不是矩形,而是画布。
var canvas = document.querySelector("canvas");
var ctx = canvas.getContext("2d");
ctx.rotate(1); //1表示57.3度(1弧度)
ctx.fillRect(100, 100, 100, 100); //相对于旋转后的坐标系开始画画
如果想旋转某一个元素,必须将坐标轴原点,放到要旋转的元素身上,然后再旋转。
ctx.save();
ctx.translate(150,150)
ctx.rotate(1); //1表示57.3度(1弧度)
ctx.fillRect(-50, -50, 100, 100); //相对于旋转后的坐标系开始画画
ctx.restore();
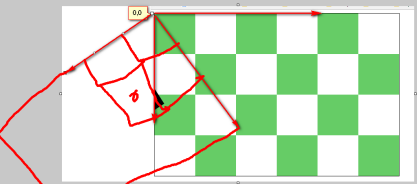
坐标系移动到物体的中心点,物体以负半宽、半高、为x,y绘制。
function Box(){
    this.x = 150;
    this.y = 150;
    this.w = 100;
    this.h = 100;
    this.deg = 0;
}
Box.prototype.render = function(){
    ctx.save()
    ctx.translate(this.x,this.y)
    ctx.rotate(this.deg);
    ctx.fillRect(-this.w / 2,-this.h / 2,this.w,this.h);
    ctx.restore()
}
Box.prototype.update = function(){
    this.deg += 0.2;
}
var b = new Box();
b.render();
setInterval(function(){
    ctx.clearRect(0,0,600,400)
    b.update();
    b.render();
},20);
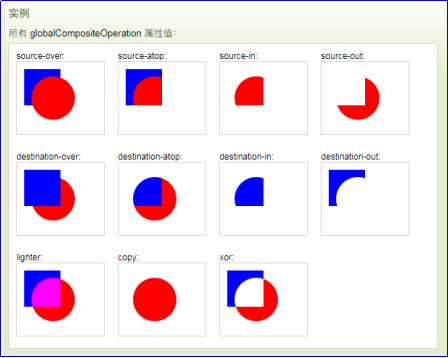
globalCompositeOperation
用来设置新图像和老图形如何“融合”、“裁剪”。
值有以下这些:
新图形是:source,老图形是destination
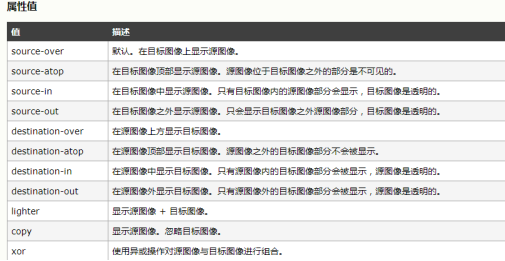
ctx.globalCompositeOperation="destination-over";

五、FlappyBird游戏
5.1游戏结构
游戏采用中介者模式开发,Game类统领全局,负责读取资源、设置定时器、维护各种演员的实例,也就是说所有的演员都是Game类new出来,当做一个子属性。
也就是,游戏项目外部就一条语句:
var game = new Game();
其他的所有语句都写在Game类里面。
需要的类:
Game类:         中介者,读取资源、设置定时器、维护各种演员的实例
Bird类:         小鸟类,这个类是单例的,实例化一次
Pipe类:         管子类
Land类:         大地类
background类:   背景类
<body>
    <canvas width="414" height="650"></canvas>
</body>
<script type="text/javascript" src="js/lib/underscore-min.js"></script>
<script type="text/javascript" src="js/Game.js"></script>
<script type="text/javascript" src="js/Bird.js"></script>
<script type="text/javascript" src="js/Land.js"></script>
<script type="text/javascript" src="js/Pipe.js"></script>
<script type="text/javascript" src="js/Background.js"></script>
5.2创建Game类:开始界面、加载资源
(function(){
    window.Game = function() {
        this.f = 0; //帧编号
        this.init();//初始化DOM
    }

    Game.prototype.init = function() {
        this.canvas = document.getElementById("canvas");
        this.ctx = this.canvas.getContext("2d");
        //R对象表示资源文件,图片总数
        this.R = {
            "bg_day": "images/bg_day.png",
            "land": "images/land.png",
            "pipe_down": "images/pipe_down.png",
            "pipe_up": "images/pipe_up.png",
            "bird0_0": "images/bird0_0.png",
            "bird0_1": "images/bird0_1.png",
            "bird0_2": "images/bird0_2.png",
        }

        var self = this;
        //遍历对象用for in语句
        //遍历这个对象,将它们变为真的图片地址
        var count = 0; //计算加载好的图片总数(成功加载一张就+1)
        var length = Object.keys(this.R).length; //得到图片的总数
        for (var k in this.R) {
            //创建一个img标签,发出图片的请求,目前img对象是孤儿节点
            var img = new Image();
            //将这个R[k]对象赋值给src设置图片的路径
            img.src = this.R[k];
            //将R里面的资源文件,改为img真的图片对象
            this.R[k] = img;
            //当图片加载完毕,就画图上画布(图片必须load才能上画布)
            img.onload = function () {
                count++; //当某张图片加载完毕,给计数器+1
                //清屏
                self.clear()
                //绘制文本,提升用户加载到什么程度了

                //save和restore方法配合使用,防止污染其他样式
                self.ctx.save(); //保存状态
                self.ctx.textAlign = "center";
                self.ctx.font = "18px 微软雅黑";
                self.ctx.fillStyle = "blue";
                //填充文字
                self.ctx.fillText(`加载中 ${count} / ${length}`, self.canvas.width / 2, 100);
                self.ctx.restore(); //恢复保存的状态
                //当加载完毕的图片总数==图片总数时,此时就开始加载图片并开始游戏
                if (count == length) {
                    self.start(); //开始游戏的回调函数
                }
            }
        }
    }
    //清屏
    Game.prototype.clear = function() {
        this.ctx.clearRect(0, 0, this.canvas.width, this.canvas.height)
    }
    // 游戏主循环
    Game.prototype.start = function () {
        var self = this;
        this.timer = setInterval(function(){
            self.f++;
            // 清屏
            self.clear();
            //显示帧率
            self.ctx.font = "16px 微软雅黑";
            self.ctx.fillText(self.f,10,20);
        },20);
    }
})();
5.3创建background.js背景类
(function () {
    window.Background = function () {
       this.image = game.R["bg_day"]; //图片
       this.x = 0;
    }
    Background.prototype.render = function () {
        // 画一个矩形,补充一下天空的颜色
        game.ctx.save()
        game.ctx.fillStyle = "#4ec0ca";
        game.ctx.fillRect(0,0,game.canvas.width,game.canvas.height - 512);
        //第一步:为了不穿帮绘制背景连续放3张图片让背景无缝滚动             game.ctx.drawImage(this.image,this.x,game.canvas.height - 512);
        game.ctx.drawImage(this.image,this.x + 288 ,game.canvas.height - 512);
        game.ctx.drawImage(this.image,this.x + 288 * 2 ,game.canvas.height - 512);
        game.ctx.restore();
    }
    Background.prototype.update = function () {
        this.x--;
        if(this.x < -288){
            this.x = 0;
        }
    }
})();
Game.prototype.start = function() {
    // 游戏开始主 循环
    var self = this;
    this.background = new Background();// new 背景类
    this.land = new Land(); //new实例化大地类
    this.timer = setInterval(function(){
        self.f++;
        self.clear();
        // 渲染 和 更新 背景类
        self.background.render();
        self.background.update();
        // 每隔100帧,实例化一根管子类
        self.f % 100 == 0 && new Pipe();
        // 渲染 和 更新 大地类
        self.land.render();
        self.land.update();
        // 渲染 和 更新所有管子类
        for (var i = 0; i < self.pipeArr.length; i++) {
            self.pipeArr[i].render()
            self.pipeArr[i].update()
        }
        self.ctx.font = "16px 微软雅黑";
        self.ctx.fillText(self.f,10,20);
    }, 20)
}
5.4创建Land.js大地类
(function () {
    window.Land = function () {
        this.image = game.R["land"]; //图片
        this.x = 0;
    }
    Land.prototype.render = function () {
        game.ctx.drawImage(this.image, this.x, game.canvas.height - 112);
        game.ctx.drawImage(this.image, this.x + 336, game.canvas.height - 112);
        game.ctx.drawImage(this.image, this.x + 336 * 2, game.canvas.height - 112);
    }
    Land.prototype.update = function () {
        this.x--;
        if (this.x < -336) {
            this.x = 0;
        }
    }
})();
5.5创建Pipe.js管子类:
(function () {
    window.Pipe = function () {
        this.pipeDown = game.R["pipe_down"]; //上管子
        this.pipeUp = game.R["pipe_up"]; //下管子

        this.pipeDownH = _.random(50,300); //随机一个上面管子的高度(因)
        this.space = 120; //上下管子之间的空隙(因)
        //下面管子的高度随之而定了(果),高度-大地高-上管子高-空隙
        this.pipeUpH = game.canvas.height - 112 - this.pipeDownH - this.space;
        this.x = game.canvas.width; //让管子在屏幕右侧外面就绪
        game.pipeArr.push(this); //将自己存进数组

    }
    Pipe.prototype.render = function () {
        //两根管子在画布的位置(image对象, 切片X, 切片Y, 切片W,切片H,画布X,画布Y,图片W,图片H)
        //渲染上面的管子
        game.ctx.drawImage(this.pipeDown, 0, 400 - this.pipeDownH, 52, this.pipeDownH, this.x, 0, 52, this.pipeDownH);
        //下面的管子
        game.ctx.drawImage(this.pipeUp, 0, 0, 52, this.pipeUpH, this.x, this.pipeDownH + this.space, 52, this.pipeUpH);
    }
    Pipe.prototype.update = function () {
       this.x -= 2;//更新管子(让管子移动)
       if(this.x < -52){
           this.goDie(); //超过屏幕左侧-52的位置(删除管子)
       }
    }
    Pipe.prototype.goDie = function () {
        for(var i = game.pipeArr.length - 1; i >= 0; i--){
             if (game.pipeArr[i] == this){
                 game.pipeArr.splice(i,1);
             }
        }
    }
})();
5.6创建Bird.js小鸟类
(function () {
    window.Bird = function () {
        this.img = [game.R["bird0_0"], game.R["bird0_1"], game.R["bird0_2"]]; //小鸟
        this.x = 100;
        this.y = 100;
        //位置,这里的x,y不是小鸟的左上角位置,而是小鸟的中心点
        // this.x = game.width / 2 * 0.618;
        this.dy = 0.2; //下降的增量,每帧的恒定变
        this.deg = 0; //旋转
        this.wing = 0; //拍打翅膀的编号
    }

    //渲染小鸟
    Bird.prototype.render = function() {
        game.ctx.save();
        game.ctx.translate(this.x,this.y);
        game.ctx.rotate(this.deg);
        //减去24是因为x、y是中心点位置(减去宽度和高度的一半)
        game.ctx.drawImage(this.img[this.wing],-24,-24);
        game.ctx.restore()
    }
    //更新小鸟
    Bird.prototype.update = function () {
        // 下降的增量0.88,变化的量也在变,这就是自由落体
        this.dy += 0.88;
        //旋转角度的增量
        this.deg += 0.08;
        this.y += this.dy;
        //每2帧拍打一次翅膀
        game.f % 2 && this.wing++;
        if(this.wing > 2){
            this.wing = 0;
        }
    }
    //小鸟飞
    Bird.prototype.fly = function() {
        //小鸟只要有一个负的dy此时就会向上飞,因为this.y += 一个数
        this.dy = -10;
        this.deg = -1;
    }
})();
5.7碰撞检测
小鸟的碰撞检测,使用AABB盒方法,就是把小鸟看作是一个矩形,去判断有没有碰撞。
碰撞公式:
鸟的X2 >管子的X1 && (鸟的Y1 < 管子的Y1 || 鸟的Y2 > 管子的Y2) && 鸟的X1 < 管子的X2

AABB盒,轴对齐包围盒也称为矩形盒,要自己会调试,将关键的数据fillText()渲染到界面上。
碰撞检测写在管子身上,因为管子很多,只需要检测有没有碰撞到那唯一的小鸟即可,没有for循环。
如果写在鸟身上,要用for循环遍历所有管子,一一检测。
六、场景管理器
游戏是有各种场景的:
① 欢迎界面
② 教学界面
③ 游戏界面
④ GameOver界面
l 场景管理器(SceneManager)的好处就是可以管理零碎的东西。
l Game类现在不再直接管理Bird、Background、Pipe、Land了。而是只管理场景管理器。
l 场景管理器负责管理其他类的实例化、更新渲染。
删除Game类所有的实例化、更新、渲染,然后创建场景管理器,并实例化场景管理器
继续引入图片资源:
this.R = {
   ...
   "title" : "images/title.png",
   "button_play" : "images/button_play.png",
   "text_ready" : "images/text_ready.png",
   "tutorial" : "images/tutorial.png",
   "gameoverbg": "images/gameoverbg.png",
   "b0" : "images/b0.png",
   "b1" : "images/b1.png",
   "b2" : "images/b2.png",
   "b3" : "images/b3.png",
   "b4" : "images/b4.png",
   "b5" : "images/b5.png",
   "b6" : "images/b6.png",
   "b7" : "images/b7.png",
   "b8" : "images/b8.png",
   "b9" : "images/b9.png",
   "b10" : "images/b10.png",
   "b11" : "images/b11.png"
}
3号场景:
window.SceneManager = function () {
    //当前场景的编号
    this.smNumber = 1;
    // 初始化场景编号的方法
    this.init(1);
    this.bindEvent();
}


(function () {
    //场景初始化方法
    SceneManager.prototype.init = function(number) {
        switch(number){
            case 1:
                // 1号场景
                break;
            case 2:
                // 2号场景
                break;
            case 3:
                // 3号场景:游戏的主场景
                this.background = new Background(); //实例化背景类
                this.land = new Land(); //实例化大地类
                this.bird = new Bird(); //实例化小鸟类
                break;
        }
    }
    //场景渲染方法
    SceneManager.prototype.render = function () {
        //这里才是真正的渲染方法,可以写动画,因为game类里面render此方法了
        switch (this.smNumber) {
            case 1:
                break;
            case 2:
                break;
            case 3:
                // 渲染 和 更新背景
                this.background.render();
                this.background.update();

                // 每间隔100帧,实例化一根管子
                game.f % 100 == 0 && new Pipe(); //实例化管子类
                // 循环遍历管子数组,更新和渲染管子类
                for(var i = 0; i < game.pipeArr.length;i++){
                    game.pipeArr[i].render();
                    game.pipeArr[i].update();
                }
                // 渲染 和 更新大地类
                this.land.render();
                this.land.update();

                // 渲染 和 更新小鸟类
                this.bird.render();
                this.bird.update();
                break;
        }
    }

})();
修改碰撞检测:
if(game.sm.bird.x2 > this.x1 && ( game.sm.bird.y1 < this.y1 || game.sm.bird.y2 > this.y2 ) && game.sm.bird.x1 < this.x2) { }
3号场景事件:
SceneManager.prototype.bindEvent = function(){
    var self = this;
    game.canvas.onmousedown = function(e){
        //添加事件监听,要根据当前场景是几号,触发对应的场景事件
        switch(self.smNumber){
            case 1:
                break;
            case 2:
                break;
            case 3:
                self.bird.fly();
                break;
            case 4:
                break;
        }
    }
}
以上是全是3号场景业务,都已经完成。
1号场景:
//场景初始化方法
//不管什么时候来到这个场景,此时都有一个默认就位状态
//我们动画是可以重复的,但是这个函数不是每帧执行。
SceneManager.prototype.init = function(number) {
    //init中只有一个初始化参数,不要涉及到运动
    switch(number){
        case 1:
            // 1号场景:游戏封面和开始按钮场景的初始化
            this.background = new Background(); //实例化背景类
            this.land = new Land();     //实例化大地类
            this.titleY = -48;         //初始化title位置
            this.titleYTarget = 120; //title停留的位置
            this.buttonY = game.canvas.height; //初始化按钮的位置
            this.buttonYTarget = 360;          //按钮停留的位置

            this.birdY = 180;         //初始化小鸟的位置
            this.birdD = "down";     //小鸟的运动方向
            break;
        case 2:
            // 2号场景
            break;
        case 3:
            // 3号场景:游戏的主场景
            this.background = new Background(); //实例化背景类
            this.land = new Land(); //实例化大地类
            this.bird = new Bird(); //实例化小鸟类
            break;
    }
}

//场景渲染方法
SceneManager.prototype.render = function () {
    //这里才是真正的渲染方法,可以写动画,因为game类里面render此方法了
    switch (this.smNumber) {
        case 1:
            // 1号场景:游戏封面和开始按钮场景的更新和渲染
            // 渲染 和 更新背景
            this.background.render();
            this.background.update();
            // 渲染 和 更新大地类
            this.land.render();
            this.land.update();
            //渲染title图片
           game.ctx.drawImage(game.R["title"],(game.canvas.width-178)/2,this.titleY);

game.ctx.drawImage(game.R["button_play"],(game.canvas.width-116)/2,this.buttonY);
            game.ctx.drawImage(game.R["bird1_2"], (game.canvas.width - 48) / 2, this.birdY);
            //title下降运动到目标位置
            this.titleY += 2;
            if(this.titleY > this.titleYTarget){
                this.titleY = this.titleYTarget;
            }
            //按钮上升运动到目标位置
            this.buttonY -= 5;
            if (this.buttonY < this.buttonYTarget) {
                this.buttonY = this.buttonYTarget;
            }
            //小鸟不停的上下运动
            if(this.birdD == "down") {
                this.birdY += 2;
                if (this.birdY > 260){
                    this.birdD = "up";
                }
            } else if (this.birdD == "up"){
                this.birdY -= 2;
                if (this.birdY < 170) {
                    this.birdD = "down";
                }
            }
            break;
        case 2:
            break;
        case 3:
            ...
            break;
    }
}

//事件监听方法
SceneManager.prototype.bindEvent = function () {
    //根据当前场景触发事件
    var self = this;
    game.canvas.onmousedown = function(e) {
        //鼠标点击的坐标位置
        var x = e.offsetX;
        var y = e.offsetY;
        switch (self.smNumber) {
            case 1:
                //1号场景:游戏封面和开始按钮场景的初始化
                //得到按钮的上下左右包围盒
                var left  = (game.canvas.width - 116) / 2
                var right = (game.canvas.width - 116) / 2 + 116;
                var up    = self.buttonYTarget;
                var down  = self.buttonYTarget + 60;
                if(x >= left && x <= right && y <= down && y >= up){
                    //点击进去2号场景
                    self.smNumber = 2;
                    self.init(2);
                }
                break;
            case 2:
                break;
            case 3:
                break;
        }
    }
}
以上,1号场景完成。
2号场景:
2号场景init初始化:
SceneManganer.prototype.init = function(number) {
    switch (number) {
        case 1:
            ...
            break;
        case 2:
            // 教学 场景
            this.background = new Background();
            this.land = new Land();
            this.readyY = -62; //2号场景的ready图片
            // 修改 tutorial 的透明度
            this.tutorial = 1
            this.tutorialD = "A"
            break;
        case 3:
            ...
            break;
        case 4:
            ...
            break;
    }
};

2号场景render渲染方法:
//场景渲染方法
SceneManager.prototype.render = function () {
    //这里才是真正的渲染方法,可以写动画,因为game类里面render此方法了
    switch (this.smNumber) {
        case 1:
            ...
            break;
        case 2:
            // 2号场景:教学场景
            this.background.render();
            this.background.update();
            // 渲染 和 更新大地类
            this.land.render();
            this.land.update();
            //渲染title图片
           game.ctx.drawImage(game.R["text_ready"],(game.canvas.width-196)/2,this.readyY)
           game.ctx.drawImage(game.R["bird0_1"],100,180);

            this.readyY += 2;
            if (this.readyY > this.readyYTarget) {
                this.readyY = this.readyYTarget;
            }
            game.ctx.save();
            //让一个物体闪烁
            if(this.tutorialD == "A"){
                this.tutorial -= 0.04;
                if(this.tutorial < 0.1){
                    this.tutorialD = "B"
                }
             }else if(this.tutorialD == "B"){
                this.tutorial += 0.04;
                if(this.tutorial > 1){
                    this.tutorialD = "A"
                }
            }
            // ctx.globalAlpha改变透明度的API
            game.ctx.globalAlpha = this.tutorialOpacity;
            game.ctx.drawImage(game.R["tutorial"], (game.canvas.width - 114) / 2, 250);
            game.ctx.restore();
            break;
        case 3:
           ...
            break;
        case 4:
           ...
            break;
    }
}

2号场景bindEvent监听事件方法:
//事件监听方法
SceneManager.prototype.bindEvent = function () {
    //根据当前场景触发事件
    var self = this;
    game.canvas.onmousedown = function(e) {
        //鼠标点击的坐标位置
        var x = e.offsetX;
        var y = e.offsetY;
        switch (self.smNumber) {
            case 1:

                break;
            case 2:
                //2号场景
                var left = (game.canvas.width - 114) / 2
                var right = (game.canvas.width - 114) / 2 + 114;
                var up = 250;
                var down = 350;
                if (x >= left && x <= right && y <= down && y >= up) {
                    //点击进去2号场景
                    self.smNumber = 3;
                    self.init(3);
                }
                break;
            case 3:
                //3号场景:游戏的主场景
                self.bird.fly();
                break;
        }
}
}
4号场景:
4号场景init方法
SceneManager.prototype.init = function(number) {
    //init中只有一个初始化参数,不要涉及到运动
    switch(number){
        case 1:
            break;
        case 2:
            break;
        case 3:
            break;
        case 4:
            //4号场景:死亡场景
            //红色边框图片的透明度
            this.GameOverBg = 1;
            //小鸟落地死亡的爆炸动画初始化图片编号
            this.boom = 0;
            break;
    }
}
碰撞检测死亡,进入4号场景:
//碰撞检测
if (game.sm.bird.x1 < this.x2 && game.sm.bird.x2 > this.x1 && (game.sm.bird.y1 < this.y1 || game.sm.bird.y2 > this.y2)){
    //死亡之后,进入4号场景(小鸟下坠)
    document.getElementById("die").play();
    game.sm.smNumber = 4;
    game.sm.init(4);
    return;
}else if(!this.isScore && game.sm.bird.x1 > this.x2){
    // 这里是记分,条件就是把是否加分的true或false给管子身上
    this.isScore = true;
    game.sm.score++;
    document.getElementById("score").play();
}
4号场景render渲染方法:
//场景渲染方法
SceneManager.prototype.render = function () {
    switch (this.smNumber) {
        case 1:
            ...
            break;
        case 2:
            break;
        case 3:
           ...
            break;
        case 4:
        // 让所有的物体静止,只渲染,不更新(update不用调用了)
        this.background.render();
        this.land.render();
        for (var i = 0; i < game.pipeArr.length; i++) {
            game.pipeArr[i].render();
        }
        this.bird.render();
        // 让鸟急速下降
        this.bird.y += 10;
        //播放声音
        document.getElementById("down").play();
        // 保证鸟头朝下掉
        this.bird.deg += 0.5;
        if (this.bird.deg > 1.57){
            this.bird.deg = 1.57;
        }

        //撞击地面产生爆炸动画,并且小鸟飞升
        if(this.bird.y > game.canvas.height - 112 - 17){
            //小鸟撞地停留在原位
            this.bird.y = game.canvas.height - 112 - 17;
            game.f % 2 == 0 && this.boom++;
            if (this.boom >= 11) {
                //清空管子数组和分数,为下一回合准备
                game.pipeArr = [];
                this.score = 0;
                //回到1号场景
                this.smNumber = 1;
                this.init(1);
                this.boom = 5;
                // clearInterval(game.timer); //停止游戏主循环
            }
            //渲染爆炸动画
            game.ctx.drawImage(game.R["b" + this.boom], this.bird.x - 50, this.bird.y - 100);

        }
        //渲染红色边框
        this.GameOverBg -= 0.03;
        if(this.GameOverBg < 0){
            this.GameOverBg = 0;
        }
        game.ctx.save()
        game.ctx.globalAlpha = this.GameOverBg;
        game.ctx.drawImage(game.R["gameoverbg"],0,0,game.canvas.width,game.canvas.height)
        game.ctx.restore();
        break;
      }
}
Bird.prototype.update = function(){
    this.y += this.dy; //下降的速度
    this.deg += 0.08;
    if(this.deg > 1.57){
        this.deg = 1.57;
}
//掉地死亡
    if(this.y > game.canvas.height - 112){
        document.getElementById('die').play();
        game.sm.smNumber = 4;
        game.sm.init(4);
}
}
添加键盘事件和声音、分数:
<audio src="music/die.ogg" id="die"></audio>
<audio src="music/down.ogg" id="down"></audio>
<audio src="music/fly.ogg" id="fly"></audio>
<audio src="music/score.ogg" id="score"></audio>
<canvas id="canvas" width="414" height="650" tabindex="1"></canvas>
写在bindEvent里:
ame.canvas.onkeydown = function(e){
    switch(self.smNumber){
        case 3:
            if(e.keyCode == 32){
                self.bird.fly();
            }
            break;
    }
}
game.canvas.focus();
七、Canvas动画
让元素在canvas上运动,需要使用定时器。
canvas使用了一个特殊的模式,上画布的元素,立刻被像素化。也就是说,上画布的元素,你将得不到这个“对象”的引用。比如,一个圆形画到了画布上面,此时就是一堆的像素点,不是一个整体的对象了,你没有任何变量能够得到这个对象,改变这个对象的属性。也就是说,这种改变的思路在canvas中是行不通的。
要实现动画,必须:每帧重新画一个。
所以,canvas的画图原理是:
清屏 → 重绘 →清屏 → 重绘 →清屏 → 重绘 →清屏 → 重绘 →清屏 → 重绘 →清屏 → 重绘 →
清屏 → 重绘 →...
注意:千万不要将得到的Canvas和ctx放到init中,因为new一个球,来一个定时器得到一个Canvas画布。
7.1小球反弹
var canvas = document.querySelector("canvas");
var ctx = canvas.getContext("2d");
function Ball(x,y,r){
   //传入小球的属性,x和y表示小球left和top的位置
   this.x = x;
   this.y = y;
   this.r = r;
   //当增量的dx、dy都为0的时候再随机一次
   do{
       this.dx = parseInt(Math.random() * 18) - 9;
       this.dy = parseInt(Math.random() * 18) - 9;
   }while(this.dx == 0 || this.dy == 0);
   //随机颜色
   var colors = ['#f90','#ff0','#09c','#c06','#F99','#9c3','#6cc','#9cc'];
   this.color = colors[parseInt(Math.random() * colors.length)]
   arr.push(this); //将小球的实例放进数组
}
//渲染方法,画一个小球
Ball.prototype.render = function(){
   ctx.beginPath();
   ctx.arc(this.x, this.y, this.r, 0,Math.PI * 2 ,false);
   ctx.fillStyle = this.color;
   ctx.fill();
}
Ball.prototype.update = function(){
   this.x += this.dx;
   this.y += this.dy;
   if(this.x >= canvas.width - this.r || this.x <= this.r){
       this.dx = -this.dx
   }
   if(this.y >= canvas.height - this.r || this.y <= this.r){
       this.dy = -this.dy;
   }
}
var arr = [];
var f = 0;
//开始定时器,每一帧清屏、更新、渲染所有小球
setInterval(function(){
   f++;
   //清屏
   ctx.clearRect(0, 0, canvas.width, canvas.height);
   //渲染
   for(var i = 0;i < arr.length;i++){
       arr[i].render();
       arr[i].update();
   }
   ctx.font = "18px 微软雅黑";
   ctx.fillStyle = "blue";
   ctx.fillText(f, 10, 20)
},20);
var count = 60;
while(count--){
   new Ball(100,100,20);
}
7.2炫彩小球
var canvas = document.querySelector("canvas");
var ctx = canvas.getContext("2d");
canvas.width = document.documentElement.clientWidth;
canvas.height = document.documentElement.clientHeight;
function Ball(x,y,r){
   //传入小球的属性,x和y表示小球left和top的位置
   this.x = x;
   this.y = y;
   this.r = r;
   //当增量的dx、dy都为0的时候再随机一次
   do{
       this.dx = parseInt(Math.random() * 18) - 9;
       this.dy = parseInt(Math.random() * 18) - 9;
   }while(this.dx == 0 || this.dy == 0);
   //随机颜色
   var colors = ['#f90','#ff0','#09c','#c06','#F99','#9c3','#6cc','#9cc'];
   this.color = colors[parseInt(Math.random() * colors.length)]
   arr.push(this); //将小球的实例放进数组
}
//渲染方法,画一个小球
Ball.prototype.render = function(){
   ctx.beginPath();
   ctx.arc(this.x, this.y, this.r, 0,Math.PI * 2 ,false);
   ctx.fillStyle = this.color;
   ctx.fill();
}
Ball.prototype.update = function(){
   this.x += this.dx;
   this.y += this.dy;
   this.r--;
   if(this.r <= 0){
       this.goDie();
   }
   if(this.x >= canvas.width - this.r || this.x <= this.r){
       this.dx = -this.dx
   }
   if(this.y >= canvas.height - this.r || this.y <= this.r){
       this.dy = -this.dy;
   }
}
Ball.prototype.goDie = function(){
   for(var i = arr.length-1; i >= 0; i--){
       if(arr[i] == this){
           arr.splice(i,1); //从数组第i项,删除一项
       }
   }
}
var arr = [];
var f = 0;
setInterval(function(){
   f++;
   //清屏
   ctx.clearRect(0, 0, canvas.width, canvas.height);
   //渲染
   for(var i = 0;i < arr.length;i++){
       arr[i].render();
       arr[i].update();
   }
   ctx.font = "18px 微软雅黑";
   ctx.fillStyle = "blue";
   ctx.fillText(f, 10, 20)
},20);

canvas.onmousemove = function(e){
   new Ball(e.offsetX,e.offsetY, 30);
}


 387
387


 被折叠的 条评论
为什么被折叠?
被折叠的 条评论
为什么被折叠?
 到【灌水乐园】发言


