


在看imooc打造Android中的流式布局和热门标签这个课程时,感觉没有什么太大难度,但是一练习就发现有很多问题会不断出现,于是就有了这个笔记…..
个人笔记,个人理解 , 如有错误欢迎指正
要想实现流式布局 Android中没有现成的控件,所以需要我们自己写,也就传说中的自定义View啦!
对自定义View的了解不是很多, 目前我的理解是
1、 继承View或者ViewGroup (或者其子类)
2、 根据需要重写其方法
3、 使用
其实这三点就是废话。。。。但也的确就是这样的=.=
继承
流式布局 应该都见过,它是要放控件的容器,所以不能继承View 必须继承ViewGroup或其子类
视频中继承的是ViewGroup 至于为什么不继承RelativeLayout、LinearLayout、FrameLayout 我也没有想太明白。。。。
继承后必须实现protected void onLayout(boolean changed, int l, int t, int r, int b) {} 和 几个构造器
onLayout 这个方法是设置子view的位置 ,那么设置位置的前提 是要知道要设置子view的大小吧
那么需要用到onMeasure方法, 这个是测量子View和自身的宽高
如果想要知道子View的一些参数那么得需要 子view.getLayoutParams这个方法,返回类型的是ViewGroup.LayoutParams
我们可能会需要子View的margin,然而能获取子ViewMargin 的是ViewGroup.MarginLayoutParams这个类,
所以我们子view的父容器(也就是我们自定义的ViewGroup)必须返回子View一个ViewGroup.MarginLayoutParams类型的LayoutParams,怎么返回呢
这个方法是在public LayoutParams generateLayoutParams(AttributeSet attrs) {}中返回的
OK,继承如下
public class MyGroupView extends ViewGroup {
    public MyGroupView(Context context) {
        this(context, null);
    }
    public MyGroupView(Context context, AttributeSet attrs) {
        this(context, attrs, 0);
    }
    public MyGroupView(Context context, AttributeSet attrs, int defStyleAttr) {
        super(context, attrs, defStyleAttr);
    }

    @Override
    protected void onMeasure(int widthMeasureSpec, int heightMeasureSpec) {
     super.onMeasure(widthMeasureSpec,heightMeasureSpec);
    }
    @Override
    protected void onLayout(boolean changed, int l, int t, int r, int b) {

    }
  @Override
    public LayoutParams generateLayoutParams(AttributeSet attrs) {
        return super.generateLayoutParams(attrs);
    }
 }
重写
1、重写generateLayoutParams,让其返回MarginLayoutParams类型,这样子View才可获取Margin
    @Override
    public LayoutParams generateLayoutParams(AttributeSet attrs) {
        return new MarginLayoutParams(getContext(), attrs);
    }
2、重写onMeasure,这样才可以知道ViewGroup应该绘制多大
@Override
    protected void onMeasure(int widthMeasureSpec, int heightMeasureSpec) {
        int width_size = MeasureSpec.getSize(widthMeasureSpec);
        int height_size = MeasureSpec.getSize(heightMeasureSpec);
        int width_mode = MeasureSpec.getMode(widthMeasureSpec);
        int height_mode = MeasureSpec.getMode(heightMeasureSpec);
        int width = 0, height = 0, line_width = 0, line_height = 0;
        int mCount = getChildCount();
        int viewWidth = 0, viewHeight = 0;
        //遍历ChildView 获得 width 和height
        for (int i = 0; i < mCount; i++) {
            View view = getChildAt(i);
            measureChild(view, widthMeasureSpec, heightMeasureSpec);
            MarginLayoutParams params = (MarginLayoutParams) view.getLayoutParams();

            viewWidth = params.leftMargin + params.rightMargin + view.getMeasuredWidth();
            viewHeight = params.topMargin + params.bottomMargin + view.getMeasuredHeight();

            if (line_width + viewWidth > width_size - getPaddingRight() - getPaddingLeft()) {//换行
                width = Math.max(width, line_width);//宽度为最宽的行宽
                height += line_height;//高度累加

                //清除以前的宽高
                line_width = viewWidth ;
                line_height = viewHeight;
            } else {//无需换行
                line_width += viewWidth;//累加
                line_height = Math.max(line_height, viewHeight);//高度为最高的行高
            }

            if (i == mCount - 1) {//最后一个控件
                width = Math.max(width, line_width);//宽度为最宽的行宽
                height += line_height;//高度累加
            }

        }

        setMeasuredDimension(//如果是EXACTLY设置原来大小,如果不是则设置计算后的大小
                width_mode == MeasureSpec.EXACTLY ? width_size : width + getPaddingRight() + getPaddingLeft(),//
                height_mode == MeasureSpec.EXACTLY ? height_size : height + getPaddingTop() + getPaddingBottom()//
        );

    }
3、重写onLayout,开始分配每个子View的位置
@Override
    protected void onLayout(boolean changed, int l, int t, int r, int b) {
        int line_width = getPaddingLeft(), line_height = 0;
        int mCount = getChildCount();
        int left = 0, top = getPaddingTop();

        //遍历ChildView
        for (int i = 0; i < mCount; i++) {
            View view = getChildAt(i);
        //获得子View属性
            MarginLayoutParams params = (MarginLayoutParams) view.getLayoutParams();
            int viewWidth = params.leftMargin + params.rightMargin + view.getMeasuredWidth();
            int viewHeight = params.topMargin + params.bottomMargin + view.getMeasuredHeight();

            if (line_width + viewWidth > getWidth() - getPaddingLeft()) {//换行
                left = getPaddingLeft();
                top += line_height;//高度累加
                view.layout(left + params.leftMargin, top + params.topMargin,
                        left + view.getMeasuredWidth() + params.rightMargin,
                        top + view.getMeasuredHeight() + params.bottomMargin);

                //清除宽高
                line_width = viewWidth + getPaddingLeft();
                line_height = viewHeight;

            } else {//无需换行
                left = line_width;
        //为
                view.layout(left + params.leftMargin, top + params.topMargin,
                        left + view.getMeasuredWidth() + params.rightMargin,
                        top + view.getMeasuredHeight() + params.bottomMargin);

                line_width += viewWidth;//累加行宽
                line_height = Math.max(line_height, viewHeight);//高度为最高的控件高度
            }
        }
    }
使用
使用方法很简单啦
就是在布局文件中添加进去就好了
<包名.自定义ViewGroup名>
比如我的就是这样
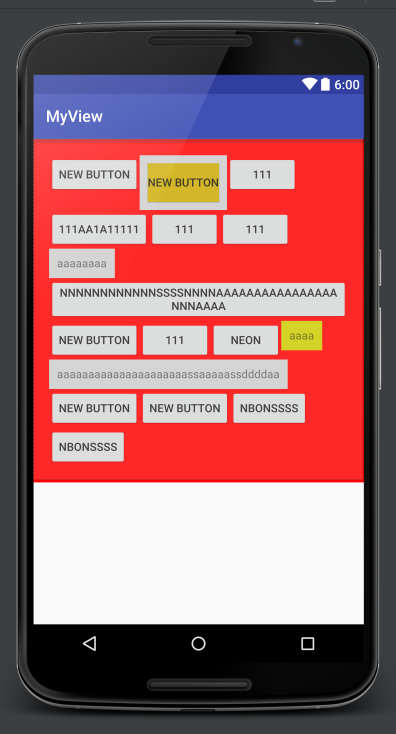
   <?xml version="1.0" encoding="utf-8"?>
<LinearLayout xmlns:android="http://schemas.android.com/apk/res/android"
    android:layout_width="match_parent"
    android:layout_height="match_parent"
    android:orientation="vertical">

    <sunshine.myview.MyGroupView
        android:id="@+id/view"
        android:layout_width="wrap_content"
        android:layout_height="wrap_content"
        android:background="#f00"
        android:padding="20dp">
        <Button
            android:layout_width="wrap_content"
            android:layout_height="wrap_content"
            android:text="New Button" />
        <LinearLayout
            android:layout_width="wrap_content"
            android:layout_height="wrap_content"
            android:background="#ccc">
            <Button
                android:layout_width="wrap_content"
                android:layout_height="wrap_content"
                android:layout_margin="10dp"
                android:background="#ca0"
                android:text="New Button" />
        </LinearLayout>
        <Button
            android:layout_width="wrap_content"
            android:layout_height="wrap_content"
            android:text="111" />
        <Button
            android:layout_width="wrap_content"
            android:layout_height="wrap_content"
            android:text="111aa1a11111" />
        <Button
            android:layout_width="wrap_content"
            android:layout_height="wrap_content"
            android:text="111" />
        <Button
            android:layout_width="wrap_content"
            android:layout_height="wrap_content"
            android:text="111" />
        <TextView
            android:layout_width="wrap_content"
            android:layout_height="wrap_content"
            android:background="#ccc"
            android:gravity="center"
            android:padding="10dp"
            android:text="aaaaaaaa" />
        <Button
            android:layout_width="wrap_content"
            android:layout_height="wrap_content"
            android:text="NNNNNNNNNNNNssssNNNNaaaaaaaaaaaaaaaaNNNaaaa" />
        <Button
            android:layout_width="match_parent"
            android:layout_height="wrap_content"
            android:text="New Button" />
        <Button
            android:layout_width="wrap_content"
            android:layout_height="wrap_content"
            android:text="111" />
        <Button
            android:layout_width="wrap_content"
            android:layout_height="wrap_content"
            android:text="Neon" />
        <TextView
            android:layout_width="wrap_content"
            android:layout_height="wrap_content"
            android:background="#cc0"
            android:gravity="center"
            android:padding="10dp"
            android:text="aaaa" />
        <TextView
            android:layout_width="wrap_content"
            android:layout_height="wrap_content"
            android:background="#ccc"
            android:gravity="center"
            android:padding="10dp"
            android:text="aaaaaaaaaaaaaaaaaaaaassaaaaassddddaa" />
        <Button
            android:layout_width="wrap_content"
            android:layout_height="wrap_content"
            android:text="New Button" />
        <Button
            android:layout_width="wrap_content"
            android:layout_height="wrap_content"
            android:text="New Button" />
        <Button
            android:layout_width="wrap_content"
            android:layout_height="wrap_content"
            android:text="NBonssss" />
    </sunshine.myview.MyGroupView>
</LinearLayout>
少年,加油吧!


 2966
2966

 被折叠的 条评论
为什么被折叠?
被折叠的 条评论
为什么被折叠?
 到【灌水乐园】发言


