


既然开始了FFmpeg开发,那不做个Demo,怎么知道你的猜想,你的学的东西到底对不对呢?嗯,所以我们今儿个做个demo,为视频添加背景音乐!

Activity的代码如下(其实就一个按钮):
加载native代码块:
    /**
     * A native method that is implemented by the 'native-lib' native library,
     * which is packaged with this application.
     */
    public native String stringFromJNI();
    public native String urlprotocolinfo();
    public native String avformatinfo();
    public native String avcodecinfo();
    public native String avfilterinfo();
    public native int addBgMusci(String videoUrl, String musicUrl);

    // Used to load the 'native-lib' library on application startup.
    static {
        loadLibrary("native-lib");
    }
按钮的点击事件:
findViewById(R.id.btn_add_muc).setOnClickListener(new View.OnClickListener() {
            @Override
            public void onClick(View v) {
                String videopath=BaseUrl+"/aa.mp4";
                File file1=new File(videopath);
                String audioPath=BaseUrl+"/bb.mp3";
                File file2=new File(audioPath);
                if(file1.exists()&&file2.exists()){
                    addBgMusci(videopath,audioPath);
                }
            }
        });
SD卡路径:
private String BaseUrl= Environment.getExternalStorageDirectory().getAbsolutePath();OK!接着上最最重要的cpp添加背景音乐代码:
JNIEXPORT jint JNICALL
Java_com_jared_helloffmpeg_MainActivity_addBgMusci(
        JNIEnv *env,
        jobject , jstring input_video, jstring input_music) {
    AVOutputFormat *ofmt = NULL;
    AVFormatContext *ifmt_ctx_v = NULL, *ifmt_ctx_a = NULL,*ofmt_ctx = NULL;
    AVPacket pkt;

    int ret, i;
    int videoindex_v=-1,videoindex_out=-1;
    int audioindex_a=-1,audioindex_out=-1;
    int frame_index=0;

    int64_t cur_pts_v=0,cur_pts_a=0;

    //java的String是不能直接被C识别的,需要转换
    const char *in_filename_v =  env->GetStringUTFChars(input_video,NULL);
    const char *in_filename_a =  env->GetStringUTFChars(input_music,NULL);
    //输出文件路径
    const char *out_filename = "/storage/emulated/0/wsAddMusic.mp4";

    //注册所有的复用器,分配器和协议(新版本和旧的版本可能有些不同,需注意)
    av_register_all();


    //打开输入的视频文件
    if ((ret = avformat_open_input(&ifmt_ctx_v, in_filename_v, 0, 0)) < 0) {
        //注意:这个操作需要你配置SD卡的读写权限,不然ret的返回值为-13,提示你需要权限
        LOGE( "Could not open input file.");
        goto end;
    }

    //获取视频文件信息
    if ((ret = avformat_find_stream_info(ifmt_ctx_v, 0)) < 0) {
        LOGE( "Failed to retrieve input stream information");
        goto end;
    }

    //打开输入的音频文件
    if ((ret = avformat_open_input(&ifmt_ctx_a, in_filename_a, 0, 0)) < 0) {
        LOGE( "Could not open input file.");
        goto end;
    }

    //获取音频文件信息
    if ((ret = avformat_find_stream_info(ifmt_ctx_a, 0)) < 0) {
        LOGE( "Failed to retrieve input stream information");
        goto end;
    }
    LOGE("===========Input Information==========\n");
    av_dump_format(ifmt_ctx_v, 0, in_filename_v, 0);
    av_dump_format(ifmt_ctx_a, 0, in_filename_a, 0);
    LOGE("======================================\n");


    //初始化输出码流的AVFormatContext
    avformat_alloc_output_context2(&ofmt_ctx, NULL, NULL, out_filename);
    if (!ofmt_ctx) {
        LOGE( "Could not create output context\n");
        ret = AVERROR_UNKNOWN;
        return -1;
    }

    //输出格式赋值(看不懂的同学可以了解一下C++结构体赋值语法)
    ofmt = ofmt_ctx->oformat;

    //从输入的AVStream中获取一个输出的out_stream,视频输出流
    for (i = 0; i < ifmt_ctx_v->nb_streams; i++) {
        //Create output AVStream according to input AVStream
        if(ifmt_ctx_v->streams[i]->codec->codec_type==AVMEDIA_TYPE_VIDEO){
            AVStream *in_stream = ifmt_ctx_v->streams[i];

            //创建流通道AVStream
            AVStream *out_stream = avformat_new_stream(ofmt_ctx, in_stream->codec->codec);
            videoindex_v=i;
            if (!out_stream) {
                LOGE( "Failed allocating output stream\n");
                ret = AVERROR_UNKNOWN;
                break;
            }
            videoindex_out=out_stream->index;
            //Copy the settings of AVCodecContext
            if (avcodec_copy_context(out_stream->codec, in_stream->codec) < 0) {
                LOGE( "Failed to copy context from input to output stream codec context\n");
                break;
            }
            out_stream->codec->codec_tag = 0;
            if (ofmt_ctx->oformat->flags & AVFMT_GLOBALHEADER)
                out_stream->codec->flags |= CODEC_FLAG_GLOBAL_HEADER;
            break;
        }
    }

    //从输入的AVStream中获取一个输出的out_stream,音频输出流
    for (i = 0; i < ifmt_ctx_a->nb_streams; i++) {
        //Create output AVStream according to input AVStream
        if(ifmt_ctx_a->streams[i]->codec->codec_type==AVMEDIA_TYPE_AUDIO){
            AVStream *in_stream = ifmt_ctx_a->streams[i];
            AVStream *out_stream = avformat_new_stream(ofmt_ctx, in_stream->codec->codec);
            audioindex_a=i;
            if (!out_stream) {
//                LOGE( "Failed allocating output stream\n");
                ret = AVERROR_UNKNOWN;
                goto end;
            }
            audioindex_out=out_stream->index;
            //Copy the settings of AVCodecContext
            if (avcodec_copy_context(out_stream->codec, in_stream->codec) < 0) {
//                LOGE( "Failed to copy context from input to output stream codec context\n");
                goto end;
            }
            out_stream->codec->codec_tag = 0;
            if (ofmt_ctx->oformat->flags & AVFMT_GLOBALHEADER)
                out_stream->codec->flags |= CODEC_FLAG_GLOBAL_HEADER;

            break;
        }
    }

    LOGE("==========Output Information==========\n");
    av_dump_format(ofmt_ctx, 0, out_filename, 1);
    LOGE("======================================\n");


    if (!(ofmt->flags & AVFMT_NOFILE)) {

        //打开输出文件。
        if (avio_open(&ofmt_ctx->pb, out_filename, AVIO_FLAG_WRITE) < 0) {
            LOGE( "Could not open output file '%s'", out_filename);
            return -1;
        }
    }

    //写头部操作
    if (avformat_write_header(ofmt_ctx, NULL) < 0) {
        LOGE( "Error occurred when opening output file\n");
        return -1;
    }


    //这两方法,我也没搞明白(-.-||)
#if USE_H264BSF
    AVBitStreamFilterContext* h264bsfc =  av_bitstream_filter_init("h264_mp4toannexb");
#endif
#if USE_AACBSF
    AVBitStreamFilterContext* aacbsfc =  av_bitstream_filter_init("aac_adtstoasc");
#endif

    while (1) {
        AVFormatContext *ifmt_ctx;
        int stream_index=0;
        AVStream *in_stream, *out_stream;

        // av_compare_ts是比较时间戳用的。通过该函数可以决定该写入视频还是音频。
        if(av_compare_ts(cur_pts_v,ifmt_ctx_v->streams[videoindex_v]->time_base,cur_pts_a,ifmt_ctx_a->streams[audioindex_a]->time_base) <= 0){
            ifmt_ctx=ifmt_ctx_v;

            //这里要赋值了,注意注意
            stream_index=videoindex_out;

            if(av_read_frame(ifmt_ctx, &pkt) >= 0){
                do{
                    in_stream  = ifmt_ctx->streams[pkt.stream_index];
                    out_stream = ofmt_ctx->streams[stream_index];

                    if(pkt.stream_index==videoindex_v){
                        //FIX:No PTS (Example: Raw H.264) H.264裸流没有PTS,因此必须手动写入PTS
                        //Simple Write PTS
                        if(pkt.pts==AV_NOPTS_VALUE){
                            //Write PTS
                            AVRational time_base1=in_stream->time_base;
                            //Duration between 2 frames (us)
                            int64_t calc_duration=(double)AV_TIME_BASE/av_q2d(in_stream->r_frame_rate);
                            //Parameters
                            pkt.pts=(double)(frame_index*calc_duration)/(double)(av_q2d(time_base1)*AV_TIME_BASE);
                            pkt.dts=pkt.pts;
                            pkt.duration=(double)calc_duration/(double)(av_q2d(time_base1)*AV_TIME_BASE);
                            frame_index++;
                        }

                        cur_pts_v=pkt.pts;
                        break;
                    }
                }while(av_read_frame(ifmt_ctx, &pkt) >= 0);
            }else{
                break;
            }
        }else{
            ifmt_ctx=ifmt_ctx_a;
        //这里要赋值了,注意注意
            stream_index=audioindex_out;
            if(av_read_frame(ifmt_ctx, &pkt) >= 0){
                do{
                    in_stream  = ifmt_ctx->streams[pkt.stream_index];
                    out_stream = ofmt_ctx->streams[stream_index];

                    if(pkt.stream_index==audioindex_a){

                        //FIX:No PTS
                        //Simple Write PTS
                        if(pkt.pts==AV_NOPTS_VALUE){
                            //Write PTS
                            AVRational time_base1=in_stream->time_base;
                            //Duration between 2 frames (us)
                            int64_t calc_duration=(double)AV_TIME_BASE/av_q2d(in_stream->r_frame_rate);
                            //Parameters
                            pkt.pts=(double)(frame_index*calc_duration)/(double)(av_q2d(time_base1)*AV_TIME_BASE);
                            pkt.dts=pkt.pts;
                            pkt.duration=(double)calc_duration/(double)(av_q2d(time_base1)*AV_TIME_BASE);
                            frame_index++;
                        }
                        cur_pts_a=pkt.pts;

                        break;
                    }
                }while(av_read_frame(ifmt_ctx, &pkt) >= 0);
            }else{
                break;
            }

        }

        //FIX:Bitstream Filter
#if USE_H264BSF
        av_bitstream_filter_filter(h264bsfc, in_stream->codec, NULL, &pkt.data, &pkt.size, pkt.data, pkt.size, 0);
#endif
#if USE_AACBSF
        av_bitstream_filter_filter(aacbsfc, out_stream->codec, NULL, &pkt.data, &pkt.size, pkt.data, pkt.size, 0);
#endif


        //Convert PTS/DTS
        pkt.pts = av_rescale_q_rnd(pkt.pts, in_stream->time_base, out_stream->time_base, (AVRounding)(AV_ROUND_NEAR_INF|AV_ROUND_PASS_MINMAX));
        pkt.dts = av_rescale_q_rnd(pkt.dts, in_stream->time_base, out_stream->time_base, (AVRounding)(AV_ROUND_NEAR_INF|AV_ROUND_PASS_MINMAX));
        pkt.duration = av_rescale_q(pkt.duration, in_stream->time_base, out_stream->time_base);
        pkt.pos = -1;
        pkt.stream_index=stream_index;

//        LOGE("Write 1 Packet. size:%5d\tpts:%lld\n",pkt.size,pkt.pts);
        //Write AVPacket 音频或视频裸流
        if (av_interleaved_write_frame(ofmt_ctx, &pkt) < 0) {
//            LOGE( "Error muxing packet\n");
            break;
        }
        av_free_packet(&pkt);

    }
    //Write file trailer
    av_write_trailer(ofmt_ctx);

#if USE_H264BSF
    av_bitstream_filter_close(h264bsfc);
#endif
#if USE_AACBSF
    av_bitstream_filter_close(aacbsfc);
#endif

    end:
    avformat_close_input(&ifmt_ctx_v);
    avformat_close_input(&ifmt_ctx_a);
    /* close output */
    if (ofmt_ctx && !(ofmt->flags & AVFMT_NOFILE))
        avio_close(ofmt_ctx->pb);
    avformat_free_context(ofmt_ctx);
    if (ret < 0 && ret != AVERROR_EOF) {
//        LOGE( "Error occurred.\n");
        return -1;
    }
    return 0;
}
OK,虽然是一步一查文档,又是问百度又是问谷歌的,但是还是对这个方法体懵懵懂懂的!不过还算OK,毕竟成功的编译出来,并将bgm加上了!后续还得继续学习啊!大部分地方都有注释,我也就不在这多BB了!

编写过程中遇到的异常!
如果是这个异常的话,可能是你的CMakeLists.txt配置出现了问题:
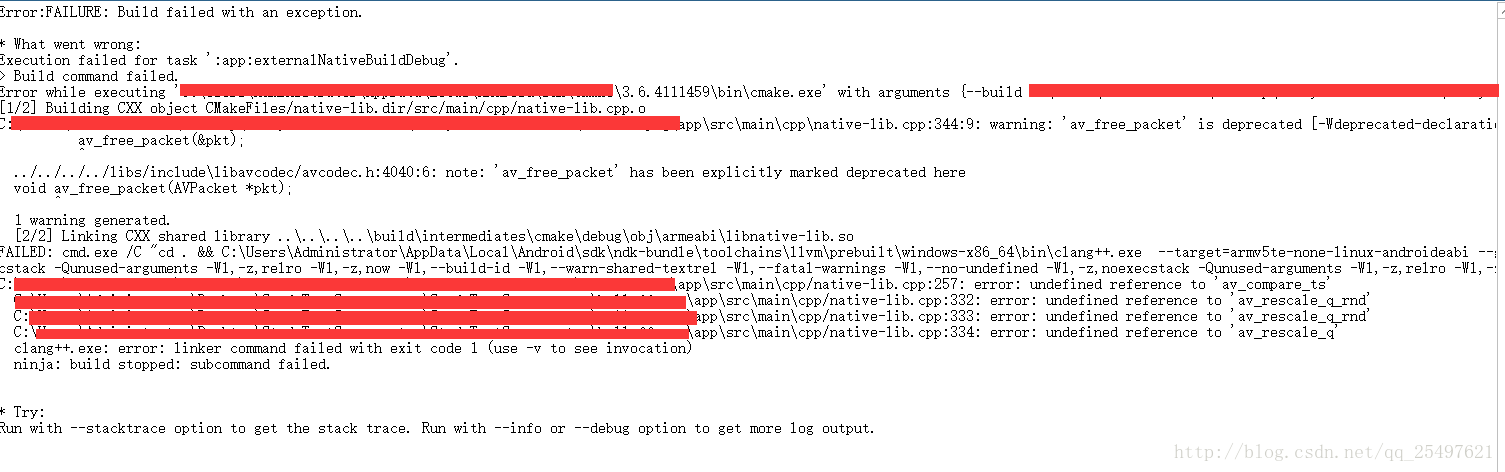
解决方案为:

OK,就写到这了!如有什么问题,可以留言交流!接下来的几篇要对FFmpeg的一些方法进行解读理解了!
参考文章:
http://blog.csdn.net/king1425/article/details/72628607
(C++结构体语法介绍)
http://blog.csdn.net/littesss/article/details/71185916
感谢能让我站在你们肩膀上远眺的巨人们!
每天进步一点点,时间会让你成为巨人!加油!


 2884
2884

 被折叠的 条评论
为什么被折叠?
被折叠的 条评论
为什么被折叠?
 到【灌水乐园】发言


