


step 1 ->先布局
<?xml version="1.0" encoding="utf-8"?>
<RelativeLayout xmlns:android="http://schemas.android.com/apk/res/android"
android:id="@+id/ll_bp_data_date_all"
android:layout_width="fill_parent"
android:layout_height="fill_parent"
android:background="#3f000000"
>
<LinearLayout
android:id="@+id/ll_bottom"
android:layout_width="fill_parent"
android:layout_height="wrap_content"
android:layout_alignParentBottom="true"
android:background="#efeff7"
android:orientation="vertical"
>
<Button
android:id="@+id/camera_btn"
android:layout_width="fill_parent"
android:layout_height="wrap_content"
android:background="@drawable/bg_bt_user_center"
android:gravity="center"
android:paddingBottom="10dp"
android:paddingTop="10dp"
android:text="拍照"
android:textColor="#353535"
android:textSize="16sp" />
<TextView
android:layout_width="match_parent"
android:layout_height="0.4dp"
android:background="#d9d9d9"
/>
<Button
android:id="@+id/picture_btn"
android:layout_width="fill_parent"
android:layout_height="wrap_content"
android:background="@drawable/bg_bt_user_center"
android:gravity="center"
android:paddingBottom="10dp"
android:paddingTop="10dp"
android:text="从手机相册选择"
android:textColor="#353535"
android:textSize="16sp" />
<Button
android:id="@+id/cancle_btn"
android:layout_width="fill_parent"
android:layout_height="wrap_content"
android:layout_marginTop="15dp"
android:background="@drawable/bg_bt_user_center"
android:gravity="center"
android:paddingBottom="10dp"
android:paddingTop="10dp"
android:text="取消"
android:textColor="#353535"
android:textSize="16sp" />
</LinearLayout>
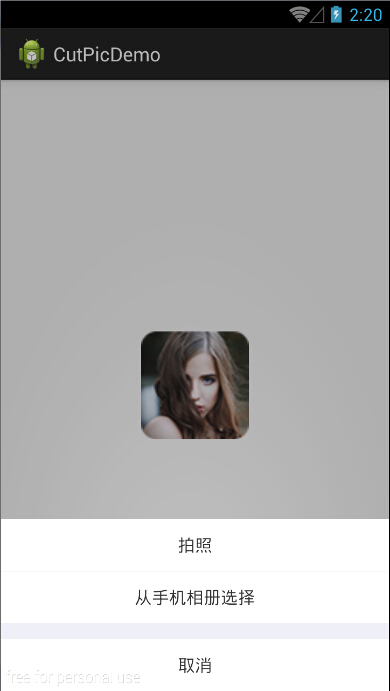
</RelativeLayout>效果图:

step 2 ->通过PopupWindow来显示step1的界面(PopupWindow 可以简单理解为在任意位置显示任意视图的Dialog)
public class SelectPicturePopup implements OnClickListener {
    private PopupWindow mPopupWindow;// 定义popupwindow
    private Button m_camera, m_picture, m_cancle;// 定义三个按钮
    private Context mContext;
    private OnClickFlagDialogListener onClickFlagDialogListener;

    public SelectPicturePopup(Context mContext) {
        this.mContext = mContext;
        init();
    }
    //初始化
    private void init() {
        // TODO Auto-generated method stub
        mPopupWindow = new PopupWindow(mContext);
        // 如果不设置PopupWindow的背景,无论是点击外部区域还是Back键都无法dismiss弹框
        mPopupWindow.setBackgroundDrawable(new BitmapDrawable());
        mPopupWindow.setWidth(WindowManager.LayoutParams.FILL_PARENT);
        mPopupWindow.setHeight(WindowManager.LayoutParams.FILL_PARENT);
        mPopupWindow.setTouchable(true);
        // 设置Pop响应内部区域焦点
        mPopupWindow.setFocusable(true);
        // 设置Pop响应外部区域焦点
        mPopupWindow.setOutsideTouchable(true);
        // 设置动画效果(可以再style中设置任意效果)
        mPopupWindow.setAnimationStyle(R.style.AnimPopup);
        // 初始化控件
        mPopupWindow.setContentView(initViews());
        mPopupWindow.getContentView().setOnTouchListener(new OnTouchListener() {

            @Override
            public boolean onTouch(View v, MotionEvent event) {
                // TODO Auto-generated method stub
                mPopupWindow.setFocusable(false);
                mPopupWindow.dismiss();
                return true;
            }
        });
    }

    private View initViews() {
        // TODO Auto-generated method stub
        View view = LayoutInflater.from(mContext).inflate(
                R.layout.select_picture_popup, null);
        m_camera = (Button) view.findViewById(R.id.camera_btn);
        m_camera.setOnClickListener(this);
        m_picture = (Button) view.findViewById(R.id.picture_btn);
        m_picture.setOnClickListener(this);
        m_cancle = (Button) view.findViewById(R.id.cancle_btn);
        m_cancle.setOnClickListener(this);
        return view;
    }

    @Override
    public void onClick(View v) {
        // TODO Auto-generated method stub
        int id = v.getId();
        switch (id) {
        case R.id.cancle_btn:
            dimiss();
            break;
        case R.id.camera_btn:
            // 通过接口返回数值,方便activity判断操作
            onClickFlagDialogListener.getFlag(1);
            break;
        case R.id.picture_btn:
            onClickFlagDialogListener.getFlag(2);
            break;
        }
    }

    public interface OnClickFlagDialogListener {
        void getFlag(int flag);
    }

    public void setOnClickFlagDialogListener(
            OnClickFlagDialogListener onClickFlagDialogListener) {
        this.onClickFlagDialogListener = onClickFlagDialogListener;
    }

    public void dimiss() {
        if (mPopupWindow != null && mPopupWindow.isShowing()) {
            mPopupWindow.dismiss();
        }
    }

    public void showView(View rootView) {
        // 设置在父类View中的位置
        mPopupWindow.showAtLocation(rootView, Gravity.BOTTOM, 0, 0);
    }
}
step 3 ->在activity中使用popupwindow
iv.setOnClickListener(new OnClickListener() {
    @Override
    public void onClick(View v) {
        final SelectPicturePopup sp = new SelectPicturePopup(
                        MainActivity.this);
        //rl是父类View,popupwindow悬浮在这上面 ,是activity_main跟布局
        sp.showView(rl);
        sp.setOnClickFlagDialogListener(new OnClickFlagDialogListener() {
            @Override
            public void getFlag(int flag) {
                switch (flag) {
                case 1:
                    sp.dimiss();
                    if (!android.os.Environment.getExternalStorageState().equals(android.os.Environment.MEDIA_MOUNTED)) {
                        Toast.makeText(MainActivity.this, "sd卡不存在", 0).show();
                    return;
                    }
                            //打开系统相机
                    startActivityForResult(new Intent(MediaStore.ACTION_IMAGE_CAPTURE).putExtra(MediaStore.EXTRA_OUTPUT,Uri.fromFile(cameraFile)),REQUEST_CODE_CAMERA);
                    break;
                case 2:
                    sp.dimiss();
                    Intent intent;
                    //由于api19后代码改变所有区分开
                    if (Build.VERSION.SDK_INT < 19) {
                        intent = new Intent(Intent.ACTION_GET_CONTENT);
                        intent.setType("image/*");
                    } else {
                        intent = new Intent(Intent.ACTION_PICK,android.provider.MediaStore.Images.Media.EXTERNAL_CONTENT_URI);
                    }
                    startActivityForResult(intent, REQUEST_CODE_PICTURE);
                    break;
                }
            }
        });
    }
});
@Override
protected void onActivityResult(int requestCode, int resultCode, Intent data) {
super.onActivityResult(requestCode, resultCode, data);
if (resultCode == RESULT_OK) {
if (requestCode == REQUEST_CODE_CAMERA) {
if (cameraFile != null && cameraFile.exists()) {
cropImageUri(Uri.fromFile(cameraFile), 130, 130,REQUEST_CODE_CUT, Uri.fromFile(cameraFile));
}
} else if (requestCode == REQUEST_CODE_PICTURE) {
if (data != null) {
Uri selectedImage = data.getData();
cropImageUri(selectedImage, 130, 130, REQUEST_CODE_CUT,Uri.fromFile(cameraFile));
}
} else if (requestCode == REQUEST_CODE_CUT) {
if (data != null) {
setPic(cameraFile.getAbsolutePath());
}
}
}
}
// 修改图片
private void setPic(String path) {
Bitmap bitmap = BitmapFactory.decodeFile(path);
iv.setImageBitmap(bitmap);
}
/*
* 图片裁剪
*/
private void cropImageUri(Uri uri, int outputX, int outputY,
int requestCode, Uri outUri) {
Intent intent = new Intent("com.android.camera.action.CROP");
intent.setDataAndType(uri, "image/*");
intent.putExtra("crop", "true");
// 宽高比例
intent.putExtra("aspectX", 1);
intent.putExtra("aspectY", 1);
// 输出大小
intent.putExtra("outputX", outputX);
intent.putExtra("outputY", outputY);
intent.putExtra("scale", true);
// 输出路径
intent.putExtra(MediaStore.EXTRA_OUTPUT, outUri);
intent.putExtra("return-data", false);
intent.putExtra("outputFormat", Bitmap.CompressFormat.JPEG.toString());
intent.putExtra("noFaceDetection", true);
startActivityForResult(intent, requestCode);
}step 4 ->完成,上图
最后别忘了加权限
<uses-permission android:name="android.permission.CAMERA"/>
<uses-permission android:name="android.permission.WRITE_EXTERNAL_STORAGE"/>
<uses-permission android:name="android.permission.READ_EXTERNAL_STORAGE"/>


 959
959

 被折叠的 条评论
为什么被折叠?
被折叠的 条评论
为什么被折叠?
 到【灌水乐园】发言


