


 本文深入解析Spring Boot Actuator中HealthEndpoint组件的工作原理及其与HealthIndicator的关系,详细介绍了不同HealthIndicator的实现及自动装配过程。
前言
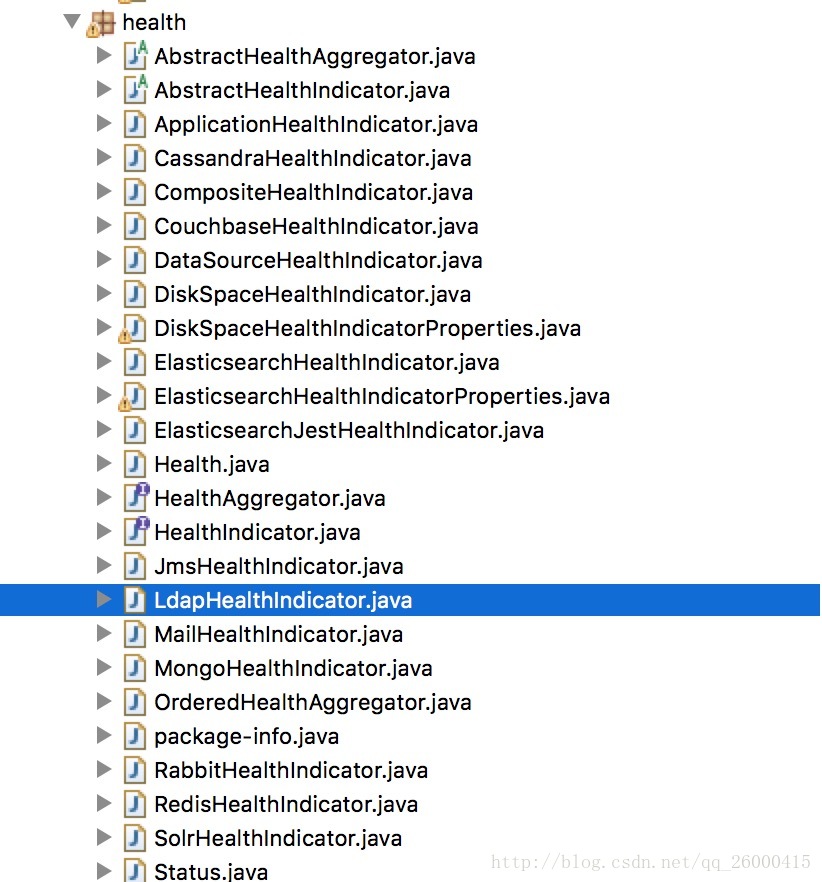
spring boot actuator中的HealthEndPoint涉及的内容比较多, HealthEndPoint是通过HealthIndicator来实现功能的,而HealthIndicator的实现都在org.springframework.boot.actuate.health包下,如图:
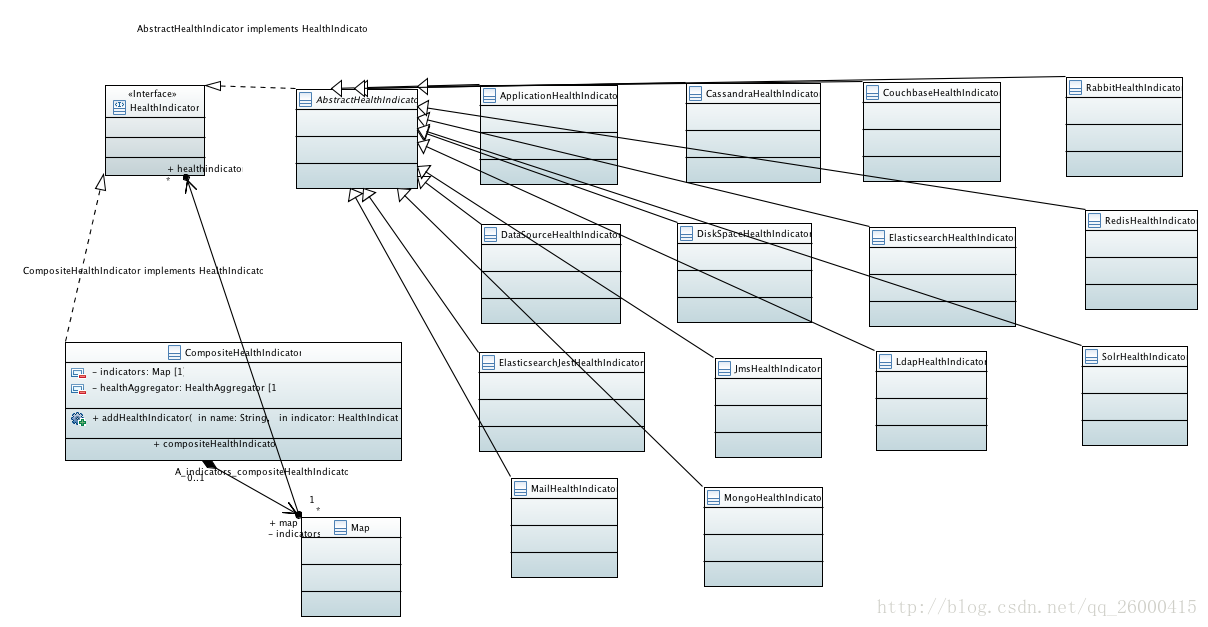
整理成类图如下:
本节我们就来分析这部分的内容.
解析
HealthIndicator
HealthIndicator 是一个顶层接口,在之前的类图我们可以知道,其只声明了1个方法,如下:
public interface HealthIndicator {

    // 返回health
    Health health();

}
这里面涉及到了Health, 该类的实现使用了建造者模式,类图如下:
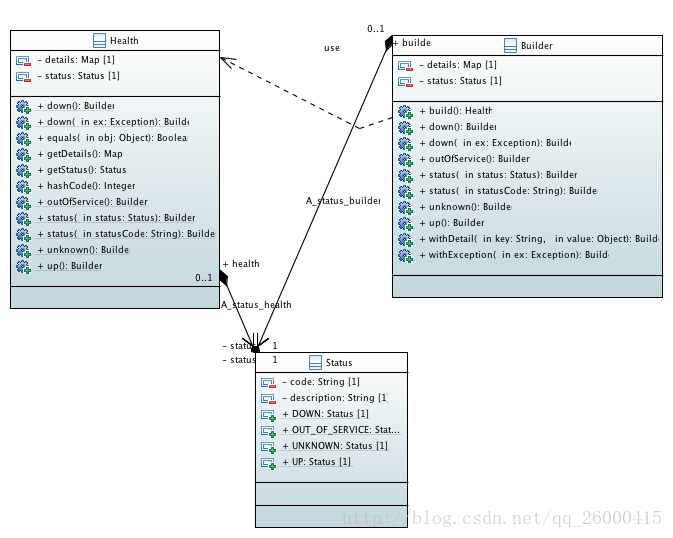
Status 在类上声明了如下注解:
@JsonInclude(Include.NON_EMPTY)则如果该类中的所有属性都为空(“”)或者为 NULL则不序列化.
其内部定义了如下字段:
// 状态码
private final String code;

// 描述
private final String description;
并预定义了4个静态字段,:
// 系统状态未知
public static final Status UNKNOWN = new Status("UNKNOWN");

// 可用
public static final Status UP = new Status("UP");

// 服务挂掉
public static final Status DOWN = new Status("DOWN");

// 服务不可用
public static final Status OUT_OF_SERVICE = new Status("OUT_OF_SERVICE");
Health 类同样也声明了@JsonInclude(Include.NON_EMPTY) 注解,表明如果该类中所有属性如果为空(“”) 或者为NULL则不序列化.
声明了如下字段:
// 状态
private final Status status;

// 详情
private final Map<String, Object> details;
Builder 则是定义在 Health类中,则定义的字段和Health中的一样.则构造器如下:
public Builder() {
        this.status = Status.UNKNOWN;
        this.details = new LinkedHashMap<String, Object>();
}
意味着:默认情况下,构建出来的Health状态为UNKNOWN.
如何使用 Builder 构建Health呢?
可以通过如下的方式进行:
try {
// do some test to determine state of component
return new Health.Builder().up().withDetail("version", "1.1.2").build();
}
catch (Exception ex) {
return new Health.Builder().down(ex).build();
 }
更多的方式,可以参考Builder类的api
AbstractHealthIndicator
spring的一贯套路是 定义1个接口,然后声明1个抽象实现,然后定义1堆实现继承抽象类(模板方法).对于HealthIndicator来说,也是同样.定义了AbstractHealthIndicator,实现了health方法,同时声明了doHealthCheck方法,让子类进行实现:
public final Health health() {
        // 1. 实例化Health$Builder
        Health.Builder builder = new Health.Builder();
        try {
            // 2. 进行状态的检查,如果在检查过程中出现异常,则状态为Status.DOWN
            doHealthCheck(builder);
        }
        catch (Exception ex) {
            this.logger.warn("Health check failed", ex);
            builder.down(ex);
        }
        // 3. 构建Health
        return builder.build();
    }
- 实例化Health$Builder
- 调用抽象方法doHealthCheck–>进行状态的检查,如果在检查过程中出现异常,则状态为Status.DOWN
- 构建Health
下面我们就依次看一下其各个子类的实现吧
ApplicationHealthIndicator
该类的实现比较简单,通过继承AbstractHealthIndicator,实现其doHealthCheck,在该方法中直接将其设置为up.代码如下:
    protected void doHealthCheck(Health.Builder builder) throws Exception {
        builder.up();
    }
自动化配置:
在HealthIndicatorAutoConfiguration 进行了配置,代码如下:
@Bean @ConditionalOnMissingBean(HealthIndicator.class) public ApplicationHealthIndicator applicationHealthIndicator() { return new ApplicationHealthIndicator(); }- @Bean –> 注册1个id为applicationHealthIndicator,类型为ApplicationHealthIndicator的bean
- @ConditionalOnMissingBean(HealthIndicator.class) –> 当beanFactory中不存在HealthIndicator类型的bean时生效
CassandraHealthIndicator
CassandraHealthIndicator 持有1个CassandraOperations类型的实例,该实例通过构造器进行注入,代码如下:
private CassandraOperations cassandraOperations;

public CassandraHealthIndicator(CassandraOperations cassandraOperations) {
    Assert.notNull(cassandraOperations, "CassandraOperations must not be null");
    this.cassandraOperations = cassandraOperations;
}
doHealthCheck 实现:
protected void doHealthCheck(Health.Builder builder) throws Exception {
    try {
        Select select = QueryBuilder.select("release_version").from("system",
                "local");
        ResultSet results = this.cassandraOperations.query(select);
        if (results.isExhausted()) {
            builder.up();
            return;
        }
        String version = results.one().getString(0);
        builder.up().withDetail("version", version);
    }
    catch (Exception ex) {
        builder.down(ex);
    }
}
通过CassandraOperations 查询 在system(keyspace)下的local表中的 release_version 字段
如果执行成功,但是没有返回值,则设置为up,然后return
- 否则,设置状态为up,并添加key–>version,value–> 结果值到详情中
- 如果在查询过程中出现异常,则设置为状态为down.
自动化装配:
定义在CassandraHealthIndicatorConfiguration中,该类继承了CompositeHealthIndicatorConfiguration, CompositeHealthIndicatorConfiguration 声明如下:
public abstract class CompositeHealthIndicatorConfiguration<H extends HealthIndicator, S>其中,泛型参数H 代表 HealthIndicator 的类型,泛型参数S代表bean的原始类型(the bean source type).
在该类中声明了2个方法:
createHealthIndicator,代码如下:
protected HealthIndicator createHealthIndicator(Map<String, S> beans) { if (beans.size() == 1) { return createHealthIndicator(beans.values().iterator().next()); } CompositeHealthIndicator composite = new CompositeHealthIndicator( this.healthAggregator); for (Map.Entry<String, S> entry : beans.entrySet()) { composite.addHealthIndicator(entry.getKey(), createHealthIndicator(entry.getValue())); } return composite; }- 如果传入的beans的size 为 1,则调用createHealthIndicator 创建HealthIndicator
- 否则,创建CompositeHealthIndicator,遍历传入的beans,依次创建HealthIndicator,加入到CompositeHealthIndicator中
createHealthIndicator,代码如下:
protected H createHealthIndicator(S source) { Class<?>[] generics = ResolvableType .forClass(CompositeHealthIndicatorConfiguration.class, getClass()) .resolveGenerics(); Class<H> indicatorClass = (Class<H>) generics[0]; Class<S> sourceClass = (Class<S>) generics[1]; try { return indicatorClass.getConstructor(sourceClass).newInstance(source); } catch (Exception ex) { throw new IllegalStateException("Unable to create indicator " + indicatorClass + " for source " + sourceClass, ex); } }- 获得CompositeHealthIndicatorConfiguration中的泛型参数
- 根据泛型参数H对应的class和S对应的class,在H对应的class中找到声明了参数为S类型的构造器进行实例化.
由于CassandraHealthIndicatorConfiguration声明了如下注解:
@Configuration @ConditionalOnClass({ CassandraOperations.class, Cluster.class }) @ConditionalOnBean(CassandraOperations.class) @ConditionalOnEnabledHealthIndicator("cassandra")- @Configuration –> 配置类
- @ConditionalOnClass({ CassandraOperations.class, Cluster.class }) –> 在当前的类路径下存在CassandraOperations.class, Cluster.class时生效
- @ConditionalOnBean(CassandraOperations.class)–> 在beanFactory 中存在CassandraOperations类型的bean时生效
- @ConditionalOnEnabledHealthIndicator(“cassandra”)–> 如果配置有management.health.cassandra.enabled = true 或者management.health.defaults.enabled = true 则该配置生效.关于此处的实现我们后续有文章进行分析.
因此,默认情况下,该配置(CassandraHealthIndicator) 是不会生效的.
同时,在@Bean方法上声明了如下注解:
@Bean @ConditionalOnMissingBean(name = "cassandraHealthIndicator") public HealthIndicator cassandraHealthIndicator() { return createHealthIndicator(this.cassandraOperations); }- @Bean –> 注册1个id为cassandraHealthIndicator,类型为HealthIndicator的bean
- @ConditionalOnMissingBean(name = “cassandraHealthIndicator”) –> 当beanFactory中不存在id为cassandraHealthIndicator 的bean 时生效.
由于CassandraHealthIndicatorConfiguration的声明如下:
public static class CassandraHealthIndicatorConfiguration extends
        CompositeHealthIndicatorConfiguration<CassandraHealthIndicator, CassandraOperations>
因此,H为 CassandraHealthIndicator,S 为 CassandraOperations.
又由于CassandraHealthIndicatorConfiguration 持有的是Map 集合,因此,在实例化CassandraHealthIndicatorConfiguration的时候,会将BeanFactory中所有类型为CassandraOperations都注入进来,key–>bean的id,value –> bean的实例.
因此,当前创建的HealthIndicator有2种情况:
当前beanFactory中只存在1个CassandraOperations的实例:
则此时会调用createHealthIndicator 进行创建.首先获得CassandraHealthIndicator类中声明的参数为CassandraOperations的构造器,如下:
public CassandraHealthIndicator(CassandraOperations cassandraOperations) {
Assert.notNull(cassandraOperations, "CassandraOperations must not be null");
this.cassandraOperations = cassandraOperations;
}
然后进行实例化.
当前beanFactory中存在多个CassandraOperations实例的话,则会创建CompositeHealthIndicator,会遍历CassandraOperations的实例,创建CassandraHealthIndicator,在CompositeHealthIndicator中进行注册,其中,Key为CassandraOperations bean的id,value为 CassandraHealthIndicator
CouchbaseHealthIndicator
CouchbaseHealthIndicator和CassandraHealthIndicator类似,其内部持有CassandraOperations,构造器如下:
private CassandraOperations cassandraOperations;


public CassandraHealthIndicator(CassandraOperations cassandraOperations) {
    Assert.notNull(cassandraOperations, "CassandraOperations must not be null");
    this.cassandraOperations = cassandraOperations;
}
doHealthCheck 实现如下:
protected void doHealthCheck(Health.Builder builder) throws Exception { List<Version> versions = this.couchbaseOperations.getCouchbaseClusterInfo() .getAllVersions(); builder.up().withDetail("versions", StringUtils.collectionToCommaDelimitedString(versions)); }- 通过couchbaseOperations 获得版本号
- 如果访问成功的话,则设置状态为up,并设置key–> versions,value–> 版本号,如果有多个的话,会通过,进行拼接
自动装配:
同样和CassandraHealthIndicatorConfiguration 一样,继承自CompositeHealthIndicatorConfiguration,泛型参数分别为CouchbaseHealthIndicator, CouchbaseOperations,代码如下:
public static class CouchbaseHealthIndicatorConfiguration extends
        CompositeHealthIndicatorConfiguration<CouchbaseHealthIndicator, CouchbaseOperations>
由于CouchbaseHealthIndicatorConfiguration 声明有如下注解:
@Configuration @ConditionalOnClass({ CouchbaseOperations.class, Bucket.class }) @ConditionalOnBean(CouchbaseOperations.class) @ConditionalOnEnabledHealthIndicator("couchbase")- @Configuration –> 配置类
- @ConditionalOnClass({ CouchbaseOperations.class, Bucket.class }) –> 在当前类路径下存在CouchbaseOperations.class, Bucket.class时生效
- @ConditionalOnBean(CouchbaseOperations.class)–> 在beanFactory中存在CouchbaseOperations类型的bean时生效
- @ConditionalOnEnabledHealthIndicator(“couchbase”) –> 如果配置有management.health.couchbase.enabled = true 或者management.health.defaults.enabled = true 则该配置生效.
其@Bean方法如下:
@Bean @ConditionalOnMissingBean(name = "couchbaseHealthIndicator") public HealthIndicator couchbaseHealthIndicator() { return createHealthIndicator(this.couchbaseOperations); }- @Bean –> 注册1个id为couchbaseHealthIndicator,类型为HealthIndicator的bean
- @ConditionalOnMissingBean(name = “couchbaseHealthIndicator”) –> 当beanFactory中不存在id为couchbaseHealthIndicator 的bean 时生效.
其构建过程和CassandraHealthIndicatorConfiguration一样,这里就不在赘述了
DataSourceHealthIndicator
DataSourceHealthIndicator 中定义了如下字段:
// 默认的测试语句为SELECT 1
private static final String DEFAULT_QUERY = "SELECT 1";

// 数据库资源
private DataSource dataSource;

// 测试语句
private String query;

private JdbcTemplate jdbcTemplate;
DataSourceHealthIndicator 实现了InitializingBean接口,因此在初始化后会调用afterPropertiesSet方法,代码如下:
public void afterPropertiesSet() throws Exception {
    Assert.state(this.dataSource != null,
            "DataSource for DataSourceHealthIndicator must be specified");
}
doHealthCheck 实现:
protected void doHealthCheck(Health.Builder builder) throws Exception { // 1. 如果DataSource没有配置,则直接返回up,message 为unknown if (this.dataSource == null) { builder.up().withDetail("database", "unknown"); } else { // 2. doDataSourceHealthCheck(builder); } }- 如果DataSource没有配置,则直接返回up,message 为unknown
否则,调用doDataSourceHealthCheck,代码如下:
private void doDataSourceHealthCheck(Health.Builder builder) throws Exception {
// 1. 获得数据库产商,并添加至builder中
String product = getProduct();
builder.up().withDetail("database", product);
// 2. 获得测试的语句,默认为SELECT 1,然后进行查询,将查询结果放入builder中,key-->hello,value-->结果值
// 如果出现异常,则调用Builder#down
String validationQuery = getValidationQuery(product);
if (StringUtils.hasText(validationQuery)) {
    try {
        // Avoid calling getObject as it breaks MySQL on Java 7
        List<Object> results = this.jdbcTemplate.query(validationQuery,
                new SingleColumnRowMapper());
        Object result = DataAccessUtils.requiredSingleResult(results);
        builder.withDetail("hello", result);
    }
    catch (Exception ex) {
        builder.down(ex);
    }
}
}
获得数据库产商,并添加至builder中,代码如下:
    private String getProduct() {
return this.jdbcTemplate.execute(new ConnectionCallback<String>() {
@Override
public String doInConnection(Connection connection)
        throws SQLException, DataAccessException {
    return connection.getMetaData().getDatabaseProductName();
}
});
}
获得测试的语句,默认为SELECT 1,然后进行查询,将查询结果放入builder中,key–>hello,value–>结果值,如果出现异常,则调用Builder#down 设置状态为down.获得查询语句的代码如下:
protected String getValidationQuery(String product) {
// 1. 将配置的query 赋值为query
String query = this.query;
// 2. 如果没有配置的话,则通过DatabaseDriver获得
if (!StringUtils.hasText(query)) {
DatabaseDriver specific = DatabaseDriver.fromProductName(product);
query = specific.getValidationQuery();
}
// 3. 如果还没有配置的化,则返回默认的SELECT 1
if (!StringUtils.hasText(query)) {
query = DEFAULT_QUERY;
}
return query;
}
自动装配:
定义在DataSourcesHealthIndicatorConfiguration中,该类继承了CompositeHealthIndicatorConfiguration,泛型参数为DataSourceHealthIndicator, DataSource,同时实现了InitializingBean 接口.故会在初始化调用其afterPropertiesSet方法,代码如下:
public void afterPropertiesSet() throws Exception {
    this.poolMetadataProvider = new DataSourcePoolMetadataProviders(
            this.metadataProviders);
}
实例化了 DataSourcePoolMetadataProviders,该类实现了DataSourcePoolMetadataProvider,封装了数据库的元数据.关于这部分的代码我们在下篇文章进行分析
DataSourcesHealthIndicatorConfiguration 声明了如下注解:
@Configuration @ConditionalOnClass({ JdbcTemplate.class, AbstractRoutingDataSource.class }) @ConditionalOnBean(DataSource.class) @ConditionalOnEnabledHealthIndicator("db")- @Configuration –> 配置类
- @ConditionalOnClass({ JdbcTemplate.class, AbstractRoutingDataSource.class }) –> 在类路径下存在 JdbcTemplate.class, AbstractRoutingDataSource.class 时生效
- @ConditionalOnBean(DataSource.class) –> 在BeanFactory中存在DataSource类型的bean时生效
- @ConditionalOnEnabledHealthIndicator(“db”)–> 如果配置有management.health.db.enabled = true 或者management.health.defaults.enabled = true 则该配置生效.
在@Bean方法中声明了如下注解:
@Bean @ConditionalOnMissingBean(name = "dbHealthIndicator") public HealthIndicator dbHealthIndicator() { return createHealthIndicator(this.dataSources); }- @Bean –> 注册1个id为dbHealthIndicator,类型为HealthIndicator的bean
- @ConditionalOnMissingBean(name = “dbHealthIndicator”) –> 当beanFactory中不存在id为dbHealthIndicator 的bean 时生效.
由于DataSourcesHealthIndicatorConfiguration覆写了createHealthIndicator,因此在创建DataSourceHealthIndicator 时,会执行如下代码:
protected DataSourceHealthIndicator createHealthIndicator(DataSource source) {
    return new DataSourceHealthIndicator(source, getValidationQuery(source));
}
直接实例化DataSourceHealthIndicator,检查sql语句通过getValidationQuery来进行获取,代码如下:
private String getValidationQuery(DataSource source) { DataSourcePoolMetadata poolMetadata = this.poolMetadataProvider .getDataSourcePoolMetadata(source); return (poolMetadata == null ? null : poolMetadata.getValidationQuery()); }- 如果DataSourcePoolMetadata 存在,则获得DataSourcePoolMetadata中配置的检查sql,此时分2种情况,如果配置了sql,则进行检查时,执行的是配置的sql语句,否则,使用的是默认的sql–> Select 1
- 否则,返回null,此时使用的是默认的sql–>Select 1
LdapHealthIndicator
LdapHealthIndicator定义了如下字段:
private static final ContextExecutor<String> versionContextExecutor = new VersionContextExecutor();

private final LdapOperations ldapOperations;
其中VersionContextExecutor 会在doHealthCheck 中用到,其实现了org.springframework.ldap.core.ContextExecutor 接口,代码如下:
    private static class VersionContextExecutor implements ContextExecutor<String> {

    @Override
    public String executeWithContext(DirContext ctx) throws NamingException {
        Object version = ctx.getEnvironment().get("java.naming.ldap.version");
        if (version != null) {
            return (String) version;
        }
        return null;
    }

}
doHealthCheck 实现:
protected void doHealthCheck(Health.Builder builder) throws Exception { // 1. 通过LdapOperations 来获取java.naming.ldap.version的值.如果获取不到,则返回null String version = this.ldapOperations.executeReadOnly(versionContextExecutor); // 2. 设置为up,属性值 version --> 版本号 builder.up().withDetail("version", version); }- 通过LdapOperations 来获取java.naming.ldap.version的值.如果获取不到,则返回null
- 如果版本号不等于null,则设置为up,属性值 version –> 版本号,否则,设置为down(在withDetail中对value进行了断言,此时传入null,导致断言失败,抛出异常,因此会设置为down)
自动装配:
- 在LdapHealthIndicatorConfiguration中声明,该类继承了CompositeHealthIndicatorConfiguration,泛型参数分别为LdapHealthIndicator, LdapOperations
LdapHealthIndicatorConfiguration 声明了如下注解:
@Configuration @ConditionalOnClass(LdapOperations.class) @ConditionalOnBean(LdapOperations.class) @ConditionalOnEnabledHealthIndicator("ldap")- @Configuration –> 配置类
- @ConditionalOnClass({LdapOperations.class }) –> 在类路径下存在 LdapOperations.class 时生效
- @ConditionalOnBean(LdapOperations.class) –> 在BeanFactory中存在LdapOperations类型的bean时生效
- @ConditionalOnEnabledHealthIndicator(“ldap”)–> 如果配置有management.health.ldap.enabled = true 或者management.health.defaults.enabled = true 则该配置生效.
@Bean方法中声明了如下注解:
@Bean @ConditionalOnMissingBean(name = "ldapHealthIndicator") public HealthIndicator ldapHealthIndicator() { return createHealthIndicator(this.ldapOperations); }- @Bean –> 注册1个id为ldapHealthIndicator,类型为HealthIndicator的bean
- @ConditionalOnMissingBean(name = “ldapHealthIndicator”) –> 当beanFactory中不存在id为ldapHealthIndicator 的bean 时生效.
创建LdapHealthIndicator的过程和CassandraHealthIndicatorConfiguration一样,这里就不在赘述了.
MongoHealthIndicator
MongoHealthIndicator 继承了AbstractHealthIndicator,有如下字段:
private final MongoTemplate mongoTemplate;构造器为:
public MongoHealthIndicator(MongoTemplate mongoTemplate) {
    Assert.notNull(mongoTemplate, "MongoTemplate must not be null");
    this.mongoTemplate = mongoTemplate;
}
doHealthCheck 的实现很简单,通过MongoTemplate 执行{ buildInfo: 1 },如果成功的话,则设置为up并设置属性version–> 版本号,否则,设置为down.代码如下:
protected void doHealthCheck(Health.Builder builder) throws Exception {
    CommandResult result = this.mongoTemplate.executeCommand("{ buildInfo: 1 }");
    builder.up().withDetail("version", result.getString("version"));
}
自动装配:
在MongoHealthIndicatorConfiguration中定义,继承了CompositeHealthIndicatorConfiguration,泛型参数为MongoHealthIndicator, MongoTemplate
MongoHealthIndicatorConfiguration 声明了如下注解:
@Configuration @ConditionalOnClass(MongoTemplate.class) @ConditionalOnBean(MongoTemplate.class) @ConditionalOnEnabledHealthIndicator("mongo")- @Configuration –> 配置类
- @ConditionalOnClass({MongoTemplate.class }) –> 在类路径下存在 MongoTemplate.class 时生效
- @ConditionalOnBean(MongoTemplate.class) –> 在BeanFactory中存在MongoTemplate类型的bean时生效
- @ConditionalOnEnabledHealthIndicator(“mongo”)–> 如果配置有management.health.mongo.enabled = true 或者management.health.defaults.enabled = true 则该配置生效.
@Bean方法 如下:
@Bean @ConditionalOnMissingBean(name = "mongoHealthIndicator") public HealthIndicator mongoHealthIndicator() { return createHealthIndicator(this.mongoTemplates); }- @Bean –> 注册1个id为mongoHealthIndicator,类型为HealthIndicator的bean
- @ConditionalOnMissingBean(name = “mongoHealthIndicator”) –> 当beanFactory中不存在id为mongoHealthIndicator 的bean 时生效.
RedisHealthIndicator
RedisHealthIndicator 定义了如下字段:
private static final String VERSION = "version";

private static final String REDIS_VERSION = "redis_version";

private final RedisConnectionFactory redisConnectionFactory;
构造器如下:
public RedisHealthIndicator(RedisConnectionFactory connectionFactory) {
    Assert.notNull(connectionFactory, "ConnectionFactory must not be null");
    this.redisConnectionFactory = connectionFactory;
}
doHealthCheck 代码如下:
protected void doHealthCheck(Health.Builder builder) throws Exception { // 1. 获得redis链接 RedisConnection connection = RedisConnectionUtils .getConnection(this.redisConnectionFactory); try { if (connection instanceof RedisClusterConnection) { // 2.1 如果是集群的话,则获得集群的信息.并设置状态为up,属性值cluster_size-->集群节点数量 // slots_up --> 可用槽的数量, slots_fail --> 不可用槽的数量 ClusterInfo clusterInfo = ((RedisClusterConnection) connection) .clusterGetClusterInfo(); builder.up().withDetail("cluster_size", clusterInfo.getClusterSize()) .withDetail("slots_up", clusterInfo.getSlotsOk()) .withDetail("slots_fail", clusterInfo.getSlotsFail()); } else { // 2.2 如果不是集群的话,则直接获取版本号 Properties info = connection.info(); builder.up().withDetail(VERSION, info.getProperty(REDIS_VERSION)); } } finally { // 3. 释放链接 RedisConnectionUtils.releaseConnection(connection, this.redisConnectionFactory); } }- 获得redis链接
- 如果是集群的话,则获得集群的信息.并设置状态为up,属性值cluster_size–>集群节点数量,slots_up –> 可用槽的数量, slots_fail –> 不可用槽的数量
- 如果不是集群的话,则直接获取版本号
- 释放链接
自动装配:
- 在RedisHealthIndicatorConfiguration中定义,继承了CompositeHealthIndicatorConfiguration,泛型参数分别为RedisHealthIndicator, RedisConnectionFactory
RedisHealthIndicatorConfiguration 声明了如下注解:
@Configuration @ConditionalOnClass(RedisConnectionFactory.class) @ConditionalOnBean(RedisConnectionFactory.class) @ConditionalOnEnabledHealthIndicator("redis")- @Configuration –> 配置类
- @ConditionalOnClass({RedisConnectionFactory.class }) –> 在类路径下存在 RedisConnectionFactory.class 时生效
- @ConditionalOnBean(RedisConnectionFactory.class) –> 在BeanFactory中存在RedisConnectionFactory类型的bean时生效
- @ConditionalOnEnabledHealthIndicator(“redis”)–> 如果配置有management.health.redis.enabled = true 或者management.health.defaults.enabled = true 则该配置生效.
@Bean方法:
@Bean @ConditionalOnMissingBean(name = "redisHealthIndicator") public HealthIndicator redisHealthIndicator() { return createHealthIndicator(this.redisConnectionFactories); }- @Bean –> 注册1个id为redisHealthIndicator,类型为HealthIndicator的bean
- @ConditionalOnMissingBean(name = “redisHealthIndicator”) –> 当beanFactory中不存在id为redisHealthIndicator 的bean 时生效.
RabbitHealthIndicator
RabbitHealthIndicator 继承AbstractHealthIndicator,声明了如下字段:
private final RabbitTemplate rabbitTemplate;构造器如下:
public RabbitHealthIndicator(RabbitTemplate rabbitTemplate) {
    Assert.notNull(rabbitTemplate, "RabbitTemplate must not be null.");
    this.rabbitTemplate = rabbitTemplate;
}
doHealthCheck–>通过rabbitTemplate 查询版本号,如果查询成功的话,则设置状态为up,并设置属性值version–>RabbitMQ的版本号, 代码如下:
protected void doHealthCheck(Health.Builder builder) throws Exception {
    builder.up().withDetail("version", getVersion());
}
其中getVersion 的代码如下:
private String getVersion() {
    return this.rabbitTemplate.execute(new ChannelCallback<String>() {
        @Override
        public String doInRabbit(Channel channel) throws Exception {
            Map<String, Object> serverProperties = channel.getConnection()
                    .getServerProperties();
            return serverProperties.get("version").toString();
        }
    });
}
自动装配:
在RabbitHealthIndicatorConfiguration中,继承了CompositeHealthIndicatorConfiguration,泛型参数分别为RabbitHealthIndicator, RabbitTemplate.
RabbitHealthIndicatorConfiguration 声明了如下注解:
@Configuration @ConditionalOnClass(RabbitTemplate.class) @ConditionalOnBean(RabbitTemplate.class) @ConditionalOnEnabledHealthIndicator("rabbit")- @Configuration –> 配置类
- @ConditionalOnClass({RabbitTemplate.class }) –> 在类路径下存在 RabbitTemplate.class 时生效
- @ConditionalOnBean(RabbitTemplate.class) –> 在BeanFactory中存在RabbitTemplate类型的bean时生效
- @ConditionalOnEnabledHealthIndicator(“rabbit”)–> 如果配置有management.health.rabbit.enabled = true 或者management.health.defaults.enabled = true 则该配置生效.
@Bean方法如下:
@Bean @ConditionalOnMissingBean(name = "rabbitHealthIndicator") public HealthIndicator rabbitHealthIndicator() { return createHealthIndicator(this.rabbitTemplates); }- @Bean –> 注册1个id为rabbitHealthIndicator,类型为HealthIndicator的bean
- @ConditionalOnMissingBean(name = “rabbitHealthIndicator”) –> 当beanFactory中不存在id为rabbitHealthIndicator 的bean 时生效.
SolrHealthIndicator
SolrHealthIndicator 继承自AbstractHealthIndicator,声明字段如下:
private final SolrClient solrClient;构造器如下:
public SolrHealthIndicator(SolrClient solrClient) {
    this.solrClient = solrClient;
}
doHealthCheck,通过SolrClient 来获取solr的状态,如果返回的状态码为0,则设置为up,属性值为solrStatus–>OK,否则,设置为down,属性值为solrStatus–>返回的状态值,代码如下:
protected void doHealthCheck(Health.Builder builder) throws Exception {
    CoreAdminRequest request = new CoreAdminRequest();
    request.setAction(CoreAdminParams.CoreAdminAction.STATUS);
    CoreAdminResponse response = request.process(this.solrClient);
    int statusCode = response.getStatus();
    Status status = (statusCode == 0 ? Status.UP : Status.DOWN);
    builder.status(status).withDetail("solrStatus",
            (statusCode == 0 ? "OK" : statusCode));
}
自动装配:
- 在SolrHealthIndicatorConfiguration中,继承自CompositeHealthIndicatorConfiguration,泛型参数分别为SolrHealthIndicator, SolrClient
SolrHealthIndicatorConfiguration 声明了如下注解:
@Configuration @ConditionalOnClass(SolrClient.class) @ConditionalOnBean(SolrClient.class) @ConditionalOnEnabledHealthIndicator("solr")- @Configuration –> 配置类
- @ConditionalOnClass({SolrClient.class }) –> 在类路径下存在 SolrClient.class 时生效
- @ConditionalOnBean(SolrClient.class) –> 在BeanFactory中存在SolrClient类型的bean时生效
- @ConditionalOnEnabledHealthIndicator(“solr”)–> 如果配置有management.health.solr.enabled = true 或者management.health.defaults.enabled = true 则该配置生效.
@Bean方法:
@Bean @ConditionalOnMissingBean(name = "solrHealthIndicator") public HealthIndicator solrHealthIndicator() { return createHealthIndicator(this.solrClients); }- @Bean –> 注册1个id为solrHealthIndicator,类型为HealthIndicator的bean
- @ConditionalOnMissingBean(name = “solrHealthIndicator”) –> 当beanFactory中不存在id为solrHealthIndicator 的bean 时生效.
MailHealthIndicator
MailHealthIndicator 继承自AbstractHealthIndicator,其内部持有JavaMailSenderImpl的实例,构造器如下:
public MailHealthIndicator(JavaMailSenderImpl mailSender) {
    this.mailSender = mailSender;
}
doHealthCheck 实现如下:
protected void doHealthCheck(Builder builder) throws Exception { // 1. 设置属性location-->mailSender配置的主机名:mailSender配置的端口号 builder.withDetail("location", this.mailSender.getHost() + ":" + this.mailSender.getPort()); // 2. 测试链接,如果成功,则状态为up,否则为down this.mailSender.testConnection(); builder.up(); }- 设置属性location–>mailSender配置的主机名:mailSender配置的端口号
- 测试链接,如果成功,则状态为up,否则为down
自动装配:
- 声明在MailHealthIndicatorConfiguration,该类继承自CompositeHealthIndicatorConfiguration,泛型参数为MailHealthIndicator, JavaMailSenderImpl
MailHealthIndicatorConfiguration声明了如下注解:
@Configuration @ConditionalOnClass(JavaMailSenderImpl.class) @ConditionalOnBean(JavaMailSenderImpl.class) @ConditionalOnEnabledHealthIndicator("mail")- @Configuration –> 配置类
- @ConditionalOnClass({JavaMailSenderImpl.class }) –> 在类路径下存在 JavaMailSenderImpl.class 时生效
- @ConditionalOnBean(JavaMailSenderImpl.class) –> 在BeanFactory中存在JavaMailSenderImpl类型的bean时生效
- @ConditionalOnEnabledHealthIndicator(“mail”)–> 如果配置有management.health.mail.enabled = true 或者management.health.defaults.enabled = true 则该配置生效.
@Bean方法如下:
@Bean @ConditionalOnMissingBean(name = "mailHealthIndicator") public HealthIndicator mailHealthIndicator() { return createHealthIndicator(this.mailSenders); }- @Bean –> 注册1个id为mailHealthIndicator,类型为HealthIndicator的bean
- @ConditionalOnMissingBean(name = “mailHealthIndicator”) –> 当beanFactory中不存在id为mailHealthIndicator 的bean 时生效.
JmsHealthIndicator
JmsHealthIndicator 继承自AbstractHealthIndicator,其内部持有ConnectionFactory,通过构造器注入,代码如下:
public JmsHealthIndicator(ConnectionFactory connectionFactory) {
    this.connectionFactory = connectionFactory;
}
doHealthCheck–>检查方式为通过ConnectionFactory 来创建1个Connection,并调用其start 方法,如果正常的话,则设置为状态为up,否则设置为down(父类方法中的try-catch设置),检查完毕后,将Connection进行关闭(finally 块保证).代码如下:
protected void doHealthCheck(Health.Builder builder) throws Exception {
    Connection connection = this.connectionFactory.createConnection();
    try {
        connection.start();
        builder.up().withDetail("provider",
                connection.getMetaData().getJMSProviderName());
    }
    finally {
        connection.close();
    }
}
自动装配:
- 声明在JmsHealthIndicatorConfiguration中,继承自CompositeHealthIndicatorConfiguration,泛型参数分别为JmsHealthIndicator, ConnectionFactory
JmsHealthIndicatorConfiguration 声明了如下注解:
@Configuration @ConditionalOnClass(ConnectionFactory.class) @ConditionalOnBean(ConnectionFactory.class) @ConditionalOnEnabledHealthIndicator("jms")- @Configuration –> 配置类
- @ConditionalOnClass({ConnectionFactory.class }) –> 在类路径下存在 ConnectionFactory.class 时生效
- @ConditionalOnBean(ConnectionFactory.class) –> 在BeanFactory中存在ConnectionFactory类型的bean时生效
- @ConditionalOnEnabledHealthIndicator(“jms”)–> 如果配置有management.health.jms.enabled = true 或者management.health.defaults.enabled = true 则该配置生效.
@Bean方法如下:
@Bean @ConditionalOnMissingBean(name = "jmsHealthIndicator") public HealthIndicator jmsHealthIndicator() { return createHealthIndicator(this.connectionFactories); }- @Bean –> 注册1个id为jmsHealthIndicator,类型为HealthIndicator的bean
- @ConditionalOnMissingBean(name = “jmsHealthIndicator”) –> 当beanFactory中不存在id为jmsHealthIndicator 的bean 时生效.
–
这里提1个问题,为什么 Cassandra,Couchbase,DataSource 等的监控是通过继承CompositeHealthIndicatorConfiguration实现的?
答案: 因为在sping 的应用中,关于这些资源的配置可能会配置多个,那么此时就需要分别做处理:
- 如果配置1个则直接实例化对应的HealthIndicator即可
- 否则,就实例化CompositeHealthIndicator,对配置的资源的健康情况做监控,最后给出一个聚合的结果(后面有详解)
同样,资源有很多,我们如果每个资源都写一套逻辑的话,就太Low了,因此抽象出CompositeHealthIndicatorConfiguration,简化开发.
DiskSpaceHealthIndicator
DiskSpaceHealthIndicator继承自AbstractHealthIndicator,声明了如下字段:
private final DiskSpaceHealthIndicatorProperties properties;DiskSpaceHealthIndicatorProperties该类的作用是通过外置的方式对DiskSpaceHealthIndicator进行设置,其代码如下:
@ConfigurationProperties(prefix = "management.health.diskspace")
public class DiskSpaceHealthIndicatorProperties {

// 常量值
private static final int MEGABYTES = 1024 * 1024;

// 阈值为10M
private static final int DEFAULT_THRESHOLD = 10 * MEGABYTES;

// 用来计算可用空间的路径,默认为当前路径
private File path = new File(".");

// 最小可用的磁盘空间,单位为字节,默认为10M
private long threshold = DEFAULT_THRESHOLD;

// 省略get,set...
}
由于其声明了@ConfigurationProperties(prefix = “management.health.diskspace”)注解,因此可以通过如下进行配置:
management.health.diskspace.enabled=true # Enable disk space health check.
management.health.diskspace.path= # Path used to compute the available disk space.
management.health.diskspace.threshold=0 # Minimum disk space that should be available, in bytes.
doHealthCheck 实现如下:
protected void doHealthCheck(Health.Builder builder) throws Exception {
    // 1. 获得配置的路径,如果当前路径的可用空间大于配置的阈值,则状态为up,否则为down
    File path = this.properties.getPath();
    long diskFreeInBytes = path.getUsableSpace();
    if (diskFreeInBytes >= this.properties.getThreshold()) {
        builder.up();
    }
    else {

        builder.down();
    }
    // 2. 设置属性值: total--> 配置检查路径的总空间, free--> 可用空间,threshold--> 配置的阈值,默认为10M
    builder.withDetail("total", path.getTotalSpace())
            .withDetail("free", diskFreeInBytes)
            .withDetail("threshold", this.properties.getThreshold());
}
获得配置的路径,如果当前路径的可用空间大于配置的阈值,则状态为up,否则为down
设置属性值: total–> 配置检查路径的总空间, free–> 可用空间,threshold–> 配置的阈值,默认为10M
自动装配:
在DiskSpaceHealthIndicatorConfiguration中进行了声明,该类声明了如下注解:
@Configuration @ConditionalOnEnabledHealthIndicator("diskspace")- @Configuration –> 配置类
- @ConditionalOnEnabledHealthIndicator(“diskspace”)–> 如果配置有management.health.diskspace.enabled = true 或者management.health.defaults.enabled = true 则该配置生效.
@Bean方法声明如下:
diskSpaceHealthIndicatorProperties,向beanFactory 注册了1个id为diskSpaceHealthIndicatorProperties,类型为DiskSpaceHealthIndicatorProperties的bean。代码如下:
@Bean
public DiskSpaceHealthIndicatorProperties diskSpaceHealthIndicatorProperties() {
return new DiskSpaceHealthIndicatorProperties();
}
diskSpaceHealthIndicator,代码如下:
@Bean @ConditionalOnMissingBean(name = "diskSpaceHealthIndicator") public DiskSpaceHealthIndicator diskSpaceHealthIndicator( DiskSpaceHealthIndicatorProperties properties) { return new DiskSpaceHealthIndicator(properties); }- @Bean –> 注册1个id为diskSpaceHealthIndicator,类型为HealthIndicator的bean
- @ConditionalOnMissingBean(name = “diskSpaceHealthIndicator”) –> 当beanFactory中不存在id为diskSpaceHealthIndicator 的bean 时生效.
CompositeHealthIndicator
该类直接实现了HealthIndicator,内部持有了Map 容器–> 持有了一系列的HealthIndicator的实例,是组合模式的范例.其构造器如下:
public CompositeHealthIndicator(HealthAggregator healthAggregator,
        Map<String, HealthIndicator> indicators) {
    Assert.notNull(healthAggregator, "HealthAggregator must not be null");
    Assert.notNull(indicators, "Indicators must not be null");
    this.indicators = new LinkedHashMap<String, HealthIndicator>(indicators);
    this.healthAggregator = healthAggregator;
}
CompositeHealthIndicator 声明了添加HealthIndicator的方法,代码如下:
public void addHealthIndicator(String name, HealthIndicator indicator) {
    this.indicators.put(name, indicator);
}
此外,其内部还持有了HealthAggregator的实例,HealthAggregator–>策略接口 通过CompositeHealthIndicator来聚合 Health的实例为一个.代码如下:
public interface HealthAggregator {

// 聚合一系列的Health为一个
Health aggregate(Map<String, Health> healths);

}
其继承结构如下:
AbstractHealthAggregator 实现了aggregate,代码如下:
public final Health aggregate(Map<String, Health> healths) { List<Status> statusCandidates = new ArrayList<Status>(); // 1. 遍历healths,依次添加Health至statusCandidates中 for (Map.Entry<String, Health> entry : healths.entrySet()) { statusCandidates.add(entry.getValue().getStatus()); } // 2. 返回一个聚合后的状态-->通过使用传入的candidates Status status = aggregateStatus(statusCandidates); // 3. 生成一个聚合后的details,在这里的实现就是简单的将传入的healths 添加至LinkedHashMap中 Map<String, Object> details = aggregateDetails(healths); // 4. 通过Health.Builder 根据生成的status,details 构建Health return new Health.Builder(status, details).build(); }- 遍历healths,依次添加Health至statusCandidates中
- 返回一个聚合后的状态–>通过使用传入的candidates,抽象方法,子类实现
生成一个聚合后的details,在这里的实现就是简单的将传入的healths 添加至LinkedHashMap中.代码如下:
protected Map<String, Object> aggregateDetails(Map<String, Health> healths) { return new LinkedHashMap<String, Object>(healths); }- 通过Health.Builder 根据生成的status,details 构建Health
OrderedHealthAggregator–>继承自AbstractHealthAggregator,其内部定义了1个名为statusOrder的List,用来存放对什么状态的数据进行聚合.默认为Status.DOWN, Status.OUT_OF_SERVICE, Status.UP, Status.UNKNOWN.代码如下:
public OrderedHealthAggregator() {
setStatusOrder(Status.DOWN, Status.OUT_OF_SERVICE, Status.UP, Status.UNKNOWN);
}
其aggregateStatus 代码如下:
- 依次遍历candidates,默认情况下只将状态为Status.DOWN, Status.OUT_OF_SERVICE, Status.UP, Status.UNKNOWN 的添加至filteredCandidates中.
- 如果filteredCandidates为空,则返回UNKNOWN
排序后,返回第一个的状态,此时使用的是StatusComparator,其比较逻辑如下:
比较给定的2个Status 在statusOrder中的下标,如果下标相同,则比较其 code值的大小.statusOrder中的顺序为: Status.DOWN, Status.OUT_OF_SERVICE, Status.UP, Status.UNKNOWN
代码如下:
public int compare(Status s1, Status s2) {
int i1 = this.statusOrder.indexOf(s1.getCode());
int i2 = this.statusOrder.indexOf(s2.getCode());
return (i1 < i2 ? -1 : (i1 == i2 ? s1.getCode().compareTo(s2.getCode()) : 1));
}
视线回到CompositeHealthIndicator中,其health的实现就比较简单了,通过遍历其indicators,依次添加至healths中,最后调用HealthAggregator#aggregate 进行聚合.代码如下:
public Health health() {
    // 遍历indicators,依次添加至healths中,最后调用HealthAggregator#aggregate 进行聚合.
    Map<String, Health> healths = new LinkedHashMap<String, Health>();
    for (Map.Entry<String, HealthIndicator> entry : this.indicators.entrySet()) {
        healths.put(entry.getKey(), entry.getValue().health());
    }
    return this.healthAggregator.aggregate(healths);
}
自动装配–>无

HealthEndpoint 解析
回到本文的重头戏–> HealthEndpoint.
作用–> 通过CompositeHealthIndicator来聚合spring boot应用中装配的HealthIndicator,在invoke中,依次展示其详情
声明的字段如下:
private final HealthIndicator healthIndicator;

// 缓存失效时间
private long timeToLive = 1000;
构造器如下:
public HealthEndpoint(HealthAggregator healthAggregator, Map<String, HealthIndicator> healthIndicators) { super("health", false); Assert.notNull(healthAggregator, "HealthAggregator must not be null"); Assert.notNull(healthIndicators, "HealthIndicators must not be null"); // 1. 实例化CompositeHealthIndicator CompositeHealthIndicator healthIndicator = new CompositeHealthIndicator( healthAggregator); // 2. 遍历healthIndicators,依次进行添加 for (Map.Entry<String, HealthIndicator> entry : healthIndicators.entrySet()) { healthIndicator.addHealthIndicator(getKey(entry.getKey()), entry.getValue()); } // 3. 赋值给healthIndicator this.healthIndicator = healthIndicator; }- 实例化CompositeHealthIndicator
- 遍历healthIndicators,依次进行添加
- 赋值给healthIndicator
invoke,只需调用CompositeHealthIndicator#health 即可.代码如下:
public Health invoke() {
    return this.healthIndicator.health();
}
属性配置–> 因为HealthEndpoint声明了@ConfigurationProperties(prefix = “endpoints.health”) 注解,因此可以如下进行配置:
endpoints.health.enabled= # Enable the endpoint.
endpoints.health.id= # Endpoint identifier.
endpoints.health.sensitive= # Mark if the endpoint exposes sensitive information.
endpoints.health.time-to-live=1000 # Time to live for cached result, in milliseconds.
自动装配–>声明在EndpointAutoConfiguration类中,代码如下:
@Bean @ConditionalOnMissingBean public HealthEndpoint healthEndpoint() { return new HealthEndpoint( this.healthAggregator == null ? new OrderedHealthAggregator() : this.healthAggregator, this.healthIndicators == null ? Collections.<String, HealthIndicator>emptyMap() : this.healthIndicators); }- @Bean –> 注册1个id为healthEndpoint,类型为HealthEndpoint的bean
@ConditionalOnMissingBean –> 当beanFactory中不存在HealthEndpoint类型的bean 时生效.
默认使用的OrderedHealthAggregator


 2761
2761

 被折叠的 条评论
为什么被折叠?
被折叠的 条评论
为什么被折叠?
 到【灌水乐园】发言


