


Yolov5近期更新了7.0版本,参考之前大佬共享的代码作出一点修改。
- 修改了已经更换的scale_coords函数部分,换为scale_boxes。
- 修改了model.warmup,取消半精度。
将yolov5-7.0修改成可调用函数,通过detect(img)可直接进行检测并输出坐标。代码可以放在yolov5-7.0根目录下直接运行。
 #导入需要的库
import os
import sys
from pathlib import Path
import numpy as np
import cv2
import torch
import torch.backends.cudnn as cudnn

#初始化目录
FILE = Path(__file__).resolve()
ROOT = FILE.parents[0]  # 定义YOLOv5的根目录
if str(ROOT) not in sys.path:
    sys.path.append(str(ROOT))  # 将YOLOv5的根目录添加到环境变量中(程序结束后删除)
ROOT = Path(os.path.relpath(ROOT, Path.cwd()))  # relative

from models.common import DetectMultiBackend
from utils.dataloaders import IMG_FORMATS, VID_FORMATS, LoadImages, LoadStreams
from utils.general import (LOGGER, Profile, check_file, check_img_size, check_imshow, check_requirements, colorstr, cv2,
                           increment_path, non_max_suppression, print_args, scale_boxes, strip_optimizer, xyxy2xywh)
from utils.plots import Annotator, colors, save_one_box
from utils.torch_utils import select_device, time_sync

#导入letterbox
from utils.augmentations import Albumentations, augment_hsv, copy_paste, letterbox, mixup, random_perspective


weights=ROOT / 'yolov5s.pt'  # 权重文件地址   .pt文件
source=ROOT / 'data/images'  # 测试数据文件(图片或视频)的保存路径
data=ROOT / 'data/coco128.yaml'  # 标签文件地址   .yaml文件

imgsz=(640, 640)  # 输入图片的大小 默认640(pixels)
conf_thres=0.25  # object置信度阈值 默认0.25  用在nms中
iou_thres=0.45  # 做nms的iou阈值 默认0.45   用在nms中
max_det=1000  # 每张图片最多的目标数量  用在nms中
device='cpu'  # 设置代码执行的设备 cuda device, i.e. 0 or 0,1,2,3 or cpu
classes=None  # 在nms中是否是只保留某些特定的类 默认是None 就是所有类只要满足条件都可以保留 --class 0, or --class 0 2 3
agnostic_nms=False  # 进行nms是否也除去不同类别之间的框 默认False
augment=False  # 预测是否也要采用数据增强 TTA 默认False
visualize=False  # 特征图可视化 默认FALSE
half=False  # 是否使用半精度 Float16 推理 可以缩短推理时间 但是默认是False
dnn=False  # 使用OpenCV DNN进行ONNX推理


# 获取设备
device = select_device(device)

# 载入模型
model = DetectMultiBackend(weights, device=device, dnn=dnn, data=data)
stride, names, pt, jit, onnx, engine = model.stride, model.names, model.pt, model.jit, model.onnx, model.engine
imgsz = check_img_size(imgsz, s=stride)  # 检查图片尺寸

# Half
# 使用半精度 Float16 推理
half &= (pt or jit or onnx or engine) and device.type != 'cpu'  # FP16 supported on limited backends with CUDA
if pt or jit:
    model.model.half() if half else model.model.float()


def detect(img):
    # Dataloader
    # 载入数据
    dataset = LoadImages(source, img_size=imgsz, stride=stride, auto=pt)

    # Run inference
    # 开始预测
    model.warmup(imgsz=(1, 3, *imgsz))  # warmup
    dt, seen = [0.0, 0.0, 0.0], 0

    #对图片进行处理
    im0 = img
    # Padded resize
    im = letterbox(im0, imgsz, stride, auto=pt)[0]
    # Convert
    im = im.transpose((2, 0, 1))[::-1]  # HWC to CHW, BGR to RGB
    im = np.ascontiguousarray(im)
    t1 = time_sync()
    im = torch.from_numpy(im).to(device)
    im = im.half() if half else im.float()  # uint8 to fp16/32
    im /= 255  # 0 - 255 to 0.0 - 1.0
    if len(im.shape) == 3:
        im = im[None]  # expand for batch dim
    t2 = time_sync()
    dt[0] += t2 - t1

    # Inference
    # 预测
    pred = model(im, augment=augment, visualize=visualize)
    t3 = time_sync()
    dt[1] += t3 - t2

    # NMS
    pred = non_max_suppression(pred, conf_thres, iou_thres, classes, agnostic_nms, max_det=max_det)
    dt[2] += time_sync() - t3

    #用于存放结果
    detections=[]

    # Process predictions
    for i, det in enumerate(pred):  # per image 每张图片
        seen += 1
        # im0 = im0s.copy()
        if len(det):
            # Rescale boxes from img_size to im0 size
            det[:, :4] = scale_boxes(im.shape[2:], det[:, :4], im0.shape).round()
            # Write results
            # 写入结果
            for *xyxy, conf, cls in reversed(det):
                xywh = (xyxy2xywh(torch.tensor(xyxy).view(1, 4))).view(-1).tolist()
                xywh = [round(x) for x in xywh]
                xywh = [xywh[0] - xywh[2] // 2, xywh[1] - xywh[3] // 2, xywh[2],
                        xywh[3]]  # 检测到目标位置,格式:(left,top,w,h)

                cls = names[int(cls)]
                conf = float(conf)
                detections.append({'class': cls, 'conf': conf, 'position': xywh})
    #输出结果
    for i in detections:
        print(i)

    #推测的时间
    LOGGER.info(f'({t3 - t2:.3f}s)')
    return detections


path = 'data/images/zidane.jpg'
img = cv2.imread(path)
#传入一张图片
detect(img)
运行结果如下图:
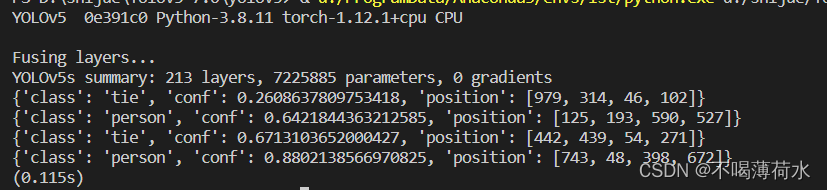
class:标签的名称
conf:置信度
position:xywh ( 左上角x,左上角y,宽,高 )
参考文章:(15条消息) 将Yolov5的detect.py修改为可以直接调用的函数_guluC的博客-CSDN博客_yolov5 detect.py修改


 2465
2465


 被折叠的 条评论
为什么被折叠?
被折叠的 条评论
为什么被折叠?
 到【灌水乐园】发言


