


转发自 Java葵花宝典公众号
一:spring mvc简介与运行原理
Spring的模型-视图-控制器(MVC)框架是围绕一个DispatcherServlet来设计的,这个Servlet会把请求分发给各个处理器,并支持可配置的处理器映射、视图渲染、本地化、时区与主题渲染等,甚至还能支持文件上传。
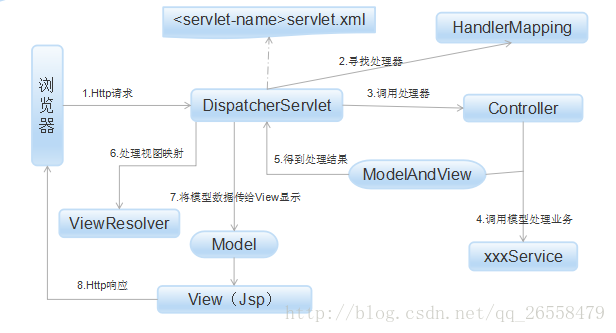
(1) Http请求:客户端请求提交到DispatcherServlet。
(2) 寻找处理器:由DispatcherServlet控制器查询一个或多个HandlerMapping,找 到处理请求的Controller。
(3) 调用处理器:DispatcherServlet将请求提交到Controller。
(4)(5)调用业务处理和返回结果:Controller调用业务逻辑处理后,返回 ModelAndView。
(6)(7)处理视图映射并返回模型: DispatcherServlet查询一个或多个ViewResoler视图解析器,找到ModelAndView指定的视图。
(8) Http响应:视图负责将结果显示到客户端。
二:主要注解

ContextLoaderListener
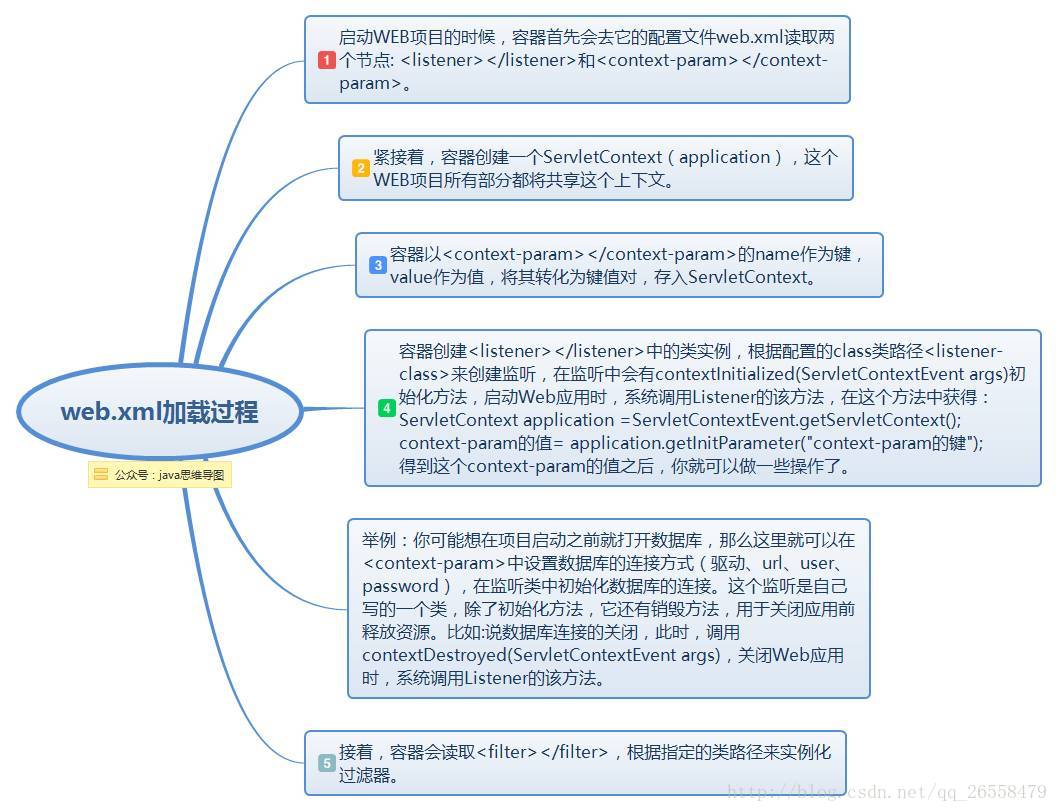
在讲ContextLoaderListener之前,首先来了解一下web.xml的作用。
一个web中可以没有web.xml文件,也就是说,web.xml文件并不是web工程必须的。web.xml文件是用来初始化配置信息:比如Welcome页面、servlet、servlet-mapping、filter、listener、启动加载级别等。当你的web工程没用到这些时,你可以不用web.xml文件来配置你的Application。
当要启动某个web项目时,服务器软件或容器如(tomcat)会第一步加载项目中的web.xml文件,通过其中的各种配置来启动项目,只有其中配置的各项均无误时,项目才能正确启动。web.xml有多项标签,在其加载的过程中顺序依次为:context-param >> listener >> fileter >> servlet。(同类多个节点以出现顺序依次加载)
而spring mvc启动过程大致分为两个过程:
- ContextLoaderListener初始化,实例化IoC容器,并将此容器实例注册到ServletContext中。
- DispatcherServlet初始化。
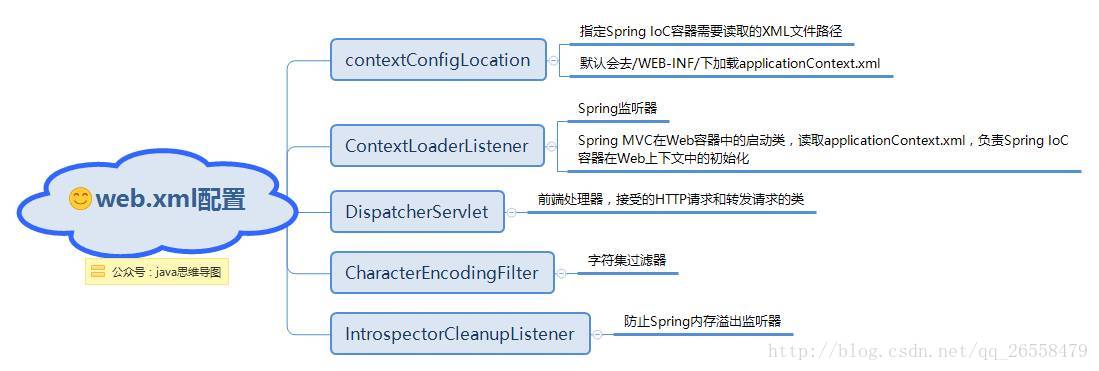
其中ContextLoaderListener监听器它实现了ServletContextListener这个接口,在web.xml配置这个监听器,启动容器时,就会默认执行它实现的方法。在ContextLoaderListener中关联了ContextLoader这个类,所以整个加载配置过程由ContextLoader来完成。
- ContextLoaderListener在web.xml中的配置
<!-- 配置contextConfigLocation初始化参数 -->
<context-param>
    <param-name>contextConfigLocation</param-name>
    <param-value>/WEB-INF/applicationContext.xml</param-value>
</context-param>
<!-- 配置ContextLoaderListerner -->
<listener>
        <listener-class>org.springframework.web.context.ContextLoaderListener</listener-class>
</listener>
ServletContextListener 接口有两个方法:contextInitialized,contextDestroyed
DispatcherServlet
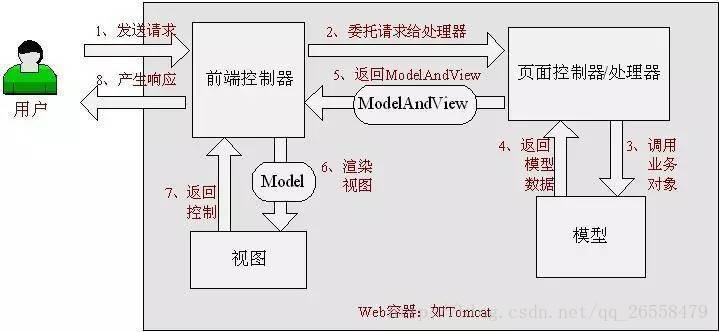
Spring MVC框架,与其他很多web的MVC框架一样:请求驱动;所有设计都围绕着一个中央Servlet来展开,它负责把所有请求分发到控制器;同时提供其他web应用开发所需要的功能。不过Spring的中央处理器,DispatcherServlet,能做的比这更多。
下图展示了Spring Web MVC的DispatcherServlet处理请求的工作流。熟悉设计模式的朋友会发现,DispatcherServlet应用的其实就是一个“前端控制器”的设计模式(其他很多优秀的web框架也都使用了这个设计模式)。
流程图
在web.xml中的配置
<!-- servlet定义 -->
<servlet>
    <servlet-name>dispatcher</servlet-name>
    <servlet-class>org.springframework.web.servlet.DispatcherServlet</servlet-class>
    <load-on-startup>1</load-on-startup>
</servlet>
<servlet-mapping>
    <servlet-name>dispatcher</servlet-name>
    <url-pattern>/</url-pattern>
</servlet-mapping>
其中
- load-on-startup:表示启动容器时初始化该Servlet;
- url-pattern:表示哪些请求交给Spring Web MVC处理, “/”
是用来定义默认servlet映射的。也可以如“*.html”表示拦截所有以html为扩展名的请求。
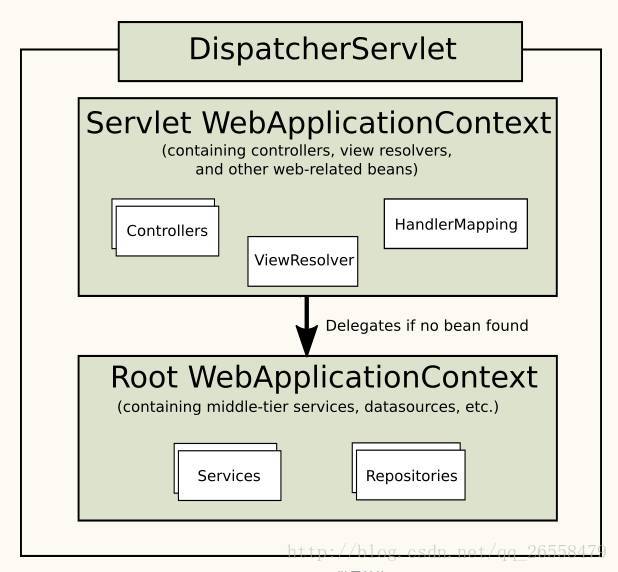
在Spring MVC中,每个DispatcherServlet都持有一个自己的上下文对象WebApplicationContext,它又继承了根(root)WebApplicationContext对象中已经定义的所有bean。这些继承的bean可以在具体的Servlet实例中被重载,在每个Servlet实例中你也可以定义其scope下的新bean。
WebApplicationContext继承自ApplicationContext,它提供了一些web应用经常需要用到的特性。它与普通的ApplicationContext不同的地方在于,它支持主题的解析,并且知道它关联到的是哪个servlet(它持有一个该ServletContext的引用)
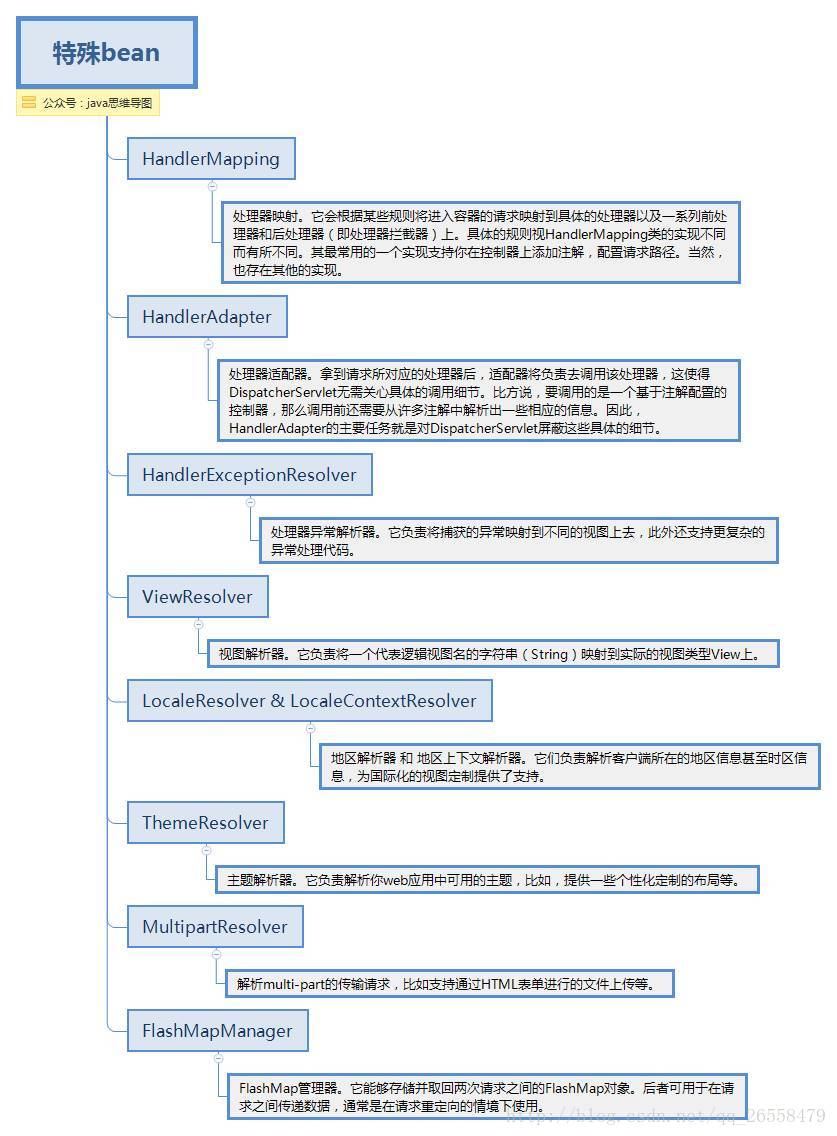
spring mvc同时提供了很多特殊的注解,用于处理请求和渲染视图等。DispatcherServlet初始化的过程中会默认使用这些特殊bean进行配置。如果你想指定使用哪个特定的bean,你可以在web应用上下文WebApplicationContext中简单地配置它们。
其中,常用的ViewResolver的配置。以jsp作为视图为例
<!-- 对模型视图名称的解析,即在模型视图名称添加前后缀 -->
<bean class="org.springframework.web.servlet.view.InternalResourceViewResolver">
    <property name="prefix" value="/WEB-INF/jsp/" />
    <property name="suffix" value=".jsp" />
</bean>
配置上传文件限制MultipartResolver
<!-- 上传限制 -->
<bean id="multipartResolver" class="org.springframework.web.multipart.commons.CommonsMultipartResolver">
<!-- 上传文件大小限制为31M,31*1024*1024 -->
<property name="maxUploadSize" value="32505856"/>
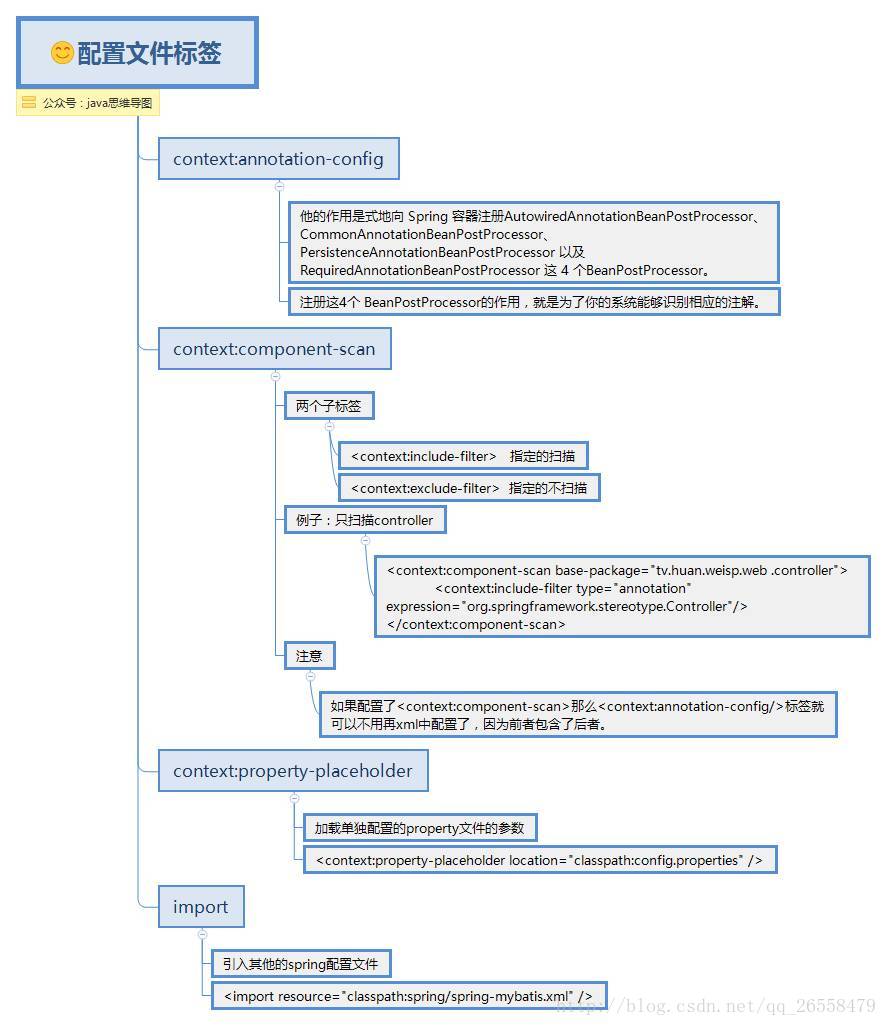
</bean>applicationContext.xml中的标签
文件上传
前面说到DispatcherServlet中有个特殊的Bean叫MultipartResolver,可用于限制文件的上传大小等。当解析器MultipartResolver完成处理时,请求便会像其他请求一样被正常流程处理。
- 表单
<form method="post" action="/form" enctype="multipart/form-data">
     <input type="text" name="name"/>
     <input type="file" name="file"/>
     <input type="submit"/>
</form>- 控制器
@RequestMapping(path = "/form", method = RequestMethod.POST) public String handleFormUpload(@RequestParam("name") String name,
            @RequestParam("file") MultipartFile file) {
   if (!file.isEmpty()) {
          byte[] bytes = file.getBytes();
          // store the bytes somewhere
          return "redirect:uploadSuccess";
    }
    return "redirect:uploadFailure";
}
异常处理
先来说下常见的异常处理有几种方式,如下图:
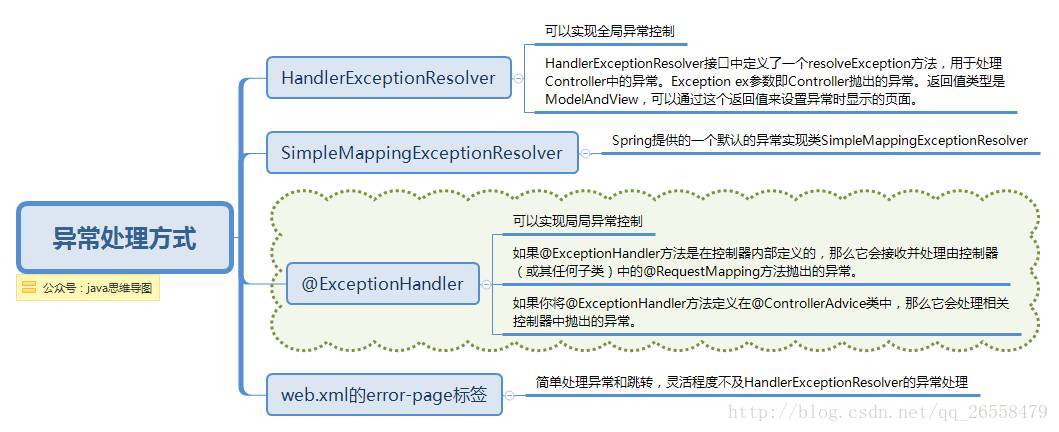
Spring的处理器异常解析器HandlerExceptionResolver接口的实现负责处理各类控制器执行过程中出现的异常。也是上面提到的,是DispatcherServlet中的特殊bean,可以自定义配置处理。
某种程度上讲,HandlerExceptionResolver与你在web应用描述符web.xml文件中能定义的异常映射(exception mapping)很相像,不过它比后者提供了更灵活的方式。比如它能提供异常被抛出时正在执行的是哪个处理器这样的信息。
- HandlerExceptionResolver 提供resolveException接口
public interface HandlerExceptionResolver {
    ModelAndView resolveException(
            HttpServletRequest request, HttpServletResponse response, Object handler, Exception ex);
}- 在BaseController中使用 @ExceptionHandler注解处理异常
 @ExceptionHandler(Exception.class)
public Object exceptionHandler(Exception ex, HttpServletResponse response,
              HttpServletRequest request) throws IOException {
        String url = "";
        String msg = ex.getMessage();
        Object resultModel = null;        try {            if (ex.getClass() == HttpRequestMethodNotSupportedException.class) {
                url = "admin/common/500";
                System.out.println("--------毛有找到对应方法---------");
            } else if (ex.getClass() == ParameterException.class) {//自定义的异常

            } else if (ex.getClass() == UnauthorizedException.class) {
                url = "admin/common/unauth";
                System.out.println("--------毛有权限---------");
            }

            String header = req.getHeader("X-Requested-With");
            boolean isAjax = "XMLHttpRequest".equalsIgnoreCase(header);
            String method = req.getMethod();
            boolean isPost = "POST".equalsIgnoreCase(method);            if (isAjax || isPost) {                return Message.error(msg);
            } else {
                ModelAndView view = new ModelAndView(url);
                view.addObject("error", msg);
                view.addObject("class", ex.getClass());
                view.addObject("method", request.getRequestURI());                return view;
            }
        } catch (Exception exception) {
            logger.error(exception.getMessage(), exception);            return resultModel;
        } finally {
            logger.error(msg, ex);
            ex.printStackTrace();
        }
}- 在web.xml中处理异常
<!-- 默认的错误处理页面 -->
<error-page>
    <error-code>403</error-code>
    <location>/403.html</location>
</error-page>
<error-page>
    <error-code>404</error-code>
    <location>/404.html</location>
</error-page>
<!-- 仅仅在调试的时候注视掉,在正式部署的时候不能注释 --><!-- 这样配置也是可以的,表示发生500错误的时候,转到500.jsp页面处理。 -->
<error-page>
    <error-code>500</error-code>
    <location>/500.html</location>
</error-page>
<!-- 这样的配置表示如果jsp页面或者servlet发生java.lang.Exception类型(当然包含子类)的异常就会转到500.jsp页面处理。 -->
<error-page>
    <exception-type>java.lang.Exception</exception-type>
    <location>/500.jsp</location>
</error-page>
<error-page>
    <exception-type>java.lang.Throwable</exception-type>
    <location>/500.jsp</location>
</error-page>
<!-- 当error-code和exception-type都配置时,exception-type配置的页面优先级高及出现500错误,发生异常Exception时会跳转到500.jsp-->


 563
563


 被折叠的 条评论
为什么被折叠?
被折叠的 条评论
为什么被折叠?
 到【灌水乐园】发言


