


初始化一个定时器,假设定时器1ms调用1次中断服务函数,要实现不同频率的任务执行,如何搭建一个合理的架构。
网上已经有许多文章、代码,这里仅挑选其中一个个人认为比较合适的进行分析与学习。
代码分析
// 定义两个不同频率的任务
define TASKS_NUM 2
// 定义一个任务结构体
typedef struct _TASK_COMPONENETS{
	uint8_T Run;			// 运行标志, Run = 0, 任务不执行
	uint16_T Timer;		// 最大为65535*base_sample_time
	uint16_T IvtTime;	// 任务间隔时间,同上
	void (*TaskHook)(void); //任务函数
}TASK_COMPONENTS;
// 定义具体的任务
static TASK_COMPONENTS TaskComps[]={
	{0,1000,1000,Task100ms},
	{0,1000,500,Task50ms}
};

// 中断服务函数
void TaskRemarks(){
	uint8_T i;
	for (i=0;i<TASKS_NUM;i++){
		if (TaskComps[i].Timer) // 时间不为0
		{
			TaskComps[i].Timer--;
			if (TaskComps[i].Timer == 0){
				// 恢复计时器值
				TaskComps[i].Timer = TaskComps[i].IvtTime;
				TaskComps[i].Run = 1;
			}
		}
	}
}

void TaskProcess(void){
	uint8_T i;
	for(i=0; i< TASKS_NUM; i++){
		// 如果要执行一次任务
		if(TaskComps[i].Run){
			//运行任务
			TaskComps[i].TaskHook();
			TaskComps[i].Run = 0;
		}
	}
}
接下来是主函数,如下
void main(){
	// 系统初始化 SysInit();
	while(1){
		TaskProcess();
	}
}
很明显,我们只需要补齐上面的系统初始化代码(包括系统初始化代码)和具体的Task函数即可实现自己想要的功能。
举个例子:
这里举一个简单的例子:
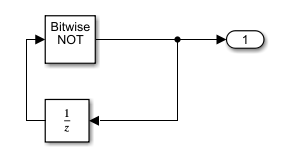
- 任务1 :100ms周期,实现LED灯的反转
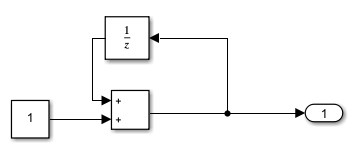
- 任务2 : 50ms周期,实现LED流水灯计数
模型如下:
- 任务1:
- 任务2:
具体代码:
#include "reg52.h"
#include "rtwtypes.h"
#include "driver.h"
#include "Task100ms.h"
#include "Task50ms.h"


// 定义任务的个数,最大支持256个任务
#define TASKS_NUM 2

// 任务结构体
typedef struct _TASK_COMPONENETS{
	uint8_T Run;			// 运行标志, Run = 0, 任务不执行
	uint16_T Timer;		// 上电后多久执行任务, 最大为65535*base_sample_time
	uint16_T IvtTime;	// 任务间隔时间,同上
	void (*TaskHook)(void); //任务函数
}TASK_COMPONENTS;

void Task100ms(){
	Task100ms_step();
	P0 = Task100ms_Y.Out1;
}

void Task50ms(){
	Task50ms_step();
	P1 = Task50ms_Y.Out1;
}


//定义任务
static TASK_COMPONENTS TaskComps[]={
	{0,1000,1000,Task100ms},
	{0,1000,500,Task50ms}
};

// 中断服务函数
void TaskRemarks(){
	uint8_T i;
	for (i=0;i<TASKS_NUM;i++){
		if (TaskComps[i].Timer) // 时间不为0
		{
			TaskComps[i].Timer--;
			if (TaskComps[i].Timer == 0){
				// 恢复计时器值
				TaskComps[i].Timer = TaskComps[i].IvtTime;
				TaskComps[i].Run = 1;
			}
		}
	}
}

void TaskProcess(void){
	uint8_T i;
	for(i=0; i< TASKS_NUM; i++){
		// 如果要执行一次任务
		if(TaskComps[i].Run){
			//运行任务
			TaskComps[i].TaskHook();
			TaskComps[i].Run = 0;
		}
	}
}

void main(){
	// 系统初始化
	Timer0Init();
	while(1){
		TaskProcess();
	}
}

void Timer0() interrupt 1{
	TH0=0XFC;
	TL0=0X18;
	TaskRemarks();
}
思考一下:
在Simulink中如何完成 —— 如下图:

代码如下:
#include "reg52.h"
#include "rtwtypes.h"
#include "driver.h"
#include "TasksExample.h"

void main(){
	// 系统初始化
	Timer0Init();
	while(1){
	}
}

void Timer0() interrupt 1{
	TH0=0XFC;
	TL0=0X18;
	TasksExample_step();
	P0 = TasksExample_Y.Out1;
	P1 = TasksExample_Y.Out2;

}
看一下Simulink生成的代码是怎么解决的?
static void rate_scheduler(void)
{
  (TasksExample_M->Timing.TaskCounters.TID[1])++;
  if ((TasksExample_M->Timing.TaskCounters.TID[1]) > 499) {/* Sample time: [0.5s, 0.0s] */
    TasksExample_M->Timing.TaskCounters.TID[1] = 0;
  }

  (TasksExample_M->Timing.TaskCounters.TID[2])++;
  if ((TasksExample_M->Timing.TaskCounters.TID[2]) > 999) {/* Sample time: [1.0s, 0.0s] */
    TasksExample_M->Timing.TaskCounters.TID[2] = 0;
  }
}

/* Model step function */
void TasksExample_step(void)
{
  if (TasksExample_M->Timing.TaskCounters.TID[2] == 0) {
    TasksExample_DW.UnitDelay_DSTATE_p = (uint8_T)
      ~TasksExample_DW.UnitDelay_DSTATE_p;
    TasksExample_Y.Out1 = TasksExample_DW.UnitDelay_DSTATE_p;
  }

  if (TasksExample_M->Timing.TaskCounters.TID[1] == 0) {
    TasksExample_DW.UnitDelay_DSTATE++;
   TasksExample_Y.Out2 = TasksExample_DW.UnitDelay_DSTATE;
  }

  rate_scheduler();
}
感觉还是C语言写的那个结构比较好,但是!!Simulink更简单部署。
百度云链接:
链接:https://pan.baidu.com/s/1gG4Rjux9UOEvOYNmnucc6w
提取码:5wrl


 2617
2617


 被折叠的 条评论
为什么被折叠?
被折叠的 条评论
为什么被折叠?
 到【灌水乐园】发言


