


目录
4.6、验证
1、运行环境
| VMware | 16.1.0 |
| CentOS Linux release 7.9.2009 : 2C2G 20G | |
| Python3.6.8 |
节点信息:
| IP | hostname | 备注 |
| 192.168.5.1 | node1 | 主 |
| 192.168.5.3 | node3 | 备 |
| 192.168.5.5 | node5 | 备 |
2、部署方案
主备模式相当于两个数据副本,主机和备机各一个数据副本,备机接受日志、执行日志回放。
主备部署架构:
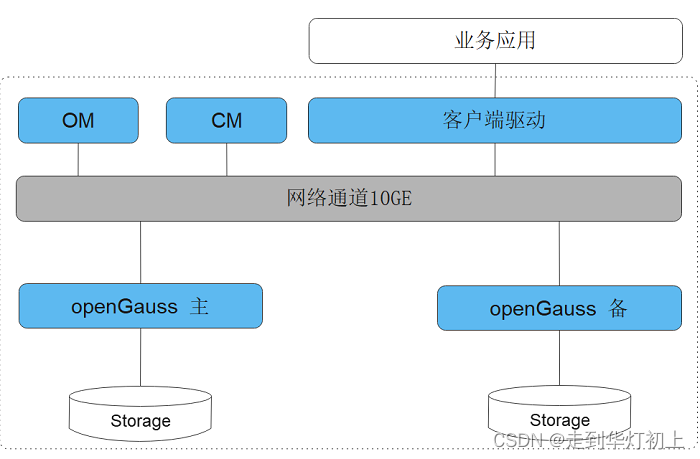
架构说明:
| 数据库管理模块(Cluster Manager)。管理和监控数据库系统中各个功能单元和物理资源的运行情况,确保整个系统的稳定运行。 | |
| 客户端驱动(Client Driver)。负责接收来自应用的访问请求,并向应用返回执行结果。客户端驱动负责与openGauss实例通信,发送应用的SQL命令,接收openGauss实例的执行结果。 | |
多副本的部署形态,提供了抵御实例级故障的能力,适用于不要求机房级别容灾,但是需要抵御个别硬件故障的应用场景。
一般多副本部署时使用1主2备模式,总共3个副本,3个副本的可靠性为99.99%,可以满足大多数应用的可靠性要求。
- 主备间Quorum复制,至少同步到一台备机,保证最大性能。
- 主备任意一个节点故障,不影响业务的进行。
- 数据有三份,任何一个节点故障,系统仍然有双份数据确保继续运行。任何一个备份都可以升主。
- 主备实例之间不可部署在同一台物理机上。
一主多备部署形态图:

3、安装准备
在所有节点均执行以下检查
3.1、依赖包准备
| 所需软件 | |
|---|---|
| expect | 建议版本:5.45 |
| bzip2 | 建议版本:1.0.6 |
1、安装
yum install -y libaio-devel flex bison ncurses-devel glibc-devel patch lsb_release readline-devel expect bzip22、检查依赖包
rpm -qa libaio-devel flex bison ncurses-devel glibc-devel patch lsb_release readline-devel expect bzip2
3.2、关闭防火墙
systemctl disable firewalld.service
systemctl stop firewalld.service

# 检查防火墙状态
systemctl status firewalld
3.3、设置字符集
# 检查
cat /etc/profile | grep LANG

# 设置
cat>> /etc/profile<<EOF
export LANG=en_US.UTF-8
EOF

source /etc/profile
3.4、设置时区和时间
# 查看
date

# 如果时间与当前时间不一致,则执行
cp /usr/share/zoneinfo/Asia/Shanghai /etc/localtime
3.5、设置网卡MTU值
MTU值推荐8192,要求不小于1500,使用默认值 1500 满足要求即可
-- 设置网卡为1500
ifconfig ens33 mtu 1500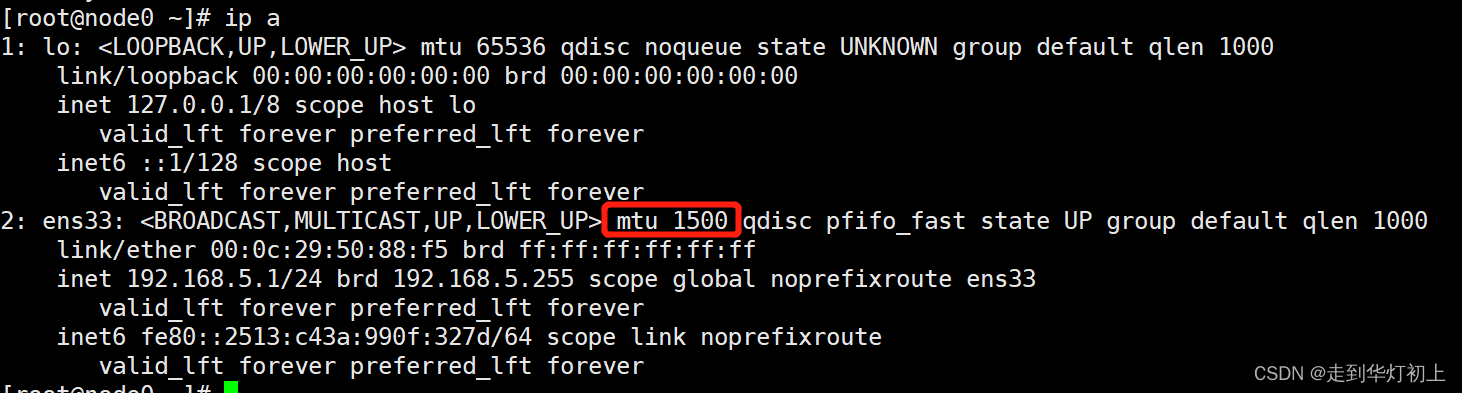
3.6、创建安装目录及用户
mkdir -p /opt/software/openGauss

useradd omm -p openGauss@1234

chown omm:omm -R /opt/software/openGauss
3.7、设置root用户远程登录
cat >>/etc/ssh/sshd_config<<EOF
PermitRootLogin yes
EOF

# 检查
cat /etc/ssh/sshd_config |grep PermitRootLogin
3.8、修改Banner配置
cat >>/etc/ssh/sshd_config<<EOF
Banner none
EOF
# 检查
cat /etc/ssh/sshd_config | grep Banner
# 重启生效
systemctl restart sshd.service
3.9、修改主机名和hosts
各节点按实际填写hostname
# 检查
cat /etc/hostname

cat > /etc/hosts<<EOF
192.168.5.1 node1
192.168.5.3 node3
192.168.5.5 node5
EOF

# 检查
cat /etc/hosts
4、安装
以下主节点执行
4.1、安装包准备
cd /opt/software/openGauss/上传安装包(企业版):openGauss-5.0.0-CentOS-64bit-all.tar.gz
4.2、解压
tar -zxvf openGauss-5.0.0-CentOS-64bit-all.tar.gz
tar -zxvf openGauss-5.0.0-CentOS-64bit-om.tar.gz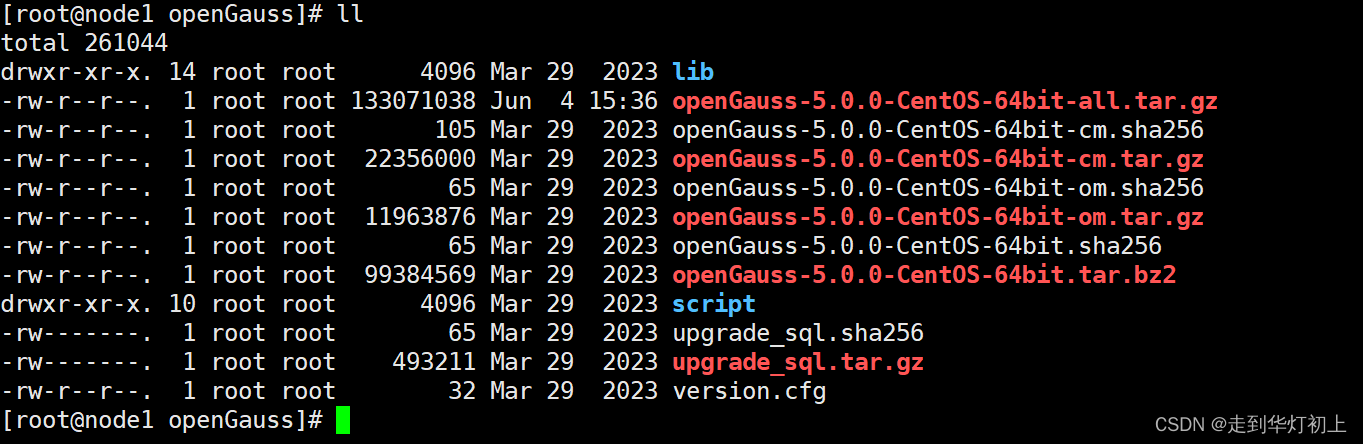
4.3、修改XML文件
xml格式一定要正确
vi /opt/software/openGauss/cluster_config.xml<?xml version="1.0" encoding="UTF-8"?>
<ROOT>
<!-- openGauss整体信息 -->
<CLUSTER>
<PARAM name="clusterName" value="gauss_cluster" />
<PARAM name="nodeNames" value="node1,node3,node5" />
<PARAM name="gaussdbAppPath" value="/opt/opengauss/app" />
<PARAM name="gaussdbLogPath" value="/opt/opengauss/log/omm" />
<PARAM name="tmpMppdbPath" value="/opt/opengauss/tmp"/>
<PARAM name="gaussdbToolPath" value="/opt/opengauss/om" />
<PARAM name="corePath" value="/opt/opengauss/corefile"/>
<PARAM name="backIp1s" value="192.168.5.1,192.168.5.3,192.168.5.5"/>
</CLUSTER>
<!-- 每台服务器上的节点部署信息 -->
<DEVICELIST>
<!-- node1上的节点部署信息 -->
<DEVICE sn="node1">
<PARAM name="name" value="node1"/>
<PARAM name="azName" value="AZ1"/>
<PARAM name="azPriority" value="1"/>
<!-- 如果服务器只有一个网卡可用,将backIP1和sshIP1配置成同一个IP -->
<PARAM name="backIp1" value="192.168.5.1"/>
<PARAM name="sshIp1" value="192.168.5.1"/>
<!--CM节点部署信息-->
<PARAM name="cmsNum" value="1"/>
<PARAM name="cmServerPortBase" value="15000"/>
<PARAM name="cmServerListenIp1" value="192.168.5.1,192.168.5.3,192.168.5.5"/>
<PARAM name="cmServerHaIp1" value="192.168.5.1,192.168.5.3,192.168.5.5"/>
<PARAM name="cmServerlevel" value="1"/>
<PARAM name="cmServerRelation" value="node1,node3,node5"/>
<PARAM name="cmDir" value="/opt/opengauss/data/cmserver"/>
<!--dn-->
<PARAM name="dataNum" value="1"/>
<PARAM name="dataPortBase" value="15400"/>
<PARAM name="dataNode1" value="/opt/opengauss/data/dn,node3,/opt/opengauss/data/dn,node5,/opt/opengauss/data/dn"/>
<PARAM name="dataNode1_syncNum" value="0"/>
</DEVICE>
<!-- node2上的节点部署信息,其中“name”的值配置为主机名称 -->
<DEVICE sn="node3">
<PARAM name="name" value="node3"/>
<PARAM name="azName" value="AZ1"/>
<PARAM name="azPriority" value="1"/>
<!-- 如果服务器只有一个网卡可用,将backIP1和sshIP1配置成同一个IP -->
<PARAM name="backIp1" value="192.168.5.3"/>
<PARAM name="sshIp1" value="192.168.5.3"/>
<!-- cm -->
<PARAM name="cmServerPortStandby" value="15000"/>
<PARAM name="cmDir" value="/opt/opengauss/data/cmserver"/>
</DEVICE>
<!-- node3上的节点部署信息,其中“name”的值配置为主机名称 -->
<DEVICE sn="node5">
<PARAM name="name" value="node5"/>
<PARAM name="azName" value="AZ1"/>
<PARAM name="azPriority" value="1"/>
<!-- 如果服务器只有一个网卡可用,将backIP1和sshIP1配置成同一个IP -->
<PARAM name="backIp1" value="192.168.5.5"/>
<PARAM name="sshIp1" value="192.168.5.5"/>
<!-- cm -->
<PARAM name="cmServerPortStandby" value="15000"/>
<PARAM name="cmDir" value="/opt/opengauss/data/cmserver"/>
</DEVICE>
</DEVICELIST>
</ROOT>
4.4、预安装
注:各节点需要设置互信或者root账号密码一样,否则预安装密码验证不通过
/opt/software/openGauss/script/gs_preinstall -U omm -G omm -X /opt/software/openGauss/cluster_config.xml[root@node1 ~]# /opt/software/openGauss/script/gs_preinstall -U omm -G omm -X /opt/software/openGauss/cluster_config.xml
Parsing the configuration file.
Successfully parsed the configuration file.
Installing the tools on the local node.
Successfully installed the tools on the local node.
Are you sure you want to create trust for root (yes/no)?yes
Please enter password for root
Password:
Successfully created SSH trust for the root permission user.
Setting host ip env
Successfully set host ip env.
Distributing package.
Begin to distribute package to tool path.
Successfully distribute package to tool path.
Begin to distribute package to package path.
Successfully distribute package to package path.
Successfully distributed package.
Are you sure you want to create the user[omm] and create trust for it (yes/no)? yes
Preparing SSH service.
Successfully prepared SSH service.
Installing the tools in the cluster.
Successfully installed the tools in the cluster.
Checking hostname mapping.
Successfully checked hostname mapping.
Creating SSH trust for [omm] user.
Please enter password for current user[omm].
Password:
Checking network information.
All nodes in the network are Normal.
Successfully checked network information.
Creating SSH trust.
Creating the local key file.
Successfully created the local key files.
Appending local ID to authorized_keys.
Successfully appended local ID to authorized_keys.
Updating the known_hosts file.
Successfully updated the known_hosts file.
Appending authorized_key on the remote node.
Successfully appended authorized_key on all remote node.
Checking common authentication file content.
Successfully checked common authentication content.
Distributing SSH trust file to all node.
Distributing trust keys file to all node successfully.
Successfully distributed SSH trust file to all node.
Verifying SSH trust on all hosts.
Successfully verified SSH trust on all hosts.
Successfully created SSH trust.
Successfully created SSH trust for [omm] user.
Checking OS software.
Successfully check os software.
Checking OS version.
Successfully checked OS version.
Creating cluster's path.
Successfully created cluster's path.
Set and check OS parameter.
Setting OS parameters.
Successfully set OS parameters.
Warning: Installation environment contains some warning messages.
Please get more details by "/opt/software/openGauss/script/gs_checkos -i A -h node1,node3,node5 --detail".
Set and check OS parameter completed.
Preparing CRON service.
Successfully prepared CRON service.
Setting user environmental variables.
Successfully set user environmental variables.
Setting the dynamic link library.
Successfully set the dynamic link library.
Setting Core file
Successfully set core path.
Setting pssh path
Successfully set pssh path.
Setting Cgroup.
Successfully set Cgroup.
Set ARM Optimization.
No need to set ARM Optimization.
Fixing server package owner.
Setting finish flag.
Successfully set finish flag.
Preinstallation succeeded.
校验预安装结果:
/opt/software/openGauss/script/gs_checkos -i A -h node1,node3,node5 --detail[root@node1 openGauss]# /opt/software/openGauss/script/gs_checkos -i A -h node1,node3,node5 --detail
Checking items:
A1. [ OS version status ] : Normal
[node5]
centos_7.9.2009_64bit
[node1]
centos_7.9.2009_64bit
[node3]
centos_7.9.2009_64bitA2. [ Kernel version status ] : Normal
The names about all kernel versions are same. The value is "3.10.0-1160.el7.x86_64".
A3. [ Unicode status ] : Normal
The values of all unicode are same. The value is "LANG=en_US.UTF-8".
A4. [ Time zone status ] : Normal
The informations about all timezones are same. The value is "+0800".
A5. [ Swap memory status ] : Warning
[node3]
SwapMemory 2147479552 TotalMemory 1907740672[node1]
SwapMemory 2147479552 TotalMemory 1907740672[node5]
SwapMemory 2147479552 TotalMemory 1907740672
A6. [ System control parameters status ] : Warning
[node5]
Warning reason: variable 'net.ipv4.tcp_retries1' RealValue '3' ExpectedValue '5'.
Warning reason: variable 'net.ipv4.tcp_syn_retries' RealValue '6' ExpectedValue '5'.
Check_SysCtl_Parameter warning.[node1]
Warning reason: variable 'net.ipv4.tcp_retries1' RealValue '3' ExpectedValue '5'.
Warning reason: variable 'net.ipv4.tcp_syn_retries' RealValue '6' ExpectedValue '5'.
Check_SysCtl_Parameter warning.[node3]
Warning reason: variable 'net.ipv4.tcp_retries1' RealValue '3' ExpectedValue '5'.
Warning reason: variable 'net.ipv4.tcp_syn_retries' RealValue '6' ExpectedValue '5'.
Check_SysCtl_Parameter warning.
A7. [ File system configuration status ] : Normal
Both soft nofile and hard nofile are correct.
A8. [ Disk configuration status ] : Normal
The value about XFS mount parameters is correct.
A9. [ Pre-read block size status ] : Normal
The value about Logical block size is correct.
A11.[ Network card configuration status ] : Warning
[node3]
BondMode Null
Warning reason: network 'ens33' 'mtu' RealValue '1500' ExpectedValue '8192'[node1]
BondMode Null
Warning reason: network 'ens33' 'mtu' RealValue '1500' ExpectedValue '8192'[node5]
BondMode Null
Warning reason: network 'ens33' 'mtu' RealValue '1500' ExpectedValue '8192'
A12.[ Time consistency status ] : Warning
[node1]
The NTPD not detected on machine and local time is "2024-06-04 16:12:35".
[node5]
The NTPD not detected on machine and local time is "2024-06-04 16:12:36".
[node3]
The NTPD not detected on machine and local time is "2024-06-04 16:12:36".A13.[ Firewall service status ] : Normal
The firewall service is stopped.
A14.[ THP service status ] : Normal
The THP service is stopped.
Total numbers:13. Abnormal numbers:0. Warning numbers:4.
4.5、安装
1、切换到omm用户
su omm2、安装
注:数据库初始账号omm,密码要求:
最少包含8个字符,最多包含16个字符。
不能和用户名、当前密码(ALTER)、或当前密码反序相同。
至少包含大写字母(A-Z)、小写字母(a-z)、数字、非字母数字字符(限定为~!@#$%^&*()-_=+\|[{}];:,<.>/?)四类字符中的三类字符
gs_install -X /opt/software/openGauss/cluster_config.xml[omm@node1 ~]$ gs_install -X /opt/software/openGauss/cluster_config.xml
Parsing the configuration file.
Check preinstall on every node.
Successfully checked preinstall on every node.
Creating the backup directory.
Successfully created the backup directory.
begin deploy..
Installing the cluster.
begin prepare Install Cluster..
Checking the installation environment on all nodes.
begin install Cluster..
Installing applications on all nodes.
Successfully installed APP.
begin init Instance..
encrypt cipher and rand files for database.
Please enter password for database:
Please repeat for database:
begin to create CA cert files
The sslcert will be generated in /opt/opengauss/app/share/sslcert/om
Create CA files for cm beginning.
Create CA files on directory [/opt/opengauss/app_a07d57c3/share/sslcert/cm]. file list: ['cacert.pem', 'server.key', 'server.crt', 'client.key', 'client.crt', 'server.key.cipher', 'server.key.rand', 'client.key.cipher', 'client.key.rand']
Non-dss_ssl_enable, no need to create CA for DSS
Cluster installation is completed.
Configuring.
Deleting instances from all nodes.
Successfully deleted instances from all nodes.
Checking node configuration on all nodes.
Initializing instances on all nodes.
Updating instance configuration on all nodes.
Check consistence of memCheck and coresCheck on database nodes.
Successful check consistence of memCheck and coresCheck on all nodes.
Configuring pg_hba on all nodes.
Configuration is completed.
Starting cluster.
======================================================================
Successfully started primary instance. Wait for standby instance.
======================================================================
.
Successfully started cluster.
======================================================================
cluster_state : Normal
redistributing : No
node_count : 3
Datanode State
primary : 1
standby : 2
secondary : 0
cascade_standby : 0
building : 0
abnormal : 0
down : 0Successfully installed application.
end deploy.
3、检查状态
gs_om -t status --detail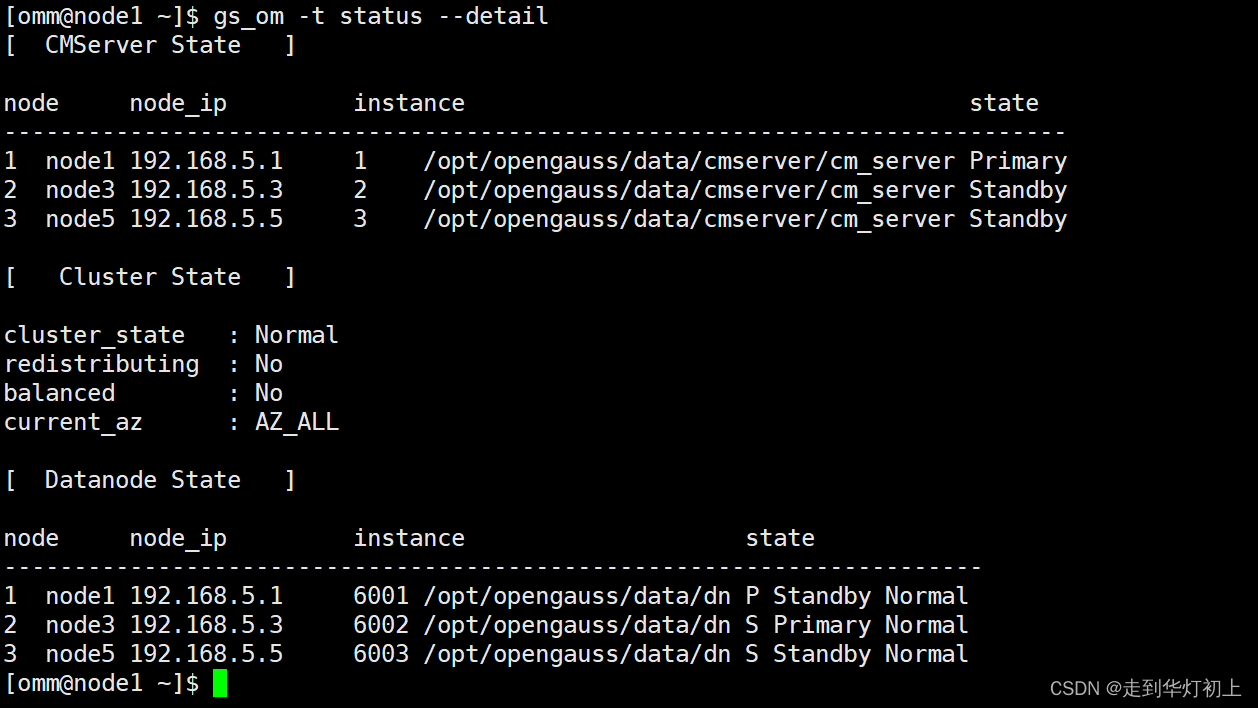
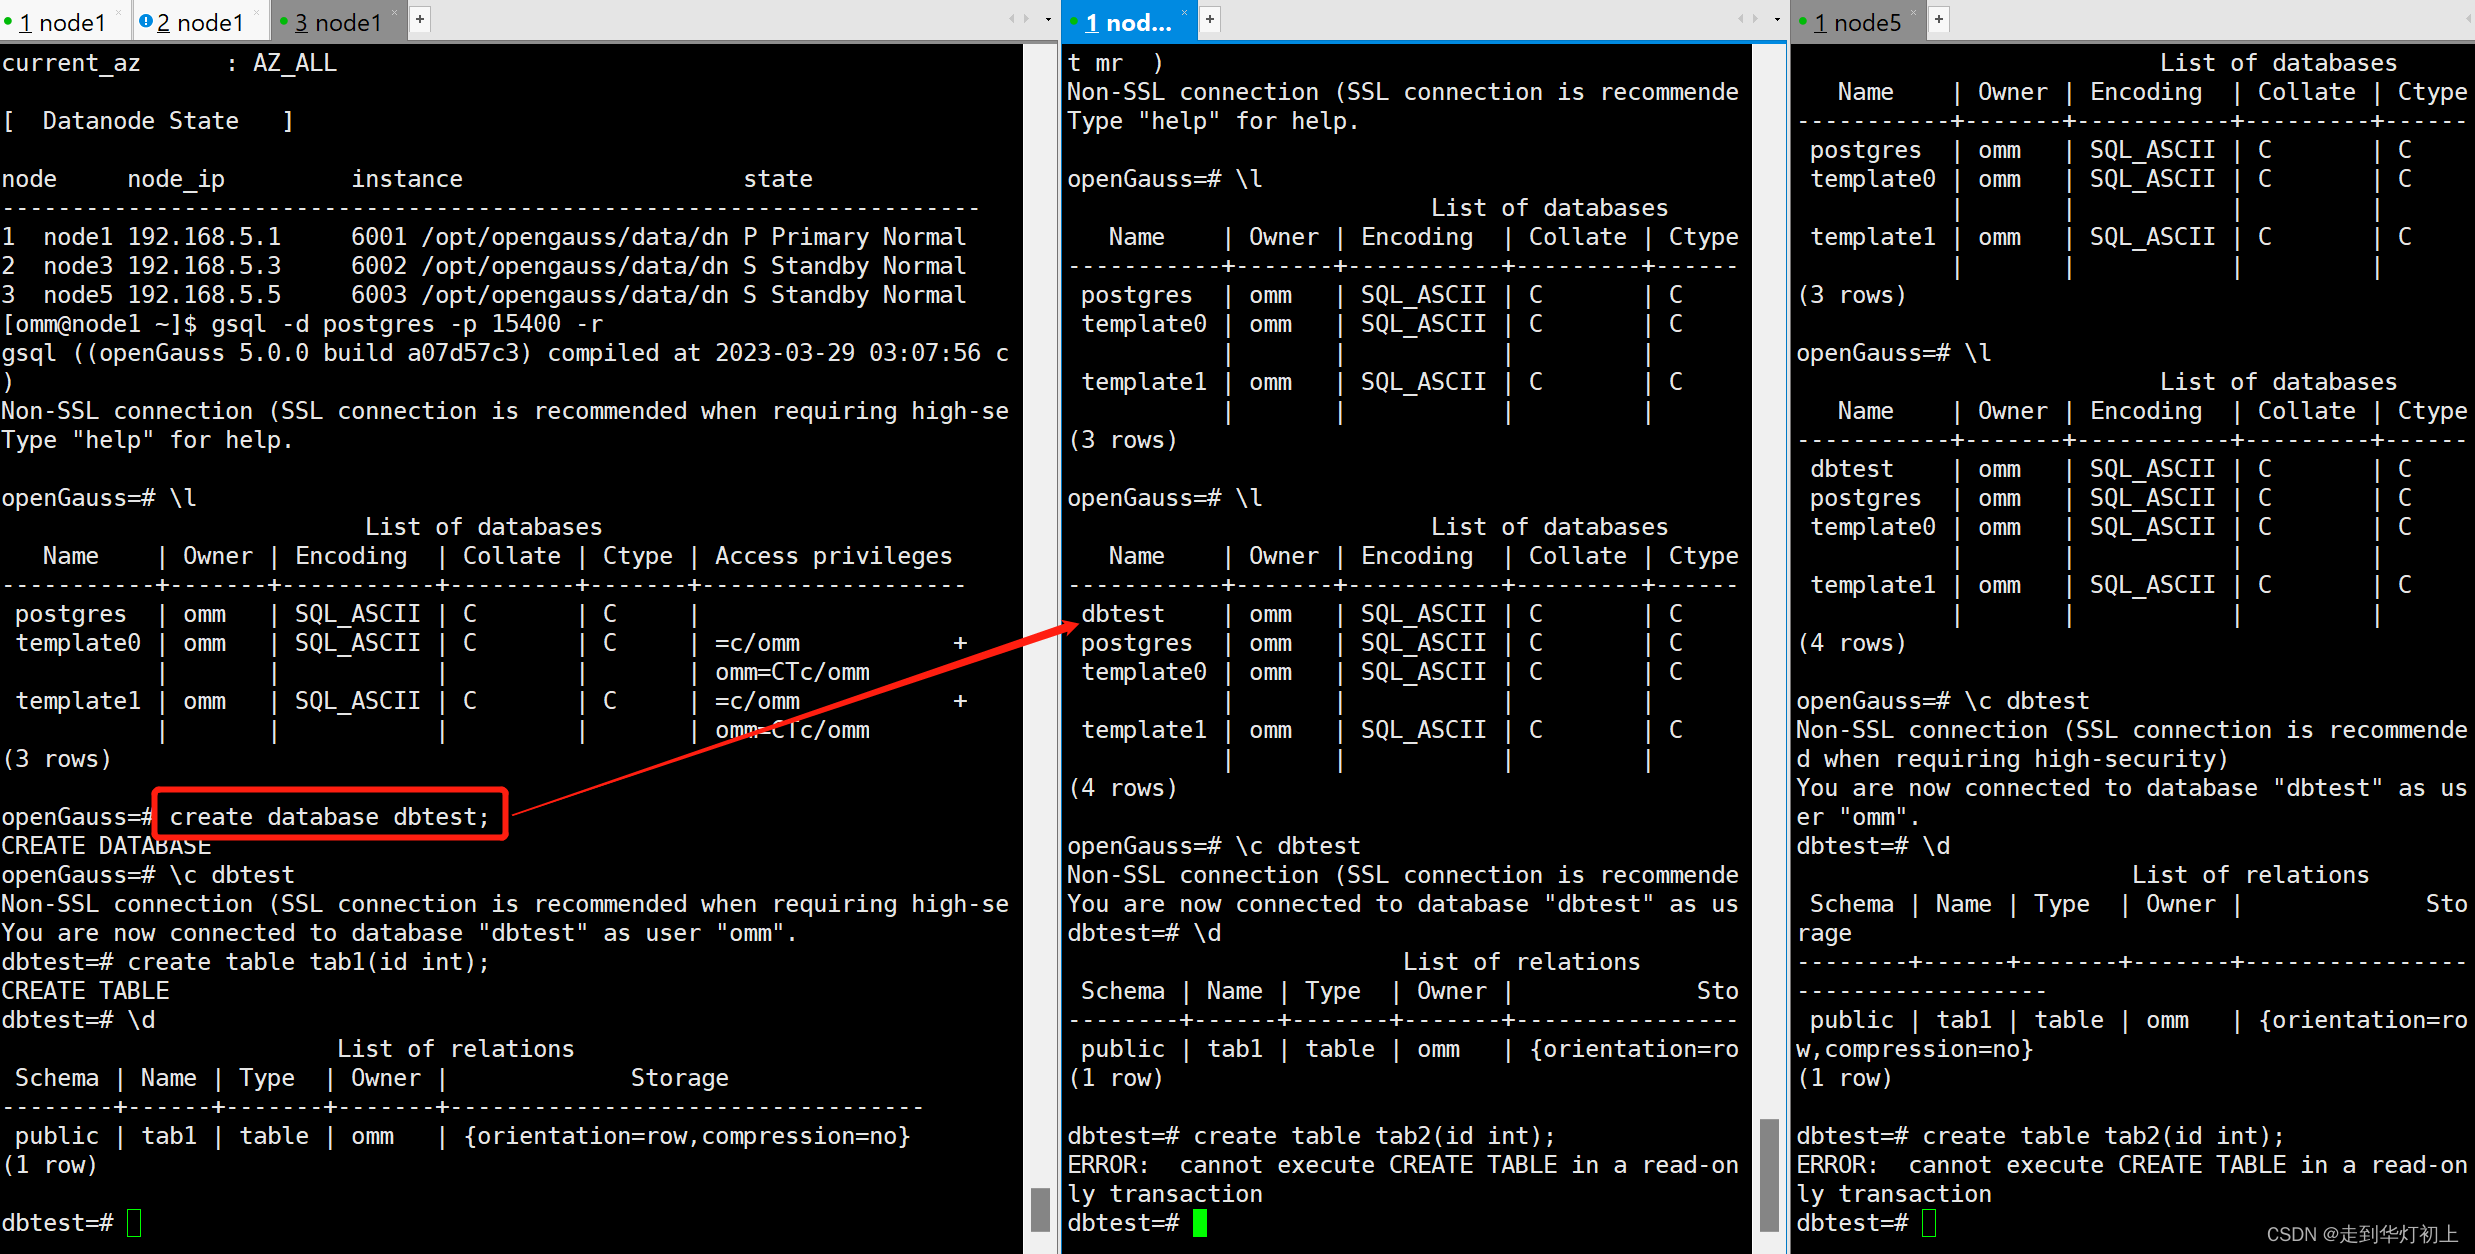
4.6、验证
# 连接数据库
gsql -d postgres -p 15400 -r
# 主库创建库表,从库查看同步状态
# 从库只读,无法创建对象
# 如果需要指定某个节点作为主节点,可以在该节点执行
gs_ctl restart -D /opt/opengauss/data/dn -M primary
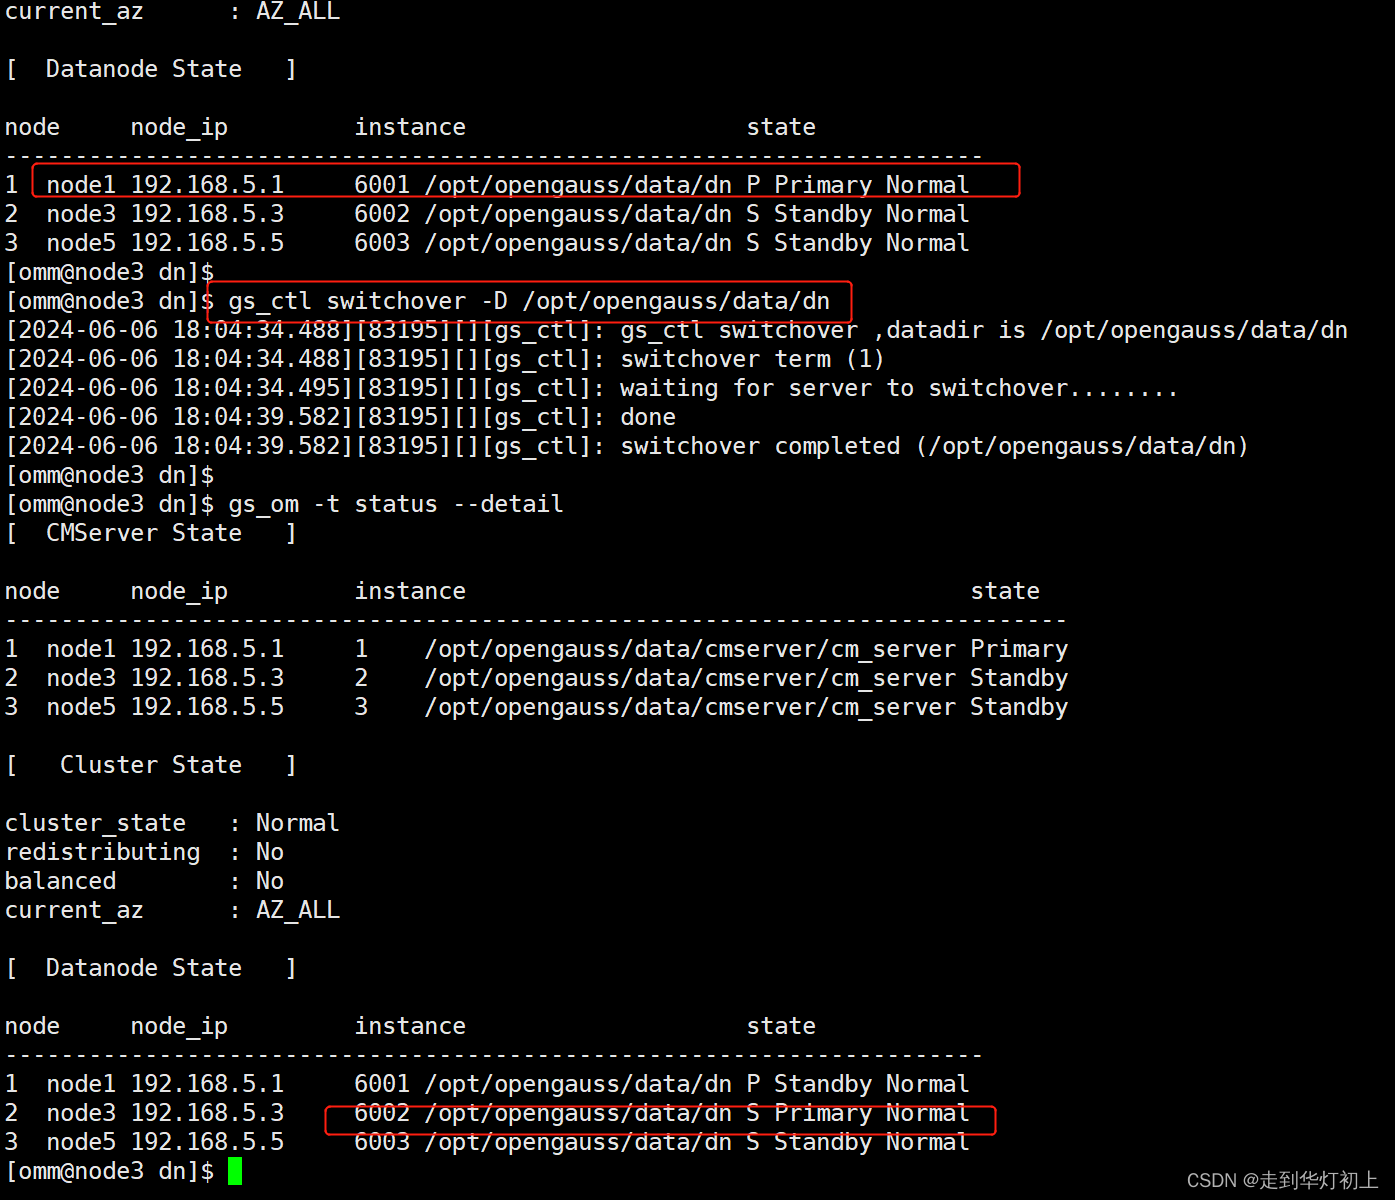
# 主备切换,在待切换的备机执行
gs_ctl switchover -D /opt/opengauss/data/dn
4.7、卸载
### 卸载所有节点
# 在任一安装节点执行,返回至预安装之后的状态
gs_uninstall --delete-data

### 卸载单一节点
# 在卸载节点执行
gs_uninstall --delete-data -L单节点卸载,需要通过节点扩缩容处理参考:openGauss5.0扩容、缩容
附:
1、安装异常
1、执行安装时报[GAUSS-51400]
[omm@node1 ~]$ gs_install -X /opt/software/openGauss/cluster_config.xml
Parsing the configuration file.
Check preinstall on every node.
[GAUSS-51400] : Failed to execute the command: python3 '/opt/opengauss/om/script/local/CheckPreInstall.py' -U omm -t preinstall. Result:{'node1': 'Failure', 'node5': 'Failure', 'node3': 'Failure'}.
Error:
[FAILURE] node1:
[FAILURE] node3:
[FAILURE] node5:
原因是执行安装时:
Are you sure you want to create the user[omm] and create trust for it (yes/no)?
填写的是no,且用户间没设置互信,导致切换omm用户后安装失败;
重新预安装且填写yes即可
2、执行安装时没报错,但一直卡在Starting cluster.

到此步骤说明已经安装成功,可能是部分节点启动失败导致一直等待,通过 gs_om -t status --detail 查看状态查看是否启动成功,发现安装节点启动失败,另外两个节点启动成功
在失败节点通过gs_ctl手动启动数据库
gs_ctl restart -D /opt/opengauss/data/dn
报错:
2024-06-05 14:15:15.538 66600273.1 [unknown] 139903670546688 [unknown] 0 dn_6001_6002_6003 01000 0 [BACKEND] WARNING: Faialize the memory protect for g_instance.attr.attr_storage.cstore_buffers (300 Mbytes) or shared memory (3527 Mbytes) is lar
2024-06-05 14:15:15.538 66600273.1 [unknown] 139903670546688 [unknown] 0 dn_6001_6002_6003 42809 0 [BACKEND] FATAL: couldshared memory segment: Cannot allocate memory
2024-06-05 14:15:15.538 66600273.1 [unknown] 139903670546688 [unknown] 0 dn_6001_6002_6003 42809 0 [BACKEND] DETAIL: Failll was shmget(key=15400001, size=3698690376, 03600).
2024-06-05 14:15:15.538 66600273.1 [unknown] 139903670546688 [unknown] 0 dn_6001_6002_6003 42809 0 [BACKEND] HINT: This e means that openGauss's request for a shared memory segment exceeded available memory or swap space, or exceeded your kernearameter. You can either reduce the request size or reconfigure the kernel with larger SHMALL. To reduce the request size3698690376 bytes), reduce openGauss's shared memory usage, perhaps by reducing shared_buffers.
The openGauss documentation contains more information about shared memory configuration.
2024-06-05 14:15:15.548 66600273.1 [unknown] 139903670546688 [unknown] 0 dn_6001_6002_6003 00000 0 [BACKEND] LOG: FiniNum: 0.
[2024-06-05 14:15:16.446][119960][][gs_ctl]: waitpid 119961 failed, exitstatus is 256, ret is 2[2024-06-05 14:15:16.446][119960][][gs_ctl]: stopped waiting
[2024-06-05 14:15:16.446][119960][][gs_ctl]: could not start server
是因为shared_buffers过大导致内存不够用,因此,先暂停所有数据库服务(一定要先暂停,否则可能会因为同步导致刚修改的参数被覆盖),然后修改shared_buffers即可
# 暂停数据库服务
gs_om -t stop

# 修改shared_buffers至一个更小的值
# 测试虚拟机的内存在4GB,shared_buffers设置为300MB

# 启动数据库
gs_om -t start

# 查看是否启动成功
gs_om -t status --detail
2、其他部署方案配置
一主一备一级联
<?xml version="1.0" encoding="UTF-8"?>
<ROOT>
<!-- openGauss整体信息 -->
<CLUSTER>
<PARAM name="clusterName" value="gauss_cluster" />
<PARAM name="nodeNames" value="node1,node3,node5" />
<PARAM name="gaussdbAppPath" value="/opt/opengauss/app" />
<PARAM name="gaussdbLogPath" value="/opt/opengauss/log/omm" />
<PARAM name="tmpMppdbPath" value="/opt/opengauss/tmp"/>
<PARAM name="gaussdbToolPath" value="/opt/opengauss/om" />
<PARAM name="corePath" value="/opt/opengauss/corefile"/>
<PARAM name="backIp1s" value="192.168.5.1,192.168.5.3,192.168.5.5"/>
</CLUSTER>
<!-- 每台服务器上的节点部署信息 -->
<DEVICELIST>
<!-- node1上的节点部署信息 -->
<DEVICE sn="node1">
<PARAM name="name" value="node1"/>
<PARAM name="azName" value="AZ1"/>
<PARAM name="azPriority" value="1"/>
<!-- 如果服务器只有一个网卡可用,将backIP1和sshIP1配置成同一个IP -->
<PARAM name="backIp1" value="192.168.5.1"/>
<PARAM name="sshIp1" value="192.168.5.1"/>
<!--CM节点部署信息-->
<PARAM name="cmsNum" value="1"/>
<PARAM name="cmServerPortBase" value="15000"/>
<PARAM name="cmServerListenIp1" value="192.168.5.1,192.168.5.3,192.168.5.5"/>
<PARAM name="cmServerHaIp1" value="192.168.5.1,192.168.5.3,192.168.5.5"/>
<PARAM name="cmServerlevel" value="1"/>
<PARAM name="cmServerRelation" value="node1,node3,node5"/>
<PARAM name="cmDir" value="/opt/opengauss/data/cmserver"/>
<!--dn-->
<PARAM name="dataNum" value="1"/>
<PARAM name="dataPortBase" value="15400"/>
<PARAM name="dataNode1" value="/opt/opengauss/data/dn,node3,/opt/opengauss/data/dn,node5,/opt/opengauss/data/dn"/>
<PARAM name="dataNode1_syncNum" value="0"/>
</DEVICE>
<!-- node2上的节点部署信息,其中“name”的值配置为主机名称 -->
<DEVICE sn="node3">
<PARAM name="name" value="node3"/>
<PARAM name="azName" value="AZ1"/>
<PARAM name="azPriority" value="1"/>
<!-- 如果服务器只有一个网卡可用,将backIP1和sshIP1配置成同一个IP -->
<PARAM name="backIp1" value="192.168.5.3"/>
<PARAM name="sshIp1" value="192.168.5.3"/>
<!-- cm -->
<PARAM name="cmServerPortStandby" value="15000"/>
<PARAM name="cmDir" value="/opt/opengauss/data/cmserver"/>
</DEVICE>
<!-- node3上的节点部署信息,其中“name”的值配置为主机名称 -->
<DEVICE sn="node5">
<PARAM name="name" value="node5"/>
<PARAM name="azName" value="AZ1"/>
<PARAM name="azPriority" value="1"/>
<!-- 如果服务器只有一个网卡可用,将backIP1和sshIP1配置成同一个IP -->
<PARAM name="backIp1" value="192.168.5.5"/>
<PARAM name="sshIp1" value="192.168.5.5"/>
<!-- 如果需要设置级联备,只需加上此参数即可 -->
<PARAM name="cascadeRole" value="on"/>
<!-- cm -->
<PARAM name="cmServerPortStandby" value="15000"/>
<PARAM name="cmDir" value="/opt/opengauss/data/cmserver"/>
</DEVICE>
</DEVICELIST>
</ROOT>

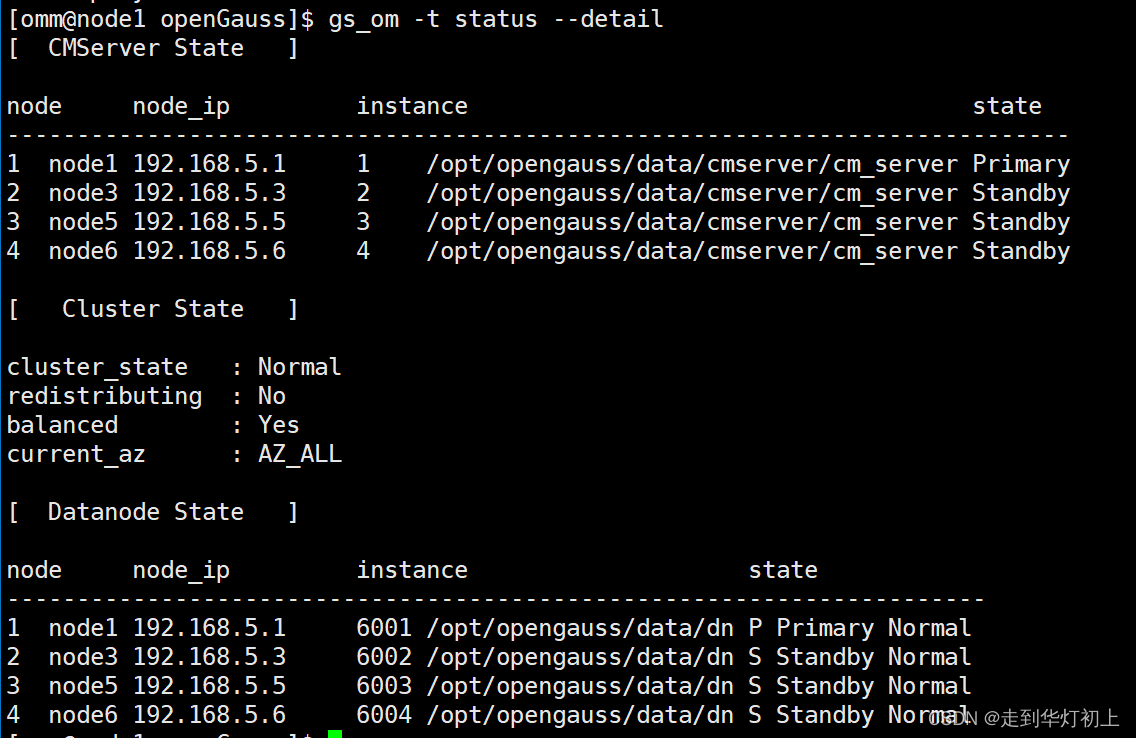
一主三备
<?xml version="1.0" encoding="UTF-8"?>
<ROOT>
<!-- openGauss整体信息 -->
<CLUSTER>
<PARAM name="clusterName" value="gauss_cluster" />
<PARAM name="nodeNames" value="node1,node3,node5,node6" />
<PARAM name="gaussdbAppPath" value="/opt/opengauss/app" />
<PARAM name="gaussdbLogPath" value="/opt/opengauss/log/omm" />
<PARAM name="tmpMppdbPath" value="/opt/opengauss/tmp"/>
<PARAM name="gaussdbToolPath" value="/opt/opengauss/om" />
<PARAM name="corePath" value="/opt/opengauss/corefile"/>
<PARAM name="backIp1s" value="192.168.5.1,192.168.5.3,192.168.5.5,192.168.5.6"/>
</CLUSTER>
<!-- 每台服务器上的节点部署信息 -->
<DEVICELIST>
<!-- node1上的节点部署信息 -->
<DEVICE sn="node1">
<PARAM name="name" value="node1"/>
<PARAM name="azName" value="AZ1"/>
<PARAM name="azPriority" value="1"/>
<!-- 如果服务器只有一个网卡可用,将backIP1和sshIP1配置成同一个IP -->
<PARAM name="backIp1" value="192.168.5.1"/>
<PARAM name="sshIp1" value="192.168.5.1"/>
<!--CM节点部署信息-->
<PARAM name="cmsNum" value="1"/>
<PARAM name="cmServerPortBase" value="15000"/>
<PARAM name="cmServerListenIp1" value="192.168.5.1,192.168.5.3,192.168.5.5,192.168.5.6"/>
<PARAM name="cmServerHaIp1" value="192.168.5.1,192.168.5.3,192.168.5.5,192.168.5.6"/>
<PARAM name="cmServerlevel" value="1"/>
<PARAM name="cmServerRelation" value="node1,node3,node5,node6"/>
<PARAM name="cmDir" value="/opt/opengauss/data/cmserver"/>
<!--dn-->
<PARAM name="dataNum" value="1"/>
<PARAM name="dataPortBase" value="15400"/>
<PARAM name="dataNode1" value="/opt/opengauss/data/dn,node3,/opt/opengauss/data/dn,node5,/opt/opengauss/data/dn,node6,/opt/opengauss/data/dn"/>
<PARAM name="dataNode1_syncNum" value="0"/>
</DEVICE>
<!-- node2上的节点部署信息,其中“name”的值配置为主机名称 -->
<DEVICE sn="node3">
<PARAM name="name" value="node3"/>
<PARAM name="azName" value="AZ1"/>
<PARAM name="azPriority" value="1"/>
<!-- 如果服务器只有一个网卡可用,将backIP1和sshIP1配置成同一个IP -->
<PARAM name="backIp1" value="192.168.5.3"/>
<PARAM name="sshIp1" value="192.168.5.3"/>
<!-- cm -->
<PARAM name="cmServerPortStandby" value="15000"/>
<PARAM name="cmDir" value="/opt/opengauss/data/cmserver"/>
</DEVICE>
<!-- node3上的节点部署信息,其中“name”的值配置为主机名称 -->
<DEVICE sn="node5">
<PARAM name="name" value="node5"/>
<PARAM name="azName" value="AZ1"/>
<PARAM name="azPriority" value="1"/>
<!-- 如果服务器只有一个网卡可用,将backIP1和sshIP1配置成同一个IP -->
<PARAM name="backIp1" value="192.168.5.5"/>
<PARAM name="sshIp1" value="192.168.5.5"/>
<!-- cm -->
<PARAM name="cmServerPortStandby" value="15000"/>
<PARAM name="cmDir" value="/opt/opengauss/data/cmserver"/>
</DEVICE>
<!-- node4上的节点部署信息,其中“name”的值配置为主机名称 -->
<DEVICE sn="node6">
<PARAM name="name" value="node6"/>
<PARAM name="azName" value="AZ1"/>
<PARAM name="azPriority" value="1"/>
<!-- 如果服务器只有一个网卡可用,将backIP1和sshIP1配置成同一个IP -->
<PARAM name="backIp1" value="192.168.5.6"/>
<PARAM name="sshIp1" value="192.168.5.6"/>
<!-- cm -->
<PARAM name="cmServerPortStandby" value="15000"/>
<PARAM name="cmDir" value="/opt/opengauss/data/cmserver"/>
</DEVICE>
</DEVICELIST>
</ROOT>
参考资料:


 610
610

 被折叠的 条评论
为什么被折叠?
被折叠的 条评论
为什么被折叠?
 到【灌水乐园】发言


