


文章目录
1 遇到的问题
1.1 引入本地jar包后,Idea运行没问题,打包找不到包
- 打开maven命令框,执行mvn命令,将本地jar包加入到本地仓库
- 在pom文件中引入jar包,即可重新打包。
- 第一步:打开maven命令框,执行mvn命令,将本地jar包加入到本地仓库。
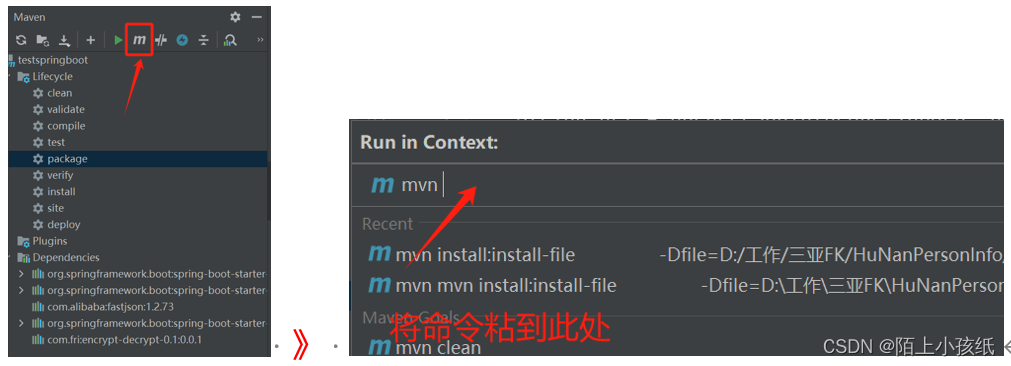
命令格式:
install:install-file
		   -Dfile=<Jar包的地址>
           -DgroupId=<Jar包的GroupId>
           -DartifactId=<Jar包的引用名称>
           -Dversion=<Jar包的版本>
           -Dpackaging=<Jar的打包方式>

点击执行,显示“BUILD SUCCESS”即表示成功。
- 第二步:在pom文件中引入jar包,即可重新打包。
        <dependency>
            <groupId>com.fri</groupId>
            <artifactId>encrypt-decrypt-0.1</artifactId>
            <version>0.0.1</version>
        </dependency>
1.2 将jar包发布成windows服务
- 下载所需文件
- 修改aaa.xml文件
- 执行aaa.exe install命令
- 启动服务,也可设置为自启动

所需文件下载地址:https://download.csdn.net/download/qq_27630263/89237639
-
- exe和xml两个文件的名字需保持一样
-
- 编辑.xml文件
<service>

  <!-- 唯一标识,我设为jar包的名称-->
  <id>testspringboot-0.0.1-SNAPSHOT</id>
  <!-- 服务中展示的名字 -->
  <name>lzh_SY_HuNan</name>
  <!-- 服务描述 -->
  <description>湖南SJ人员协查服务</description>
  <!-- java 或 jdk路径 -->
  <executable>java</executable>
  <!--执行的命令和jar包路径,我这因为jar包和xml在一个目录,可以直接写jar包名,路径没给出也可以-->
  <arguments>-jar testspringboot-0.0.1-SNAPSHOT.jar</arguments>

</service>
-
- cmd命令:
aaa.exe install

aaa.exe restart#重启服务
aaa.exe stop#停止服务
aaa.exe uninstall#卸载服务
- cmd命令:
-
- 打开服务窗口,你就可以看到你做的服务了
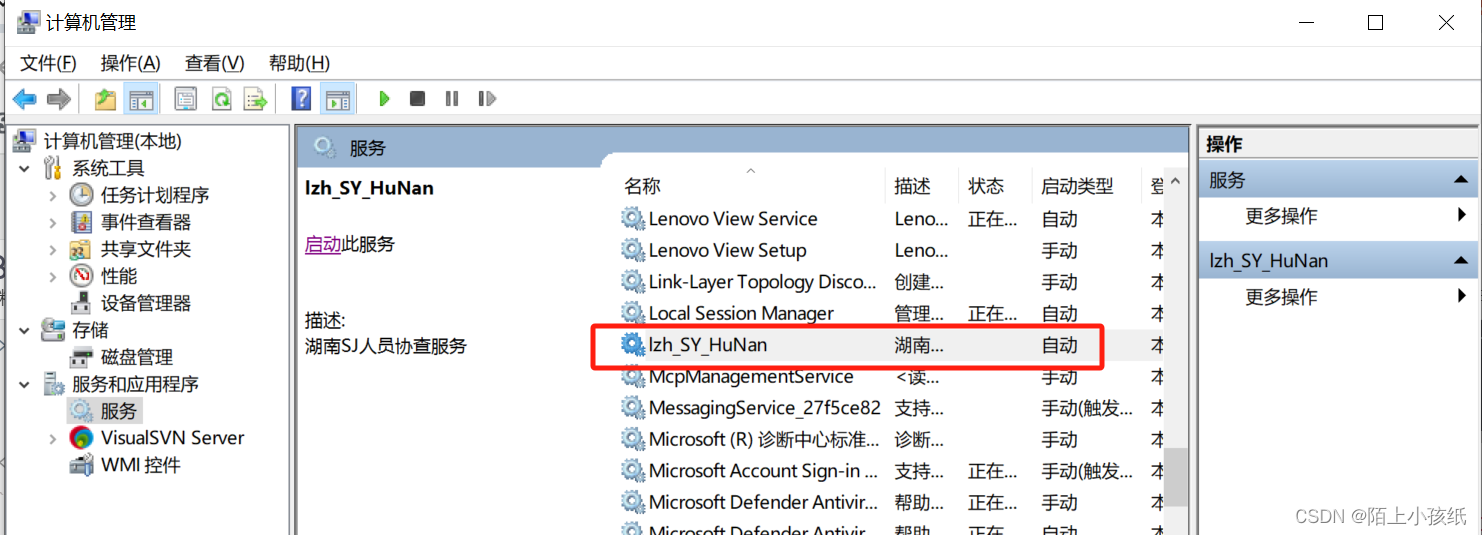
- 打开服务窗口,你就可以看到你做的服务了
2 一个简单的前后端交互小栗子
只涉及到前后端交互,没有用到数据库
vue所需js、css文件下载:https://download.csdn.net/download/qq_27630263/87380477
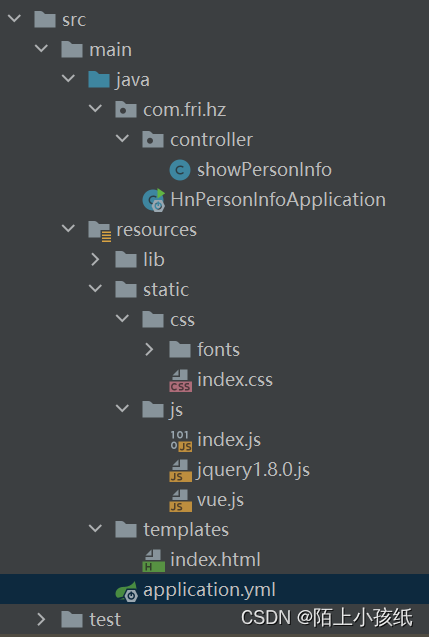
2.1 pom
<?xml version="1.0" encoding="UTF-8"?>
<project xmlns="http://maven.apache.org/POM/4.0.0" xmlns:xsi="http://www.w3.org/2001/XMLSchema-instance"
         xsi:schemaLocation="http://maven.apache.org/POM/4.0.0 https://maven.apache.org/xsd/maven-4.0.0.xsd">
    <modelVersion>4.0.0</modelVersion>
    <parent>
        <groupId>org.springframework.boot</groupId>
        <artifactId>spring-boot-starter-parent</artifactId>
        <version>2.5.5</version>
        <relativePath/> <!-- lookup parent from repository -->
    </parent>
    <groupId>com.example</groupId>
    <artifactId>testspringboot</artifactId>
    <version>0.0.1-SNAPSHOT</version>
    <name>testspringboot</name>
    <description>Demo project for Spring Boot</description>
    <properties>
        <java.version>1.8</java.version>
    </properties>
    <dependencies>
        <dependency>
            <groupId>org.springframework.boot</groupId>
            <artifactId>spring-boot-starter-thymeleaf</artifactId>
        </dependency>
        <dependency>
            <groupId>org.springframework.boot</groupId>
            <artifactId>spring-boot-starter-web</artifactId>
        </dependency>
        <dependency>
            <groupId>com.alibaba</groupId>
            <artifactId>fastjson</artifactId>
            <version>1.2.73</version>
        </dependency>
        <dependency>
            <groupId>org.springframework.boot</groupId>
            <artifactId>spring-boot-starter-test</artifactId>
        </dependency>
    </dependencies>

    <build>
        <plugins>
            <plugin>
                <groupId>org.springframework.boot</groupId>
                <artifactId>spring-boot-maven-plugin</artifactId>
            </plugin>
        </plugins>
    </build>

</project>
2.2 application.yml
server:
  port: 18088

spring:
  mvc:
    static-path-pattern: /static/**
  web:
    resources:
      static-locations: classpath:/static,classpath:/public,classpath:/resources,classpath:/META-INF/resources

diyData:
  syPubKey: MIIBIjANBgkqhki
  syPriKey: MIIEvgIBADANBg
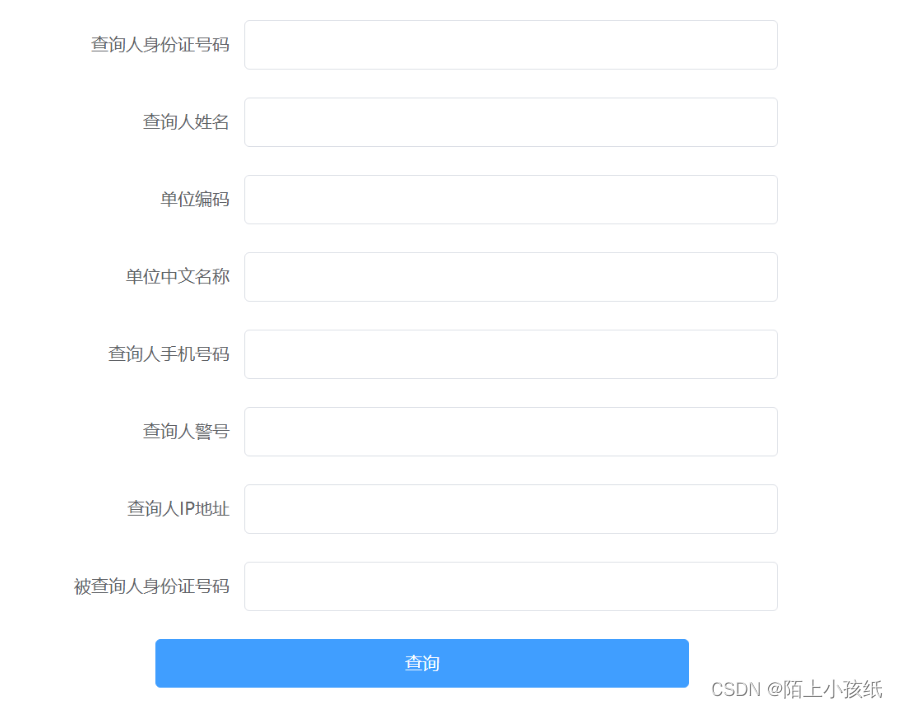
2.3 index.html
<!DOCTYPE html>
<html lang="en">
<head>
    <meta charset="UTF-8">
    <title>协查人员电子档案</title>
    <link rel="stylesheet" type="text/css" href="../static/css/index.css">
    <style>
        . {
            margin: 0;
            padding: 0;
        }
        body, #app, .el-form, .el-form-item, .el-button{
            width: 100%;
        }
        .el-form-item__label{
            width: 40% !important;
        }
        .el-form-item__content{
            width: 30% !important;
        }
    </style>
</head>
<body>
    <h1 style="text-align: center">新疆协查人员电子档案</h1>
    <div id="app">
        <el-form :inline="true" :label-position="labelPosition" label-width="80px" :model="formLabelAlign">
            <el-form-item label="查询人身份证号码">
                <el-input v-model="formLabelAlign.idCard"></el-input>
            </el-form-item>
            <el-form-item label="查询人姓名">
                <el-input v-model="formLabelAlign.name"></el-input>
            </el-form-item>
            <el-form-item label="单位编码">
                <el-input v-model="formLabelAlign.orgCode"></el-input>
            </el-form-item>
            <el-form-item label="单位中文名称">
                <el-input v-model="formLabelAlign.orgName"></el-input>
            </el-form-item>
            <el-form-item label="查询人手机号码">
                <el-input v-model="formLabelAlign.mobile"></el-input>
            </el-form-item>
            <el-form-item label="查询人警号">
                <el-input v-model="formLabelAlign.policeNo"></el-input>
            </el-form-item>
            <el-form-item label="查询人IP地址">
                <el-input v-model="formLabelAlign.ip"></el-input>
            </el-form-item>
            <el-form-item label="被查询人身份证号码">
                <el-input v-model="formLabelAlign.checkedIdCard"></el-input>
            </el-form-item>
            <el-form-item style="text-align: center">
                <el-button type="primary" @click="checkFun">查询</el-button>
            </el-form-item>
        </el-form>
    </div>


    <script src="../static/js/jquery1.8.0.js"></script>
    <script src="../static/js/vue.js"></script>
    <script src="../static/js/index.js"></script>
    <script type="text/javascript">
        //创建一个Vue对象
        var app = new Vue({
            //指定,该对象代表<div id="app">,也就是说,这个div中的所有内容,都被当前的app对象管理
            el: "#app",
            //定义vue中的数据
            data: {
                labelPosition: 'right',
                formLabelAlign: {
                    idCard: '',
                    name: '',
                    orgCode: '',
                    orgName: '',
                    mobile: '',
                    policeNo: '',
                    ip: '',
                    checkedIdCard: ''
                }
            },
            methods: {
                removeNull(p){
                    if(p == null){
                        return "";
                    }
                    return p;
                },
                checkFun() {
                    var param = {
                        idCard: this.removeNull(this.formLabelAlign.idCard),
                        name: this.removeNull(this.formLabelAlign.name),
                        orgCode: this.removeNull(this.formLabelAlign.orgCode),
                        orgName: this.removeNull(this.formLabelAlign.orgName),
                        mobile: this.removeNull(this.formLabelAlign.mobile),
                        policeNo: this.removeNull(this.formLabelAlign.policeNo),
                        ip: this.removeNull(this.formLabelAlign.ip),
                        checkedIdCard: this.removeNull(this.formLabelAlign.checkedIdCard)
                    }
                    $.ajax({
                        type: "post",
                        url:"/api/showPersonInfo",   //控制器路径
                        contentType: "application/json;charset=utf-8",
                        data: JSON.stringify(param),
                        cache: false,
                        success: function (msg) {
                            //新页面打开地址
                            window.open(msg.url);
                            console.log("---over---");
                        }
                    });
                }
            }
        });
    </script>
</body>
</html>
2.4 controller
@RestController
@RequestMapping("/api")
public class showPersonInfo {

    @Value("${diyData.syPubKey}")
    private String syPubKey;
    @Value("${diyData.syPriKey}")
    private String syPriKey;

    @PostMapping("/showPersonInfo")
    public JSONObject showPersonInfo(@RequestBody JSONObject data){
        System.out.println("查询" + data.toJSONString());
        String url = openPersonInfoPage(data.getString("idCard"), data.getString("name"),
                data.getString("orgCode"), data.getString("orgName"),
                data.getString("mobile"), data.getString("policeNo"),
                data.getString("ip"), data.getString("checkedIdCard"));
        JSONObject res = new JSONObject();
        res.put("url", url);
        res.put("syPubKey", syPubKey);
        return res;
    }
}
3 基础知识点
3.1 定时任务实现方式
3.1.1 第一种方式:使用@Scheduled注解
- 创建一个定时任务类,使用@Scheduled注解要执行的任务
- 在Springboot入口类上添加@EnableScheduling注解已启动定时任务
-
- 创建一个定时任务类,使用@Scheduled注解要执行的任务
package com.fri.hz.util;

import org.springframework.scheduling.annotation.Scheduled;
import org.springframework.stereotype.Component;

@Component
public class Scheduler {

    @Scheduled(fixedRate = 5000) //每五秒执行一次
    public void printCurrentTime(){
        System.out.println(System.currentTimeMillis());
    }
}
-
- 在Springboot入口类上添加@EnableScheduling注解已启动定时任务
package com.fri.hz;

import org.springframework.boot.SpringApplication;
import org.springframework.boot.autoconfigure.SpringBootApplication;
import org.springframework.scheduling.annotation.EnableScheduling;

@SpringBootApplication
@EnableScheduling
public class HnPersonInfoApplication {

    public static void main(String[] args) {
        SpringApplication.run(HnPersonInfoApplication.class, args);
    }

}
3.2 加载resources目录下文件
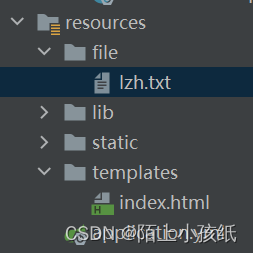
3.2.1 第一种方式:使用ClassPathResource获取InputStream
package com.fri.hz;

import org.springframework.boot.SpringApplication;
import org.springframework.boot.autoconfigure.SpringBootApplication;
import org.springframework.core.io.ClassPathResource;
import org.springframework.core.io.Resource;
import org.springframework.scheduling.annotation.EnableScheduling;

import java.io.ByteArrayOutputStream;
import java.io.FileNotFoundException;
import java.io.IOException;
import java.io.InputStream;
import java.util.Arrays;

@SpringBootApplication
public class HnPersonInfoApplication {

    public static void main(String[] args) {
        SpringApplication.run(HnPersonInfoApplication.class, args);

        Resource resource = new ClassPathResource("/file/lzh.txt");
        try{
            InputStream inputStream = resource.getInputStream();
            System.out.println(readStream(inputStream));
        }catch (Exception e){
            e.printStackTrace();
        }
    }

    /**
     * 读取流
     *
     * @param is
     * @return 字节数组
     * @throws Exception
     */
    public static String readStream(InputStream is) throws Exception {
        //磁盘路径两种表示方式:1.\\  2./
        try {
            //从文件地址中读取内容到程序中
            //InputStream is=new FileInputStream("此处为文件的相对路径");
            //开始读取信息,方法一
            //先定义一个字节数组存放数据 ,用available方法确定读取的文件长度
            byte[]b=new byte[is.available()];
            //声明一个int存储每一次读取到的数据
            int i=0;
            //定义一个索引的变量
            int index=0;
            //循环读取每个 数据
            while((i=is.read())!=-1){
                b[index]=(byte) i;
                index++;
            }
            //使用完毕,关闭流
            is.close();
            //String(byte[])把字节数组转换成字符串
            return new String(b);
        } catch (FileNotFoundException e) {
            //文件没有找到
            // TODO Auto-generated catch block
            e.printStackTrace();
            return null;
        } catch (IOException e) {
            //文件读写异常
            // TODO Auto-generated catch block
            e.printStackTrace();
            return null;
        }
    }

}
3.3 字符串加解密
3.3.1 DES加解密
package com.fri.hz;

import org.springframework.boot.SpringApplication;
import org.springframework.boot.autoconfigure.SpringBootApplication;
import sun.misc.BASE64Decoder;
import sun.misc.BASE64Encoder;

import javax.crypto.Cipher;
import javax.crypto.SecretKey;
import javax.crypto.SecretKeyFactory;
import javax.crypto.spec.DESKeySpec;
import java.io.IOException;
import java.security.SecureRandom;

@SpringBootApplication
public class DESUtil{

    // 加密算法
    private final static String DES = "DES";
    // 密钥
    public final static String PWD_KEY = "12#QWEadZXC";

    public static void main(String[] args) throws Exception {
        SpringApplication.run(HnPersonInfoApplication.class, args);

        String data = "xk我aj是sda奥sdk'特al;ks'曼dl;kas哈哈哈l;d";
        System.err.println("加密:"+encrypt(data, PWD_KEY));
        System.err.println("解密:" +decrypt(encrypt(data, PWD_KEY), PWD_KEY));
    }


    /**
     * Description 根据键值进行加密
     *
     * @param data
     * @param key
     * 加密键byte数组
     * @return
     * @throws Exception
     */
    public static String encrypt(String data, String key) throws Exception {
        byte[] bt = encrypt(data.getBytes("GB18030"), key.getBytes("GB18030"));
        String strs = new BASE64Encoder().encode(bt);
        return strs;
    }

    /**
     * Description 根据键值进行解密
     *
     * @param data
     * @param key
     * 加密键byte数组
     * @return
     * @throws IOException
     * @throws Exception
     */
    public static String decrypt(String data, String key) throws IOException, Exception {
        if (data == null){
            return null;
        }
        BASE64Decoder decoder = new BASE64Decoder();
        byte[] buf = decoder.decodeBuffer(data);
        byte[] bt = decrypt(buf, key.getBytes("GB18030"));
        return new String(bt,"GB18030");
    }

    /**
     * Description 根据键值进行加密
     *
     * @param data
     * @param key
     * 加密键byte数组
     * @return
     * @throws Exception
     */
    private static byte[] encrypt(byte[] data, byte[] key) throws Exception {
        // 生成一个可信任的随机数源
        SecureRandom sr = new SecureRandom();

        // 从原始密钥数据创建DESKeySpec对象
        DESKeySpec dks = new DESKeySpec(key);

        // 创建一个密钥工厂,然后用它把DESKeySpec转换成SecretKey对象
        SecretKeyFactory keyFactory = SecretKeyFactory.getInstance(DES);
        SecretKey securekey = keyFactory.generateSecret(dks);

        // Cipher对象实际完成加密操作
        Cipher cipher = Cipher.getInstance(DES);

        // 用密钥初始化Cipher对象
        cipher.init(Cipher.ENCRYPT_MODE, securekey, sr);

        return cipher.doFinal(data);
    }

    /**
     * Description 根据键值进行解密
     *
     * @param data
     * @param key
     * 加密键byte数组
     * @return
     * @throws Exception
     */
    private static byte[] decrypt(byte[] data, byte[] key) throws Exception {
        // 生成一个可信任的随机数源
        SecureRandom sr = new SecureRandom();

        // 从原始密钥数据创建DESKeySpec对象
        DESKeySpec dks = new DESKeySpec(key);

        // 创建一个密钥工厂,然后用它把DESKeySpec转换成SecretKey对象
        SecretKeyFactory keyFactory = SecretKeyFactory.getInstance(DES);
        SecretKey securekey = keyFactory.generateSecret(dks);

        // Cipher对象实际完成解密操作
        Cipher cipher = Cipher.getInstance(DES);

        // 用密钥初始化Cipher对象
        cipher.init(Cipher.DECRYPT_MODE, securekey, sr);

        return cipher.doFinal(data);
    }

}

3.3.2 RSA加解密
package com.example.projectmanager.util;

import javax.crypto.Cipher;
import java.security.*;
import java.security.spec.PKCS8EncodedKeySpec;
import java.security.spec.X509EncodedKeySpec;
import java.util.Base64;

public class RSAUtil {

    private static String RSA_ALGORITHM = "RSA";
    private static String publicKeyStr = "待生成";
    private static String privateKeyStr = "待生成";
    public static void main(String[] args) throws Exception {
        //generateKeyPair();
        String data = "xk我aj是sda奥sdk'特al;ks'曼dl;kas哈哈哈l;d";
        String encryptStr = encrypt(data, publicKeyStr);
        System.out.println("加密数据:" + encryptStr);
        String decryptStr = decrypt(encryptStr, privateKeyStr);
        System.out.println("解密数据:" + decryptStr);
    }

    // 生成RSA密钥对
    public static void generateKeyPair() throws NoSuchAlgorithmException {
        // 获取密钥对生成器
        KeyPairGenerator keyPairGenerator = KeyPairGenerator.getInstance(RSA_ALGORITHM);
        // 密钥大小为2048位
        keyPairGenerator.initialize(2048);
        // 获取密钥对
        KeyPair keyPair = keyPairGenerator.generateKeyPair();
        // 获取公钥
        PublicKey publicKey = keyPair.getPublic();
        // 获取私钥
        PrivateKey privateKey = keyPair.getPrivate();
        // 将密钥转为字符串打印
        String publicKeyStr = Base64.getEncoder().encodeToString(publicKey.getEncoded());
        String privateKeyStr = Base64.getEncoder().encodeToString(privateKey.getEncoded());
        System.out.println("公钥:" + publicKeyStr);
        System.out.println("私钥:" + privateKeyStr);
    }

    // 加密方法
    public static String encrypt(String plainText, String publicKeyStr){
        try{
            // 从字符串格式的公钥创建 PublicKey 对象
            byte[] publicKeyBytes = Base64.getDecoder().decode(publicKeyStr);
            X509EncodedKeySpec keySpec = new X509EncodedKeySpec(publicKeyBytes);
            KeyFactory keyFactory = KeyFactory.getInstance(RSA_ALGORITHM);
            PublicKey publicKey = keyFactory.generatePublic(keySpec);
            // 加密数据
            Cipher cipher = Cipher.getInstance(RSA_ALGORITHM);
            cipher.init(Cipher.ENCRYPT_MODE, publicKey);
            byte[] encryptedBytes = cipher.doFinal(plainText.getBytes());
            return Base64.getEncoder().encodeToString(encryptedBytes);
        }catch (Exception e){
            return "---加密失败---";
        }
    }

    // 解密方法
    public static String decrypt(String encryptedText, String privateKeyStr) {
        try{
            // 从字符串格式的私钥创建 PrivateKey 对象
            byte[] privateKeyBytes = Base64.getDecoder().decode(privateKeyStr);
            PKCS8EncodedKeySpec keySpec = new PKCS8EncodedKeySpec(privateKeyBytes);
            KeyFactory keyFactory = KeyFactory.getInstance(RSA_ALGORITHM);
            PrivateKey privateKey = keyFactory.generatePrivate(keySpec);
            // 解密数据
            byte[] encryptedBytes = Base64.getDecoder().decode(encryptedText);
            Cipher cipher = Cipher.getInstance(RSA_ALGORITHM);
            cipher.init(Cipher.DECRYPT_MODE, privateKey);
            byte[] decryptedBytes = cipher.doFinal(encryptedBytes);
            return new String(decryptedBytes);
        }catch (Exception e){
            return "---解密失败---";
        }
    }

}
3.4 自定义Banner
默认情况下,只需在resources 根目录(准确说是classpath)下新建一个banner.txt文件,内容即为Banner
banner.txt 内容如下:
${AnsiColor.BRIGHT_GREEN}


//                                                                            //
//                                                                            //
//                            .-----------------TTTT_-----_______             //
//                          /''''''''''(______O] ----------____  \______/]_   //
//       __...---'"""\_ --''   Q                               ___________@   //
//   |'''                   ._   _______________=---------"""""""             //
//   |                ..--''|   l L |_l   |                                   //
//   |          ..--''      .  /-___j '   '                                   //
//   |    ..--''           /  ,       '   '           AK-47                   //
//   |--''                /           `    \                                  //
//                        L__'         \    -                                 //
//                                      -    '-.                              //
//                                       '.    /                              //
//                                         '-./                               //
//                                                                            //
//   ^^^^^^^^^^^^^^^^^^^^^^^^^^^^^^^^^^^^^^^^^^^^^^^^^^^^^^^^^^^^^^^^^^^^^^   //
//                       AK坐镇       永不宕机     永无BUG                       //


${AnsiColor.BRIGHT_CYAN}
Application Version: ${application.version}${application.formatted-version}
Spring Boot Version: ${spring-boot.version}${spring-boot.formatted-version}

By -- ${application.auth}
Springboot 支持我们修改 banner 的颜色,字体斜体,粗体等样式。SpringBoot 为我们提供了三个枚举类来设定这些样式。
- AnsiColor:设定字符的前景色;参考org.springframework.boot.ansi.AnsiColor枚举类。
- AnsiBackground:设定字符的背景色;参考org.springframework.boot.ansi.AnsiBackground枚举类。
- AnsiStyle:设定字符的加粗、斜体、下划线等等;参考org.springframework.boot.ansi.AnsiStyle枚举类。
而且,在 banner.txt 文件中还可以引用一些全局变量,例如:
- ${spring-boot.version}:Spring Boot 版本号;
- ${spring-boot.formatted-version}:格式化后的 Spring Boot 版本号信息。
- ${application.version}:MANIFEST.MF 文件中的版本号;
- ${application.formatted-version}:格式化后的 MANIFEST.MF 文件中的版本号信息;
不仅如此,还可以引用我们在配置文件application.yml中定义的变量,例如在配置文件中定义了如下变量:
application:
  auth: LZHZL
  version: 0.0.1

3.5 类型转换
3.5.1 字符串与Date
SimpleDateFormat sdf = new SimpleDateFormat("yyyy-MM-dd HH:mm:ss");
Date date = sdf.parse(str);
String s = sdf.format(date);

Date next = new Date(date.getTime() + 1000*60*60);
3.5.2 字符串、Class与JSONObject
//class -> JSONObject
JSONObject jsonObject = new JSONObject((Map<String, Object>) object);
//JSONObject -> Class
LvGuanXinXi lvGuanXinXi = JSON.toJavaObject(jsonObject, LvGuanXinXi.class);

//JSONObject -> String
String str = jsonObject.toJSONString();
//String -> JSONObject
JSONObject jsonObject = JSONObject.parseObject(str);
3.5.3 List与JSONArray
List list = testService.userList();
JSONArray res = JSONArray.parseArray(JSON.toJSONString(list));
4 一个简单的websocket栗子
4.1 依赖
thymeleaf:用于前端页面获取ModelAndView的值
commons-lang3:使用其中的StringUtils字符串工具类方法
        <!--thymeleaf-->
        <dependency>
            <groupId>org.springframework.boot</groupId>
            <artifactId>spring-boot-starter-thymeleaf</artifactId>
        </dependency>
        <!--websocket-->
        <dependency>
            <groupId>org.springframework.boot</groupId>
            <artifactId>spring-boot-starter-websocket</artifactId>
        </dependency>
        <!--字符串工具-->
        <dependency>
            <groupId>org.apache.commons</groupId>
            <artifactId>commons-lang3</artifactId>
            <version>3.5</version>
        </dependency>
4.2 application.yml
server:
  port: 18090

spring:
  mvc:
    static-path-pattern: /static/**
  web:
    resources:
      static-locations: classpath:/static,classpath:/public,classpath:/resources,classpath:/META-INF/resources
4.3 WebSocketConfig ——启用Springboot对WebSocke的支持
package com.example.projectmanager.config;

import org.springframework.context.annotation.Bean;
import org.springframework.context.annotation.Configuration;
import org.springframework.web.socket.server.standard.ServerEndpointExporter;

/**
 * 开启WebSocket支持
 *
 */
@Configuration
public class WebSocketConfig {

    @Bean
    public ServerEndpointExporter serverEndpointExporter() {
        return new ServerEndpointExporter();
    }

}
4.4 WebSocketServer——核心配置
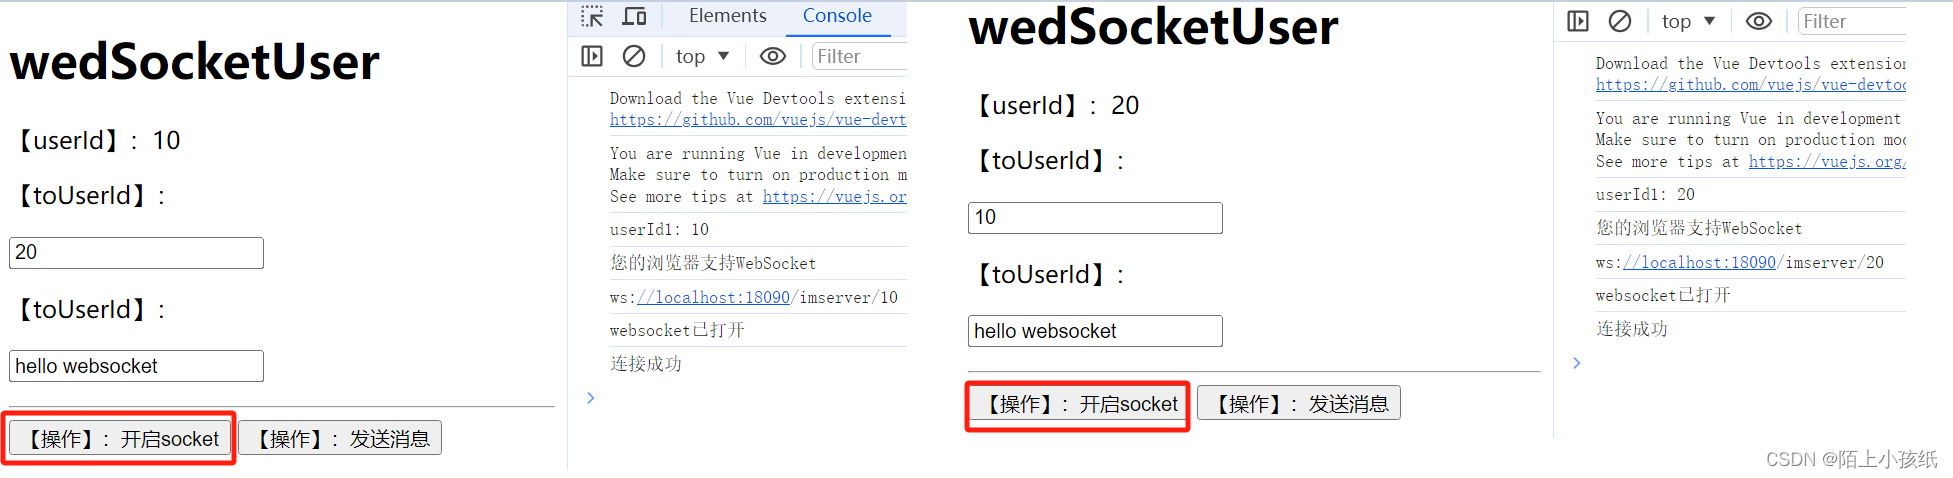
- 因为WebSocket是类似客户端服务端的形式(采用ws协议),那么这里的WebSocketServer其实就相当于一个ws协议的Controller
- 直接@ServerEndpoint(“/imserver/{userId}”) 、@Component启用即可,然后在里面实现@OnOpen开启连接,@onClose关闭连接,@onMessage接收消息等方法。
- 新建一个ConcurrentHashMap webSocketMap 用于接收当前userId的WebSocket,方便IM之间对userId进行推送消息。单机版实现到这里就可以。
- 集群版(多个ws节点)还需要借助mysql或者redis等进行处理,改造对应的sendMessage方法即可。
·
@ServerEndpoint注解是一个类层次的注解,其主要功能是将目前的类定义成一个websocket服务器端,注解的值将被用于监听用户连接的终端访问URL地址,客户端可以通过这个URL来连接到WebSocket服务器端
@ServerEndpoint(“/imserver/{userId}”),为websocket连接地址,其中userId为登录用户的id,前端页面连接wedsocket时,使用该地址this.socket = new WebSocket('ws://localhost:18090/imserver/10');
package com.example.projectmanager.util;
import com.alibaba.fastjson.JSON;
import com.alibaba.fastjson.JSONObject;
import org.apache.commons.lang3.StringUtils;
import org.springframework.stereotype.Component;
import javax.websocket.*;
import javax.websocket.server.PathParam;
import javax.websocket.server.ServerEndpoint;
import java.io.IOException;
import java.util.concurrent.ConcurrentHashMap;
@ServerEndpoint("/imserver/{userId}")
@Component
public class WebSocketServer {
/**静态变量,用来记录当前在线连接数。应该把它设计成线程安全的。*/
private static int onlineCount = 0;
/**concurrent包的线程安全Set,用来存放每个客户端对应的MyWebSocket对象。*/
private static ConcurrentHashMap<String, WebSocketServer> webSocketMap = new ConcurrentHashMap<>();
/**与某个客户端的连接会话,需要通过它来给客户端发送数据*/
private Session session;
/**接收userId*/
private String userId = "";
/**
* 连接建立成功调用的方法
*/
@OnOpen
public void onOpen(Session session, @PathParam("userId") String userId) {
this.session = session;
this.userId = userId;
if(webSocketMap.containsKey(userId)){
webSocketMap.remove(userId);
//加入set中
webSocketMap.put(userId, this);
}else{
//加入set中
webSocketMap.put(userId, this);
//在线数加1
addOnlineCount();
}
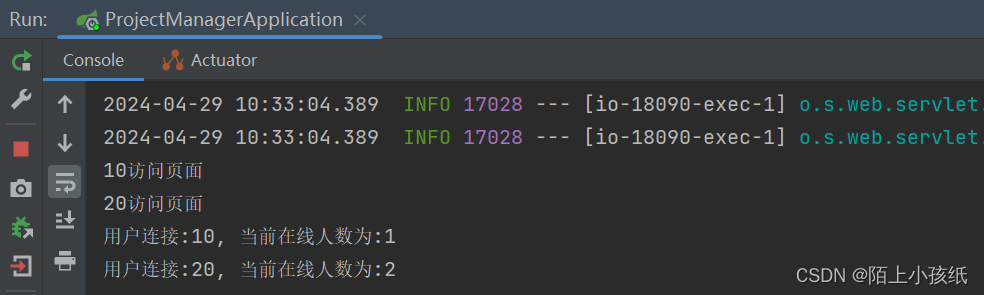
System.out.println("用户连接:"+userId+", 当前在线人数为:" + getOnlineCount());
try {
sendMessage("连接成功");
} catch (IOException e) {
System.err.println("用户:" + userId + ",网络异常!!!!!!");
}
}
/**
* 连接关闭调用的方法
*/
@OnClose
public void onClose() {
if(webSocketMap.containsKey(userId)){
//从set中删除
webSocketMap.remove(userId);
//在线数减1
subOnlineCount();
}
System.out.println("用户退出:" + userId + ", 当前在线人数为:" + getOnlineCount());
}
/**
* 收到客户端消息后调用的方法
*
* @param message 客户端发送过来的消息*/
@OnMessage
public void onMessage(String message, Session session) {
System.out.println("用户消息:" + userId + ", 报文:" + message);
//可以群发消息
//消息保存到数据库、redis
if(StringUtils.isNotBlank(message)){
try {
//解析发送的报文
JSONObject jsonObject = JSON.parseObject(message);
//追加发送人(防止串改)
jsonObject.put("fromUserId", this.userId);
String toUserId = jsonObject.getString("toUserId");
//传送给对应toUserId用户的websocket
if(StringUtils.isNotBlank(toUserId) && webSocketMap.containsKey(toUserId)){
webSocketMap.get(toUserId).sendMessage(jsonObject.toJSONString());
}else{
System.err.println("请求的userId:" + toUserId + "不在该服务器上");
//否则不在这个服务器上,发送到mysql或者redis
}
}catch (Exception e){
e.printStackTrace();
}
}
}
/**
*
* @param session
* @param error
*/
@OnError
public void onError(Session session, Throwable error) {
System.err.println("用户错误:" + this.userId + ", 原因:" + error.getMessage());
error.printStackTrace();
}
/**
* 实现服务器主动推送
*/
public void sendMessage(String message) throws IOException {
this.session.getBasicRemote().sendText(message);
}
/**
* 发送自定义消息
* */
public static void sendInfo(String message, @PathParam("userId") String userId) throws IOException {
System.out.println("发送消息到:" + userId + ",报文:" + message);
if(StringUtils.isNotBlank(userId) && webSocketMap.containsKey(userId)){
webSocketMap.get(userId).sendMessage(message);
}else{
System.err.println("用户" + userId + ",不在线!");
}
}
public static synchronized int getOnlineCount() {
return onlineCount;
}
public static synchronized void addOnlineCount() {
WebSocketServer.onlineCount++;
}
public static synchronized void subOnlineCount() {
WebSocketServer.onlineCount--;
}
}
4.5 WebSocketController.java
ModelAndView 返回页面,传递参数
package com.example.projectmanager.controller;
import com.example.projectmanager.util.WebSocketServer;
import org.springframework.http.ResponseEntity;
import org.springframework.stereotype.Controller;
import org.springframework.web.bind.annotation.*;
import org.springframework.web.servlet.ModelAndView;
import java.io.IOException;
@Controller
public class WebSocketController {
//前端访问页面,userId为登录用户id
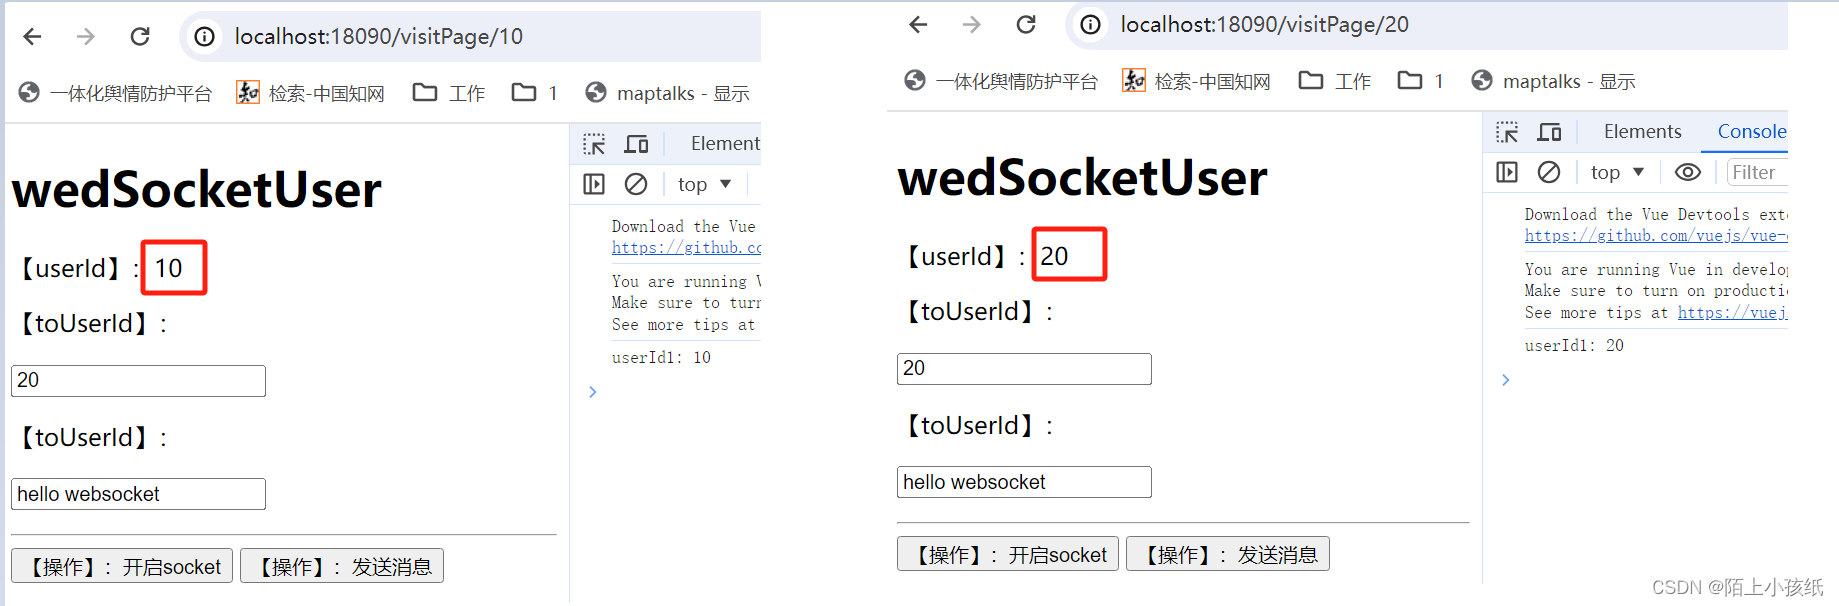
@RequestMapping(value = "/visitPage/{userId}", method = RequestMethod.GET)
public ModelAndView page(@PathVariable String userId){
ModelAndView modelAndView = new ModelAndView();
//返回页面传参
modelAndView.addObject("userId", userId);
//返回页面地址
modelAndView.setViewName("/pages/webSocketIndex");
System.out.println(userId + "访问页面");
return modelAndView;
}
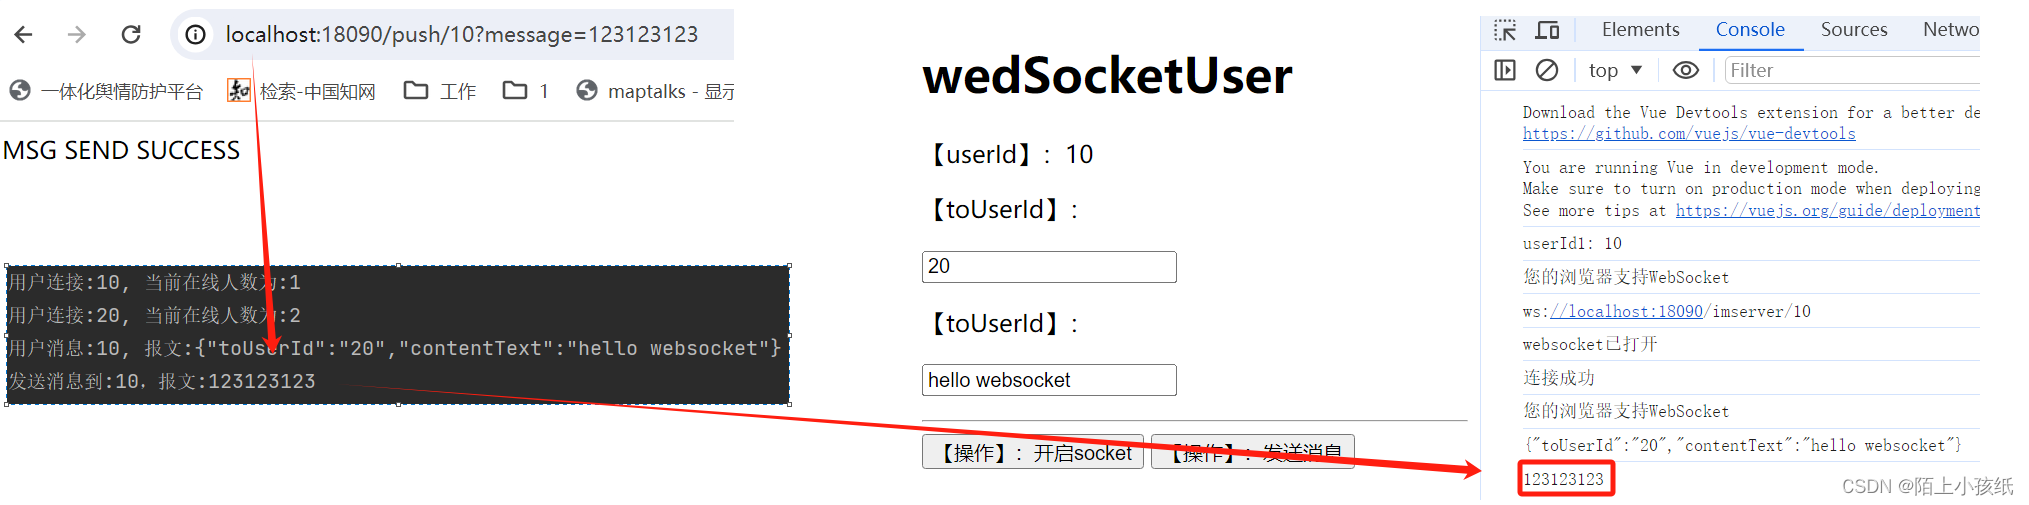
@RequestMapping("/push/{toUserId}")
public ResponseEntity<String> pushToWeb(String message, @PathVariable String toUserId) throws IOException {
WebSocketServer.sendInfo(message, toUserId);
return ResponseEntity.ok("MSG SEND SUCCESS");
}
}
4.6 webSocketIndex.html
thymeleaf获取ModelAndView传参:
- _<html lang=“en”
xmlns:th="http://www.thymeleaf.org">- this.userId1 = `[[${userId}]]`;
– – 返回的【userId】是字符串,注意值两端有:``- this.onlineUserIds = eval( `[[${onlineUserIds}]]`.replaceAll(“"”, “'”) );
– – 返回的【onlineUserIds】是JSONArray,注意:先转换引号,再用eval转换格式
<!DOCTYPE html>
<html lang="en" xmlns:th="http://www.thymeleaf.org">
<head>
<meta charset="UTF-8">
<title>websocket通讯</title>
<link rel="stylesheet" type="text/css" href="../../static/css/index.css">
</head>
<body>
<div id="app">
<h1>wedSocketUser</h1>
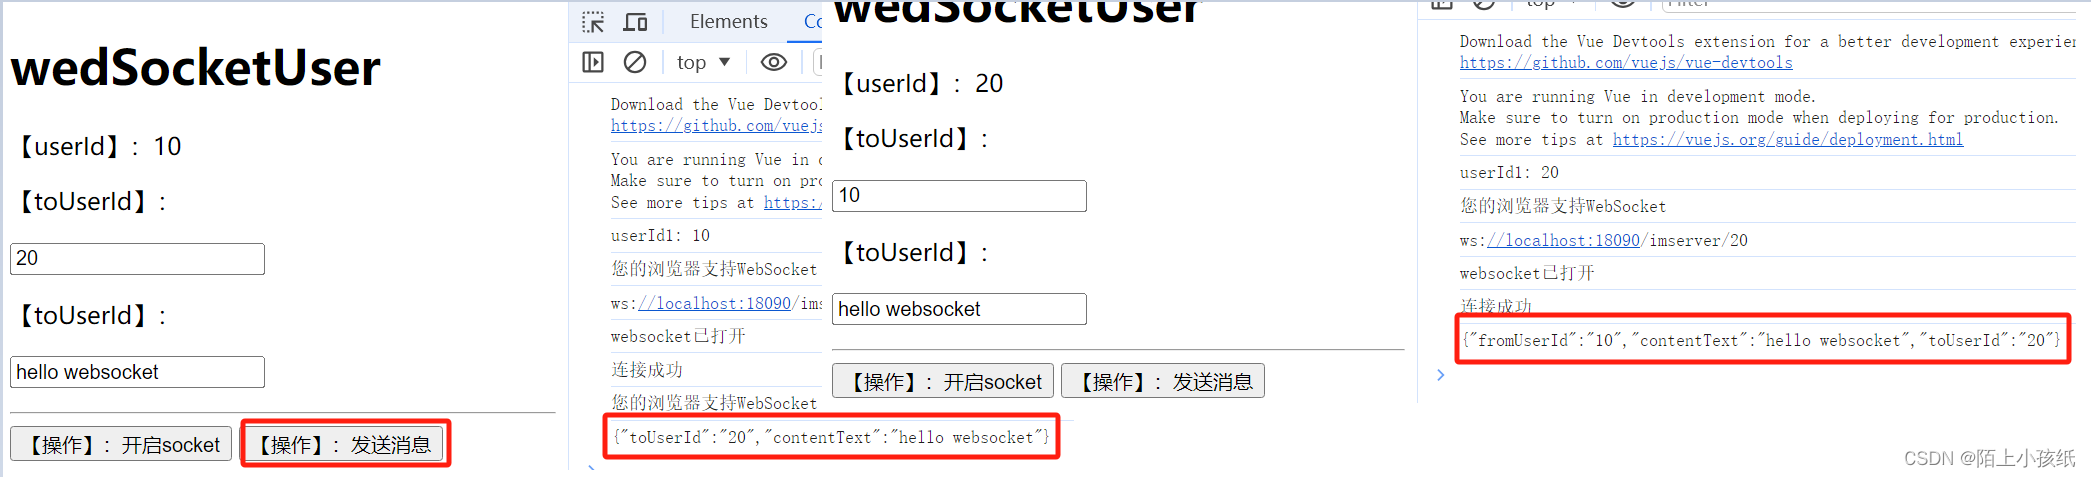
<p>【userId】:{{userId1}}</p>
<p>【toUserId】:<div><input id="toUserId" name="toUserId" type="text" v-model="userId2"></div></p>
<p>【toUserId】:<div><input id="contentText" name="contentText" type="text" value="hello websocket"></div></p>
<hr>
<button @click="openSocket">【操作】:开启socket</button>
<button @click="sendMessage">【操作】:发送消息</button>
</div>
<script src="../../static/js/vue.js"></script>
<script src="../../static/js/index.js"></script>
<script src="../../static/js/jquery-1.8.0.js"></script>
<script>
new Vue({
el: '#app',
data: function() {
return {
userId1: null,
userId2: 20,
webSocketUrl: "http://localhost:18090/imserver/",
socket: null
}
},
methods: {
openSocket(){
if(typeof(WebSocket) == "undefined") {
console.log("您的浏览器不支持WebSocket");
}else{
console.log("您的浏览器支持WebSocket");
//实现化WebSocket对象,指定要连接的服务器地址与端口 建立连接
//等同于socket = new WebSocket("ws://localhost:8888/xxxx/im/25");
var socketUrl = this.webSocketUrl + this.userId1;
socketUrl = socketUrl.replace("https","ws").replace("http","ws");
console.log(socketUrl);
if(this.socket != null){
this.socket.close();
this.socket = null;
}
//初始化socket对象
this.socket = new WebSocket(socketUrl);
//打开事件
this.socket.onopen = function() {
console.log("websocket已打开");
};
//获得消息事件
this.socket.onmessage = function(msg) {
//发现消息进入 开始处理前端触发逻辑
console.log(msg.data);
};
//关闭事件
this.socket.onclose = function() {
console.log("websocket已关闭");
};
//发生了错误事件
this.socket.onerror = function() {
console.log("websocket发生了错误");
}
}
},
sendMessage(){
if(typeof(WebSocket) == "undefined") {
console.log("您的浏览器不支持WebSocket");
}else {
console.log("您的浏览器支持WebSocket");
var msg = '{"toUserId":"' + $("#toUserId").val() + '","contentText":"' + $("#contentText").val() + '"}';
console.log(msg);
this.socket.send(msg);
}
}
},
created(){
//获取ModelAndView中的传值
this.userId1 = `[[${userId}]]`;
console.log('userId1: ' + this.userId1);
}
})
</script>
</body>
</html>
4.7 测试
-
- 用户10访问页面、用户20访问页面
-
- 用户10连接websocket、用户20连接websocket
- 3 用户10向用户20发送消息

- 4 服务器主动向用户10发送消息
5 Spring Boot配置MinIO(实现文件上传、读取、下载、删除)
5.1 MinIO安装
- 下载
- 启动:新建存储文件夹,命令行启动
- 修改用户名密码
- 修改端口
- 重新启动
-
- MinIO下载地址:
https://min.io/download?license=agpl&platform=kubernetes#/windows
minio.exe:服务端文件:,用于接收文件信息
mc.exe :客户端文件,用于上传文件 ,如果用程序代码操作文件存储,只启动服务端就ok
- MinIO下载地址:
-
- 启动minio
(1)把下载好的minio.exe放到F盘,在地址栏里输入cmd按下回车键
(2)新建一个minioData文件夹,用来储存minio上传的文件目录
(3)输入minio.exe server F:\minioData(启动minio的命令)
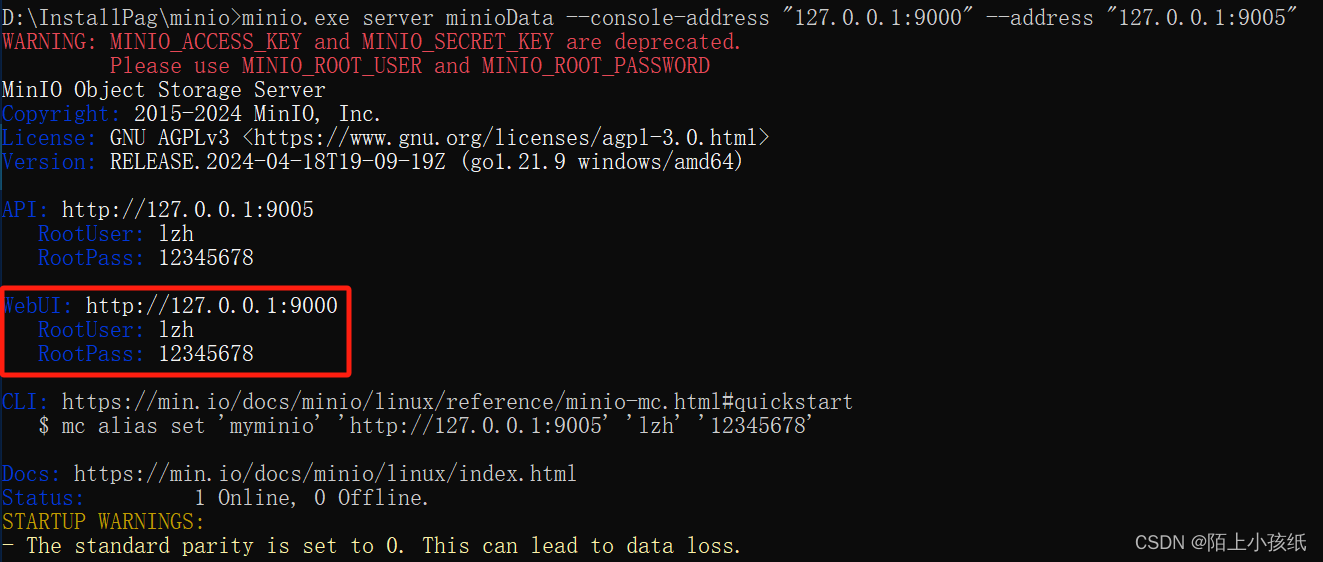
- 启动minio
-
- 登录minio后台查看查看minio是否安装成功
在浏览器中输入http://localhost:9000即可登录到后台
- 登录minio后台查看查看minio是否安装成功
-
- 修改用户名、密码
在minio.exe所在的目录,进去cmd窗口
输入set MINIO_ACCESS_KEY=lzh命令,修改ACCESS-KEY。
输入set MINIO_SECRET_KEY=12345678命令,修改 SECRET-KEY。
输入minio.exe server F:\minioData,启动minio。
此时在的登陆minio后台时,账号为:lzh,密码为:12345678
- 修改用户名、密码
-
- 修改端口
minio.exe server D:\develpo\minio\data --console-address "127.0.0.1:9000" --address "127.0.0.1:9005"
minio.exe server D:\develpo\minio\data --console-address "127.0.0.1:9000" --address "127.0.0.1:9005" > minio.log
- 修改端口
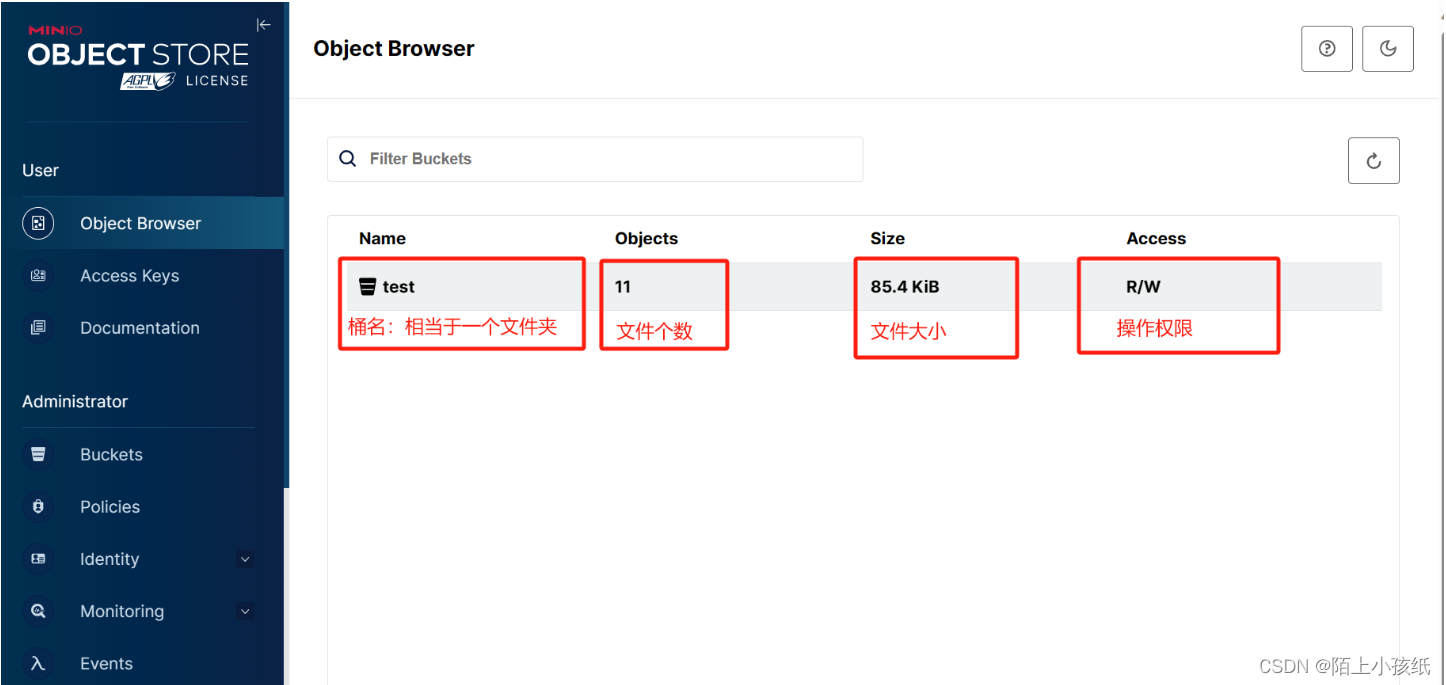
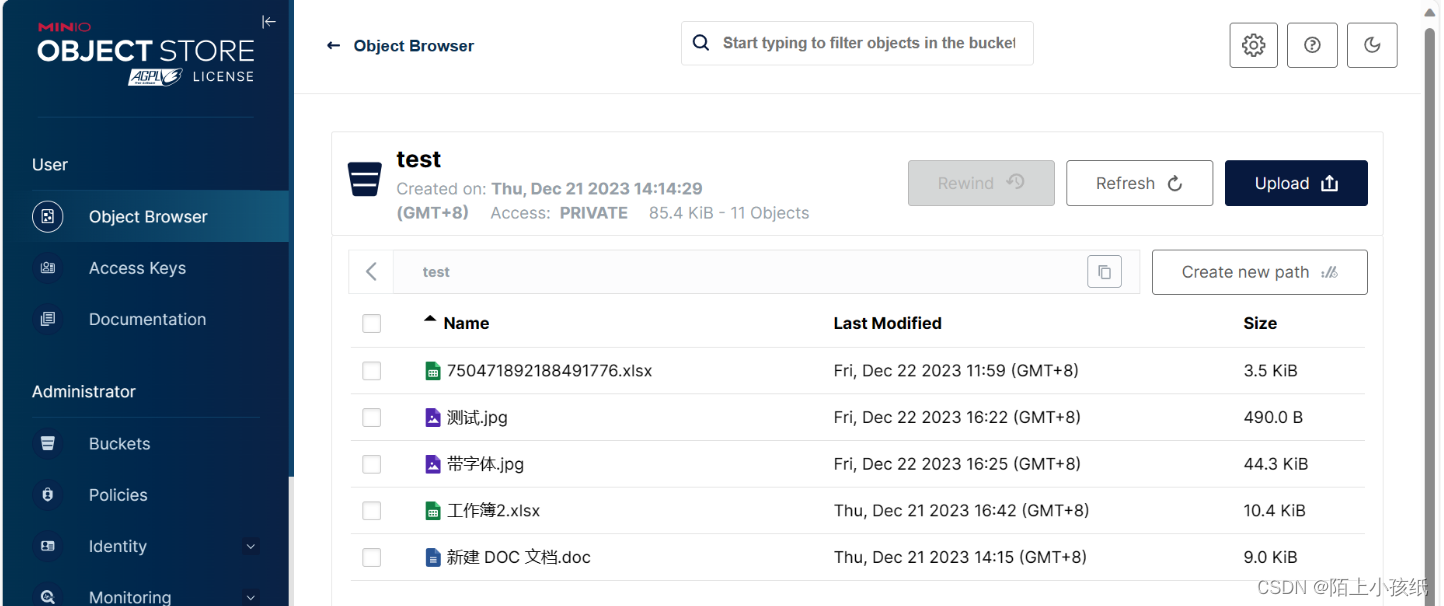
点击桶名称,可以看到该桶内的所有文件
5.2 依赖
        <dependency>
            <groupId>io.minio</groupId>
            <artifactId>minio</artifactId>
            <version>8.3.4</version>
        </dependency>
        <dependency>
            <groupId>org.projectlombok</groupId>
            <artifactId>lombok</artifactId>
            <version>1.18.16</version>
        </dependency>
        <dependency>
            <groupId>org.apache.commons</groupId>
            <artifactId>commons-lang3</artifactId>
            <version>3.5</version>
        </dependency>
5.3 application.yml
server:
  port: 18090

spring:
  mvc:
    static-path-pattern: /static/**
  web:
    resources:
      static-locations: classpath:/static,classpath:/public,classpath:/resources,classpath:/META-INF/resources
  # 设置单个文件大小
  servlet:
    multipart:
      max-file-size: 500MB
      max-request-size: 1024MB

#minio文件服务器配置
s3:
  url: http://127.0.0.1:9005
  accessKey: lzh
  secretKey: 12345678
  bucketName: test
5.4 MinioClientConfig
- 使用@ConfigurationProperties(prefix = “s3”)获取yml中定义的参数
- 使用@Data为参数增加get方法
- 初始化minio
package com.example.projectmanager.config;

import io.minio.MinioClient;
import lombok.Data;
import org.springframework.boot.context.properties.ConfigurationProperties;
import org.springframework.context.annotation.Configuration;
import org.springframework.stereotype.Component;

import javax.annotation.PostConstruct;


@Data
@Configuration
@ConfigurationProperties(prefix = "s3")
@Component
public class MinioClientConfig {

    private String url;
    private String accessKey;
    private String secretKey;
    private String bucketName;

    private static MinioClient minioClient;

    /**
     * @description: 获取minioClient
     * @date 2021/6/22 16:55
     * @return io.minio.MinioClient
     */
    public static MinioClient getMinioClient(){
        return minioClient;
    }

    /**
     * 初始化minio配置
     *
     * @param :
     * @return: void
     * @date : 2020/8/16 20:56
     */
    @PostConstruct
    public void init() {
        try {
            minioClient = MinioClient.builder()
                    .endpoint(url)
                    .credentials(accessKey, secretKey)
                    .build();
            System.out.println("minio初始化完成");
        } catch (Exception e) {
            e.printStackTrace();
            System.err.println("初始化minio配置异常: 【{" + e.fillInStackTrace() + "}】");
        }
    }

}
5.5 MinioUtil
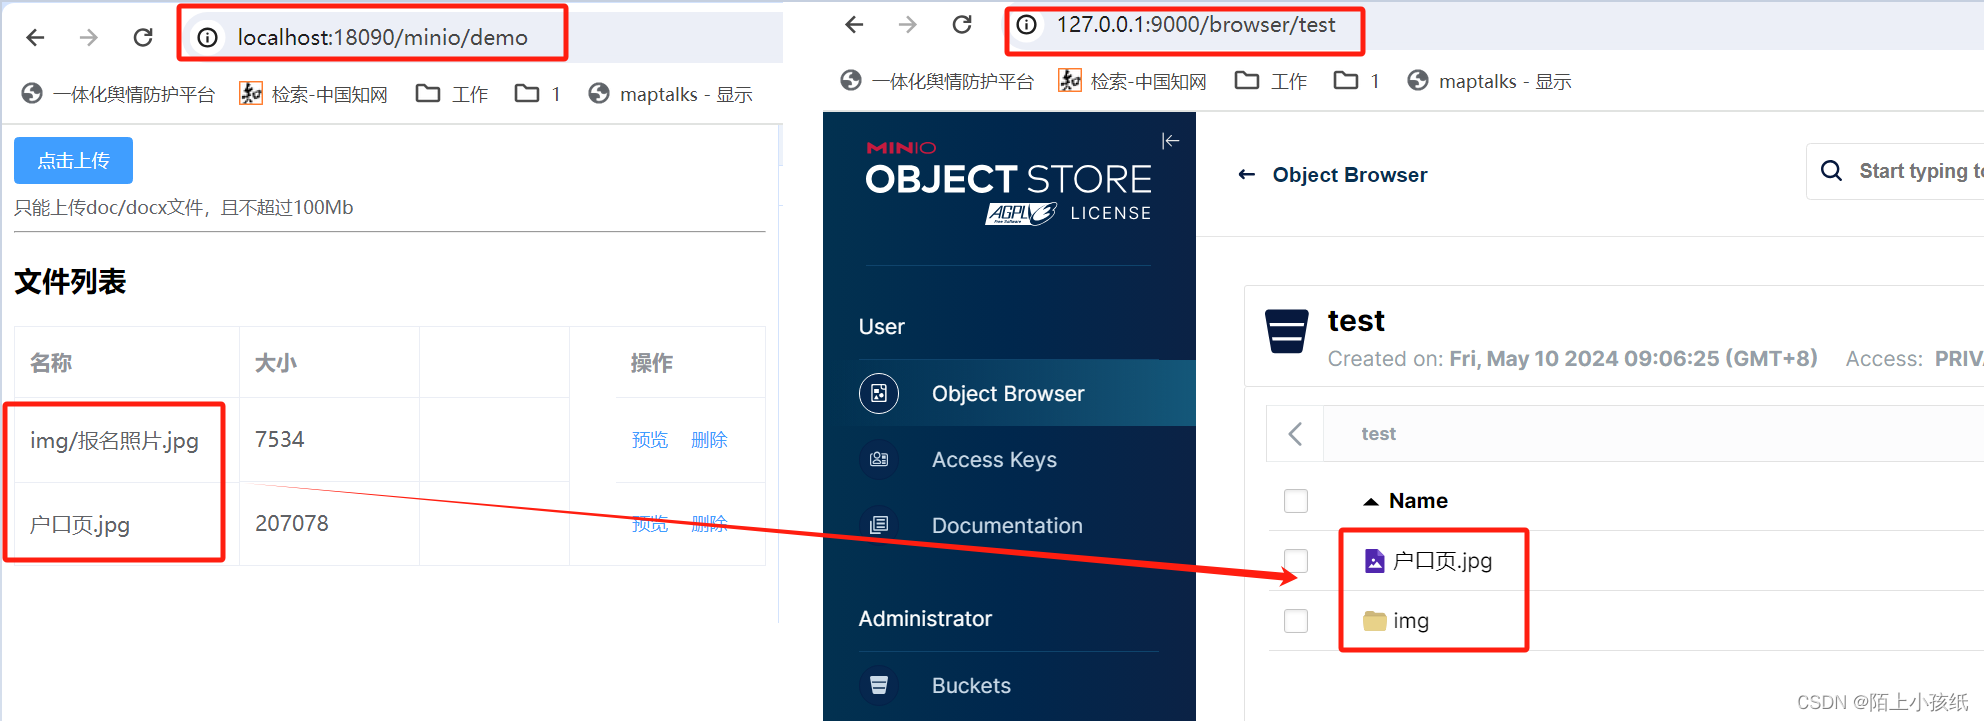
操作文件夹中的文件可以在路径上直接加文件夹名称,如下:
fileName = "/delete/" + fileName;//将文件上传到桶内delete文件夹下
package com.example.projectmanager.util;

import com.alibaba.fastjson.JSONObject;
import com.example.projectmanager.config.MinioClientConfig;
import io.minio.*;

import io.minio.http.Method;
import io.minio.messages.Bucket;
import io.minio.messages.Item;
import lombok.Cleanup;
import lombok.extern.slf4j.Slf4j;
import org.apache.commons.lang3.StringUtils;
import org.springframework.stereotype.Component;
import org.springframework.web.multipart.MultipartFile;

import javax.servlet.ServletOutputStream;
import javax.servlet.http.HttpServletResponse;
import java.io.InputStream;
import java.net.URLEncoder;
import java.util.Iterator;
import java.util.List;

/**
 *
 * 获取全部bucket
 * 检查存储桶是否存在
 * 判断文件是否存在
 * 判断文件夹是否存在
 * 获取路径下文件列表
 * 获取文件流
 * 创建桶
 * 下载文件
 * 删除桶
 * 删除桶下面所有文件
 * 删除文件
 * 拷贝文件---假删除
 * 根据文件路径得到预览文件绝对地址,可在预览时下载文件
 */

@Slf4j
@Component
public class MinioUtil {

    /**
     * Minio文件上传
     *
     * @param file       文件实体
     * @param fileName   修饰过的文件名 非源文件名
     * @param bucketName 所存文件夹(桶名)
     * @return
     */
    public JSONObject minioUpload(MultipartFile file, String fileName, String bucketName) {
        JSONObject res = new JSONObject();
        try {
            MinioClient minioClient = MinioClientConfig.getMinioClient();
            // fileName为空,说明要使用源文件名上传
            if (fileName == null) {
                fileName = file.getOriginalFilename();
                //fileName = "/delete/" + fileName; //将文件上传到桶内delete文件夹下
                fileName = fileName.replaceAll(" ", "_");
            }
            // 输入流需要关闭,使用 @Cleanup 注解,否则会报异常。
            @Cleanup
            InputStream inputStream = file.getInputStream();
            PutObjectArgs objectArgs = PutObjectArgs.builder().bucket(bucketName).object(fileName)
                    .stream(inputStream, file.getSize(), -1).contentType(file.getContentType()).build();
            //文件名称相同会覆盖
            minioClient.putObject(objectArgs);

            System.out.println(fileName + "上传成功");
            res.put("msg", fileName + "上传成功");
            res.put("code", 0);
            return res;
        } catch (Exception e) {
            e.printStackTrace();
            return null;
        }
    }

    /**
     * 获取全部bucket
     *
     * @param :
     * @return: java.util.List<io.minio.messages.Bucket>
     * @date : 2020/8/16 23:28
     */
    public List<Bucket> getAllBuckets() {
        try{
            MinioClient minioClient = MinioClientConfig.getMinioClient();
            return minioClient.listBuckets();
        }catch (Exception e) {
            e.printStackTrace();
            return null;
        }
    }

    /**
     * 检查存储桶是否存在
     *
     * @param bucketName 存储桶名称
     * @return
     */
    public boolean bucketExists(String bucketName) {
        boolean flag = false;
        try {
            MinioClient minioClient = MinioClientConfig.getMinioClient();
            flag = minioClient.bucketExists(BucketExistsArgs.builder().bucket(bucketName).build());
            if (flag) {
                return true;
            }
        } catch (Exception e) {
            e.printStackTrace();
            return false;
        }
        return false;
    }

    /**
     * 判断文件是否存在
     *
     * @param bucketName
     * @param objectName
     * @return
     */
    public boolean isObjectExist(String bucketName, String objectName) {
        boolean exist = true;
        try {
            MinioClient minioClient = MinioClientConfig.getMinioClient();
            minioClient.statObject(StatObjectArgs.builder().bucket(bucketName).object(objectName).build());
        } catch (Exception e) {
            log.error("[Minio工具类]>>>> 判断文件是否存在, 异常:", e);
            exist = false;
        }
        return exist;
    }

    /**
     * 判断文件夹是否存在
     *
     * @param bucketName
     * @param objectName
     * @return
     */
    public boolean isFolderExist(String bucketName, String objectName) {
        boolean exist = false;
        try {
            MinioClient minioClient = MinioClientConfig.getMinioClient();
            Iterable<Result<Item>> results = minioClient.listObjects(
                    ListObjectsArgs.builder().bucket(bucketName).prefix(objectName).recursive(false).build());
            for (Result<Item> result : results) {
                Item item = result.get();
                if (item.isDir() && objectName.equals(item.objectName())) {
                    exist = true;
                }
            }
        } catch (Exception e) {
            log.error("[Minio工具类]>>>> 判断文件夹是否存在,异常:", e);
            exist = false;
        }
        return exist;
    }

    /**
     * 获取路径下文件列表
     *
     * @param bucketName 存储桶
     * @param prefix     文件名称
     * @param recursive  是否递归查找,false:模拟文件夹结构查找
     * @return 二进制流
     */
    public Iterator<Result<Item>> listObjects(String bucketName, String prefix, boolean recursive) {
        MinioClient minioClient = MinioClientConfig.getMinioClient();
        Iterable<Result<Item>> iterable =  minioClient.listObjects(
                ListObjectsArgs.builder()
                        .bucket(bucketName)
                        .prefix(prefix)
                        .recursive(recursive)
                        .build());
        return iterable.iterator();
    }

    /**
     * 获取文件流
     *
     * @param fileName   文件名
     * @param bucketName 桶名(文件夹)
     * @return
     */
    public InputStream getFileInputStream(String fileName, String bucketName) {
        try {
            MinioClient minioClient = MinioClientConfig.getMinioClient();
            return minioClient.getObject(GetObjectArgs.builder().bucket(bucketName).object(fileName).build());
        } catch (Exception e) {
            e.printStackTrace();
            log.error(e.getMessage());
        }
        return null;
    }

    /**
     * @param bucketName:
     * @author
     * @description: 创建桶
     * @date 2022/8/16 14:36
     */
    public void createBucketName(String bucketName) {
        try {
            if (StringUtils.isBlank(bucketName)) {
                return;
            }
            MinioClient minioClient = MinioClientConfig.getMinioClient();
            boolean isExist = bucketExists(bucketName);
            if (isExist) {
                log.info("Bucket {} already exists.", bucketName);
            } else {
                minioClient.makeBucket(MakeBucketArgs.builder().bucket(bucketName).build());
            }
        } catch (Exception e) {
            e.printStackTrace();
            log.error(e.getMessage());
        }
    }
    /**
     * 下载文件
     *
     * @param originalName 文件路径
     */
    public InputStream downloadFile(String bucketName, String originalName, HttpServletResponse response) {
        try {
            String filename = "";
            if (StringUtils.isNotBlank(originalName)) {
                filename = originalName;
            }else{
                System.err.println("下载失败---文件名为空");
                return null;
            }
            MinioClient minioClient = MinioClientConfig.getMinioClient();
            InputStream file = minioClient.getObject(
                    GetObjectArgs.builder()
                            .bucket(bucketName)
                            .object(filename)
                            .build());
            response.setHeader("Content-Disposition", "attachment;filename=" + URLEncoder.encode(filename,"UTF-8"));
            ServletOutputStream servletOutputStream = response.getOutputStream();
            int len;
            byte[] buffer = new byte[1024];
            while ((len = file.read(buffer)) > 0) {
                servletOutputStream.write(buffer, 0, len);
            }
            servletOutputStream.flush();
            file.close();
            servletOutputStream.close();
            return file;
        } catch (Exception e) {
            e.printStackTrace();
            return null;
        }
    }

    /**
     * @param bucketName:
     * @description: 删除桶
     * @date 2022/8/16 14:36
     */
    public void deleteBucketName(String bucketName) {
        try {
            if (StringUtils.isBlank(bucketName)) {
                return;
            }
            MinioClient minioClient = MinioClientConfig.getMinioClient();
            boolean isExist = bucketExists(bucketName);
            if (isExist) {
                minioClient.removeBucket(RemoveBucketArgs.builder().bucket(bucketName).build());
            }
        } catch (Exception e) {
            e.printStackTrace();
            log.error(e.getMessage());
        }
    }
    /**
     * @param bucketName:
     * @description: 删除桶下面所有文件
     * @date 2022/8/16 14:36
     */
    public void deleteBucketFile(String bucketName) {
        try {
            if (StringUtils.isBlank(bucketName)) {
                return;
            }
            MinioClient minioClient = MinioClientConfig.getMinioClient();
            boolean isExist = minioClient.bucketExists(BucketExistsArgs.builder().bucket(bucketName).build());
            if (isExist) {
                minioClient.deleteBucketEncryption(DeleteBucketEncryptionArgs.builder().bucket(bucketName).build());
            }
        } catch (Exception e) {
            e.printStackTrace();
            log.error(e.getMessage());
        }
    }
    /**
     * 删除文件
     *
     * @param bucketName 存储桶
     * @param objectName 文件名称
     */
    public boolean deleteFile(String bucketName, String objectName) {
        try{
            MinioClient minioClient = MinioClientConfig.getMinioClient();
            minioClient.removeObject(
                    RemoveObjectArgs.builder()
                            .bucket(bucketName)
                            .object(objectName)
                            .build());
            System.out.println(bucketName + "--" + objectName + "--删除成功");
            return true;
        }catch (Exception e){
            e.printStackTrace();
            System.err.println(bucketName + "--" + objectName + "--删除失败");
            return false;
        }
    }
    /**
     * 拷贝文件---假删除
     *
     * @param bucketName    存储桶
     * @param objectName    文件名
     * @param srcBucketName 目标存储桶
     * @param srcObjectName 目标文件名
     */
    public boolean copyFile(String bucketName, String objectName, String srcBucketName, String srcObjectName) {

        try{
            if(isObjectExist(bucketName, objectName)){
                MinioClient minioClient = MinioClientConfig.getMinioClient();
                minioClient.copyObject(
                        CopyObjectArgs.builder()
                                .source(CopySource.builder().bucket(bucketName).object(objectName).build())
                                .bucket(srcBucketName)
                                .object(srcObjectName)
                                .build());
                System.out.println(bucketName + "--" + objectName + "--拷贝文件成功");
                return true;
            }
            System.out.println(bucketName + "--" + objectName + "--拷贝文件不存在");
            return false;
        }catch (Exception e){
            e.printStackTrace();
            System.err.println(bucketName + "--" + objectName + "--拷贝文件失败");
            return false;
        }
    }

    /**
     * 根据文件路径得到预览文件绝对地址
     *
     * @param bucketName
     * @param fileName
     * @return
     */
    public String getPreviewFileUrl(String bucketName, String fileName) {
        try {
            GetPresignedObjectUrlArgs args = GetPresignedObjectUrlArgs.builder()
                    .bucket(bucketName)
                    .object(fileName)
                    .method(Method.GET).build();
            MinioClient minioClient = MinioClientConfig.getMinioClient();
            String url = minioClient.getPresignedObjectUrl(args);
            return url;
        } catch (Exception e) {
            e.printStackTrace();
            return null;
        }
    }
}
5.6 MinIoController
package com.example.projectmanager.controller;

import com.alibaba.fastjson.JSON;
import com.alibaba.fastjson.JSONArray;
import com.alibaba.fastjson.JSONObject;
import com.example.projectmanager.config.MinioClientConfig;
import com.example.projectmanager.util.MinioUtil;
import io.minio.MinioClient;
import io.minio.Result;
import io.minio.errors.*;
import io.minio.messages.Item;
import org.springframework.beans.factory.annotation.Autowired;
import org.springframework.web.bind.annotation.*;
import org.springframework.web.multipart.MultipartFile;
import org.springframework.web.servlet.ModelAndView;

import javax.servlet.http.HttpServletResponse;
import java.io.IOException;
import java.security.InvalidKeyException;
import java.security.NoSuchAlgorithmException;
import java.util.ArrayList;
import java.util.Iterator;
import java.util.List;

@RestController
@RequestMapping("/minio")
public class MinIoController {

    @Autowired
    private MinioClientConfig minioClientConfig;

    @Autowired
    MinioUtil minioUtil;

    @GetMapping("/demo")
    public ModelAndView Demo(){
        ModelAndView modelAndView = new ModelAndView();
        modelAndView.setViewName("/pages/JSDemo");
        return modelAndView;
    }

    /**
     * 上传文件
     * @param file
     * @return
     */
    @PostMapping("/uploadFile")
    public JSONObject uploadFile(@RequestBody MultipartFile file) {
        JSONObject res = new JSONObject();
        MinioClient minioClient = MinioClientConfig.getMinioClient();
        if (minioClient == null) {
            res.put("msg", "连接MinIO服务器失败");
            return res;
        }
        JSONObject result = minioUtil.minioUpload(file, null, minioClientConfig.getBucketName());
        if (result != null && result.getInteger("code") == 0) {
            res.put("msg", "上传成功");
            return res;
        } else {
            res.put("msg", "上传错误!!!");
            return res;
        }
    }

    @GetMapping("/getFileList")
    public JSONObject getFileList() throws ServerException, InsufficientDataException, ErrorResponseException, IOException, NoSuchAlgorithmException, InvalidKeyException, InvalidResponseException, XmlParserException, InternalException {
        JSONObject res = new JSONObject();
        MinioClient minioClient = MinioClientConfig.getMinioClient();
        if (minioClient == null) {
            res.put("msg", "连接MinIO服务器失败");
            return res;
        }
        Iterator<Result<Item>> iterator = minioUtil.listObjects(minioClientConfig.getBucketName(), "", true);
        JSONArray array = new JSONArray();
        while (iterator.hasNext()) {
            Item item = iterator.next().get();
            JSONObject obj = new JSONObject();
            obj.put("name", item.objectName());
            obj.put("size", item.size());
            array.add(obj);
        }
        System.out.println("获取文件列表: " + array.size());
        res.put("list", array);
        return res;
    }

    /**
     * 获取文件预览地址
     * @param fileName
     * @return
     */
    @GetMapping("/getRedFile")
    public JSONObject getRedFile(String fileName) {
        JSONObject res = new JSONObject();
        MinioClient minioClient = MinioClientConfig.getMinioClient();
        if (minioClient == null) {
            res.put("msg", "连接MinIO服务器失败");
            return res;
        }
        String url = minioUtil.getPreviewFileUrl(minioClientConfig.getBucketName(), fileName);
        System.out.println(fileName + "-预览地址: " + url);
        res.put("url", url);
        return res;
    }

    /**
     * 下载文件
     * @param fileName
     * @param response
     * @return
     */
    @GetMapping("/downloadFile")
    public String downloadFile(String fileName, HttpServletResponse response) {
        MinioClient minioClient = MinioClientConfig.getMinioClient();
        if (minioClient == null) {
            return "连接MinIO服务器失败";
        }
        return minioUtil.downloadFile(minioClientConfig.getBucketName(), fileName, response) != null ? "下载成功" : "下载失败";
    }

    /**
     * 删除文件
     *
     * @param fileName 文件路径
     * @return
     */
    @GetMapping("/deleteFile")
    public String deleteFile(String fileName) {
        MinioClient minioClient = MinioClientConfig.getMinioClient();
        if (minioClient == null) {
            return "连接MinIO服务器失败";
        }
        boolean flag = minioUtil.deleteFile(minioClientConfig.getBucketName(), fileName);
        return flag == true ? "删除成功" : "删除失败";
    }

    /**
     * 假删除文件
     *
     * @param fileName 文件路径
     * @return
     */
    @GetMapping("/jiaDeleteFile")
    public String jiaDeleteFile(String fileName) {
        String srcFileName = "/delete/" +  System.currentTimeMillis() + "-" + fileName;
        MinioClient minioClient = MinioClientConfig.getMinioClient();
        if (minioClient == null) {
            return "连接MinIO服务器失败";
        }
        boolean flag = minioUtil.copyFile(minioClientConfig.getBucketName(), fileName, minioClientConfig.getBucketName(), srcFileName);
        return flag == true ? "删除成功" : "删除失败";
    }

}
5.7 JSDemo.html
<!DOCTYPE html>
<html lang="en">
<head>
    <meta charset="UTF-8">
    <title>选择文件</title>
    <link rel="stylesheet" type="text/css" href="../../static/css/index.css">
</head>
<body>
<div id="app">
    <el-upload
            class="upload-demo"
            action="/minio/uploadFile"
            :before-upload="beforeUpload"
            :on-preview="handlePreview"
            :on-remove="handleRemove"
            :before-remove="beforeRemove"
            multiple
            :limit="2"
            :on-success="handleSuccess"
            accept="*无格式 | .doc,.docxWord格式"
            :file-list="fileList">
        <el-button size="small" type="primary">点击上传</el-button>
        <div slot="tip" class="el-upload__tip">只能上传doc/docx文件,且不超过100Mb</div>
    </el-upload>
    <hr>
    <p v-html="word_content"></p>

    <h3>文件列表</h3>
    <el-table
            :data="tableData"
            border
            style="width: 100%">
        <el-table-column
                fixed
                prop="name"
                label="名称"
                width="150">
        </el-table-column>
        <el-table-column
                prop="size"
                label="大小"
                width="120">
        </el-table-column>
        <el-table-column
                fixed="right"
                label="操作"
                width="100">
            <template slot-scope="scope">
                <el-button @click="handleClick_look(scope.row)" type="text" size="small">预览</el-button>
                <el-button @click="handleClick_delete(scope.row)" type="text" size="small">删除</el-button>
            </template>
        </el-table-column>
    </el-table>
</div>

<script src="../../static/js/vue.js"></script>
<script src="../../static/js/index.js"></script>
<script src="../../static/js/jquery-1.8.0.js"></script>
<script>
    new Vue({
        el: '#app',
        data: function() {
            return {
                fileList: [],
                word_content: "",
                tableData: []
            }
        },
        methods: {
            //文件列表移除文件时的钩子
            handleRemove(file, fileList) {
                this.word_content = "";
                this.fileList.splice(0,1);
            },
            //点击文件列表中已上传的文件时的钩子
            handlePreview(file) {
                console.log(file);
            },
            //文件上传成功时的钩子
            handleSuccess(response, file, fileList){
                if(this.fileList.length > 0){
                    this.word_content = "";
                    this.fileList.splice(0,1);
                }
                this.fileList.push(file);
                this.word_content = response;
            },
            // 上传文件之前
            beforeUpload(file) {
                let size10M = file.size / 1024 / 1024 < 100
                if (!size10M) {
                    this.$message.warning('上传文件大小不能超过 100MB!');
                    return false;
                }
            },
            //删除文件之前的钩子
            beforeRemove(file, fileList) {
                return this.$confirm(`确定移除 ${ file.name }?`);
            },

            //表格操作------
            //文件预览
            handleClick_look(row) {
                console.log(row);
                $.ajax({
                    type: "get",
                    url:"/minio/getRedFile",   //控制器路径
                    contentType: "application/json;charset=utf-8",
                    data: {
                        fileName: row.name
                    },
                    cache: false,
                    success: function (msg) {
                        window.open(msg.url);
                        console.log("---over---");
                    }
                });
            },
            //文件删除
            handleClick_delete(row) {
                console.log(row);
                $.ajax({
                    type: "GET",
                    url:"/minio/jiaDeleteFile",   //控制器路径
                    contentType: "application/json;charset=utf-8",
                    data: {
                        fileName: row.name
                    },
                    cache: false,
                    success: function (msg) {
                        console.log(msg);
                    }
                });
            },
            //获取minio文件列表
            getFileList(){
                var that = this;
                $.ajax({
                    type: "get",
                    url:"/minio/getFileList",   //控制器路径
                    contentType: "application/json;charset=utf-8",
                    data: null,
                    cache: false,
                    success: function (msg) {
                        that.tableData = msg.list;
                        console.log("---over---");
                    }
                });
            }
        },
        created(){
            //获取minio文件列表
            this.getFileList();
        }
    })
</script>
</body>
ajax中参数传参:
1)post请求:data: JSON.stringify(param),
2)get请求:data: { fileName: row.name }
对应的controller接收参数:
@GetMapping("/deleteFile")
public String deleteFile(String fileName) {}
5.8 测试
-
- 查看桶中文件列表
-
- 预览(预览时可以通过浏览器下载)
-
- 删除

6 使用JWT为接口添加token
6.1 依赖
        <dependency>
            <groupId>com.auth0</groupId>
            <artifactId>java-jwt</artifactId>
            <version>3.10.3</version>
        </dependency>
6.2 JWTUtils
包含两个方法:
1)生成密钥
2)验证密钥并解析密钥中的用户信息
package com.example.projectmanager.util;

import com.auth0.jwt.JWT;
import com.auth0.jwt.JWTVerifier;
import com.auth0.jwt.algorithms.Algorithm;
import com.auth0.jwt.interfaces.DecodedJWT;

import java.util.Calendar;
import java.util.HashMap;

public class JWTUtils {
    // 签名密钥
    private static final String SECRET = "!DAR$";

    /**
     * 生成token
     * @param userId   token携带的信息
     * @param userName token携带的信息
     * @return token字符串
     */
    public String getToken(String userId, String userName){
        // 指定token过期时间为30秒
        Calendar calendar = Calendar.getInstance();
        calendar.add(Calendar.SECOND, 300);

        String token = JWT.create()
                .withHeader(new HashMap<>())  // Header
                .withClaim("userId", userId)  // Payload
                .withClaim("userName", userName)
                .withExpiresAt(calendar.getTime())  // 过期时间
                .sign(Algorithm.HMAC256(SECRET));  // 签名用的secret

        return token;
    }

     /**
     * 验证token  合法性
     * 解析token
     * @param token token字符串
     * @return 解析后的token
     */
    public static DecodedJWT decode(String token){
        // 验证令牌
        JWTVerifier jwtVerifier = JWT.require(Algorithm.HMAC256(SECRET)).build();
        DecodedJWT decodedJWT = jwtVerifier.verify(token);
        System.out.println(decodedJWT.getClaim("userId").asString());
        System.out.println(decodedJWT.getClaim("userName").asString());
        System.out.println("令牌过期时间:" + decodedJWT.getExpiresAt());
        return decodedJWT;
    }
}
6.3 JWTInterceptors 拦截器
1)获取请求中的token参数
2)使用JWTUtils.decode(token);,验证token,若token验证失败,则会出现异常,并返回前端异常类型
package com.example.projectmanager.config;

import com.auth0.jwt.exceptions.AlgorithmMismatchException;
import com.auth0.jwt.exceptions.SignatureVerificationException;
import com.auth0.jwt.exceptions.TokenExpiredException;
import com.example.projectmanager.util.JWTUtils;
import com.fasterxml.jackson.databind.ObjectMapper;
import org.springframework.web.servlet.HandlerInterceptor;

import javax.servlet.http.HttpServletRequest;
import javax.servlet.http.HttpServletResponse;
import java.util.HashMap;
import java.util.Map;

public class JWTInterceptors implements HandlerInterceptor {
    @Override
    public boolean preHandle(HttpServletRequest request, HttpServletResponse response, Object handler) throws Exception {
        Map<String,Object> map = new HashMap<>();
        // 获取请求头中令牌
        String token = request.getHeader("token");
        try {
            // 验证令牌
            JWTUtils.decode(token);
            return true;  // 放行请求
        } catch (SignatureVerificationException e) {
            e.printStackTrace();
            map.put("msg","无效签名!");
        }catch (TokenExpiredException e){
            e.printStackTrace();
            map.put("msg","token过期");
        }catch (AlgorithmMismatchException e){
            e.printStackTrace();
            map.put("msg","算法不一致");
        }catch (Exception e){
            e.printStackTrace();
            map.put("msg","token无效!");
        }
        map.put("state",false);  // 设置状态
        // 将map以json的形式响应到前台  map --> json  (jackson)
        String json = new ObjectMapper().writeValueAsString(map);
        response.setContentType("application/json;charset=UTF-8");
        response.getWriter().println(json);
        return false;
    }
}
6.4 InterceptorConfig 定制拦截器规则
定义哪些接口放行,哪些接口需进行验证
package com.example.projectmanager.config;

import org.springframework.context.annotation.Configuration;
import org.springframework.web.servlet.config.annotation.InterceptorRegistry;
import org.springframework.web.servlet.config.annotation.WebMvcConfigurer;

@Configuration
public class InterceptorConfig implements WebMvcConfigurer {

    @Override
    public void addInterceptors(InterceptorRegistry registry) {
        registry.addInterceptor(new JWTInterceptors())
                //.addPathPatterns("/jwt/demo")  // 该接口不进行token验证
                .excludePathPatterns("/jwt/getToken");  // 除该接口外,其他接口都要验证
    }
}
6.5 测试controller
package com.example.projectmanager.controller;

import com.alibaba.fastjson.JSONObject;
import com.example.projectmanager.util.JWTUtils;
import org.springframework.web.bind.annotation.GetMapping;
import org.springframework.web.bind.annotation.RequestMapping;
import org.springframework.web.bind.annotation.RestController;
import org.springframework.web.servlet.ModelAndView;

@RestController
@RequestMapping("/jwt")
public class TestController {

    private JWTUtils jwtUtils = new JWTUtils();

    // 获取token
    @GetMapping("/getToken")
    public JSONObject getToken(String userId, String userName){
        String token = jwtUtils.getToken(userId, userName);
        JSONObject jsonObject = new JSONObject();
        jsonObject.put("token", token);
        return jsonObject;
    }

    // 访问demo页面
    @GetMapping("/demo")
    public ModelAndView Demo(){
        ModelAndView modelAndView = new ModelAndView();
        modelAndView.setViewName("/pages/JSDemo");
        return modelAndView;
    }

}
6.6 测试
-
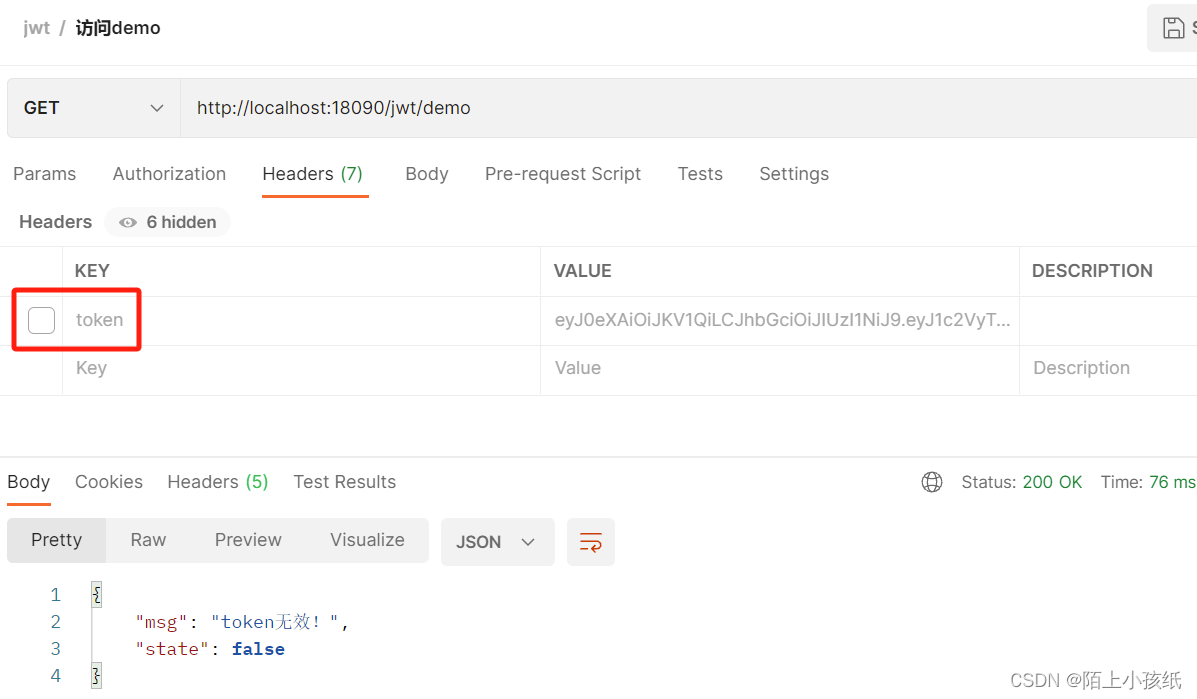
- 无token,显示token无效
-
- 获取token

-
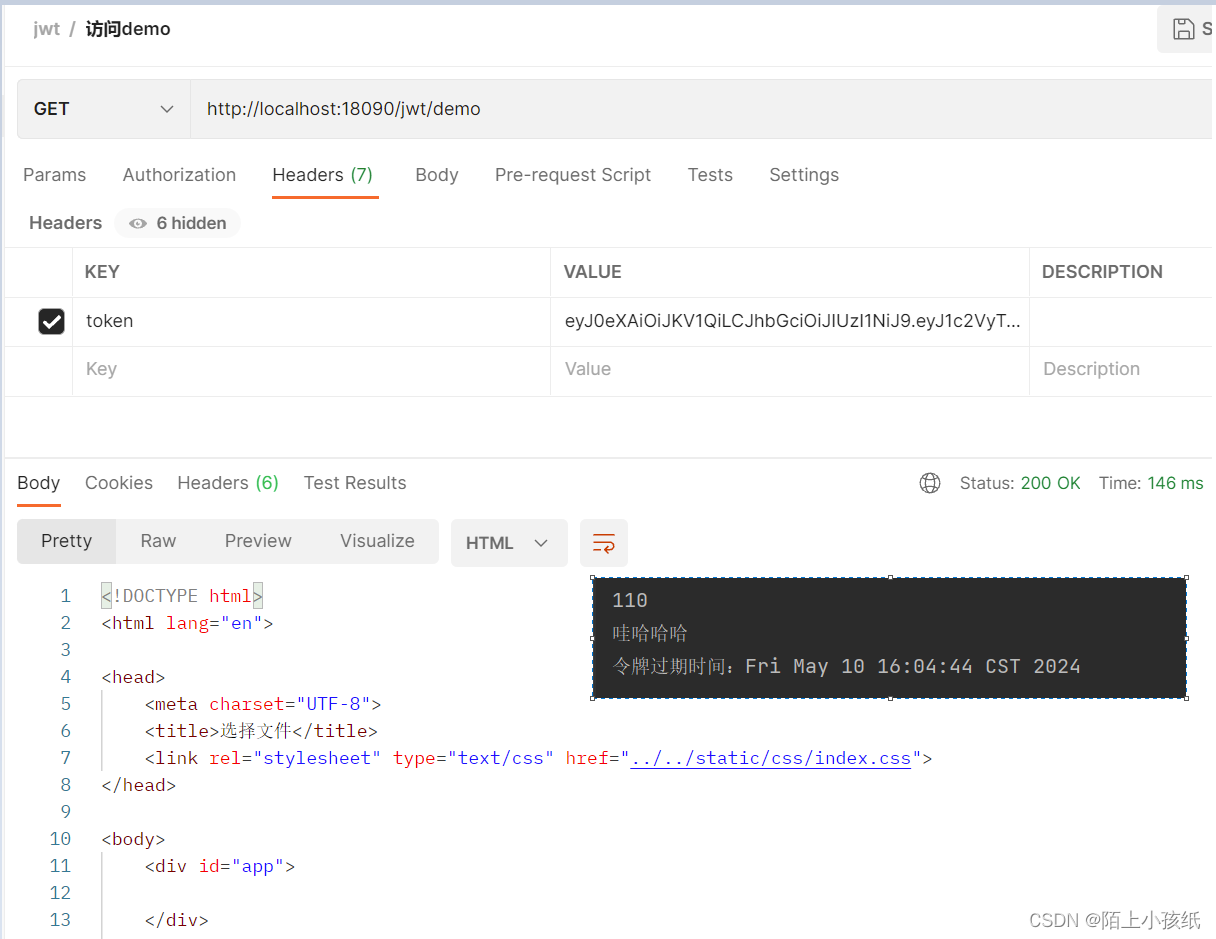
- 加入token,访问成功,同时解析出用户信息
-
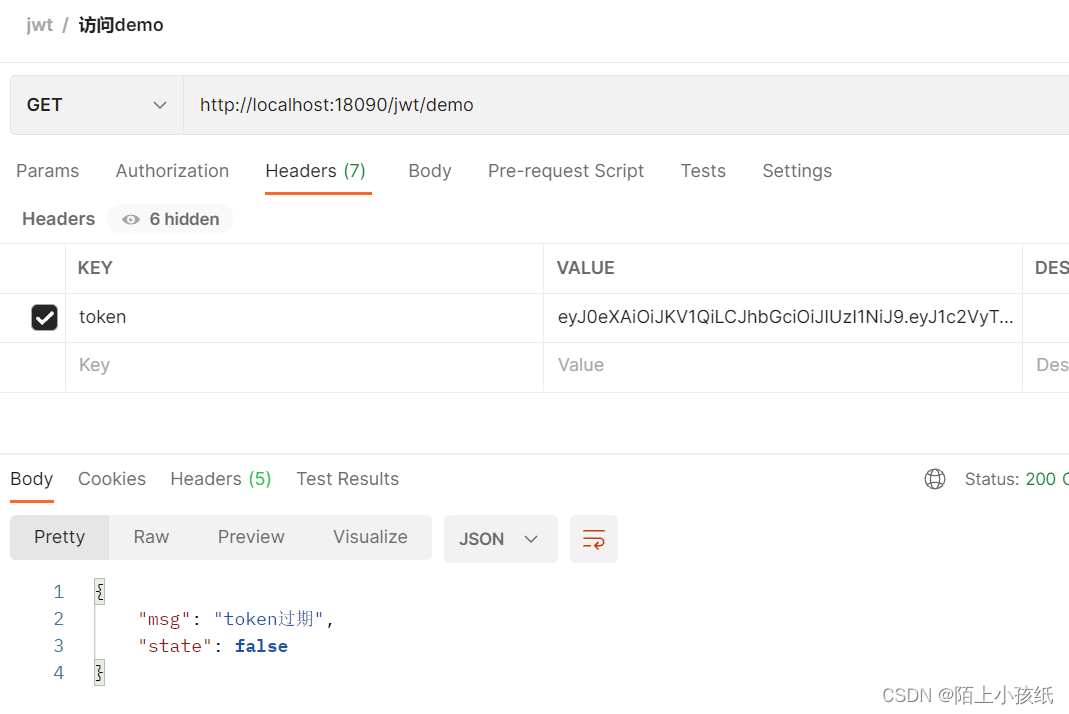
- token过期
7 LogBack生成日志文件
7.1 依赖
        <dependency>
            <groupId>org.projectlombok</groupId>
            <artifactId>lombok</artifactId>
            <optional>true</optional>
        </dependency>
7.2 yml配置
logging: #日志配置
  config:
    classpath: logback-spring.xml
7.3 在resources下新建日志配置文件logback-spring.xml
文件生成位置:D:/authorityLog/Logs/
<?xml version="1.0" encoding="UTF-8"?>
<configuration debug="false">
    <!--定义日志文件的存储地址 勿在 LogBack 的配置中使用相对路径-->
    <property name="LOG_HOME" value="D:/authorityLog/Logs/"/>
    <appender name="STDOUT" class="ch.qos.logback.core.ConsoleAppender">
        <layout class="ch.qos.logback.classic.PatternLayout">
            <!--格式化输出:%d表示日期,%thread表示线程名,%-5level:级别从左显示5个字符宽度,%line:行号,%msg:日志消息,%n是换行符-->
            <pattern>%d{yyyy-MM-dd HH:mm:ss.SSS} [%thread] %-5level %logger{50} Line:%line ----------------> %msg%n
            </pattern>
        </layout>
    </appender>
    <!-- 按照每天生成日志文件 INFO_FILE-->
    <appender name="INFO_FILE" class="ch.qos.logback.core.rolling.RollingFileAppender">
        <!-- 正在记录的日志文件的路径及文件名 -->
        <file>${LOG_HOME}/info.log</file>
        <!--日志文件最大的大小-->
        <triggeringPolicy class="ch.qos.logback.core.rolling.SizeBasedTriggeringPolicy">
            <MaxFileSize>10MB</MaxFileSize>
        </triggeringPolicy>
        <filter class="ch.qos.logback.classic.filter.LevelFilter">
            <level>INFO</level>
            <onMatch>ACCEPT</onMatch>
            <onMismatch>DENY</onMismatch>
        </filter>
        <rollingPolicy class="ch.qos.logback.core.rolling.TimeBasedRollingPolicy">
            <!--日志文件输出的文件名-->
            <FileNamePattern>${LOG_HOME}/info-%d{yyyy-MM-dd}.%i.log</FileNamePattern>
            <!--日志文件保留天数-->
            <timeBasedFileNamingAndTriggeringPolicy class="ch.qos.logback.core.rolling.SizeAndTimeBasedFNATP">
                <maxFileSize>10MB</maxFileSize>
            </timeBasedFileNamingAndTriggeringPolicy>
            <!--日志文件保留天数-->
            <maxHistory>30</maxHistory>
        </rollingPolicy>
        <encoder class="ch.qos.logback.classic.encoder.PatternLayoutEncoder">
            <pattern>%d{yyyy-MM-dd HH:mm:ss.SSS} [%thread] %-5level %logger{50} Line:%line ----------------> %msg%n
            </pattern>
            <!-- 设置字符集 -->
            <charset>UTF-8</charset>
        </encoder>
    </appender>

    <!-- 按照每天生成日志文件 WARN_FILE-->
    <appender name="WARN_FILE" class="ch.qos.logback.core.rolling.RollingFileAppender">
        <!-- 正在记录的日志文件的路径及文件名 -->
        <file>${LOG_HOME}/warn.log</file>
        <!--日志文件最大的大小-->
        <triggeringPolicy class="ch.qos.logback.core.rolling.SizeBasedTriggeringPolicy">
            <MaxFileSize>10MB</MaxFileSize>
        </triggeringPolicy>
        <filter class="ch.qos.logback.classic.filter.LevelFilter">
            <level>WARN</level>
            <onMatch>ACCEPT</onMatch>
            <onMismatch>DENY</onMismatch>
        </filter>
        <rollingPolicy class="ch.qos.logback.core.rolling.TimeBasedRollingPolicy">
            <!--日志文件输出的文件名-->
            <FileNamePattern>${LOG_HOME}/warn-%d{yyyy-MM-dd}.%i.log</FileNamePattern>
            <!--日志文件保留天数-->
            <timeBasedFileNamingAndTriggeringPolicy class="ch.qos.logback.core.rolling.SizeAndTimeBasedFNATP">
                <maxFileSize>10MB</maxFileSize>
            </timeBasedFileNamingAndTriggeringPolicy>
            <!--日志文件保留天数-->
            <maxHistory>30</maxHistory>
        </rollingPolicy>
        <encoder class="ch.qos.logback.classic.encoder.PatternLayoutEncoder">
            <pattern>%d{yyyy-MM-dd HH:mm:ss.SSS} [%thread] %-5level %logger{50} Line:%line ----------------> %msg%n
            </pattern>
            <!-- 设置字符集 -->
            <charset>UTF-8</charset>
        </encoder>
    </appender>

    <!-- 按照每天生成日志文件 ERROR_FILE-->
    <appender name="ERROR_FILE" class="ch.qos.logback.core.rolling.RollingFileAppender">
        <!-- 正在记录的日志文件的路径及文件名 -->
        <file>${LOG_HOME}/error.log</file>
        <!--日志文件最大的大小-->
        <triggeringPolicy class="ch.qos.logback.core.rolling.SizeBasedTriggeringPolicy">
            <MaxFileSize>10MB</MaxFileSize>
        </triggeringPolicy>
        <filter class="ch.qos.logback.classic.filter.LevelFilter">
            <level>ERROR</level>
            <onMatch>ACCEPT</onMatch>
            <onMismatch>DENY</onMismatch>
        </filter>
        <rollingPolicy class="ch.qos.logback.core.rolling.TimeBasedRollingPolicy">
            <!--日志文件输出的文件名-->
            <FileNamePattern>${LOG_HOME}/error-%d{yyyy-MM-dd}.%i.log</FileNamePattern>
            <!--日志文件保留天数-->
            <timeBasedFileNamingAndTriggeringPolicy class="ch.qos.logback.core.rolling.SizeAndTimeBasedFNATP">
                <maxFileSize>10MB</maxFileSize>
            </timeBasedFileNamingAndTriggeringPolicy>
            <!--日志文件保留天数-->
            <maxHistory>30</maxHistory>
        </rollingPolicy>
        <encoder class="ch.qos.logback.classic.encoder.PatternLayoutEncoder">
            <pattern>%d{yyyy-MM-dd HH:mm:ss.SSS} [%thread] %-5level %logger{50} Line:%line ----------------> %msg%n
            </pattern>
            <!-- 设置字符集 -->
            <charset>UTF-8</charset>
        </encoder>
    </appender>
    <appender name="ASYNC" class="ch.qos.logback.classic.AsyncAppender">
        <!--不丢失日志.默认的,如果队列的80%已满,则会丢弃TRACT、DEBUG、INFO级别的日志 -->
        <discardingThreshold>0</discardingThreshold>
        <!-- 更改默认的队列的深度,该值会影响性能.默认值为256 -->
        <queueSize>512</queueSize>
        <!--添加附加的appender,最多只能添加一个-->
        <appender-ref ref="ERROR_FILE"/>
    </appender>
    <root level="INFO">
        <appender-ref ref="STDOUT"/>
        <appender-ref ref="INFO_FILE"/>
        <appender-ref ref="WARN_FILE"/>
        <appender-ref ref="ERROR_FILE"/>
        <appender-ref ref="ASYNC"/>
    </root>
</configuration>
7.4 在程序中生成日志
记得加上注解@Slf4j
@Slf4j
@SpringBootApplication
public class AuthoritySystemApplication {

    public static void main(String[] args) {
        SpringApplication.run(AuthoritySystemApplication.class, args);
        log.info("大眼直转!~info");
        log.error("大眼直转!~error");
        log.warn("大眼直转!~warn");
    }

}
8 数据库连接池使用
数据库表信息: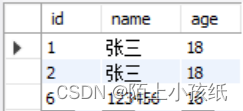
8.1 数据库基础使用
8.1.1 pom.xml
<?xml version="1.0" encoding="UTF-8"?>
<project xmlns="http://maven.apache.org/POM/4.0.0" xmlns:xsi="http://www.w3.org/2001/XMLSchema-instance"
         xsi:schemaLocation="http://maven.apache.org/POM/4.0.0 https://maven.apache.org/xsd/maven-4.0.0.xsd">
    <modelVersion>4.0.0</modelVersion>
    <parent>
        <groupId>org.springframework.boot</groupId>
        <artifactId>spring-boot-starter-parent</artifactId>
        <version>2.5.5</version>
        <relativePath/> <!-- lookup parent from repository -->
    </parent>
    <groupId>com.example</groupId>
    <artifactId>ProjectManager</artifactId>
    <version>0.0.1-SNAPSHOT</version>
    <name>ProjectManager</name>
    <description>ProjectManager</description>
    <properties>
        <java.version>1.8</java.version>
    </properties>
    <dependencies>
        <dependency>
            <groupId>org.springframework.boot</groupId>
            <artifactId>spring-boot-starter-thymeleaf</artifactId>
        </dependency>
        <dependency>
            <groupId>org.springframework.boot</groupId>
            <artifactId>spring-boot-starter-web</artifactId>
        </dependency>
        <dependency>
            <groupId>com.alibaba</groupId>
            <artifactId>fastjson</artifactId>
            <version>1.2.73</version>
        </dependency>
        <dependency>
            <groupId>org.springframework.boot</groupId>
            <artifactId>spring-boot-starter-test</artifactId>
            <scope>test</scope>
        </dependency>

        <dependency>
            <groupId>org.springframework.boot</groupId>
            <artifactId>spring-boot-starter-jdbc</artifactId>
        </dependency>
        <dependency>
            <groupId>org.mybatis.spring.boot</groupId>
            <artifactId>mybatis-spring-boot-starter</artifactId>
            <version>2.2.0</version>
        </dependency>
        <dependency>
            <groupId>mysql</groupId>
            <artifactId>mysql-connector-java</artifactId>
            <scope>runtime</scope>
        </dependency>

    </dependencies>

    <build>
        <plugins>
            <plugin>
                <groupId>org.springframework.boot</groupId>
                <artifactId>spring-boot-maven-plugin</artifactId>
            </plugin>
        </plugins>
    </build>

</project>
8.1.2 application.yml
主要是关注
spring.datasource和mybatis的配置信息
server:
  port: 18090

spring:
  datasource:
    url: jdbc:mysql://127.0.0.1:3306/test?serverTimezone=Asia/Shanghai&useUnicode=true&characterEncoding=utf8&allowMultiQueries=true
    username: root
    password: 123456
    driver-class-name: com.mysql.cj.jdbc.Driver
  # 设置页面访问资源
  mvc:
    static-path-pattern: /static/**
  web:
    resources:
      static-locations: classpath:/static,classpath:/public,classpath:/resources,classpath:/META-INF/resources
  # 设置单个文件大小
  servlet:
    multipart:
      max-file-size: 500MB
      max-request-size: 1024MB

mybatis: #resources下新建的放置mapper文件的文件夹应与此处同名
  mapper-locations: classpath:mapper/*.xml
  #type-aliases-package: com.lzh.authoritysystem.model

#banner使用
application:
  auth: LZHZL
  version: 0.0.1
8.1.3 mapper
package com.example.projectmanager.mapper;

import org.apache.ibatis.annotations.Mapper;

import java.util.List;

@Mapper
public interface TestMapper {
    List userList();
}
8.1.4 mapper.xml
在
resources下新建mapper文件夹,在该文件夹下新建各mapper接口对应的sql配置文件
<?xml version="1.0" encoding="UTF-8"?>
<!DOCTYPE mapper PUBLIC "-//mybatis.org//DTD Mapper 3.0//EN" "http://mybatis.org/dtd/mybatis-3-mapper.dtd" >
<mapper namespace="com.example.projectmanager.mapper.TestMapper">

    <select id="userList"  resultType="java.util.HashMap">
        SELECT * FROM test1
    </select>

</mapper>
8.1.5 service、impl
package com.example.projectmanager.service;

import java.util.List;

public interface TestService {
    List userList();
}
package com.example.projectmanager.service.impl;

import com.example.projectmanager.mapper.TestMapper;
import com.example.projectmanager.service.TestService;
import org.springframework.beans.factory.annotation.Autowired;
import org.springframework.stereotype.Service;

import java.util.List;

@Service
public class TestServiceImpl implements TestService {

    @Autowired
    private TestMapper testMapper;

    @Override
    public List userList() {
        return testMapper.userList();
    }
}
8.1.6 controller
package com.example.projectmanager.controller;

import com.alibaba.fastjson.JSON;
import com.alibaba.fastjson.JSONArray;
import org.springframework.beans.factory.annotation.Autowired;
import org.springframework.web.bind.annotation.GetMapping;
import org.springframework.web.bind.annotation.RequestMapping;
import org.springframework.web.bind.annotation.RestController;
import org.springframework.web.servlet.ModelAndView;
import com.example.projectmanager.service.TestService;

import java.util.List;

@RestController
@RequestMapping("/druid")
public class TestController {

    @Autowired
    private TestService testService;

    @GetMapping("/getUsers")
    public JSONArray getUsers(){
        List list = testService.userList();
        JSONArray res = JSONArray.parseArray(JSON.toJSONString(list));
        return res;
    }

}
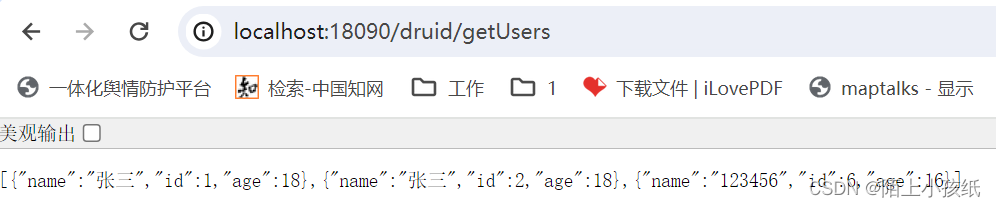
8.1.7 测试
8.2 Druid使用
8.2.1 依赖
        <dependency>
            <groupId>com.alibaba</groupId>
            <artifactId>druid-spring-boot-starter</artifactId>
            <version>1.2.6</version>
        </dependency>
8.2.2 yml
server:
  port: 18090

spring:
  datasource:
    url: jdbc:mysql://127.0.0.1:3306/test?serverTimezone=Asia/Shanghai&useUnicode=true&characterEncoding=utf8&allowMultiQueries=true
    username: root
    password: 123456
    driver-class-name: com.mysql.cj.jdbc.Driver
    # Druid相关配置
    type: com.alibaba.druid.pool.DruidDataSource
    # 初始连接数
    initialSize: 5
    # 最小连接池数量
    minIdle: 10
    # 最大连接池数量
    maxActive: 20
    # 配置获取连接等待超时的时间
    maxWait: 60000
    # 配置间隔多久才进行一次检测,检测需要关闭的空闲连接,单位是毫秒
    timeBetweenEvictionRunsMillis: 60000
    # 配置一个连接在池中最小生存的时间,单位是毫秒
    minEvictableIdleTimeMillis: 300000
    # 配置一个连接在池中最大生存的时间,单位是毫秒
    maxEvictableIdleTimeMillis: 900000
    # 配置检测连接是否有效
    validationQuery: SELECT 1 FROM test1
    testWhileIdle: true
    testOnBorrow: false
    testOnReturn: false
    druid:
      web-stat-filter:
        # 开启WebStatFilter
        enabled: true
        # 配置拦截规则,这里设置所有
        url-pattern: /*
        # 排除一些不会涉及到 SQL 查询的 URL
        exclusions: /*
        # 开启 session 统计功能
        session-stat-enable: true
        # 缺省 sessionStatMaxCount 值为 1000 ,开发者可按需进行配置
        session-stat-max-count: 1000
      stat-view-servlet:
        # 启用内置的监控页面
        enabled: true
        # 内置监控页面的 URL 地址
        url-pattern: /druid/*
        # 开启 Reset All 功能,注意值设置为false,按钮会显示,但是点击没有反应
        reset-enable: true
        # 设置监控页面登录用户名
        login-username: lzh
        # 设置监控页面登录密码
        login-password: 123456
        # 设置白名单(如果allow没有配置或者为空,表示允许所有访问)
        allow: 127.0.0.1
        # 黑名单(注意 deny 的优先级高于 allow,即只有在 deny 列表中,那么即使在 allow 列表中,也会被拒绝)
        deny:
      # 过滤器设置
      filters: stat
8.2.3 测试
访问http://localhost:18090/druid/login.html链接,展示【druid】后台监控页面。
注意,controller中的请求url,不要有druid,不然后重定向监控页面!
9 文件操作
9.1 txt
9.1.1 读取txt
	/**
     * 读txt文件,按行读,每行一个String存入List返回
     * @param txtpath D:/save-file-gaw/1.txt
     * @return
     */
    public JSONArray readStringFromtxt(String txtpath) {
        JSONArray jsonArray = new JSONArray();
        File file = new File(txtpath);
        //StringBuilder result = new StringBuilder();
        try {
            BufferedReader br = new BufferedReader(new FileReader(file));
            String str = null;
            while ((str = br.readLine()) != null) {
                //result.append(System.lineSeparator() + s);
                JSONObject jsonObject = JSONObject.parseObject(str);
                //System.out.println("保持一致性读取txt中的数据:" + jsonObject.toJSONString());
                jsonArray.add(jsonObject);
            }
            br.close();
        } catch (Exception e) {
            e.printStackTrace();
            return null;
        }
        return jsonArray;
    }
9.1.2 新建文件、写入txt
	/**
     * 写入txt文件---覆盖写
     * @param txtpath D:/save-file-gaw/1.txt
     * @param str
     * @return
     */
    public int writeStringToTxt_fg(String txtpath, String str) throws IOException {
        File file = new File(txtpath);
        if(!file.exists()){
            file.createNewFile();
        }
        BufferedWriter bwriter;
        try {
            bwriter = new BufferedWriter(new OutputStreamWriter(new FileOutputStream(file)));
            bwriter.write(str);
            bwriter.flush();
            bwriter.close();
        } catch (Exception e) {
            e.printStackTrace();
        }
        return 0;
    }

    /**
     * 写入txt文件---追加写
     * @param txtpath
     * @param str
     * @return
     */
    public int writeStringToTxt_zj(String txtpath, String str) throws IOException {
        File file = new File(txtpath);
        if(!file.exists()){
            file.createNewFile();
        }
        try {
            // 打开一个随机访问文件流,按读写方式
            RandomAccessFile randomFile = new RandomAccessFile(txtpath, "rw");
            // 文件长度,字节数
            long fileLength = randomFile.length();
            // 将写文件指针移到文件尾。
            randomFile.seek(fileLength);
            randomFile.writeBytes(str + "\r\n");
            randomFile.close();
        } catch (IOException e) {
            e.printStackTrace();
        }
        return 0;
    }
9.1.3 创建文件夹、保存接收的文件
	//保存接收的文件
	public int saveFile(MultipartFile file){
        // 构建上传文件的存放 "文件夹" 路径
        String fileDirPath = "src/main/resources/temp";
        File fileDir = new File(fileDirPath);
        if(!fileDir.exists()){
            // 生成文件夹
            fileDir.mkdirs();
        }
        // 拿到文件名
        String filename = file.getOriginalFilename();
        if(!(filename.endsWith(".doc") || filename.endsWith(".docx"))){
            return "请上传Word文档";
        }
        // 输出文件夹绝对路径  -- 这里的绝对路径是相当于当前项目的路径而不是“容器”路径
        System.out.println("文件绝对路径为:" + fileDir.getAbsolutePath());
        try {
            // 构建真实的文件路径
            File newFile = new File(fileDir.getAbsolutePath() + File.separator + filename);
            System.out.println("文件路径为" + newFile.getAbsolutePath());
            // 上传文件到 -》 “绝对路径”
            file.transferTo(newFile);
        } catch (IOException e) {
            e.printStackTrace();
            return 0;
        }
        return 1;
   	}
9.1.4 删除文件、删除文件夹
	// 需要注意的是当删除某一目录时,必须保证该目录下没有其他文件才能正确删除,否则将删除失败。
	// String fileDirPath = "src/main/resources/temp";
	// String fileDirPath = "src/main/resources/temp/1.doc";
    // File fileDir = new File(fileDirPath);
    public void deleteFolder(File folder) throws Exception {
        if (!folder.exists()) {
            throw new Exception("文件不存在");
        }
        File[] files = folder.listFiles();
        if (files != null) {
            for (File file : files) {
                if (file.isDirectory()) {
                    //递归直到目录下没有文件
                    deleteFolder(file);
                } else {
                    //删除文件
                    file.delete();
                }
            }
        }
        //删除自身
        folder.delete();
    }


 23万+
23万+


 被折叠的 条评论
为什么被折叠?
被折叠的 条评论
为什么被折叠?
 到【灌水乐园】发言


