


文章目录
离线环境搭建
1 配置Maven
1.1 安装

- 配置环境变量
(1) 新建M2_HOME,值为D:\apache-maven-3.6.2
(2) 在Path中新增%M2_HOME%\bin - cmd查看版本信息:
mvn -v
1.2 repository下载
下载地址
也可以直接把自己常用的一个本地仓库复制到内网中
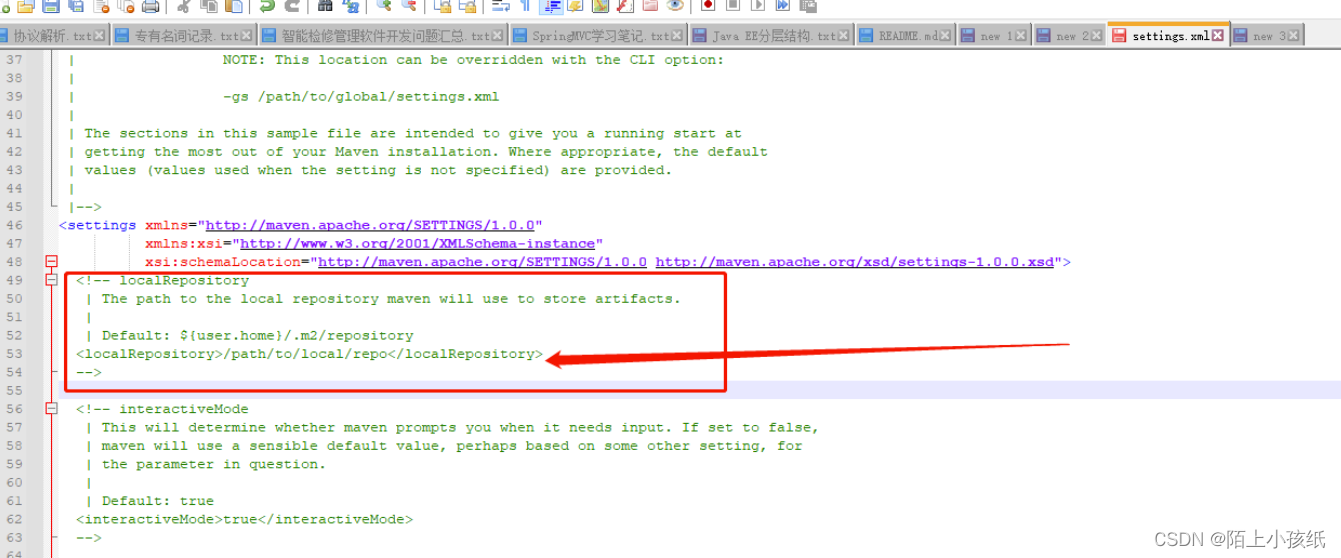
1.3 setting.xml
maven全局配置文件settings.xml详解
setting.xml 位于 D:\apache-maven-3.6.2\conf 下
<?xml version="1.0" encoding="UTF-8"?>

<settings xmlns="http://maven.apache.org/SETTINGS/1.0.0"
          xmlns:xsi="http://www.w3.org/2001/XMLSchema-instance"
          xsi:schemaLocation="http://maven.apache.org/SETTINGS/1.0.0 http://maven.apache.org/xsd/settings-1.0.0.xsd">

  <localRepository>F:\myCenterRepository</localRepository>
  <offline>false</offline>

</settings>
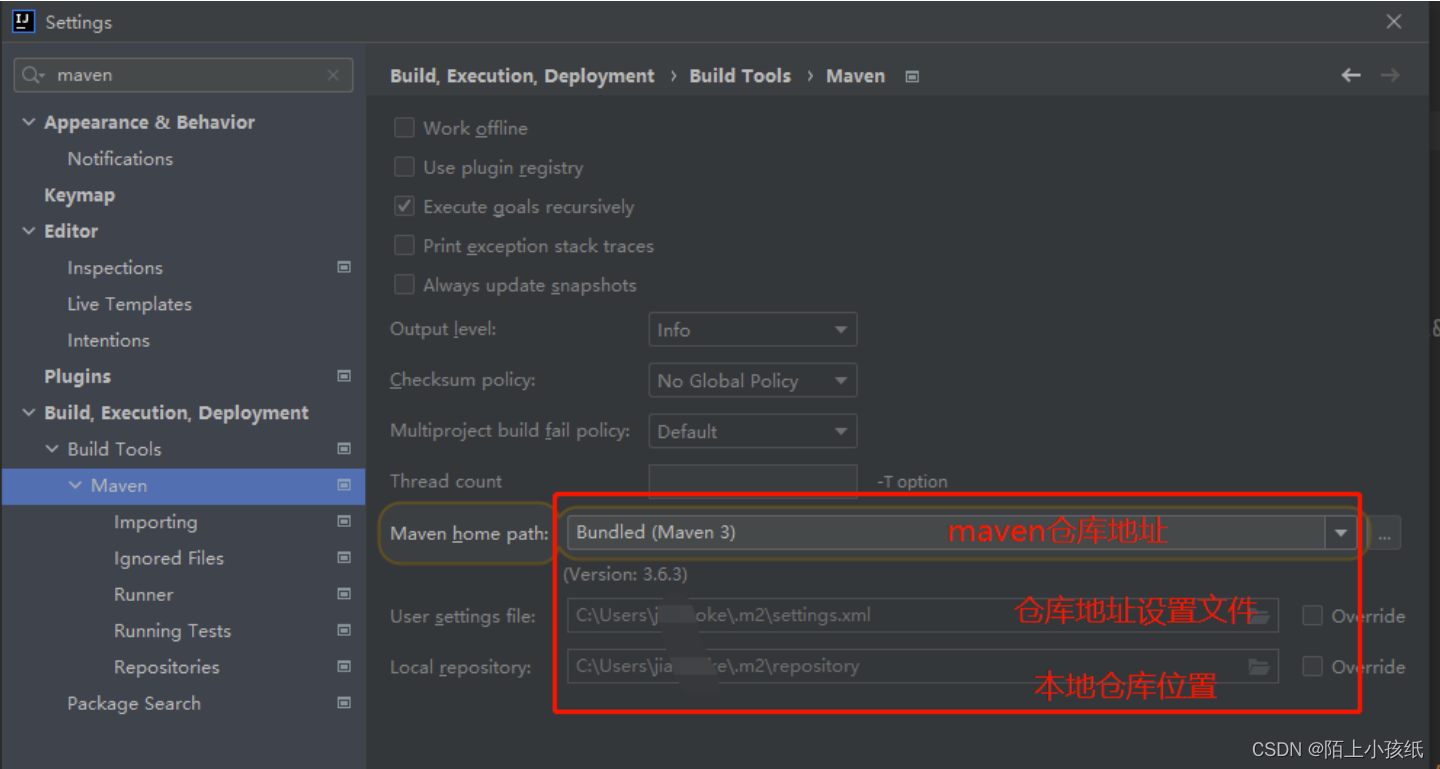
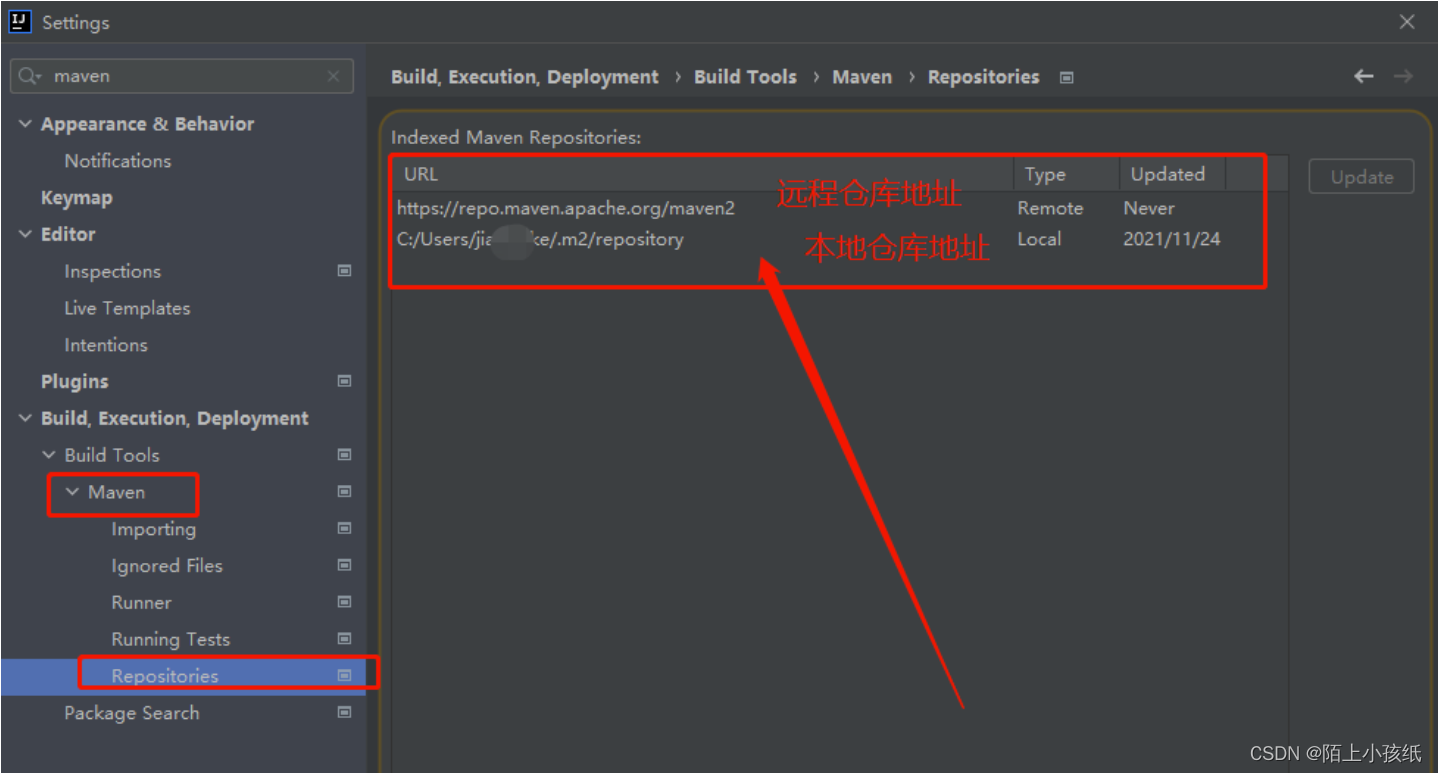
配置maven
File -> Settings -> Build,Execution,Deployment -> Build Tools -> Maven
2 配置jdk
下载安装教程
配置位置:File -> Project Structure -> Project SDK
3 构建SpringBoot项目
- 新建
Maven项目,一直next即可 - 配置
pom
<?xml version="1.0" encoding="UTF-8"?>
<project xmlns="http://maven.apache.org/POM/4.0.0"
         xmlns:xsi="http://www.w3.org/2001/XMLSchema-instance"
         xsi:schemaLocation="http://maven.apache.org/POM/4.0.0 http://maven.apache.org/xsd/maven-4.0.0.xsd">
    <modelVersion>4.0.0</modelVersion>

    <groupId>org.fri</groupId>
    <artifactId>test</artifactId>
    <version>1.0-SNAPSHOT</version>

    <parent>
        <groupId>org.springframework.boot</groupId>
        <artifactId>spring-boot-starter-parent</artifactId>
        <version>2.7.12</version>
        <relativePath/> <!-- lookup parent from repository -->
    </parent>


    <dependencies>
        <dependency>
            <groupId>org.springframework.boot</groupId>
            <artifactId>spring-boot-starter-web</artifactId>
        </dependency>
        <dependency>
            <groupId>org.springframework.boot</groupId>
            <artifactId>spring-boot-starter-thymeleaf</artifactId>
        </dependency>
    </dependencies>

</project>
resources下新建application.yml
server:
  port: 8090
resources下新建tempaltes文件夹,并创建index.htmljava下新建TestApplication
package com.fri.test;

import org.springframework.boot.SpringApplication;
import org.springframework.boot.autoconfigure.SpringBootApplication;

@SpringBootApplication
public class TestApplication {

    public static void main(String[] args) {
        SpringApplication.run(TestApplication.class, args);
    }
}
java下新建TestController
package com.fri.test.controller;

import org.springframework.web.bind.annotation.GetMapping;
import org.springframework.web.bind.annotation.RequestMapping;
import org.springframework.web.bind.annotation.RestController;

@RestController
@RequestMapping("/test")
public class TestController {

    @GetMapping("/get")
    public String getTest(){
        return "HelloWorld";
    }
}
- 此时即可访问
localhost:8090、localhost:8090\test\get
4 遇到的问题
4.1 idea在离线情况下使用repository仓库后编译一直显示Could not transfer artifact org.springframew
问题描述: 一直无法加载本地仓库,直接根据默认自带配置中的链接去网上中央仓库下载。
解决办法:直接在setting.xml里根据需要去配置相应的东西,从根本上解决这个问题。
- 配置本地仓库和setting.xml
- 即使是配置了仓库地址,idea2019也可能不会去本地仓库去找,这可能是idea2019的一个bug.
此时应该直接修改本地仓库的settings.xml.
我们直接在这个后面追加一下地址就好
<!-- 本地仓库地址-->
<localRepository>${user.home}/.m2/repository</localRepository>
<!-- 离线网络设置,false为离线状态,true为在线状态-->
<offline>false</offline>
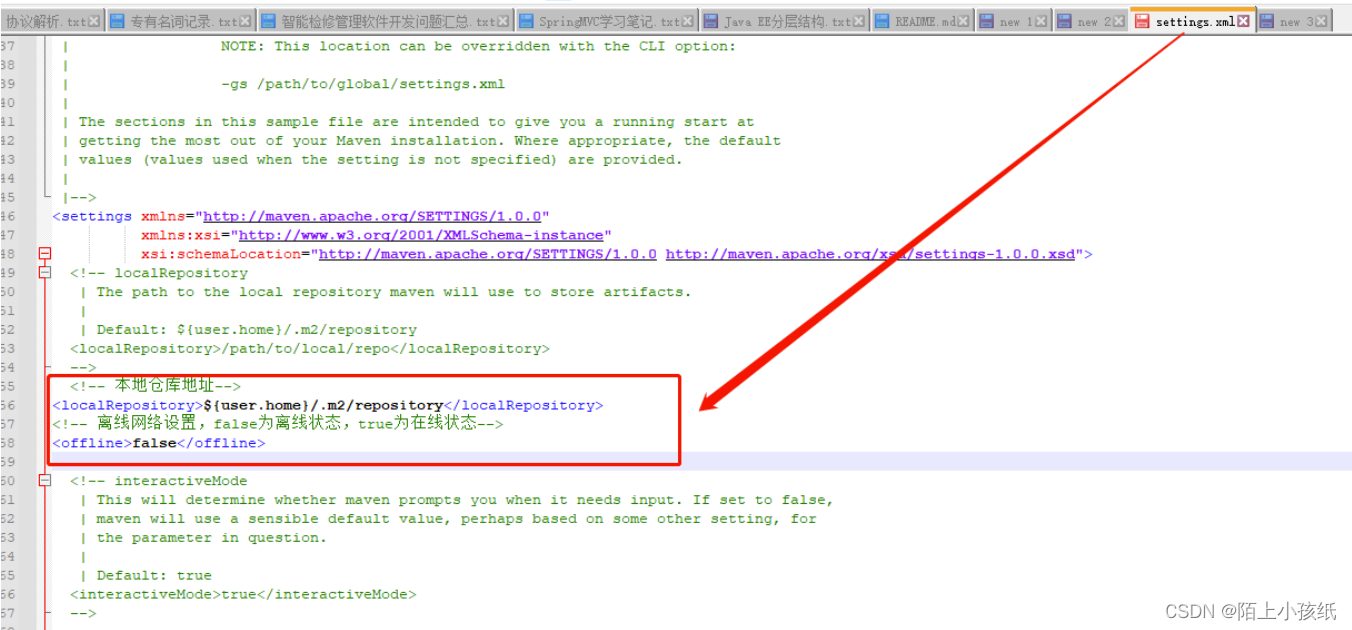
然后这样就可以确保idea2019在离线的状态下也能读取到本地仓库。
之后就可以顺利的clean\package\install等操作了,不同的项目,选择对应项目的不同仓库完全没有问题.
4.2 导入新的springboot项目启动时提示程序包不存在,但没有报红
问题描述:明明项目的maven依赖什么的都配好了,也没有报红,但是启动的时候就是报错,报的错是程序包不存在,这种情况就容易让新入门的小伙伴们摸不着头脑,明明依赖什么的都配置好了,代码也没爆红,但是就是启动不起来。
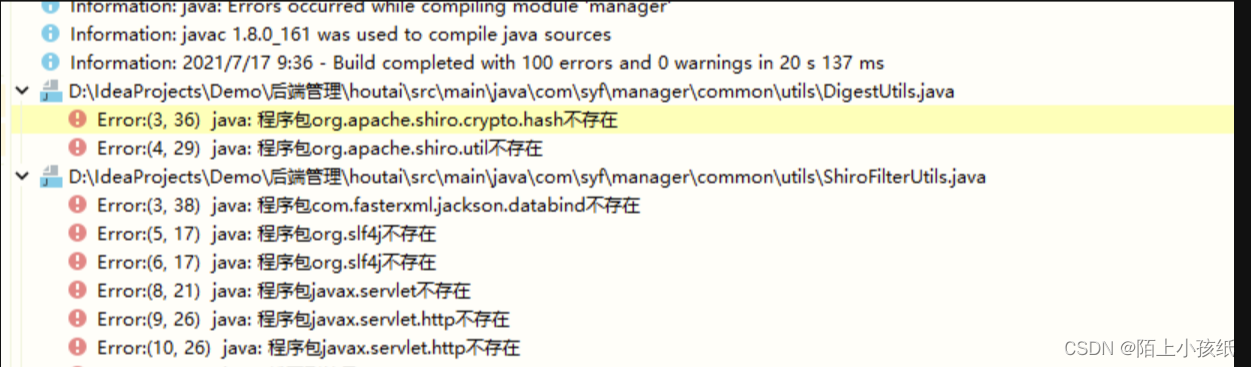
解决办法: 这是因为我们没有把这个项目交给idea进行maven管理,下面便是怎么将新项目交给idea进行maven管理
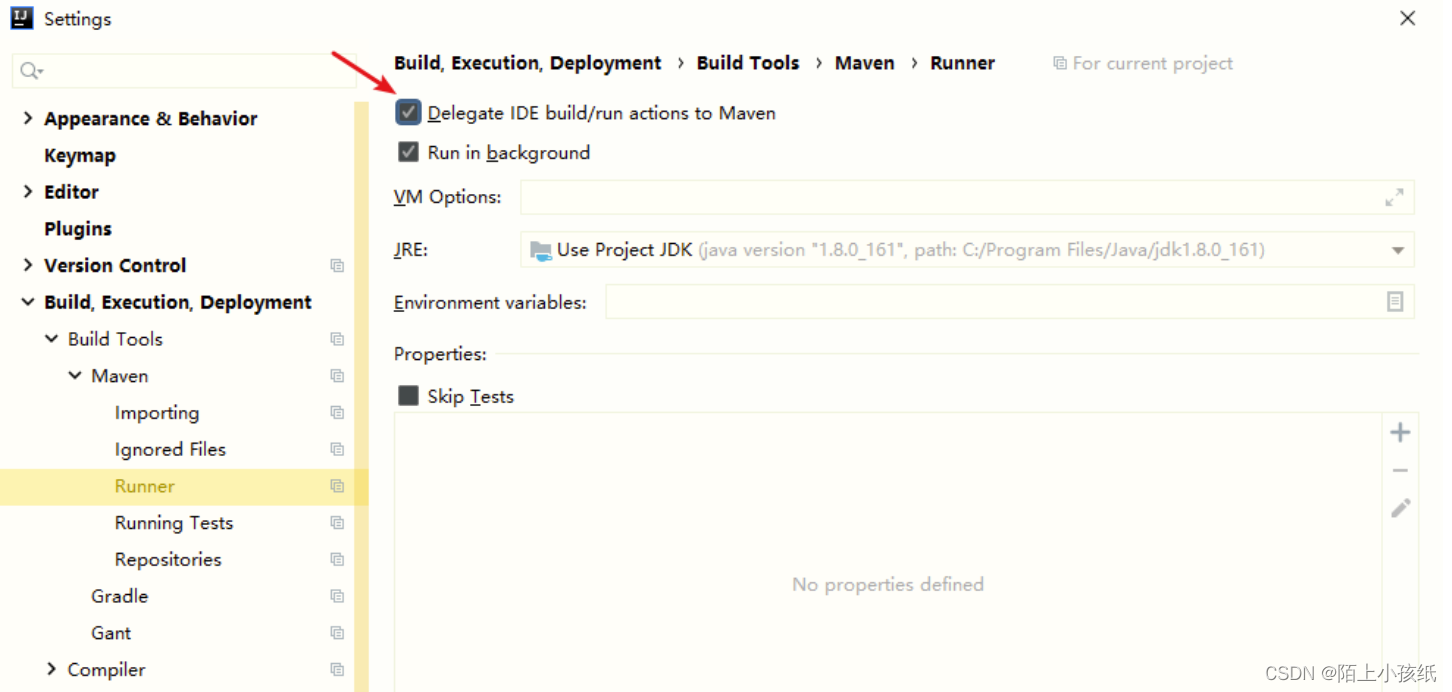
将设置中的这个勾选上就好了,就可以正常启动了。
2 后台发送、接受请求
2.1 引入JSON处理依赖
<dependency>
    <groupId>com.alibaba</groupId>
    <artifactId>fastjson</artifactId>
    <version>1.2.73</version>
</dependency>
2.2 发送对象
@GetMapping("postData")
public String postData() throws SQLException {
    String txt_path = "D:\\ProjectsCode\\PutData\\test.txt";
    Util util = new Util();
    //查询txt数据
    JSONArray txt_list = util.readStringFromtxt(txt_path);
    String url = "http://192.168.43.83:8082/yisuo/api/saveData";
    //发送Post数据并返回数据
    JSONObject post_result = util.sendPostRequest(url, txt_list);
    return "index";
}


/**
 * 向目的URL发送post请求
 * @param url       目的url
 * @param params    发送的参数
 * @return  ResultVO
 */
public JSONObject sendPostRequest(String url, JSONArray params){
    RestTemplate restTemplate = new RestTemplate();
    HttpHeaders headers = new HttpHeaders();
    MediaType type = MediaType.parseMediaType("application/json; charset=UTF-8");
    headers.setContentType(type);
    headers.add("Accept", MediaType.APPLICATION_JSON.toString());
    HttpEntity formEntity = new HttpEntity(params, headers);
    JSONObject result = restTemplate.postForObject(url, formEntity, JSONObject.class);
    return result;
}
2.3 接收对象
@PostMapping("saveData")
@ResponseBody
public String getData(@RequestBody JSONArray mysqlList) throws SQLException {
    JSONObject jsonObject_return = new JSONObject();
    System.out.println(jsonObject_return);
    return jsonObject_return.toJSONString();
}
2.4 发送文件
@GetMapping("postFile")
public String postFile() throws SQLException {
    String txt_path = "D:\\ProjectsCode\\PutData\\test.txt";
    String url = "http://192.168.43.83:8082/yisuo/api/saveFile";
    Util util = new Util();
    JSONObject post_result = util.sendPostFileRequest(url, txt_path);
    return "index";
}

/**
 * 向目的URL发送post请求
 * @param url       目的url
 * @param txt_path    发送的参数
 * @return  ResultVO
 */
public JSONObject sendPostFileRequest(String url, String txt_path){
    try {//构造请求头
        HttpHeaders headers = new HttpHeaders();
        MediaType type = MediaType.parseMediaType("multipart/form-data");
        headers.setContentType(type);

        //FileSystemResource将文件变成流以发送
        FileSystemResource fileSystemResource = new FileSystemResource(txt_path);

        //构造请求体,使用LinkedMultiValueMap
        MultiValueMap<String, Object> resultMap = new LinkedMultiValueMap<>();
        resultMap.add("file", fileSystemResource);
        //resultMap.add("filename", fileName);

        //HttpEntity封装整个请求报文
        HttpEntity<MultiValueMap<String, Object>> httpEntity = new HttpEntity<>(resultMap, headers);

        //postForObject发送请求体
        RestTemplate restTemplate = new RestTemplate();
        JSONObject result = restTemplate.postForObject(url, httpEntity, JSONObject.class);
        System.out.println("result = " + result.toString());
        if(result.getInteger("code") == 200){
            File file = new File(txt_path);
            String newpath = txt_path.replaceAll(file.getName(), "yfs_" + file.getName());
            file.renameTo(new File(newpath));
        }
        return result;
    } catch(Exception e){
        e.printStackTrace();
    }
    return null;
}
2.5 接收文件
@PostMapping("saveFile")
@ResponseBody
public String getFile(@RequestParam(value = "file") MultipartFile file) throws SQLException {
    JSONObject jsonObject_return = new JSONObject();
    int res = saveFile(file);
    System.out.println(jsonObject_return);
    return jsonObject_return.toJSONString();
}

public int saveFile(MultipartFile file) {
    String txt_path = operationUtils.saveFolderPath;
    String filename = file.getOriginalFilename();
    File newFile = new File(txt_path + filename );
    try{
        log.info("执行保存txt文件---" + filename);
        file.transferTo(newFile);
    }catch (Exception e){
        log.info("执行保存txt文件---保存失败");
        e.printStackTrace();
        return 0;
    }
    return 1;
}
3 工具类注入Bean
@Component
public class Util {

    @Autowired
    private DataSource dataSource;
    public static Util operationUtils;
    @PostConstruct
    public void init() {
        operationUtils = this;
        operationUtils.dataSource = this.dataSource;
    }

    public JSONArray selectData() throws SQLException {
         conn = operationUtils.dataSource.getConnection();
  }
}
4 读取yml中配置参数
4.1 yml添加参数
data:
    #公安网后置机保存txt文件的位置
    folderPath: D:/save-file/
    #公安网后置机发送数据的接口
    saveDataUrl: http://192.168.8.100:18093/yisuo/api/saveData
在Controller中直接使用@Value读取参数
4.2 在工具类中使用参数
@Component
public class Util {

    public static Util operationUtils;
    @PostConstruct
    public void init() {
        operationUtils = this;
        operationUtils.folderPath = this.folderPath;
        operationUtils.saveDataUrl = this.saveDataUrl;

    }

    //保存数据的txt文件夹路径
    @Value("${data.folderPath}")
    private String folderPath;
    public String getFolderPath(){ //在其它类中调用
        return operationUtils.folderPath;
    }
    //接受数据的接口地址
    @Value("${data.saveDataUrl}")
    private String saveDataUrl;
    public String getSaveDataUrl(){ //在其它类中调用
      return operationUtils.saveDataUrl;
    }
}
5 配置Springboot自带的数据库连接池
		<dependency>
            <groupId>org.springframework.boot</groupId>
            <artifactId>spring-boot-starter-jdbc</artifactId>
        </dependency>
        <dependency>
            <groupId>mysql</groupId>
            <artifactId>mysql-connector-java</artifactId>
            <scope>runtime</scope>
        </dependency>
        <dependency>
            <groupId>com.alibaba</groupId>
            <artifactId>fastjson</artifactId>
            <version>1.2.73</version>
        </dependency>
5.1 发送文件时显示文件过大
Springboot自带的tomcat发送文件最大为1M
spring:
  datasource:
    url: jdbc:mysql://127.0.0.1:3306/mysql?serverTimezone=Asia/Shanghai&useUnicode=true&characterEncoding=utf8&allowMultiQueries=true
    username: root
    password: 123456
    driver-class-name: com.mysql.cj.jdbc.Driver
  type: com.zaxxer.hikari.HikariDataSource
  hikari:
    ## 最小空闲连接数量
    minimum-idle: 5
    ## 空闲连接存活最大时间,默认600000(10分钟)
    idle-timeout: 180000
    ## 连接池最大连接数,默认是10
    maximum-pool-size: 500
    ## 此属性控制从池返回的连接的默认自动提交行为,默认值:true
    auto-commit: true
    ## 连接池母子
    pool-name: MyHikariCP
    ## 此属性控制池中连接的最长生命周期,值0表示无限生命周期,默认1800000即30分钟
    max-lifetime: 1800000
    ## 数据库连接超时时间,默认30秒,即30000
    connection-timeout: 30000
    connection-test-query: SELECT 1
  #文件过大解决办法
  servlet:
    multipart:
      max-file-size: 500MB  #单个数据大小
      max-request-size: 1024MB  #总数居大小
5.2 insert
捕获主键冲突
import org.springframework.beans.factory.annotation.Autowired;
import org.springframework.stereotype.Component;

import javax.annotation.PostConstruct;
import javax.sql.DataSource;
import java.sql.Connection;
import java.sql.SQLException;
import java.sql.Statement;


@Slf4j
@Component
public class Util {

    @Autowired
    private DataSource dataSource;
    public static Util operationUtils;

    @PostConstruct
    public void init() {
        operationUtils = this;
        operationUtils.dataSource = this.dataSource;
    }

 	/**
     * 将接收到的数据列表,逐个保存至数据库
     * @param jsonObject
     * @return
     * @throws SQLException
     */
    public int saveDatatoMysql(JSONObject jsonObject) throws SQLException {
        //log.info("插入数据库: " + jsonObject.toJSONString());
        Connection conn = null;
        Statement stmt = null;
        String sql = "insert into tableName(id,name,age) values (1, '张三', 18);"
        //1.获取连接(从连接池获取)
        try {
            conn = operationUtils.dataSource.getConnection();
            //2.创建statement对象
            stmt = conn.createStatement();
            //3.发送sql
            stmt.execute(sql.toString());
        } catch (Exception e) {
            e.printStackTrace();
            String errorCode = getErrorCode(e);
            if(errorCode.indexOf("Duplicate entry") >= 0){
                log.info("执行保存sql---主键重复");
                return -1;
            }
            log.info("执行保存sql---保存失败");
            return 0;
        } finally {
            //5.释放资源
            if(stmt!=null)try{stmt.close();}catch(SQLException e1){}
            if(conn!=null)try{conn.close();}catch(SQLException e1){}
        }
        return 1;
    }
    private String getErrorCode(Exception e){
        String errorCode = "";
        if(e.getCause() != null && e.getCause().getMessage() != null){
            errorCode = e.getCause().getMessage();
        }
        if(errorCode.length()==0 && e.getMessage() != null){
            errorCode = e.getMessage();
        }
        return errorCode;
    }
}
5.3 select
    /**
     * 查询数据库中的数据,返回JSONArray
     * @return
     * @throws SQLException
     */
    public JSONArray selectData(String datatime) throws SQLException, ParseException {
        //datetime 2022-09-09-10
        SimpleDateFormat sdf = new SimpleDateFormat("yyyy-MM-dd HH");
        SimpleDateFormat simpleDateFormat = new SimpleDateFormat("yyyy-MM-dd-HH");
        Date date =  simpleDateFormat.parse(datatime);
        String nextdatetime = sdf.format(new Date(date.getTime() + 1000*60*60));
        String dateStr = sdf.format(date);

        Connection conn = null;
        Statement stmt = null;
        ResultSet rs = null;
        String sql = "select * from tableName where datetime between '" + dateStr + "' and '" + nextdatetime + "'";
        JSONArray jsonArray = new JSONArray();
        //1.获取连接(从连接池获取)
        try {
            conn = operationUtils.dataSource.getConnection();
            //2.创建statement对象
            stmt = conn.createStatement();
            //3.发送sql
            rs = stmt.executeQuery(sql);
            if(rs != null){
                //4.处理结果
                ResultSetMetaData rsmd = rs.getMetaData(); //获取结果集中的元数据(描述数据的数据)
                while (rs.next()) {
                    jsonArray.add(formalDataToJSONObject(rsmd, rs));
                }
            }
        } catch (Exception e) {
            log.info("根据文件名读取数据库中数据时---失败");
            e.printStackTrace();
            return null;
        } finally {
            //5.释放资源
            if(rs!=null)try{rs.close();}catch(SQLException e1){}
            if(stmt!=null)try{stmt.close();}catch(SQLException e1){}
            if(conn!=null)try{conn.close();}catch(SQLException e1){}
        }
        return jsonArray;
    }

	 /**
     * 将查询数据库返回的数据格式化为Map
     * @param rsmd
     * @param rs
     * @return
     * @throws SQLException
     */
    public JSONObject formalDataToJSONObject(ResultSetMetaData rsmd, ResultSet rs) throws SQLException {
        JSONObject jsonObject = new JSONObject();
        for (int i = 1; i <= rsmd.getColumnCount(); i++) {//循环取出所有字段的值
            Object o = rs.getObject(rsmd.getColumnName(i));
            if(o == null){
                continue;
            }
            jsonObject.put(rsmd.getColumnName(i), o.toString());
        }
        return jsonObject;
    }
5.4 update
	/**
     * 将推送的最后一条数据的id存至数据库
     * @param id
     * @return
     * @throws SQLException
     */
    public int saveCurrentIdtoMysql(int age) {
        Connection conn = null;
        Statement stmt = null;
        String sql = "update tableName set age = "+ age + " where id = 0";
        //1.获取连接(从连接池获取)
        try {
            conn = operationUtils.dataSource.getConnection();
            //2.创建statement对象
            stmt = conn.createStatement();
            //3.发送sql
            stmt.execute(sql);
        } catch (Exception e) {
            log.info("执行保存推送数据id的sql---保存失败");
            e.printStackTrace();
            return 0;
        } finally {
            //5.释放资源
            if(stmt!=null)try{stmt.close();}catch(SQLException e1){}
            if(conn!=null)try{conn.close();}catch(SQLException e1){}
        }
        return 1;
    }
5.5 delete
    /**
     * 删除数据
     * @return
     * @throws SQLException
     */
    public boolean deleteData(JSONObject oneData) throws SQLException {
        System.out.println("开始删除数据:" + oneData.toJSONString());
        Connection conn = null;
        Statement stmt = null;
        boolean rs = false;
        List list = new ArrayList<>();
        //1.获取连接(从连接池获取)
        try {
            String sql = "delete from tableName where id = " + oneData.getInteger("id");
            conn = operationUtils.dataSource.getConnection();
            //2.创建statement对象
            stmt = conn.createStatement();
            //3.发送sql
            rs = stmt.execute(sql);
            System.out.println("删除数据成功");
        } catch (Exception e) {
            e.printStackTrace();
            log.info("删除数据出现异常");
        } finally {
            //5.释放资源
            if(stmt!=null)try{stmt.close();}catch(SQLException e1){}
            if(conn!=null)try{conn.close();}catch(SQLException e1){}
        }
        return rs;
    }
5.6 JdbcTemplate
package com.example.wordtool.util;

import com.alibaba.fastjson.JSONObject;
import org.springframework.beans.factory.annotation.Autowired;
import org.springframework.jdbc.core.JdbcTemplate;
import org.springframework.stereotype.Component;

import javax.annotation.PostConstruct;
import java.util.List;

@Component
public class Util {
    @Autowired
    private JdbcTemplate jdbcTemplate;
    public static Util operationUtils;

    @PostConstruct
    public void init() {
        operationUtils = this;
        operationUtils.jdbcTemplate = this.jdbcTemplate;
    }

    /**
     * 插入数据
     * @return 插入影响的行数
     */
    public Integer insertUser(){
        String sql = "insert into test1(id, name, age) values(?, ?, ?), (?, ?, ?)";
        Object args[] = new Object[]{5, "admin", 10, 6, "123456", 16};
        //参数一:插入数据的SQL语句,参数二:对应SQL语句中占位符?的参数
        return operationUtils.jdbcTemplate.update(sql, args);
    }

    /**
     * 根据id查询数据
     * @param id
     * @return User对象
     *
     * JSONObject object = new JSONObject((Map<String, Object>) list.get(0));
     */
    public List findUserById(Integer id){
        //定义SQL语句
        String sql = "select * from test1 where id = ?";
        //执行查询方法
        return operationUtils.jdbcTemplate.queryForList(sql, new Object[]{id});
    }

    /**
     * 查询所有数据
     * @return 包含User对象的List集合
     */
    public List findAll(){
        //定义SQL语句
        String sql = "select * from test1";
        return operationUtils.jdbcTemplate.queryForList(sql);
    }

    /**
     * 根据id删除数据
     * @param id
     */
    public int delete(final Integer id){
        //定义SQL语句
        String sql = "delete from test1 where id=?";
        //执行
        return operationUtils.jdbcTemplate.update(sql, new Object[]{id});
    }

    /**
     * 修改数据
     * @param user
     */
    public int update(final JSONObject user){
        //定义SQL语句
        String sql = "update test1 set name=?, age=? where id=?";
        //执行
        return operationUtils.jdbcTemplate.update(sql, new Object[]{user.get("name"), user.getInteger("age"), user.getInteger("id")});
    }
}
8 注解
1、@Controller + @RequestMapping
返回类型为ModelAndView

2、@RestController + @GetMapping / @PostMapping / @PutMapping / @DeleteMapping
直接返回字符串
注意:@RestContrller = @Controller + @ResponseBody

3、@RequestBody:POST请求接收参数
   @RequestParam: GET请求接收参数(url中“?“之后的参数)或者接收文件
   @PathVariable:Restful风格请求地址中的参数 http:127.0.0.1:8080/user/12

4、若某接口有多个Service实现类,注入Service类时,可以使用@Resource(name=””)或者@Autowired+@Quaifier(value=””)
9 接收、发送https请求
9.1 设置https访问Springboot项目
server:
  port: 18092
  ssl:
    key-store: classpath:key.keystore
    key-store-password: 123456
    key-store-type: jks
key.keystore是jdk自带的keytool工具生成的密钥库,放在项目resources下
创建密钥库:keytool -genkey -alias eviltop -keyalg RSA -keystore D:/key.keystore -dname "CN=localhost, OU=localhost, O=localhost, L=SH, ST=SH, C=CN" -keypass 123456 -storepass 123456 -validity 3650

实现http自动跳转https:
package seeker1.seeker1;

import org.apache.catalina.Context;
import org.apache.catalina.connector.Connector;
import org.apache.tomcat.util.descriptor.web.SecurityCollection;
import org.apache.tomcat.util.descriptor.web.SecurityConstraint;
import org.springframework.boot.SpringApplication;
import org.springframework.boot.autoconfigure.SpringBootApplication;
import org.springframework.boot.context.embedded.EmbeddedServletContainerFactory;
import org.springframework.boot.context.embedded.tomcat.TomcatEmbeddedServletContainerFactory;
import org.springframework.context.annotation.Bean;
import org.springframework.scheduling.annotation.EnableScheduling;

@SpringBootApplication
public class Seeker1Application {

    public static void main(String[] args) {
        SpringApplication.run(Seeker1Application.class, args);
    }

    /**
     * it's for set http url auto change to https
     */
    @Bean
    public EmbeddedServletContainerFactory servletContainer() {
        TomcatEmbeddedServletContainerFactory tomcat = new TomcatEmbeddedServletContainerFactory() {
            @Override
            protected void postProcessContext(Context context) {
                SecurityConstraint securityConstraint = new SecurityConstraint();
                securityConstraint.setUserConstraint("CONFIDENTIAL");// confidential
                SecurityCollection collection = new SecurityCollection();
                collection.addPattern("/*");
                securityConstraint.addCollection(collection);
                context.addConstraint(securityConstraint);
            }
        };
        tomcat.addAdditionalTomcatConnectors(httpConnector());
        return tomcat;
    }

    @Bean
    public Connector httpConnector() {
        Connector connector = new Connector("org.apache.coyote.http11.Http11NioProtocol");
        connector.setScheme("http");
        connector.setPort(8080);
        connector.setSecure(false);
        connector.setRedirectPort(8443);
        return connector;
    }
}
9.2 发送https请求
情况1:https网站的证书为机构所颁发的被认证的证书,这种情况下和http请求一模一样,无需做任何改变。
情况2:个人所设定的证书。
这种证书默认不被信任,需要我们自己选择信任,信任的办法有两种
方法一:忽略证书验证过程,忽略之后任何Https协议网站皆能正常访问,这种方法比较暴力。
(1)新建一个信任类
import java.security.cert.CertificateException;
import java.security.cert.X509Certificate;
import javax.net.ssl.X509TrustManager;

public class MyX509TrustManager implements X509TrustManager {

    @Override
    public void checkClientTrusted(X509Certificate certificates[], String authType) throws CertificateException {
    }

    @Override
    public void checkServerTrusted(X509Certificate[] ax509certificate, String s) throws CertificateException {
    }

    @Override
    public X509Certificate[] getAcceptedIssuers() {
        // TODO Auto-generated method stub
        return null;
    }
}
(2)在main函数中加载信任类
public static void main(String[] args) throws NoSuchAlgorithmException, NoSuchProviderException, KeyManagementException, MalformedURLException {
        SSLContext sslcontext = SSLContext.getInstance("SSL","SunJSSE");
        sslcontext.init(null, new TrustManager[]{new MyX509TrustManager()}, new java.security.SecureRandom());
        URL url = new URL("https://xxxx");
        HostnameVerifier ignoreHostnameVerifier = new HostnameVerifier() {
            public boolean verify(String s, SSLSession sslsession) {
                System.out.println("WARNING: Hostname is not matched for cert.");
                return true;
            }
        };
        HttpsURLConnection.setDefaultHostnameVerifier(ignoreHostnameVerifier);
        HttpsURLConnection.setDefaultSSLSocketFactory(sslcontext.getSocketFactory());

        SpringApplication.run(TestApplication.class, args);
}
方法二:将证书导入java的运行环境中
(1)从该网站下载或者从网站开发者出获取证书cacert.crt
(2)运行命令将证书导入java运行环境:keytool -import -keystore %JAVA_HOME%\jre\lib\security\cacerts -file cacert.crt -alias xxx
(3)完成。java代码中发送https的请求和http一样,同第一种情况。
10 Springboot 读取文件
10.1 前端上传word文件,并读取内容
pom
        <!--Word操作 本实例使用jdk1.8、SpringBoot2.5.5-->
        <dependency>
            <groupId>org.apache.poi</groupId>
            <artifactId>poi-ooxml</artifactId>
            <version>3.8</version>
        </dependency>
        <dependency>
            <groupId>org.apache.poi</groupId>
            <artifactId>poi-scratchpad</artifactId>
            <version>3.8</version>
        </dependency>
application.yml
server:
  port: 8090

spring:
  mvc:
    static-path-pattern: /static/**
  web:
    resources:
      static-locations: classpath:/static,classpath:/public,classpath:/resources,classpath:/META-INF/resources

  #文件过大解决办法
  servlet:
    multipart:
      max-file-size: 500MB  #单个数据大小
      max-request-size: 1024MB  #总数居大小
index.html
静态文件下载
<!DOCTYPE html>
<html lang="en">
<head>
    <meta charset="UTF-8">
    <title>选择文件</title>
    <link rel="stylesheet" type="text/css" href="../static/css/index.css">
</head>
<body>
<div id="app">
    <el-upload
            class="upload-demo"
            action="/postfile"
            :before-upload="beforeUpload"
            :on-preview="handlePreview"
            :on-remove="handleRemove"
            :before-remove="beforeRemove"
            multiple
            :limit="2"
            :on-success="handleSuccess"
            accept=".doc, .docx"
            :file-list="fileList">
        <el-button size="small" type="primary">点击上传</el-button>
        <div slot="tip" class="el-upload__tip">只能上传doc/docx文件,且不超过100Mb</div>
    </el-upload>
    <hr>
    <p v-html="word_content"></p>
</div>

<script src="../static/js/vue.js"></script>
<script src="../static/js/index.js"></script>
<script src="../static/js/jquery-1.8.0.js"></script>
<script>
    new Vue({
        el: '#app',
        data: function() {
            return {
                fileList: [],
                word_content: ""
            }
        },
        methods: {
            //文件列表移除文件时的钩子
            handleRemove(file, fileList) {
                this.word_content = "";
                this.fileList.splice(0,1);
            },
            //点击文件列表中已上传的文件时的钩子
            handlePreview(file) {
                console.log(file);
            },
            //文件上传成功时的钩子
            handleSuccess(response, file, fileList){
                if(this.fileList.length > 0){
                    this.word_content = "";
                    this.fileList.splice(0,1);
                }
                this.fileList.push(file);
                this.word_content = response;
            },
            // 上传文件之前
            beforeUpload(file) {
                let size10M = file.size / 1024 / 1024 < 100
                if (!size10M) {
                    this.$message.warning('上传文件大小不能超过 100MB!');
                    return false;
                }
            },
            //删除文件之前的钩子
            beforeRemove(file, fileList) {
                return this.$confirm(`确定移除 ${ file.name }?`);
            }
        },
        created(){
        }
    })
</script>
</body>
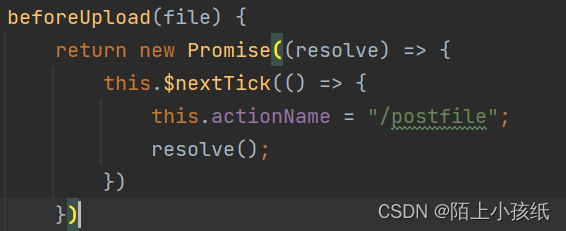
动态修改上传文件的方法
<el-upload
class=“upload-demo”
:action=“actionName” -----------------------》controller
:data=“{radio:radio,selectWendangRadio:selectWendangRadio}”--------》传参
:before-upload=“beforeUpload” --------------》上传之前执行的方法
:on-preview=“handlePreview”
:on-remove=“handleRemove”
:before-remove=“beforeRemove”
multiple
:limit=“2”
:on-success=“handleSuccess”
accept=“.xls, .xlsx”
:file-list=“fileList”>
页面中动态修改 action url
后台接收参数

Controller
package com.lzh.word.controller;

import net.sourceforge.pinyin4j.PinyinHelper;
import net.sourceforge.pinyin4j.format.HanyuPinyinCaseType;
import net.sourceforge.pinyin4j.format.HanyuPinyinOutputFormat;
import net.sourceforge.pinyin4j.format.HanyuPinyinToneType;
import net.sourceforge.pinyin4j.format.HanyuPinyinVCharType;
import net.sourceforge.pinyin4j.format.exception.BadHanyuPinyinOutputFormatCombination;
import org.apache.poi.POIXMLDocument;
import org.apache.poi.POIXMLTextExtractor;
import org.apache.poi.hwpf.HWPFDocument;
import org.apache.poi.hwpf.extractor.WordExtractor;
import org.apache.poi.hwpf.usermodel.Paragraph;
import org.apache.poi.hwpf.usermodel.Range;
import org.apache.poi.hwpf.usermodel.Table;
import org.apache.poi.hwpf.usermodel.TableRow;
import org.apache.poi.openxml4j.opc.OPCPackage;
import org.apache.poi.poifs.filesystem.POIFSFileSystem;
import org.apache.poi.xwpf.extractor.XWPFWordExtractor;
import org.apache.poi.xwpf.usermodel.*;
import org.springframework.web.bind.annotation.*;
import org.springframework.web.multipart.MultipartFile;

import javax.servlet.http.HttpServletResponse;
import javax.servlet.http.HttpSession;
import java.io.*;
import java.util.List;

@RestController
public class WordController {

    private static final String notWordFile = "此文件不是word文件!";

    //采用PostMapping
    @PostMapping("/postfile")
    public String saveVue(@RequestParam("file") MultipartFile file) throws Exception {
        // 构建上传文件的存放 "文件夹" 路径
        String fileDirPath = "src/main/resources/temp";
        File fileDir = new File(fileDirPath);
        if(!fileDir.exists()){
            // 递归生成文件夹
            fileDir.mkdirs();
        }else{
            // 删除文件下内容
            deleteFolder(fileDir);
        }
        // 拿到文件名
        String filename = file.getOriginalFilename();
        // 输出文件夹绝对路径  -- 这里的绝对路径是相当于当前项目的路径而不是“容器”路径
        System.out.println("文件绝对路径为:" + fileDir.getAbsolutePath());
        try {
            // 构建真实的文件路径
            File newFile = new File(fileDir.getAbsolutePath() + File.separator + filename);
            System.out.println("文件路径为" + newFile.getAbsolutePath());
            // 上传文件到 -》 “绝对路径”
            file.transferTo(newFile);
            String res = readWord(newFile.getPath());
            String r = res.replaceAll("\n", "<br>");
            return r;
        } catch (IOException e) {
            e.printStackTrace();
        }
        return "FAIL";
    }

    public String readWord(String path) {
        String buffer = "";
        try {
            if (path.endsWith(".doc")) {
                FileInputStream is = new FileInputStream(path);
                WordExtractor ex = new WordExtractor(is);
                buffer = ex.getText();
                is.close();
            } else if (path.endsWith("docx")) {
                OPCPackage opcPackage = POIXMLDocument.openPackage(path);
                POIXMLTextExtractor extractor = new XWPFWordExtractor(opcPackage);
                buffer = extractor.getText();
                opcPackage.close();
            } else {
                buffer = notWordFile;
            }

        } catch (Exception e) {
            e.printStackTrace();
        }
        return buffer;
    }

    //需要注意的是当删除某一目录时,必须保证该目录下没有其他文件才能正确删除,否则将删除失败。
    public void deleteFolder(File folder) throws Exception {
        if (!folder.exists()) {
            throw new Exception("文件不存在");
        }
        File[] files = folder.listFiles();
        if (files != null) {
            for (File file : files) {
                /*if (file.isDirectory()) {
                    //递归直到目录下没有文件
                    deleteFolder(file);
                } else {
                    //删除
                    file.delete();
                }*/
                // 删除文件夹下内容
                file.delete();
            }
        }
        //删除
        //folder.delete();
    }

    //读取代表格的word文档
    public String readWordHasTable(String path) {
        String buffer = "";
        try {
            if (path.endsWith(".doc")) {
                FileInputStream is = new FileInputStream(path);
                POIFSFileSystem pfs = new POIFSFileSystem(is);
                HWPFDocument hwpf = new HWPFDocument(pfs);
                Range range = hwpf.getRange();
                for(int i = 0; i < range.numParagraphs(); i++) {
                    //段落
                    Paragraph p = range.getParagraph(i);
                    //字号,字号和是否加粗可用来当做标题或者某一关键标识的判断
                    int fontSize = p.getCharacterRun(0).getFontSize();
                    //是否加粗
                    boolean isBold = p.getCharacterRun(0).isBold();
                    if(p.isInTable()){
                        //读取表格
                        Table table = range.getTable(p);
                        int rowSize = table.numRows();
                        i += rowSize - 1;
                        for(int rowi = 0; rowi < rowSize; rowi++){
                            TableRow tableRow = table.getRow(rowi);
                            int celSize = tableRow.numCells();
                            for(int celi = 0; celi < celSize; celi++,i++){
                                String lineString = tableRow.getCell(celi).text();
                                // 去除字符串末尾的一个管道符
                                if (lineString != null && lineString.compareTo("") != 0) {
                                    lineString = lineString.substring(0, lineString.length() - 1);
                                }
                                System.out.printf(lineString + " | ");
                            }
                            System.out.println("\n-------------------------------------------");
                        }
                    }else{
                        //读取段落
                        String paragraphText = p.text();
                        System.out.println(i + "--" + paragraphText);
                    }
                }
            } else if (path.endsWith("docx")) {
                XWPFDocument xdoc = new XWPFDocument(POIXMLDocument.openPackage(path));
                List list = xdoc.getBodyElements();
                for(int i = 0; i < list.size(); i++){
                    Object object = list.get(i);
                    if(object instanceof XWPFParagraph){
                        //读取段落
                        String paragraphText = ((XWPFParagraph)object).getText();
                        System.out.println(i + "--" + paragraphText);
                    }else if(object instanceof XWPFTable){
                        //读取表格
                        for(XWPFTableRow row : ((XWPFTable)object).getRows()){
                            for(XWPFTableCell cell : row.getTableCells()){
                                System.out.printf(cell.getText() + " | ");
                            }
                            System.out.println("\n-------------------------------------------");
                        }
                    }
                }
            } else {
                buffer = notWordFile;
            }
        } catch (Exception e) {
            e.printStackTrace();
        }
        return buffer;
    }
}
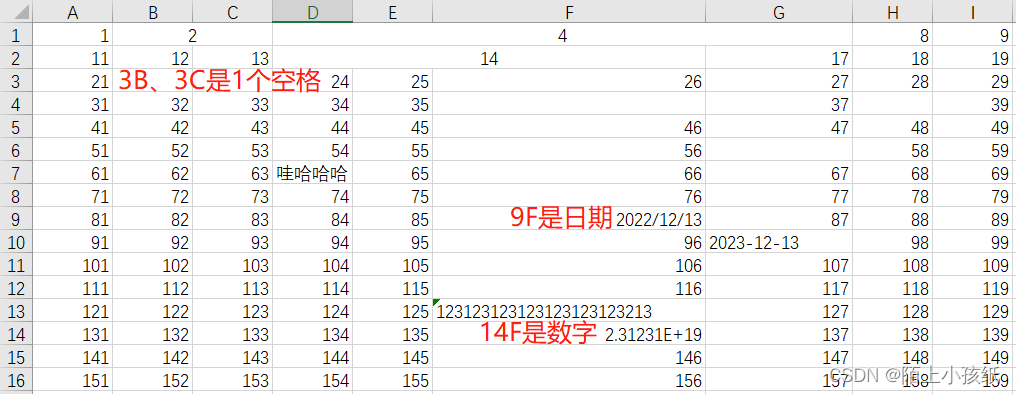
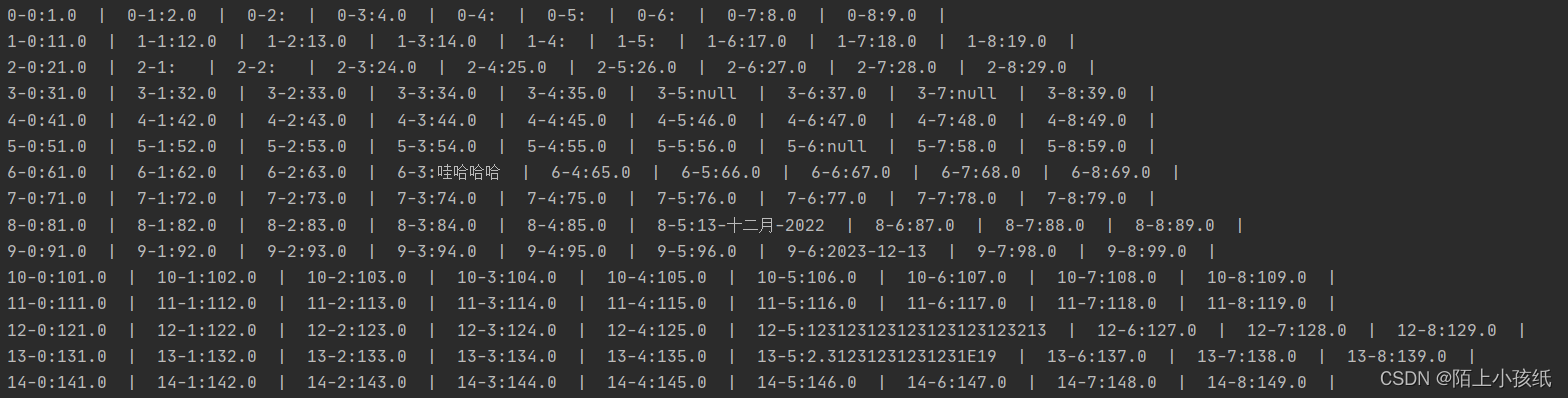
10.2 读取Excel
	public JSONArray readExcelTitle(String path){
        try{
            JSONArray res = new JSONArray();
            File file = new File(path);
            InputStream is = new FileInputStream(file);
            Workbook workbook = null;
            if(path.endsWith("xlsx")){
                workbook = new XSSFWorkbook(is);
            }else if(path.endsWith("xls")){
                // 如果excel的后缀是xls,说明是03版,需要用如下方法
                workbook = new HSSFWorkbook(is);
            }else{
                System.out.println("请上传Excel文件");
                return null;
            }
            //读取工作簿的第一张表格
            Sheet sheet = workbook.getSheetAt(0);
            System.out.println(sheet.getLastRowNum());
            for (int i = 0; i <= sheet.getLastRowNum(); i++) {
                Row row = sheet.getRow(i);
                JSONArray r = new JSONArray();
                for(int j = 0; j <= row.getLastCellNum(); j++){
                    // 读取单元格内容
                    Object o = row.getCell(j);
                    if(o == null){
                        r.add(o);
                    }else{
                        r.add(o.toString());
                    }
                }
                res.add(r);
            }
            return res;
        }catch (Exception e){
            e.printStackTrace();
        }
        return null;
    }
合并单元格:空字符串
空格:字符串
2022-12-13:13-十二月-2022
数字:科学计数法形式
啥也没有:null
11 汉字转拼音
pom
        <!--汉字转拼音-->
        <dependency>
            <groupId>com.belerweb</groupId>
            <artifactId>pinyin4j</artifactId>
            <version>2.5.0</version>
        </dependency>
Function
    /**
     * 汉字转拼音
     *
     * @param chinese   汉字
     * @return  拼音
     */
    public String changeSpell(String chinese) {
        //将汉字参数去除空格后转化为数组
        char[] chineseArr = chinese.trim().toCharArray();
        //定义一个字符串
        StringBuilder spell = new StringBuilder();
        //输出格式
        HanyuPinyinOutputFormat format = new HanyuPinyinOutputFormat();
        /**
         * 输出大小写设置
         * LOWERCASE:输出小写
         * UPPERCASE:输出大写
         */
        format.setCaseType(HanyuPinyinCaseType.LOWERCASE);
        /**
         * 输出音标设置
         * WITH_TONE_MARK:直接用音标符(必须设置WITH_U_UNICODE,否则会抛出异常)
         * WITH_TONE_NUMBER:1-4数字表示音标
         * WITHOUT_TONE:没有音标
         */
        format.setToneType(HanyuPinyinToneType.WITHOUT_TONE);
        /**
         * 特殊音标ü设置
         * WITH_V:用v表示ü
         * WITH_U_AND_COLON:用"u:"表示ü
         * WITH_U_UNICODE:直接用ü
         */
        format.setVCharType(HanyuPinyinVCharType.WITH_U_UNICODE);

        try {
            for (int i = 0; i < chineseArr.length; i++) {
                //判断是否是汉字
                if (Character.toString(chineseArr[i]).matches("[\\u4E00-\\u9FA5]+")) {
                    //如果是多音字,返回多个拼音的数组
                    String[] pys = PinyinHelper.toHanyuPinyinStringArray(chineseArr[i], format);
                    //只取数组中的第一个
                    spell.append(pys[0]);
                } else {
                    //如果不是汉字直接拼接到spell中
                    spell.append(chineseArr[i]);
                }
            }
        } catch (BadHanyuPinyinOutputFormatCombination badHanyuPinyinOutputFormatCombination) {
            badHanyuPinyinOutputFormatCombination.printStackTrace();
        }
        return spell.toString();
    }


 460
460


 被折叠的 条评论
为什么被折叠?
被折叠的 条评论
为什么被折叠?
 到【灌水乐园】发言


