


在本教程中,我们将使用Arduino和TMP102温度传感器来测量房间内的环境温度。
本教程的目标有两个。第一个是显示一个测量温度节点。第二个是演示Arduino作为ROS的I2C接口。
TMP102是使用I2C进行通信的众多硬件之一。现在,您可以使用Arduino轻松地将SPI / I2C接口连接到ROS。
1 硬件
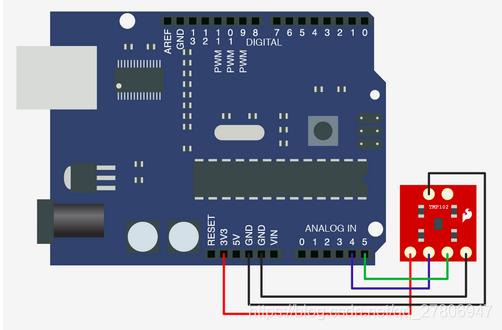
在本教程中,您需要一个的Arduino和来自Sparkfun的TMP102 Breakout板。该板是一个很好的小温度传感器,可以0.625℃的分辨率测量温度。将它连接到Arduino非常简单。它是通过I2C的3.3V传感器通信,因此它连接到Arduino的3.3V输出,GND,SDA和SCL引脚。SDA和SCL分别是I2C数据线和I2C时钟线。它们作为模拟引脚4和5在Arduino板上。
2 程序
#include <Wire.h>
#include <ros.h>
#include <std_msgs/Float32.h>


//Set up the ros node and publisher
std_msgs::Float32 temp_msg;
ros::Publisher pub_temp("temperature", &temp_msg);
ros::NodeHandle nh;

int sensorAddress = 0x91 >> 1;  // From datasheet sensor address is 0x91
                                // shift the address 1 bit right,
                                 //the Wire library only needs the 7
                                // most significant bits for the address

void setup()
{
  Wire.begin();        // join i2c bus (address optional for master)

  nh.initNode();
  nh.advertise(pub_temp);

}

long publisher_timer;

void loop()
{

  if (millis() > publisher_timer) {
  // step 1: request reading from sensor
    Wire.requestFrom(sensorAddress,2);
    delay(10);
    if (2 <= Wire.available())  // if two bytes were received
    {
      byte msb;
      byte lsb;
      int temperature;

      msb = Wire.read();  // receive high byte (full degrees)
      lsb = Wire.read();  // receive low byte (fraction degrees)
      temperature = ((msb) << 4);  // MSB
      temperature |= (lsb >> 4);   // LSB

      temp_msg.data = temperature*0.0625;
      pub_temp.publish(&temp_msg);
    }

  publisher_timer = millis() + 1000; //publish once a second
  }

  nh.spinOnce();
}本例中的特殊代码是使用Arduino的Wire库。Wire是一个I2C库,可简化对I2C总线的读写操作。
3 测试
roscorerostopic echo temperature


 被折叠的 条评论
为什么被折叠?
被折叠的 条评论
为什么被折叠?
 到【灌水乐园】发言


