


一、Seata介绍
1:简介:
Seata 是一款开源的分布式事务解决方案,致力于提供高性能和简单易用的分布式
事务服务。Seata 将为用户提供了 AT、TCC、SAGA 和 XA 事务模式,
为用户打造一站式的分布式解决方案。
2:术语
TC (Transaction Coordinator) - 事务协调者
维护全局和分支事务的状态,驱动全局事务提交或回滚。
TM (Transaction Manager) - 事务管理器
定义全局事务的范围:开始全局事务、提交或回滚全局事务。
RM (Resource Manager) - 资源管理器
管理分支事务处理的资源,与TC交谈以注册分支事务和报告分支事务的状态,
并驱动分支事务提交或回滚。
3:处理过程
1.TM向TC申请开启一个全局事务,全局事务创建成功并生成一个全局唯一的XID
2.XID在微服务调用链路的上下文中传播
3.RM向TC注册分支事务,将其纳入XID对应全局事务的管辖
4.TM向TC发起针对XID的全局提交或回滚决议
5.TC调度XID下管辖的全部分支事务完成提交或回滚

二、Seata服务端部署
1:下载
地址:http://seata.io/zh-cn/blog/download.html
选择版本下载。我使用的是1.3

2:上传解压

3:修改conf下的registry.conf
配置注册中心和配置中心


4:nacos添加seata需要配置
【1】:对源码路径seata-1.3.0\script\config-center目录下的config.txt进行修改

需要修改的项
my_tesst_cc_group需要记住以后会使用到

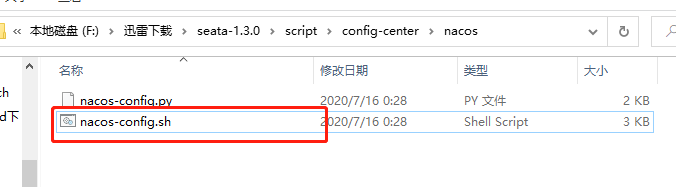
【2】:上传到nacos
进入源码seata-1.3.0\script\config-center\nacos下执行nacos-config.sh
可是使用Git Bash窗口执行就行
命令:$ sh nacos-config.sh -h 192.168.231.149 -p 8848 -g SEATA_GROUP


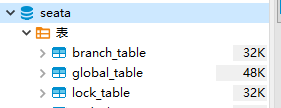
5:创建数据库
sql文件可以在源码\seata-1.3.0\script\server\db目录下复制
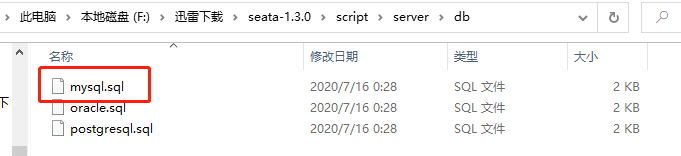
进行执行创建表后
6:启动运行
命令: ./seata-server.sh -p 9091

成功

三、Spring Boot集成
1:修改pom

<dependency>
    <groupId>com.alibaba.cloud</groupId>
    <artifactId>spring-cloud-alibaba-seata</artifactId>
    <exclusions>
        <exclusion>
            <artifactId>seata-all</artifactId>
            <groupId>io.seata</groupId>
        </exclusion>
    </exclusions>
</dependency>
<dependency>
    <groupId>io.seata</groupId>
    <artifactId>seata-all</artifactId>
    <version>1.3.0</version>
</dependency>
2:添加配置文件file.conf和registry.conf。
registry.conf与服务器上的保持一致。直接拷贝过来即可
file.conf如下所示
vgroupMapping配置与nacos中的配置保持一致

transport {
  # tcp udt unix-domain-socket
  type = "TCP"
  #NIO NATIVE
  server = "NIO"
  #enable heartbeat
  heartbeat = true
  # the client batch send request enable
  enableClientBatchSendRequest = true
  #thread factory for netty
  threadFactory {
    bossThreadPrefix = "NettyBoss"
    workerThreadPrefix = "NettyServerNIOWorker"
    serverExecutorThread-prefix = "NettyServerBizHandler"
    shareBossWorker = false
    clientSelectorThreadPrefix = "NettyClientSelector"
    clientSelectorThreadSize = 1
    clientWorkerThreadPrefix = "NettyClientWorkerThread"
    # netty boss thread size,will not be used for UDT
    bossThreadSize = 1
    #auto default pin or 8
    workerThreadSize = "default"
  }
  shutdown {
    # when destroy server, wait seconds
    wait = 3
  }
  serialization = "seata"
  compressor = "none"
}
service {
  #transaction service group mapping
  # 改成对应的
  vgroupMapping.my_test_cc_group = "default"
  #only support when registry.type=file, please don't set multiple addresses
  default.grouplist = "127.0.0.1:8091"
  #degrade, current not support
  enableDegrade = false
  #disable seata
  disableGlobalTransaction = false
}

client {
  rm {
    asyncCommitBufferLimit = 10000
    lock {
      retryInterval = 10
      retryTimes = 30
      retryPolicyBranchRollbackOnConflict = true
    }
    reportRetryCount = 5
    tableMetaCheckEnable = false
    reportSuccessEnable = false
    sagaBranchRegisterEnable = false
  }
  tm {
    commitRetryCount = 5
    rollbackRetryCount = 5
    degradeCheck = false
    degradeCheckPeriod = 2000
    degradeCheckAllowTimes = 10
  }
  undo {
    dataValidation = true
    onlyCareUpdateColumns = true
    logSerialization = "jackson"
    logTable = "undo_log"
  }
  log {
    exceptionRate = 100
  }
}
3:修改application.yml添加配置

4:添加dataSource配置

package com.cc.order.config;

import com.alibaba.druid.pool.DruidDataSource;
import io.seata.rm.datasource.DataSourceProxy;
import org.apache.ibatis.session.SqlSessionFactory;
import org.mybatis.spring.SqlSessionFactoryBean;
import org.mybatis.spring.transaction.SpringManagedTransactionFactory;
import org.springframework.beans.factory.annotation.Value;
import org.springframework.boot.context.properties.ConfigurationProperties;
import org.springframework.context.annotation.Bean;
import org.springframework.context.annotation.Configuration;
import org.springframework.core.io.support.PathMatchingResourcePatternResolver;
import javax.sql.DataSource;

/**
 * @auther zzyy
 * @create 2019-12-11 16:58
 * 使用Seata对数据源进行代理
 */
@Configuration
public class DataSourceProxyConfig {

    @Value("${mybatis.mapperLocations}")
    private String mapperLocations;

    @Bean
    @ConfigurationProperties(prefix = "spring.datasource")
    public DataSource druidDataSource(){
        return new DruidDataSource();
    }

    @Bean
    public DataSourceProxy dataSourceProxy(DataSource dataSource) {
        return new DataSourceProxy(dataSource);
    }

    @Bean
    public SqlSessionFactory sqlSessionFactoryBean(DataSourceProxy dataSourceProxy) throws Exception {
        SqlSessionFactoryBean sqlSessionFactoryBean = new SqlSessionFactoryBean();
        sqlSessionFactoryBean.setDataSource(dataSourceProxy);
        sqlSessionFactoryBean.setMapperLocations(new PathMatchingResourcePatternResolver().getResources(mapperLocations));
        sqlSessionFactoryBean.setTransactionFactory(new SpringManagedTransactionFactory());
        return sqlSessionFactoryBean.getObject();
    }

}
5:业务数据库创建undo_log表
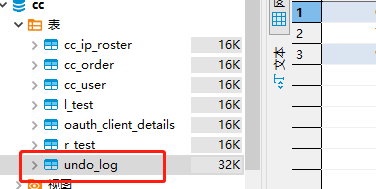
建表语句:
CREATE TABLE `undo_log` (
  `id` bigint(20) NOT NULL AUTO_INCREMENT,
  `branch_id` bigint(20) NOT NULL,
  `xid` varchar(100) NOT NULL,
  `context` varchar(128) NOT NULL,
  `rollback_info` longblob NOT NULL,
  `log_status` int(11) NOT NULL,
  `log_created` datetime NOT NULL,
  `log_modified` datetime NOT NULL,
  `ext` varchar(100) DEFAULT NULL,
  PRIMARY KEY (`id`),
  UNIQUE KEY `ux_undo_log` (`xid`,`branch_id`)
) ENGINE=InnoDB AUTO_INCREMENT=4 DEFAULT CHARSET=utf8
6:修改启动类

7:启动各个服务,在业务方法上使用@GlobalTransactional进行分布式事务控制


 4260
4260


 被折叠的 条评论
为什么被折叠?
被折叠的 条评论
为什么被折叠?
 到【灌水乐园】发言


