


我Hyb在2023-4-18调通了自己的PythonOpcUaDemo。具体Java代码和KepServerEX延时补丁都在资源中。
第1步:安装激活KepServer,补丁在资源中,不详述。
第2步:在KepServer中做OpcUa配置。
2.1 先看桌面右下角有没EX图标

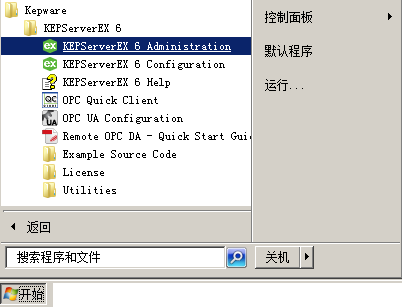
2.2 如果没有EX图标,要去开始菜单中找到KEPServerEX 6 Administration,点击打开它后,桌面右下角就会出现EX图标:
2.3 右键点击EX图标,选择“OPC UA 配置”,设置过程看这个动图:(一定要关注动图中192.168.10.60这个ip及端口的设置,它要与你代码中一致!)
第3步:在KepServer中设置用户名密码。
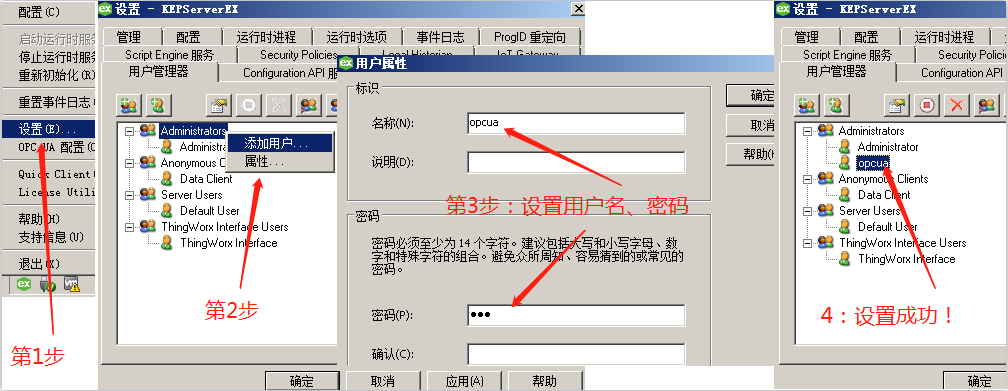
3.1 再一次点桌面右下角的EX图标,选择“设置”,点“用户管理器”,在Administrators右键选择“添加用户”。见图操作:
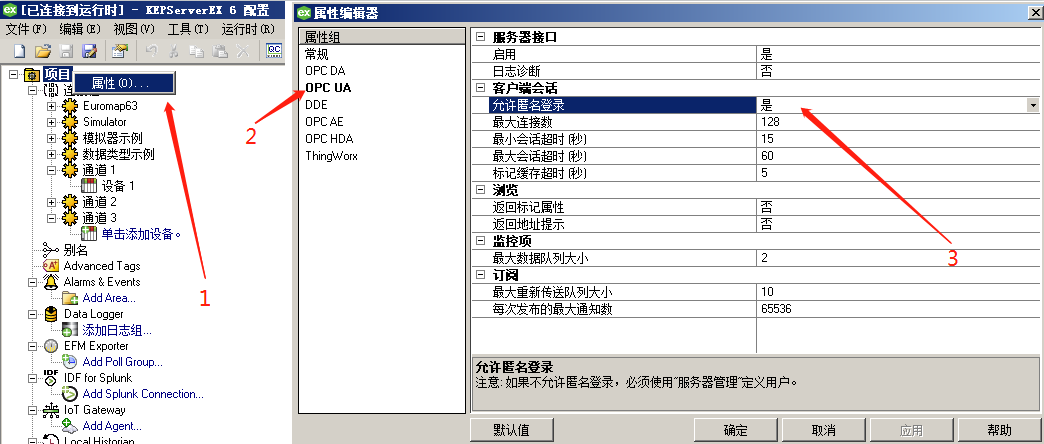
第4步:在KepServer中设置opcua匿名账户登录。
在KepServerEX界面,在“项目”右键,选择“属性”,选择“OPC UA”。在“客户端会话”、“允许匿名登录”中,选择“是”。如图:
以上KepServerEX设置完成后,就可以写Python代码了。
第5步:先使用国内镜像源安装asyncua模块:
py -m pip install asyncua -i https://pypi.tuna.tsinghua.edu.cn/simple/
asyncua开源代码库 https://github.com/FreeOpcUa/opcua-asyncio ,其英文文档是 https://opcua-asyncio.readthedocs.io/en/latest
第6:先贴份简单的python代码,能连接KepServerEX进行读写操作(并有实际运行动图,这个动图也录制了pip和asyncio的安装过程):
from asyncua import Client, ua
import asyncio

async def get_text():
	async with Client(url='opc.tcp://192.168.10.150:49320') as client:
		while True:
			node = client.get_node('ns=2;s=通道 1.设备 1.标记 2')
			value = await node.read_value()
			print(value)
			await node.write_value(ua.DataValue(ua.Variant(value+1, ua.VariantType.Int16, None, None), None))
			await asyncio.sleep(1)

def main():
	loop = asyncio.get_event_loop()
	task = get_text()
	loop.run_until_complete(task)
	loop.close()

if __name__ == '__main__':
	main()
第7:再贴份稍复杂的python代码,能连接KepServerEX订阅数据变化(并有实际运行动图):
import sys
sys.path.insert(0, "..")
import os
# os.environ['PYOPCUA_NO_TYPO_CHECK'] = 'True'

import asyncio
import logging

from asyncua import Client, ua


class SubHandler(object):
	def datachange_notification(self, node, val, data):
		idNode = node.nodeid.Identifier.split('.', maxsplit=2)
		idDevice = idNode[1]
		tag = idNode[2]
		print(idDevice, tag, val)

async def main():
	url = "opc.tcp://192.168.10.150:49320"
	# url = "opc.tcp://localhost:53530/OPCUA/SimulationServer/"
	# url = "opc.tcp://olivier:olivierpass@localhost:53530/OPCUA/SimulationServer/"
	async with Client(url=url) as client:
		#print("Root children are", await client.nodes.root.get_children())

		tag1 = client.get_node("ns=2;s=通道 1.设备 1.标记 1")
		tag1Val = await tag1.read_value()
		print(f"tag1:{tag1}, VALUE={tag1Val}, TYPE={type(tag1Val)}")

		tag2 = client.get_node("ns=2;s=通道 1.设备 1.标记 2")
		tag2Val = await tag2.read_value()
		print(f"tag2:{tag2}, VALUE={tag2Val}, TYPE={type(tag2Val)}")

		await tag2.write_value(ua.DataValue(ua.Variant(25, ua.VariantType.Int16, None, None), None))
		#await tag2.write_value(ua.Variant(23, ua.VariantType.Int16, None, None))
		#await tag2.write_value(100) # asyncua.ua.uaerrors._auto.BadWriteNotSupported 服务器不支持写入所提供的值、状态和时间戳的组合

		handler = SubHandler()
		sub = await client.create_subscription(1000, handler)
		handle1 = await sub.subscribe_data_change(tag1) # 标记1是用于验证客户端连接的加速读/写标记,该值会每秒加1,
		                                                # 但订阅时发现加1的频率被篡改。不过,java端没有这个问题。
		                                                # 所以我分析这是asyncio源代码bug,不过目前还没实力改这个源码。
		handle2 = await sub.subscribe_data_change(tag2)
		while True:await asyncio.sleep(sys.maxsize)

		# await sub.subscribe_events()
		# await sub.unsubscribe(handle1)
		# await sub.unsubscribe(handle2)
		# await sub.delete()

if __name__ == "__main__":
	logging.basicConfig(level=logging.WARN)
	asyncio.run(main())
注意观察代码的运行动图会发现:
7.1 订阅标记2没有问题,其数值被改后,立马同步给了客户端。
7.2 但订阅标记1就有问题,本来它是每秒自增1。但订阅后,变成每秒自增10。但同样 java端订阅 时没有这个问题!我估计是asyncio模块源码本身的问题,但目前限于python水平有限,还没有阅读源码和修改的能力。所以,就这样吧。。。
本文涉及的java项目代码和KepServerEX补丁下载地址:https://download.csdn.net/download/qq_28530139/87579334
Hyb✈✈✈本文结束,谢谢浏览【VX:m3920752】!个人资源的解压密码是: hyb


 1089
1089

 被折叠的 条评论
为什么被折叠?
被折叠的 条评论
为什么被折叠?
 到【灌水乐园】发言


