


assets中的图片小于1K时,会被转换为Base-64,大于1K的则不会处理
例如:在页面中引入下面两张图片


以后会介绍两种安装方式(建议直接使用第一种)
1.使用nuxt团队提供的脚手架工具create-nuxt-app
2.自己从头到尾搭建
1.安装
1.确保安装了npx(npx在NPM版本5.2.0默认安装了)
npm -v 查看当前npm版本
2.npx create-nuxt-app <项目名> //Nuxt.js创建的脚手架工具create-nuxt-app
然后会需要进行一些选择
//创建项目
F:\nuxt\nuxt> npx create-nuxt-app my-nuxt
create-nuxt-app v3.6.0
✨  Generating Nuxt.js project in my-nuxt
//项目名称
? Project name: my-nuxt

//语言,js/ts(选择一个自己比较熟悉的)
? Programming language: (Use arrow keys)
> JavaScript
  TypeScript

//包管理,yarn/npm
? Package manager: (Use arrow keys)
> Yarn
  Npm

//UI框架(之前项目中使用的是Element,所以在这里还是继续选择了Element)
? UI framework: (Use arrow keys)
> None
  Ant Design Vue
  BalmUI
  Bootstrap Vue
  Buefy
  Chakra UI
  Element
  Framevuerk
  Oruga
  Tachyons
  Tailwind CSS
  Windi CSS
  Vant
  View UI
  Vuesax
(Move up and down to reveal more choices)(移动上下键选择,然后回车)

//服务器选择
// 添加 axios module 以轻松地将 HTTP 请求发送到您的应用程序中
//(空格切换选择取消选择,a键全选,i键重置)
? Nuxt.js modules: (Press <space> to select, <a> to toggle all, <i> to in
vert selection)
>( ) Axios - Promise based HTTP client
 ( ) Progressive Web App (PWA)
 ( ) Content - Git-based headless CMS

 //代码优化工具(Eslint+Prettier)
 //添加 EsLint 以在保存时代码规范和错误检查您的代码
 //添加 Prettier 以在保存时格式化/美化您的代码
? Linting tools: (Press <space> to select, <a> to toggle all, <i> to inve
rt selection)
 (*) ESLint
 (*) Prettier
 ( ) Lint staged files
 ( ) StyleLint
>( ) Commitlint

//测试框架
? Testing framework: (Use arrow keys)
> None
  Jest
  AVA
  WebdriverIO
  Nightwatch

  //渲染模式,ssr或者SPA(单页面渲染),由于单页面不利于seo,选择ssr
 ? Rendering mode: (Use arrow keys)
> Universal (SSR / SSG)
  Single Page App

  ? Deployment target: (Use arrow keys)
> Server (Node.js hosting)
  Static (Static/Jamstack hosting)

  //开发工具,编辑器使用的vs code,所以选择jsconfig.json
  ? Development tools: (Press <space> to select, <a> to toggle all, <i> to
invert selection)
>( ) jsconfig.json (Recommended for VS Code if you're not using typescrip
t)
 ( ) Semantic Pull Requests
 ( ) Dependabot (For auto-updating dependencies, GitHub only)
 ? Continuous integration: (Use arrow keys)
> None
  GitHub Actions (GitHub only)
  Travis CI
  CircleCI
  ? Version control system: (Use arrow keys)
> Git
  None

//成功后,会出现以下内容
Successfully created project my-nuxt
  //本地运行
  To get started:

        cd my-nuxt
        npm run dev
  //服务器端运行
  To build & start for production:

        cd my-nuxt
        npm run build
        npm run start
2.自己搭建,需要一个文件和一个目录
1.创建一个空文件夹
2.
PS F:\nuxt\nuxt1> mkdir my-nuxt


    目录: F:\nuxt\nuxt1


Mode                 LastWriteTime         Length Name
----                 -------------         ------ ----
d-----          2021/5/8     12:04                my-nuxt


PS F:\nuxt\nuxt1>

cd my-nuxt
在my-nuxt文件中新建package.json
设定运行nuxt指令
{
  "name": "my-app",
  "scripts": {
    "dev": "nuxt"
  }
}
安装nuxt
npm install --save nuxt
{
  "name": "my-nuxt",
  "scripts": {
    "dev": "nuxt"
  },
  "dependencies": {
    "nuxt": "^2.15.4"
  }
}
pages目录
Nuxt.js 会依据 pages 目录中的所有 *.vue 文件生成应用的路由配置。

创建 pages 目录:
$ mkdir pages
创建我们的第一个页面 pages/index.vue:
<template>
  <h1>Hello world!</h1>
</template>
然后启动项目:
$ npm run dev
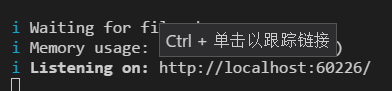
打开这个页面后就可以看到运行效果了
注意:Nuxt.js 会监听 pages 目录中的文件更改,因此在添加新页面时无需重新启动应用程序。


 1016
1016


 被折叠的 条评论
为什么被折叠?
被折叠的 条评论
为什么被折叠?
 到【灌水乐园】发言


