


自定义view之人性化Progress bar
转载请注明出处:http://blog.csdn.net/qq_28872867/article/details/51813416
虽然现在开源项目很多而且很完善,但有时候项目需要用到某一个自定义view时就不得不依赖一个很大的类库,感觉有点得不偿失。所以决定自己动手丰衣足食!
期间看过鸿洋的自定义view系列、工匠若水的自定义view绘制手册等等还有很多大神的博客,无奈肠胃不好只能在以后边工作边消化了。
下面的动画是偶然看到的,然后决定用代码把它实现了。
目录
关于自定义view动画的实现
这篇我用自定义view实现一个动画,先上效果图 有没有非常cool的感觉~

分析动画
1、黑色矩形背景
圆角的矩形,压扁拉伸形成一条线,这个比较简单一步一步来,上布局
<?xml version="1.0" encoding="utf-8"?>
<RelativeLayout xmlns:android="http://schemas.android.com/apk/res/android"
    android:layout_width="match_parent"
    android:layout_height="match_parent"
    >

    <com.zzj.myprogressbar.ProgressBarView
        android:background="#2C97DE"
        android:layout_width="match_parent"
        android:layout_height="200dp"
        android:layout_centerInParent="true" />

</RelativeLayout>
自定义view代码
public class ProgressBarView extends View {

    private Paint mPaint;
    private int rectPercent = 0;
    private int mWidth;
    private int mHeight;
    private int centerY;
    private float progressWidth = 10;
    private RectF progressRect;

    public ProgressBarView(Context context) {
        this(context, null);
    }

    public ProgressBarView(Context context, AttributeSet attrs) {
        this(context, attrs, 0);
    }

    public ProgressBarView(Context context, AttributeSet attrs, int defStyleAttr) {
        super(context, attrs, defStyleAttr);
        init();
    }

    private void init() {
        mPaint = new Paint();
        mPaint.setAntiAlias(true);
        new Thread(timeRunnable).start();
    }

    Runnable timeRunnable = new Runnable() {
        @Override
        public void run() {
            SystemClock.sleep(500);
            while (rectPercent <100){
                rectPercent+= 5;
                postInvalidate();
                SystemClock.sleep(20);
            }
        }
    };

    @Override
    protected void onMeasure(int widthMeasureSpec, int heightMeasureSpec) {
        int widthSize = MeasureSpec.getSize(widthMeasureSpec);
        int widthMode = MeasureSpec.getMode(widthMeasureSpec);
        int heightSize = MeasureSpec.getSize(heightMeasureSpec);
        int heightMode = MeasureSpec.getMode(heightMeasureSpec);
        if (widthMode == MeasureSpec.EXACTLY){
            mWidth = widthSize;
        }
        if (heightMode == MeasureSpec.EXACTLY){
            mHeight = DensityUtil.dip2px(getContext(),200);
        }
        centerY = mHeight/2;
        setMeasuredDimension(mWidth, mHeight);
    }

    @Override
    protected void onDraw(Canvas canvas) {
        drawBackgroundRect(canvas);
        super.onDraw(canvas);
    }

    private void drawBackgroundRect(Canvas canvas) {
        int percent = rectPercent;
        if (percent>100){
            percent = 100;
        }
        float progress_left = mWidth/2-centerY/2;
        float progress_top = centerY/2;
        float progress_right = mWidth/2+centerY/2;
        float progress_bottom = centerY*3/2;
        float left = centerY/4;//变成线时的左右边距
        mPaint.setColor(Color.parseColor("#FF525253"));
        progressRect = new RectF(getGradientFloat(progress_left,left,percent,100)  ,
                getGradientFloat(progress_top,centerY-progressWidth,percent,100) ,
                getGradientFloat(progress_right,mWidth-left,percent,100),     getGradientFloat(progress_bottom,centerY+progressWidth,percent,100) );
        canvas.drawRoundRect(progressRect, progressWidth, progressWidth, mPaint);
    }
    /**
     *这个方法的作用是从from到to的距离分成total等分,progress一直在增加等progress等于total时完成了这段距离
     */
    private float getGradientFloat(float from ,float to , int progress , int total){
        return from - (from - to)*progress/total;
    }
}
2、箭头的动画
观察后得出,在矩形变成线的同时,箭头的动画可以分为两个部分,变形的同时上下移动,上移60%的时间,然后下移用40%的时间。箭头的位置及变形看图
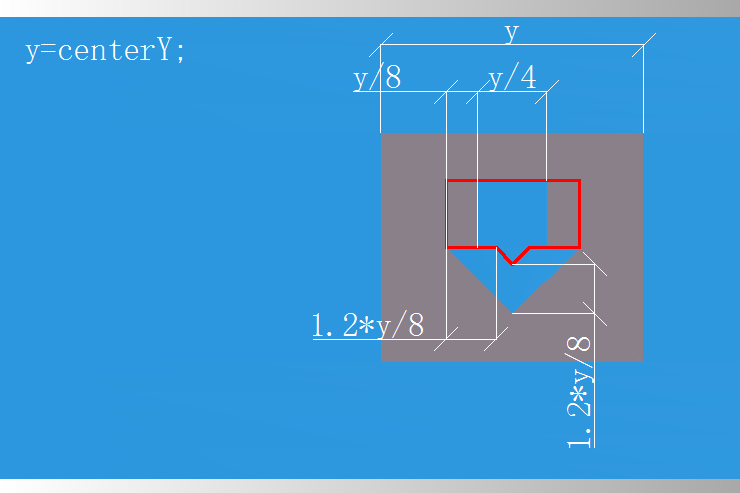
蓝色箭头距灰色矩形的上下左右距离都为centerY/4;从蓝色箭头变为红色形状,开始上代码
    private void drawArrow(Canvas canvas) {
        if (rectPercent>0){
            mPaint.setPathEffect(new CornerPathEffect(5));//变形后箭头有了圆角
        }
        int upPercent = rectPercent;//上升的时间
        int downPercent = 0;//下降的时间
        if (upPercent > 60){
            upPercent = 60;
        }
        if (rectPercent >60 && rectPercent <= 100){
            downPercent = rectPercent -60;
        }
        float shapeSize = (1.0f*centerY/8*rectPercent/100);//形状改变量
        float arrowDown = (1.0f*mHeight/4 + 1.2f*centerY/8 - centerY/4 - progressWidth)*(downPercent)/40;
        float arrowUp = 1.0f*mHeight/4*upPercent/60 ;
        float moveX = 0;//在x轴方向上的移动
        float moveY = arrowUp - arrowDown;//在y轴方向上的移动
        mPaint.setColor(Color.WHITE);
        arrowPath.reset();
        arrowPath.moveTo((mWidth / 2 - centerY / 8) - shapeSize + arrowLeft,
                centerY - centerY / 4 - moveY);
        arrowPath.lineTo(mWidth / 2 + centerY / 8 + shapeSize + arrowLeft,
                centerY - centerY / 4 - moveY);
        arrowPath.lineTo(mWidth / 2 + centerY / 8 + shapeSize + arrowLeft, centerY - moveY);
        arrowPath.lineTo(mWidth / 2 + centerY / 4 - shapeSize*1.2f+arrowLeft, centerY - moveY);
        arrowPath.lineTo(mWidth / 2 + arrowLeft, centerY + centerY / 4 - shapeSize * 1.2f - moveY);
        arrowPath.lineTo(mWidth / 2 - centerY / 4 + shapeSize * 1.2f + arrowLeft, centerY - moveY);
        arrowPath.lineTo(mWidth / 2 - centerY / 8 - shapeSize + arrowLeft, centerY - moveY);
        arrowPath.close();
        canvas.drawPath(arrowPath, mPaint);
    }
3、箭头左右移动的动画
接下来是箭头左右移动的动画,这个就简单多了,上面咱们已经预留了moveX,再进行坐标和时间计算就ok了!
在rectPercent下面添加左右移动的时间
            while (rightPercent <100){//向右移动
                rightPercent+= 5;
                postInvalidate();
                SystemClock.sleep(20);
            }
            while (leftPercent <100){//向左移动
                leftPercent+= 5;
                postInvalidate();
                SystemClock.sleep(20);
            }
在drawArrow()方法中添加
        float arrowLeft = 1.0f*(/*左边距*/centerY/4 - getWidth()/2 - centerY/4)*leftPercent/100;
        float arrowRight= 1.0f*centerY/4*rightPercent/100  ;
        float moveX = arrowRight + arrowLeft;//x轴方向的移动
接下来就是箭头的左右旋转了,产生一种箭头有惯性的感觉。
在init()中添加
matrix = new Matrix();在drawArrow()中加入
        if (rightPercent >0){
            rotateDegress = 15.f*rightPercent/100;
        }
        if (leftPercent == 100){
            rotateDegress = 0;
        }
在canvas.drawPath(arrowPath, mPaint);前面加入下面代码,用来旋转箭头,rotateDegress是旋转角度,后面参数是旋转中心,实际上就是arrowPath 的第三个点的坐标
        matrix.setRotate(rotateDegress, mWidth / 2 + moveX, centerY + centerY / 4 - shapeSize * 1.2f - moveY);
        arrowPath.transform(matrix);
4、进度条的动画
白色进度的实现很容易,比较困难的是,箭头的旋转和复位;另一个是液体的流失动画。那肯定不能用直线做,用path做;先增加一段时间
while (progressPercent <50){//进度条进度
                progressPercent+= 2;
                postInvalidate();
                SystemClock.sleep(20);
            }
然后再drawArrow()方法后面增加一个方法
        private void drawProgress(Canvas canvas) {
        mPaint.setPathEffect(new CornerPathEffect(progressWidth));//设置进度条的圆角,与灰色的progressWidth一致
        float moveX = 1.0f * (getWidth()  - centerY / 2) * progressPercent / 100;
        mPaint.setColor(Color.WHITE);
        progressPath.reset();
        progressPath.moveTo(/*左边距*/centerY / 4 , centerY - progressWidth );
        progressPath.lineTo(/*左边距*/centerY / 4 + moveX, centerY - progressWidth );
        progressPath.lineTo(/*左边距*/centerY / 4 + moveX , centerY + progressWidth);
        progressPath.lineTo(/*左边距*/centerY / 4 , centerY + progressWidth );
        progressPath.close();
        canvas.drawPath(progressPath, mPaint);
    }
也要在drawArrow()方法中增加箭头移动的动画,保证和进度条同步
float moveX = arrowRight + arrowLeft +1.0f*(getWidth() - centerY/2)*progressPercent/100;//x轴方向的移动
把进度在中间停顿两次,用来显示箭头的旋转复位,当进度200毫秒内没有增加时就让箭头执行复位操作,代码如下
   public void setProgressCount(int progress){
        if (progress > progressPercent){
            rotateDegress = -15;
        }else {
            rotateDegress = 15;
        }
        startTimerTask();
        progressPercent = progress;
        postInvalidate();
    }

    boolean isTaskRun;
    private Timer timer;
    private TimerTask timerTask;
    private void startTimerTask(){
        if (isTaskRun) {
            timer.cancel();
            timerTask.cancel();
        }
        timer = new Timer();
        timerTask = new MyTimerTask();
        isTaskRun = true;
        timer.schedule(timerTask, 200);
    }
class MyTimerTask extends TimerTask{
        @Override
        public void run() {
            isTaskRun = false;
            isIdle = true;
            tempDegress = rotateDegress ;
            idleAnimCount = 0;
            setIdleState();
        }
    }
    //进度稍微停止时让箭头旋转复位
    private void setIdleState() {
        if (isIdle) {
            while (idleAnimCount <= 50) {
                int begin = idleAnimCount;
                int end = 0;
                if (begin > 40) {
                    begin = 40;
                }
                if (idleAnimCount > 40) {
                    end = idleAnimCount - 40;
                }
                idleAnimCount += 5;
                SystemClock.sleep(20);
                if (tempDegress > 0) {
                    rotateDegress = getGradientFloat(tempDegress, -10, begin, 40) + end;
                }
                if (tempDegress < 0) {
                    rotateDegress = getGradientFloat(tempDegress, 10, begin, 40) - end;
                }
                if (idleAnimCount > 50) {
                    isIdle = false;
                }
                postInvalidate();
            }
        }
    }
实际效果比图片中好点,有箭头复位时旋转过量再恢复的效果
5、文字显示
在起始动画结束后显示进度,失败后显示failed
 private void drawText(Canvas canvas) {
        if (!startShowText){
            return;
        }
        textPaint.setColor(Color.BLACK);
        textPaint.setTextSize(0.07f * mHeight);
        String text = progressPercent+"%";
        if (isFail && failCount>100){
            textPaint.setColor(Color.RED);
            text = "Failed";
            canvas.drawTextOnPath(text, arrowPath, 15, 35, textPaint);

        }else {
            canvas.drawTextOnPath(text, arrowPath, 30, 35, textPaint);
        }
    }
6、fail的动画效果
要实现液体泄漏的动画效果,上面由4个坐标构成的path已经不能满足需要了,再增加两个点来勉强达到流失的效果
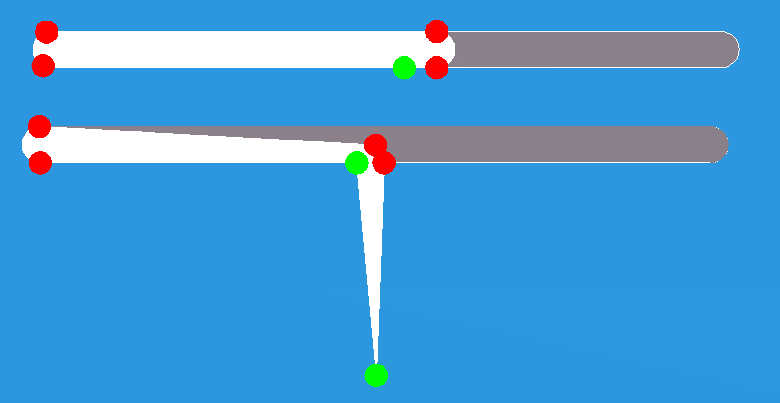
4个红点是原有的path的四个顶点,现在增加两个绿点,一个控制长度一个控制宽度。先让右上角的红点下降一半,然后和左上角的红点一起降落的底部。再增加一个缺口,代码如下
private void drawProgress(Canvas canvas) {
mPaint.setPathEffect(new CornerPathEffect(progressWidth));
        float dx = 0;
        int dropY = 0;
        if (isFail && failCount< 100){
            cornerWidth = 5;
            startY = failCount;
            endY = failCount - 50;
            if (startY>50){
                startY = 50;
            }
            if (endY < 0){
                endY = 0;
            }
        }
        float moveX = 1.0f*(getWidth() - centerY/2)*progressPercent/100;
        if (isFail && failCount>100){
            rotateDegress = 20;
            dx =moveX;
            dropY = failCount -100;
        }
        float e = ( 2.0f*progressWidth)*endY/50;
        float s = ( 1.5f*progressWidth)*startY/50 + e*0.25f;
        float dn = 20.0f*dropY;
        /*画缺口*/
        if (isFail){
            gapPath.reset();
            mPaint.setColor(Color.parseColor("#2C97DE"));
            gapPath.moveTo(/*左边距*/centerY / 4 + moveX,centerY);
            gapPath.lineTo(/*左边距*/centerY / 4 + moveX + cornerWidth, centerY + progressWidth );
            gapPath.lineTo(/*左边距*/centerY / 4 + moveX - 10 + cornerWidth, centerY + progressWidth);
            gapPath.close();
            canvas.drawPath(gapPath,mPaint);
        }
        //白色进度条
        progressPath.reset();
        mPaint.setColor(Color.WHITE);
        progressPath.moveTo(/*左边距*/centerY / 4 + dx, centerY - progressWidth + e + dn);
        progressPath.lineTo(/*左边距*/centerY / 4 + moveX, centerY - progressWidth + s+dn);
        progressPath.lineTo(/*左边距*/centerY / 4 + moveX + cornerWidth, centerY + progressWidth+dn);
        progressPath.lineTo(/*左边距*/centerY / 4 + moveX -10 +2* cornerWidth, centerY + progressWidth +3*failCount+dn);
        progressPath.lineTo(/*左边距*/centerY / 4 + moveX -5 + cornerWidth, centerY + progressWidth+dn);
        progressPath.lineTo(/*左边距*/centerY / 4 + dx, centerY + progressWidth + dn);
        progressPath.close();
        canvas.drawPath(progressPath, mPaint);
        if (isFail&&failCount<200) {
            postInvalidate();
            failCount += 2;
        }
    }
7、复位动画
当fail后把所有的标记变量重置,然后让矩形和箭头用动画的形式复位
完整的动画效果就是这样了,看着挺复杂的一个自定义view分开分析以后是不是感觉非常简单了?有兴趣的可以完善它~
源码地址:https://github.com/JoinHi/MyProgressBar/tree/master


 8477
8477

 被折叠的 条评论
为什么被折叠?
被折叠的 条评论
为什么被折叠?
 到【灌水乐园】发言


