


- 本博客是在 自定义View–Canvas和Paint详解的基础上来讲解的
绘图模式
- 16种效果图如下
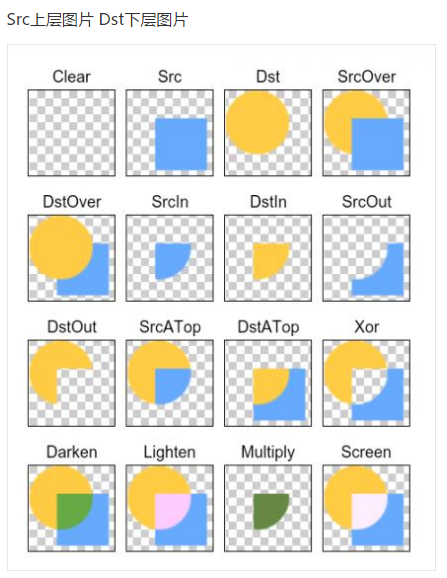
1.PorterDuff.Mode.CLEAR
所绘制不会提交到画布上。
2.PorterDuff.Mode.SRC
显示上层绘制图片
3.PorterDuff.Mode.DST
显示下层绘制图片
4.PorterDuff.Mode.SRC_OVER
正常绘制显示,上下层绘制叠盖。
5.PorterDuff.Mode.DST_OVER
上下层都显示。下层居上显示。
6.PorterDuff.Mode.SRC_IN
取两层绘制交集。显示上层。
7.PorterDuff.Mode.DST_IN
取两层绘制交集。显示下层。
8.PorterDuff.Mode.SRC_OUT
取上层绘制非交集部分。
9.PorterDuff.Mode.DST_OUT
取下层绘制非交集部分。
10.PorterDuff.Mode.SRC_ATOP
取下层非交集部分与上层交集部分
11.PorterDuff.Mode.DST_ATOP
取上层非交集部分与下层交集部分
12.PorterDuff.Mode.XOR
13.PorterDuff.Mode.DARKEN
14.PorterDuff.Mode.LIGHTEN
15.PorterDuff.Mode.MULTIPLY
16.PorterDuff.Mode.SCREEN
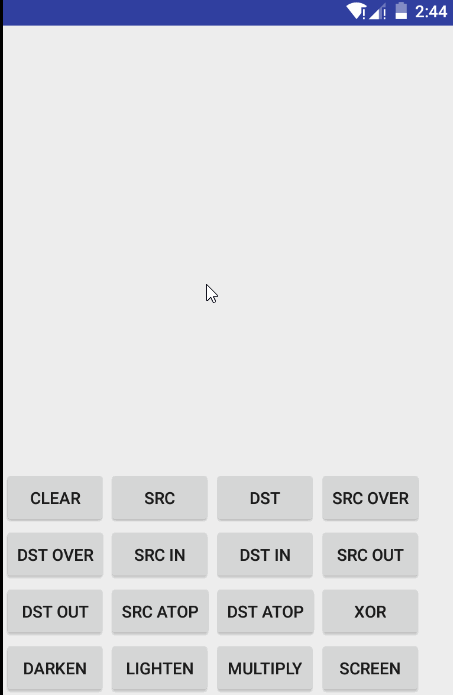
public class SecActivity extends AppCompatActivity implements View.OnClickListener {

    private Button button_clear, button_src, button_dst, button_srcOver;
    private Button button_dstOver, button_srcIn, button_dstIn, button_srcOut;
    private Button button_dstOut, button_srcAtop, button_dstAtop, button_xOr;
    private Button button_darken, button_lighten, button_multiply, button_srceen;
    private ImageView imageView;
    private int width,height;

    protected void onCreate(Bundle savedInstanceState) {
        super.onCreate(savedInstanceState);
        setContentView(R.layout.activity_sec);
        init();
        initListener();
    }

    private void initListener() {
        button_clear.setOnClickListener(this);
        button_src.setOnClickListener(this);
        button_dst.setOnClickListener(this);
        button_srcOver.setOnClickListener(this);

        button_dstOver.setOnClickListener(this);
        button_srcIn.setOnClickListener(this);
        button_dstIn.setOnClickListener(this);
        button_srcOut.setOnClickListener(this);

        button_dstOut.setOnClickListener(this);
        button_srcAtop.setOnClickListener(this);
        button_dstAtop.setOnClickListener(this);
        button_xOr.setOnClickListener(this);

        button_darken.setOnClickListener(this);
        button_lighten.setOnClickListener(this);
        button_multiply.setOnClickListener(this);
        button_srceen.setOnClickListener(this);
    }

    private void init() {
        button_darken = (Button) findViewById(R.id.button_darken);
        button_lighten = (Button) findViewById(R.id.button_lighten);
        button_multiply = (Button) findViewById(R.id.button_multiply);
        button_srceen = (Button) findViewById(R.id.button_screen);

        button_dstOut = (Button) findViewById(R.id.button_dstOut);
        button_srcAtop = (Button) findViewById(R.id.button_srcAtop);
        button_dstAtop = (Button) findViewById(R.id.button_dstAtop);
        button_xOr = (Button) findViewById(R.id.button_xOr);

        button_dstOver = (Button) findViewById(R.id.button_dstOver);
        button_srcIn = (Button) findViewById(R.id.button_srcIn);
        button_dstIn = (Button) findViewById(R.id.button_dstIn);
        button_srcOut = (Button) findViewById(R.id.button_srcOut);

        imageView = (ImageView) findViewById(R.id.imageView_Sec);
        button_clear = (Button) findViewById(R.id.button_clear);
        button_src = (Button) findViewById(R.id.button_src);
        button_dst = (Button) findViewById(R.id.button_dst);
        button_srcOver = (Button) findViewById(R.id.button_srcOver);
    }

    @Override
    public void onClick(View v) {
        switch (v.getId()) {
            //点击不同的按钮来执行不同的画图模式画图
            case R.id.button_clear:
                drawMode(PorterDuff.Mode.CLEAR);
                break;
            case R.id.button_src:
                drawMode(PorterDuff.Mode.SRC);
                break;
            case R.id.button_dst:
                drawMode(PorterDuff.Mode.DST);
                break;
            case R.id.button_srcOver:
                drawMode(PorterDuff.Mode.SRC_OVER);
                break;

            case R.id.button_dstOver:
                drawMode(PorterDuff.Mode.DST_OVER);
                break;
            case R.id.button_srcIn:
                drawMode(PorterDuff.Mode.SRC_IN);
                break;
            case R.id.button_dstIn:
                drawMode(PorterDuff.Mode.DST_IN);
                break;
            case R.id.button_srcOut:
                drawMode(PorterDuff.Mode.SRC_OUT);
                break;

            case R.id.button_dstOut:
                drawMode(PorterDuff.Mode.DST_OUT);
                break;
            case R.id.button_srcAtop:
                drawMode(PorterDuff.Mode.SRC_ATOP);
                break;
            case R.id.button_dstAtop:
                drawMode(PorterDuff.Mode.DST_ATOP);
                break;
            case R.id.button_xOr:
                drawMode(PorterDuff.Mode.XOR);
                break;
            case R.id.button_darken:
                drawMode(PorterDuff.Mode.DARKEN);
                break;
            case R.id.button_lighten:
                drawMode(PorterDuff.Mode.LIGHTEN);
                break;
            case R.id.button_multiply:
                drawMode(PorterDuff.Mode.MULTIPLY);
                break;
            case R.id.button_screen:
                drawMode(PorterDuff.Mode.SCREEN);
                break;
        }
    }

    //这是绘制矩形的方法
    public Bitmap drawRectOnCanves() {
        Bitmap bitmap = Bitmap.createBitmap(imageView.getWidth(), imageView.getHeight(), Bitmap.Config.ARGB_8888);
        Canvas canvas = new Canvas(bitmap);
        RectF rectF = new RectF(0, 0, imageView.getWidth()/2, imageView.getHeight()/2);
        Paint paint = new Paint();
        paint.setAntiAlias(true);
        paint.setColor(Color.GREEN);
        canvas.drawRect(rectF, paint);
        return bitmap;
    }

    //这是绘制圆形的方法
    public Bitmap drawCircleOnCanves() {
        Bitmap bitmap = Bitmap.createBitmap(imageView.getWidth(), imageView.getHeight(), Bitmap.Config.ARGB_8888);
        Canvas canvas = new Canvas(bitmap);
        RectF rectF = new RectF(imageView.getWidth()/4, imageView.getHeight()/4, imageView.getWidth()/4*3, imageView.getHeight()/4*3);
        Paint paint = new Paint();
        paint.setAntiAlias(true);
        paint.setColor(Color.BLUE);
        canvas.drawOval(rectF, paint);
        return bitmap;
    }

    public void drawMode(PorterDuff.Mode mode) {
        Bitmap bitmap = Bitmap.createBitmap(imageView.getWidth(), imageView.getHeight(), Bitmap.Config.ARGB_8888);
        Canvas canvas = new Canvas(bitmap);
        canvas.drawColor(Color.GRAY);
        Paint paint = new Paint();
        paint.setAntiAlias(true);
        //设置画布支持多图层
        int sc = canvas.saveLayer(0, 0, imageView.getWidth(), imageView.getHeight(), paint,
                Canvas.ALL_SAVE_FLAG | Canvas.CLIP_SAVE_FLAG | Canvas.CLIP_TO_LAYER_SAVE_FLAG |
                        Canvas.FULL_COLOR_LAYER_SAVE_FLAG | Canvas.HAS_ALPHA_LAYER_SAVE_FLAG | Canvas.MATRIX_SAVE_FLAG);
        //先画矩形作为底层图层
        canvas.drawBitmap(drawRectOnCanves(), 0, 0, paint);
        //根据传进来的参数设置相应的模式
        if (mode != null) {
            paint.setXfermode(new PorterDuffXfermode(mode));
        }
        //然后再画圆形作为上层图层
        canvas.drawBitmap(drawCircleOnCanves(), 0, 0, paint);
        canvas.restoreToCount(sc);
        imageView.setImageBitmap(bitmap);
    }
}
绘制不同样式的折线
        Paint paint = new Paint();
        paint.setStrokeWidth(8);
        //设置画笔的样式   Paint.Style.STROKE空心画笔     Paint.Style.FILL实心画笔
        paint.setStyle(Paint.Style.STROKE);
        //新建路径对象
        Path path = new Path();
        //设置路径的开始点
        path.moveTo(0,0);
        //随机后面的点的坐标
        for (int i = 1; i <=15 ; i++) {
            path.lineTo(i * 40, (float) (Math.random()*60));
        }
        int[] colors = new int[]{
                Color.BLACK,Color.BLUE,Color.CYAN,Color.DKGRAY,Color.GRAY,Color.GREEN,
                Color.RED};


        Bitmap bitmap = Bitmap.createBitmap(imageView.getWidth(), imageView.getHeight(), Bitmap.Config.ARGB_8888);
        //在我的bitmap对象上创建我的画布
        Canvas canvas = new Canvas(bitmap);
        //第一种路径,原始效果
        patheffects[0] = null;
        //第二种圆角路径
        patheffects[1] = new CornerPathEffect(10);
        //第三种路径效果
        patheffects[2] = new DashPathEffect(new float[]{1, 3, 6, 3}, 0);
        //第四种路径效果
        patheffects[3] = new DiscretePathEffect(3, 5);

        Path path2 = new Path();
        //第五种路径效果
        path2.addRect(0, 0, 8, 8, Path.Direction.CCW);
        patheffects[4] = new PathDashPathEffect(path2, 12, 0, PathDashPathEffect.Style.ROTATE);
        //第六种路径效果
        patheffects[5] = new ComposePathEffect(patheffects[3], patheffects[4]);
        //第七种路径
        patheffects[6] = new SumPathEffect(patheffects[4], patheffects[2]);
        canvas.translate(8, 8);
        for (int i = 0; i < 7; i++) {
            paint.setPathEffect(patheffects[i]);
            paint.setColor(colors[i]);
            canvas.drawPath(path, paint);
            //每画完一种路径,将画布向上移动60px,再去画下一种折线格式
            canvas.translate(0, 60);
        }
        imageView.setImageBitmap(bitmap);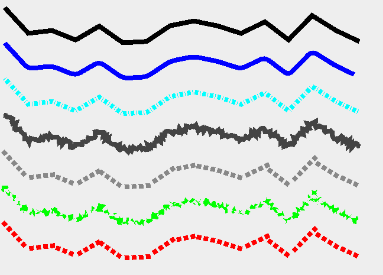
绘制表盘
        Bitmap bitmap = Bitmap.createBitmap(imageView.getWidth(), imageView.getHeight(), Bitmap.Config.ARGB_8888);
        //在我的bitmap对象上创建我的画布
        Canvas canvas = new Canvas(bitmap);
        Paint paint = new Paint();
        paint.setColor(Color.BLACK);
        paint.setAntiAlias(true);
        paint.setStrokeWidth(4);
        paint.setTextSize(20);
        //设置画笔的风格    Paint.Style.STROKE空心画笔     Paint.Style.FILL实心画笔
        paint.setStyle(Paint.Style.STROKE);
        canvas.drawCircle(imageView.getWidth() / 2, imageView.getHeight() / 2, imageView.getHeight() / 2 - 10, paint);
        canvas.save();
        //我们将画布进行适当的旋转,就可以完成表盘的简单绘制
        //这里就是进行相应的计算来绘制表盘的各种细节
        for (int i = 1; i <= 12; i++) {
            canvas.rotate(30, imageView.getWidth() / 2, imageView.getHeight() / 2);
            canvas.drawLine(imageView.getWidth() / 2, 15, imageView.getWidth() / 2, 25, paint);
            canvas.drawText(i + "", imageView.getWidth() / 2 - 7, 50, paint);
        }
        //画布旋转完毕之后进行还原
        canvas.restore();
        imageView.setImageBitmap(bitmap);
着色器Shader
- 分为五种
LinearGradient
线性渐变
RadiaGradient
环形渐变
SweepGradient
扇形渐变
BitmapShader
图片着色器
ComposeShader
组个着色器
着色器Shader的样式TileMode
分为三种TileMode
TileMode.CLAMP,设置为该Mode时画笔会根据最后一个颜色继续向下绘制
TileMode.REPAET,设置为该Mode时,画笔会重复之前的绘制
TileMode.MIRROR,设置为该Mode时,画笔会镜像的绘制使用方式比较简单,代码如下:
public class MainActivity extends AppCompatActivity implements View.OnClickListener{

    private Button button,button2,button3,button4,button5,button_next;
    private ImageView imageView;
    protected void onCreate(Bundle savedInstanceState) {
        super.onCreate(savedInstanceState);
        setContentView(R.layout.activity_main);
        init();
    }

    private void init() {
        button= (Button) findViewById(R.id.button);
        button2= (Button) findViewById(R.id.button2);
        button3= (Button) findViewById(R.id.button3);
        button4= (Button) findViewById(R.id.button4);
        button5= (Button) findViewById(R.id.button5);
        button_next= (Button) findViewById(R.id.button6);

        button.setOnClickListener(this);
        button2.setOnClickListener(this);
        button3.setOnClickListener(this);
        button4.setOnClickListener(this);
        button5.setOnClickListener(this);
        button_next.setOnClickListener(this);
        imageView= (ImageView) findViewById(R.id.imageView);
    }


    @Override
    public void onClick(View v) {
        switch (v.getId()){
            case R.id.button:
                //线性渐变
                drawLinearGradient();
                break;
            case R.id.button2:
                //环形渐变
                drawRadiaGradient();
                break;
            case R.id.button3:
                //扇形渐变
                drawSweepGradient();
                break;
            case R.id.button4:
                //图片着色器
                drawBitmapShader();
                break;
            case R.id.button5:
                //组个着色器
                drawComposeShader();
                break;
            case R.id.button6:
                startActivity(new Intent(this,SecActivity.class));
                break;

        }
    }

    private void drawComposeShader() {
        SweepGradient sweepGradient=new SweepGradient(imageView.getWidth()/2,imageView.getHeight()/2,Color.GREEN,Color.BLUE);
        LinearGradient linearGradient=new LinearGradient(0,0,100,0, Color.BLUE,Color.GREEN, Shader.TileMode.MIRROR);
        ComposeShader composeShader=new ComposeShader(sweepGradient,linearGradient, PorterDuff.Mode.LIGHTEN);
        Bitmap bitmap=Bitmap.createBitmap(imageView.getWidth(),imageView.getHeight(), Bitmap.Config.ARGB_8888);
        Canvas canvas=new Canvas(bitmap);
        Paint paint=new Paint();
        paint.setShader(composeShader);
        canvas.drawRect(0,0,imageView.getWidth(),imageView.getHeight(),paint);
        imageView.setImageBitmap(bitmap);
    }

    private void drawBitmapShader() {
        BitmapShader bitmapShader=new BitmapShader(BitmapFactory.decodeResource(getResources(),R.mipmap.aqi_bg_you), Shader.TileMode.MIRROR, Shader.TileMode.MIRROR);
        Bitmap bitmap=Bitmap.createBitmap(imageView.getWidth(),imageView.getHeight(), Bitmap.Config.ARGB_8888);
        Canvas canvas=new Canvas(bitmap);
        Paint paint=new Paint();
        paint.setShader(bitmapShader);
        canvas.drawRect(0,0,imageView.getWidth(),imageView.getHeight(),paint);
        imageView.setImageBitmap(bitmap);
    }

    private void drawSweepGradient() {
        SweepGradient sweepGradient=new SweepGradient(imageView.getWidth()/2,imageView.getHeight()/2,Color.GREEN,Color.BLUE);
        Bitmap bitmap=Bitmap.createBitmap(imageView.getWidth(),imageView.getHeight(), Bitmap.Config.ARGB_8888);
        Canvas canvas=new Canvas(bitmap);
        Paint paint=new Paint();
        paint.setShader(sweepGradient);
        canvas.drawRect(0,0,imageView.getWidth(),imageView.getHeight(),paint);
        imageView.setImageBitmap(bitmap);
    }

    private void drawRadiaGradient() {
        RadialGradient radialGradient=new RadialGradient(imageView.getWidth()/2,imageView.getHeight()/2,200,Color.GREEN,Color.BLUE, Shader.TileMode.MIRROR);
        Bitmap bitmap=Bitmap.createBitmap(imageView.getWidth(),imageView.getHeight(), Bitmap.Config.ARGB_8888);
        Canvas canvas=new Canvas(bitmap);
        Paint paint=new Paint();
        paint.setShader(radialGradient);
        canvas.drawRect(0,0,imageView.getWidth(),imageView.getHeight(),paint);
        imageView.setImageBitmap(bitmap);
    }

    private void drawLinearGradient() {
        int[] colors=new int[]{Color.BLACK,Color.RED,Color.BLUE,Color.GREEN};
        float[] floats=new float[]{0.0f,0.1f,0.9f,1.0f};
        //设置两个颜色的渐变的linearGradient
        LinearGradient linearGradient=new LinearGradient(0,0,100,0, Color.BLUE,Color.GREEN, Shader.TileMode.MIRROR);
        //设置多个颜色的渐变的linearGradient
        //floats表示的是每个颜色所占的宽度比例,设置为null表示均匀分布
        linearGradient=new LinearGradient(0,0,250,0,colors,floats, Shader.TileMode.MIRROR);
        Bitmap bitmap=Bitmap.createBitmap(imageView.getWidth(),imageView.getHeight(), Bitmap.Config.ARGB_8888);
        Canvas canvas=new Canvas(bitmap);
        Paint paint=new Paint();
        paint.setShader(linearGradient);
        canvas.drawRect(0,0,imageView.getWidth(),imageView.getHeight(),paint);
        imageView.setImageBitmap(bitmap);
    }
}- 代码逻辑就是点击不同的按钮执行不同的shader样式进行绘制。
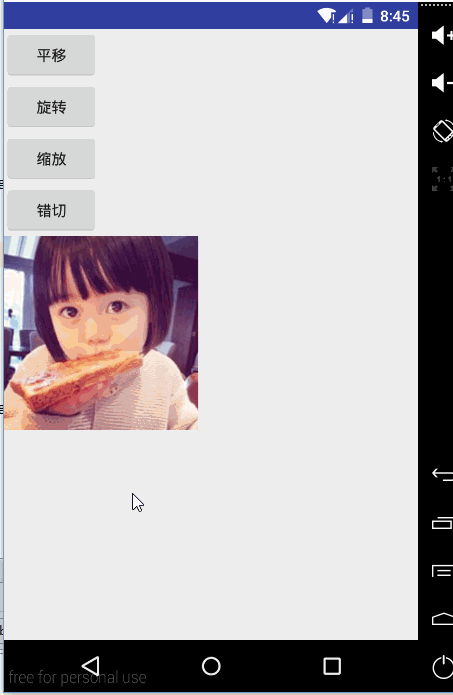
矩阵Matrix
- Matrix的对图像的处理可分为四类基本变换:
Translate 平移变换
Rotate 旋转变换
Scale 缩放变换
Skew 错切变换
public class SecActivity extends AppCompatActivity implements View.OnClickListener{

    private Button button,button2,button3,button4;
    private ImageView imageView;
    private Bitmap bitmap;
    protected void onCreate(Bundle savedInstanceState) {
        super.onCreate(savedInstanceState);
        setContentView(R.layout.activity_sec);
        init();
        bitmap= BitmapFactory.decodeResource(getResources(),R.mipmap.xiaoye);
    }

    private void init() {
        button= (Button) findViewById(R.id.button_1);
        button2= (Button) findViewById(R.id.button_2);
        button3= (Button) findViewById(R.id.button_3);
        button4= (Button) findViewById(R.id.button_4);

        imageView= (ImageView) findViewById(R.id.imageView_2);

        button.setOnClickListener(this);
        button2.setOnClickListener(this);
        button3.setOnClickListener(this);
        button4.setOnClickListener(this);
    }

    @Override
    public void onClick(View v) {
        switch (v.getId()){
            case R.id.button_1:
                translatePic();
                break;
            case R.id.button_2:
                rotatoPic();
                break;
            case R.id.button_3:
                scalePic();
                break;
            case R.id.button_4:
                skewPic();
                break;
        }
    }

    private void skewPic() {
        Bitmap bitmapMy=Bitmap.createBitmap(bitmap.getWidth(),bitmap.getHeight(), Bitmap.Config.ARGB_8888);
        Canvas canvas=new Canvas(bitmapMy);
        Matrix matrix=new Matrix();
        matrix.postSkew(0.0f,0.5f);
        canvas.drawBitmap(bitmap,matrix,null);
        imageView.setImageBitmap(bitmapMy);
    }

    private void scalePic() {
        Bitmap bitmapMy=Bitmap.createBitmap(bitmap.getWidth(),bitmap.getHeight(), Bitmap.Config.ARGB_8888);
        Canvas canvas=new Canvas(bitmapMy);
        Matrix matrix=new Matrix();
        matrix.postScale(1.5f,1.5f);

        canvas.drawBitmap(bitmap,matrix,null);
        imageView.setImageBitmap(bitmapMy);
    }

    private void rotatoPic() {
        Bitmap bitmapMy=Bitmap.createBitmap(bitmap.getWidth(),bitmap.getHeight(), Bitmap.Config.ARGB_8888);
        Canvas canvas=new Canvas(bitmapMy);
        Matrix matrix=new Matrix();
        matrix.postRotate(180,bitmap.getWidth()/2,bitmap.getHeight()/2);

        canvas.drawBitmap(bitmap,matrix,null);
        imageView.setImageBitmap(bitmapMy);
    }

    private void translatePic() {
        Bitmap bitmapMy=Bitmap.createBitmap(bitmap.getWidth(),bitmap.getHeight(), Bitmap.Config.ARGB_8888);
        Canvas canvas=new Canvas(bitmapMy);
        Matrix matrix=new Matrix();
        matrix.postTranslate(bitmapMy.getWidth()/2,0);

        canvas.drawBitmap(bitmap,matrix,null);
        imageView.setImageBitmap(bitmapMy);
    }
}


 2555
2555

 被折叠的 条评论
为什么被折叠?
被折叠的 条评论
为什么被折叠?
 到【灌水乐园】发言


