


Spring Cloud Gateway
- 关于
- Spring Cloud Gateway 特性
- 1. 基于Spring Framework 5, Project Reactor以及Spring Boot 2.0构建
- 2. Able to match routes on any request attribute.
- 3. Predicates and filters are specific to routes.
- 4 Circuit Breaker integration
- 5 Spring Cloud DiscoveryClient integration
- 6 Easy to write Predicates and Filters
- 7 Request Rate Limiting
- 8 Path Rewriting
- 以上都是使用yaml配置文件,也可以使用java代码完成配置
- 参考:
关于
什么是Spring Cloud Gateway?
This project provides a library for building an API Gateway on top of Spring WebFlux. Spring Cloud
Gateway aims to provide a simple, yet effective way to route to APIs and provide cross cutting concerns to
them such as: security, monitoring/metrics, and resiliency.
翻译:
Spring Cloud Gateway是基于Spring WebFlux构建的API 网关。
什么是 Spring WebFlux? : 从功能和使用上来讲,可以理解为类似SpringMvc,但是比SpringMvc更高级,更先进;从更新迭代上来讲,可以理解为是SpringMvc的替代品。- Spring Cloud Gateway提供了一种简单且有效的
路由方式 - Spring Cloud Gateway也提供了一些切面关注点,例如:安全,监控/指标和弹性(限流)。
Spring Cloud Gateway 特性
也可以理解为Spring Cloud Gateway 大致包含的内容有哪些。
-
Built on Spring Framework 5, Project Reactor and Spring Boot 2.0
-
Able to match routes on any request attribute.
-
Predicates and filters are specific to routes.
-
Circuit Breaker integration.
-
Spring Cloud DiscoveryClient integration
-
Easy to write Predicates and Filters
-
Request Rate Limiting
-
Path Rewriting
1. 基于Spring Framework 5, Project Reactor以及Spring Boot 2.0构建
Project Reactor是什么?
Reactor is a fourth-generation reactive library, based on the Reactive Streams
specification, for building non-blocking applications on the JVM
Reactor是一个第四代响应式编程类库,它是基于响应式流规范的,用于在JVM上构建非阻塞应用。
参考:
1. https://projectreactor.io/
2. https://spring.io/reactive
Reactor和Spring的关系
先看看Reactor响应式编程类库有什么特性(优势)?
Reactor响应式系统非常适合低延迟、高吞吐量场景的工作负荷
既然Reactor有如此优势,那Spring肯定想纳入己用,于是Spring5推出了自己的响应式编程库Reactive 。参见:Spring官网
附:
- Project Reactor是一个运行在JVM上的反应式编程基础库,以“背压”的形式管理数据处理,提供了可组合的异步序列APIFlux和Mono。同时,它也实现了Reactive Streams 规范。
- Project Reactor主要是由Pivotal公司开发和维护的,Spring框架也是该公司在维护,而且Spring Framework 5中默认使用Reactor作为反应式编程的实现,
由此虽然Reactor不是Spring的子项目,也有人称Reactor为Spring Reactor。
关于Spring 的Reactive
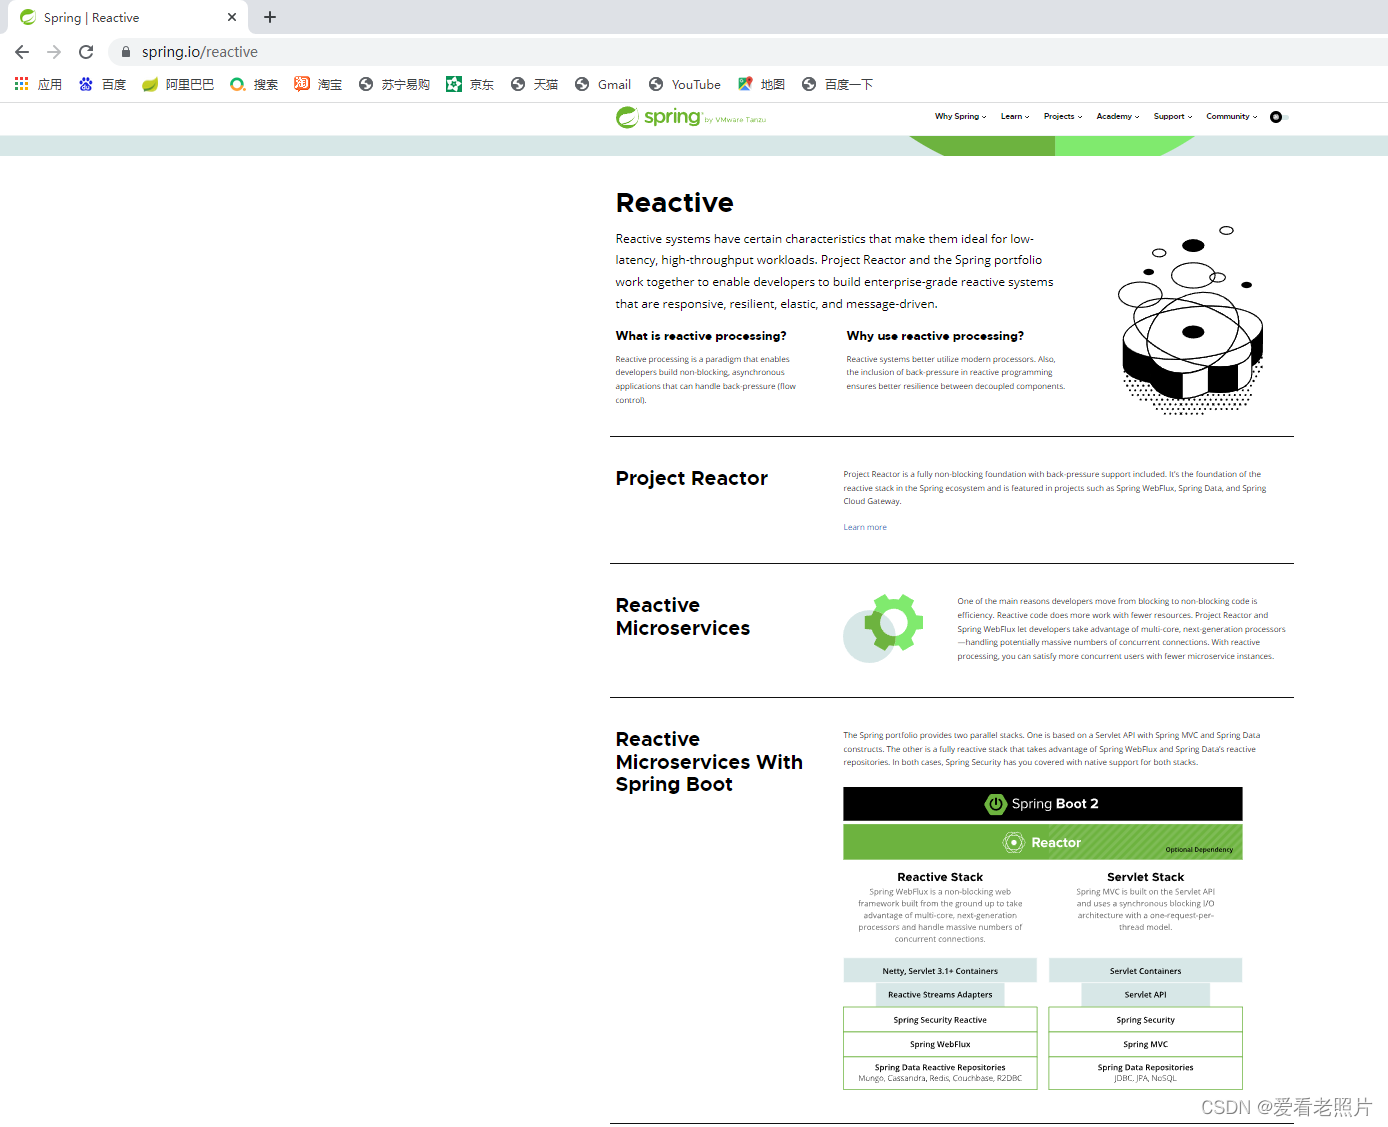
- Reactor
Reactive systems have certain characteristics that make them ideal for low-latency, high-throughput
workloads. Project Reactor and the Spring portfolio work together to enable developers to build enterprise-
grade reactive systems that are responsive, resilient, elastic, and message-driven.
响应式系统具有某种特性,这些特性使得响应式系统非常适合低延迟、高吞吐量的场景。Project Reactor和Spring portfolio(Spring集)一起工作,使得开发者能够构建响应式的、弹力和消息驱动的企业级响应式系统。
What is reactive processing? 什么是响应式处理?
Reactive processing is a paradigm that enables developers build non-blocking, asynchronous applications
that can handle back-pressure (flow control).
响应式处理是一种范例,使开发人员能够构建非阻塞的异步应用程序,可以处理背压(流量控制).
Why use reactive processing? 为什么要使用响应式处理?
反应式系统更好地利用了现代处理器。此外,在响应式编程中包含背压可确保解耦组件之间更好的弹性。
- Project Reactor
Project Reactor is a fully non-blocking foundation with back-pressure support included. It’s the foundation
of the reactive stack in the Spring ecosystem and is featured in projects such as Spring WebFlux, Spring
Data, and Spring Cloud Gateway.
Project Reactor是完全非阻塞的、它也包含了背压(流控制)支持。
Project Reactro是Spring生态系统中的响应式栈的基础,它在Spring WebFlux、Spring Data以及Spring Cloud Gateway项目中起着重要作用。
- Reactive Microservices
One of the main reasons developers move from blocking to non-blocking code is efficiency. Reactive code
does more work with fewer resources. Project Reactor and Spring WebFlux let developers take advantage
of multi-core, next-generation processors—handling potentially massive numbers of concurrent
connections. With reactive processing, you can satisfy more concurrent users with fewer microservice
instances.
开发者从阻塞编码转向非阻塞编码的一个主要原因是:效率。
响应式编码(非阻塞)可以用更少的资源做更多的事情。
Project Reactor和SpringWebFlux允许开发者利用多核心、下一代处理器来处理潜在的海量的并发连接。
使用响应式处理,用更少的微服务实例就可以满足更多的并发用户。
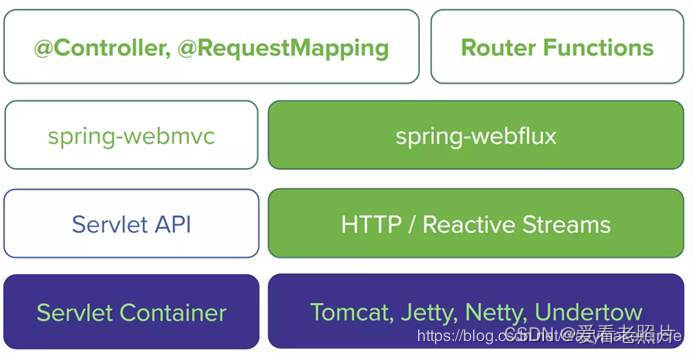
- Reactive Microservices With Spring Boot
The Spring portfolio provides two parallel stacks. One is based on a Servlet API with Spring MVC and
 Spring Data constructs. The other is a fully reactive stack that takes advantage of Spring WebFlux and
 Spring Data’s reactive repositories. In both cases, Spring Security has you covered with native support for
 both stacks.
Spring集提供了两个并行栈。
一个是:基于Servlet API,如 SpringMVC和Spring Data的构造。
另一个是:利用Spring WebFlux和SpringData的响应式仓库的完全响应式栈。
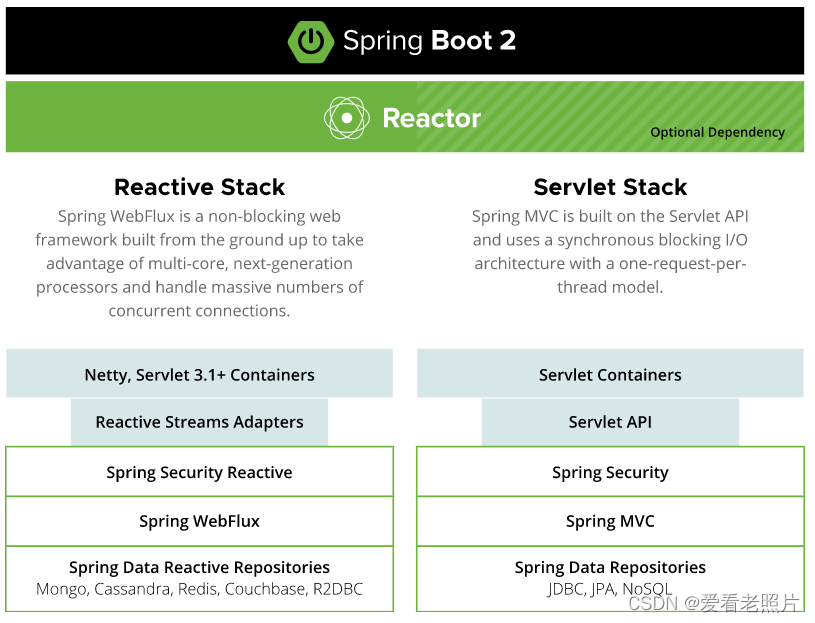
其他图示如下,来源:https://blog.csdn.net/a1036645146/article/details/106383883
- Integration with common technologies
Accessing and processing data in a reactive way is important. MongoDB, Redis, and Cassandra all have
native reactive support in Spring Data. Many relational databases (Postgres, Microsoft SQL Server,
MySQL, H2, and Google Spanner) have reactive support via R2DBC. In the world of messaging, Spring
Cloud Stream also supports reactive access to platforms like RabbitMQ and Kafka.
2. Able to match routes on any request attribute.
能够匹配任何请求属性的路由。(关于路由可参见下面的 3 . Predicates and filters are specific to routes)
如何引入Spring Cloud Gateway
参见官网:https://docs.spring.io/spring-cloud-gateway/docs/current/reference/html/#gateway-starter
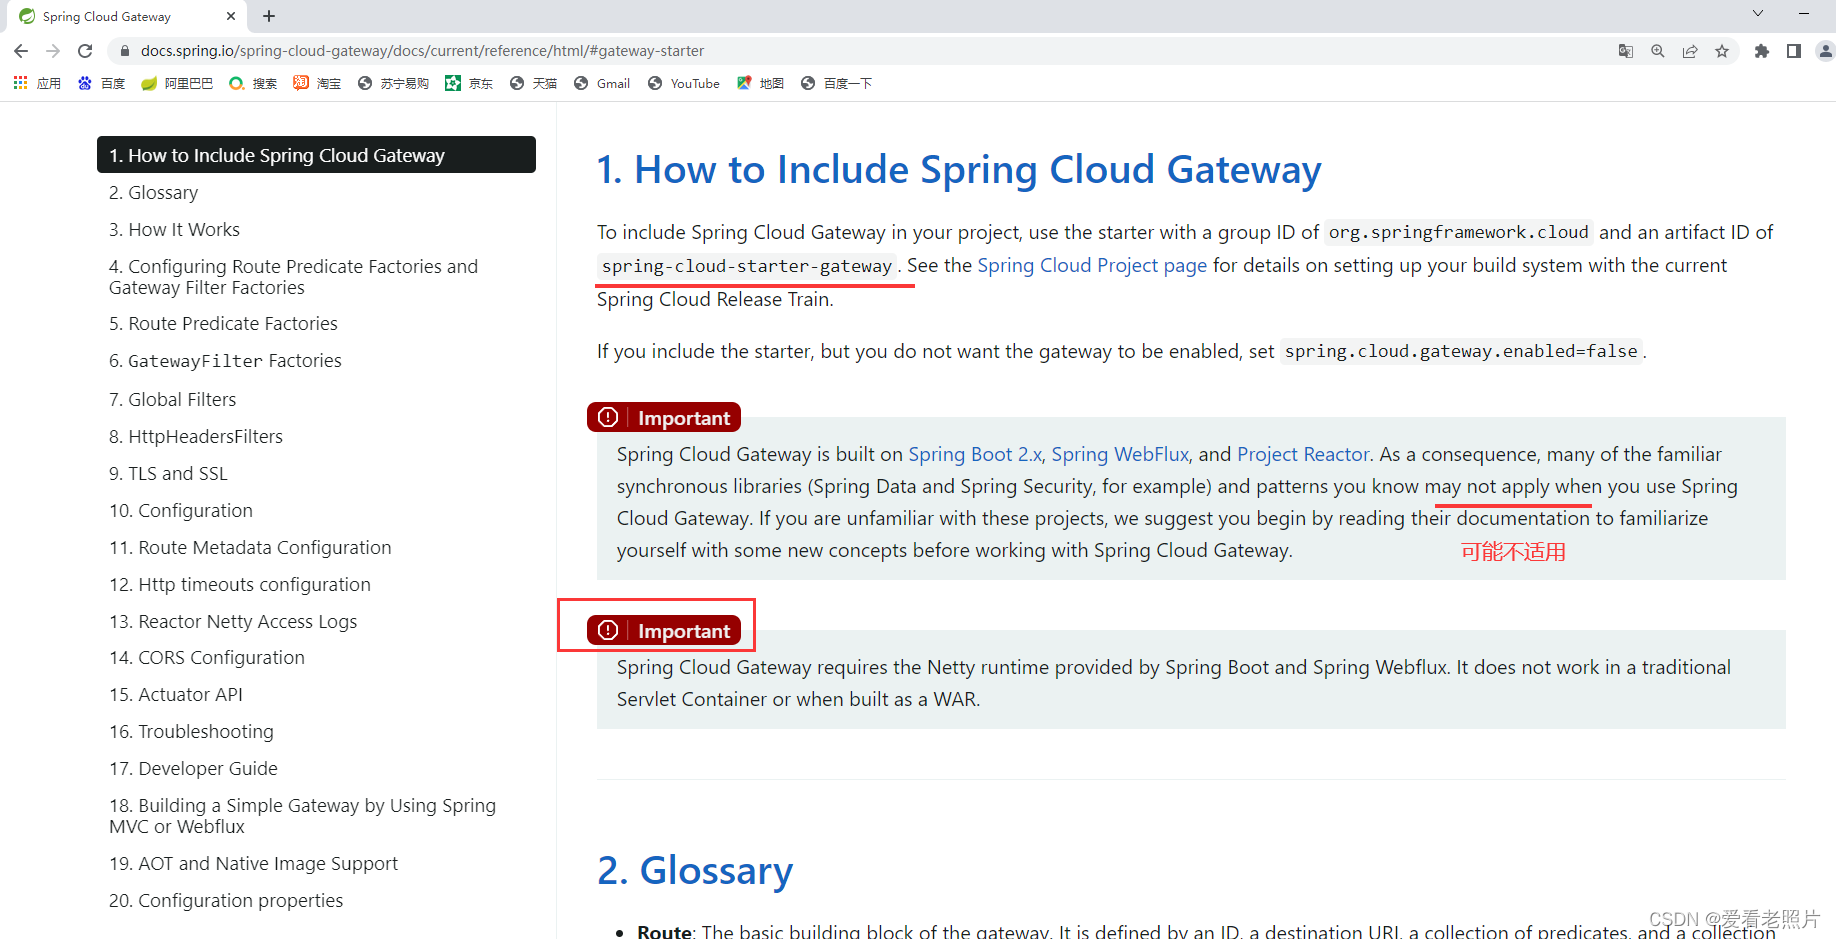
引入依赖spring-cloud-starter-gateway即可。
两个注意:
1、因为Spring Cloud Gateway是构建在Spring Boot 2.x, Spring WebFlux,以及Project Reactor上的。这就会导致之前熟悉的同步类库(如:Spring Data和Spring Security)可能不适用了。
2、Spring Cloud Gateway 需要Spring Boot和Spring Webflux提供的Netty运行环境(jar/依赖包)。Spring Coud Gateway项目不能建成WAR包,也不能在传统的Servlet容器上运行。
示例
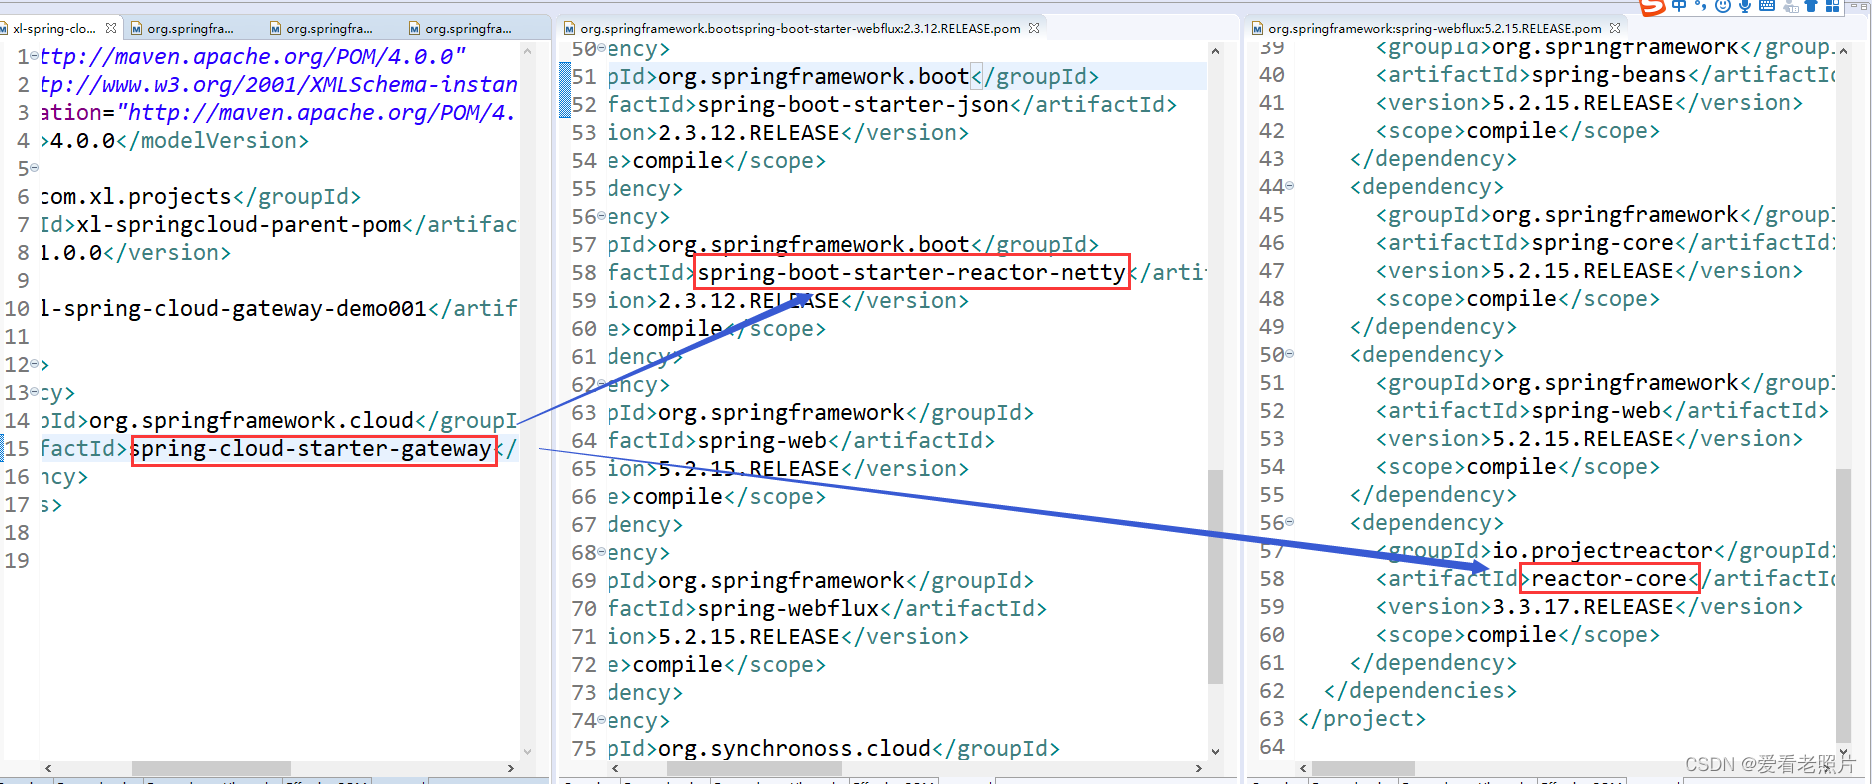
pom.xml :只引入了spring-cloud-starter-gateway
<project xmlns="http://maven.apache.org/POM/4.0.0"
	xmlns:xsi="http://www.w3.org/2001/XMLSchema-instance"
	xsi:schemaLocation="http://maven.apache.org/POM/4.0.0 http://maven.apache.org/xsd/maven-4.0.0.xsd">
	<modelVersion>4.0.0</modelVersion>
	<parent>
		<groupId>com.xl.projects</groupId>
		<artifactId>xl-springcloud-parent-pom</artifactId>
		<version>1.0.0</version>
	</parent>
	<artifactId>xl-spring-cloud-gateway-demo001</artifactId>
	<dependencies>
		<dependency>
			<groupId>org.springframework.cloud</groupId>
			<artifactId>spring-cloud-starter-gateway</artifactId>
		</dependency>
	</dependencies>
</project>
进入到spring-cloud-starter-gateway中可发现其他需要的依赖,如:netty相关依赖、reactor相关依赖等等。
主启动类:
package com.xl.projects.springcloudgateway.demo;

import org.springframework.boot.SpringApplication;
import org.springframework.boot.autoconfigure.SpringBootApplication;

@SpringBootApplication
public class SpringCloudGatewayDemoApplication {
	public static void main(String[] args) {
		SpringApplication.run(SpringCloudGatewayDemoApplication.class, args);
	}
}
启动:
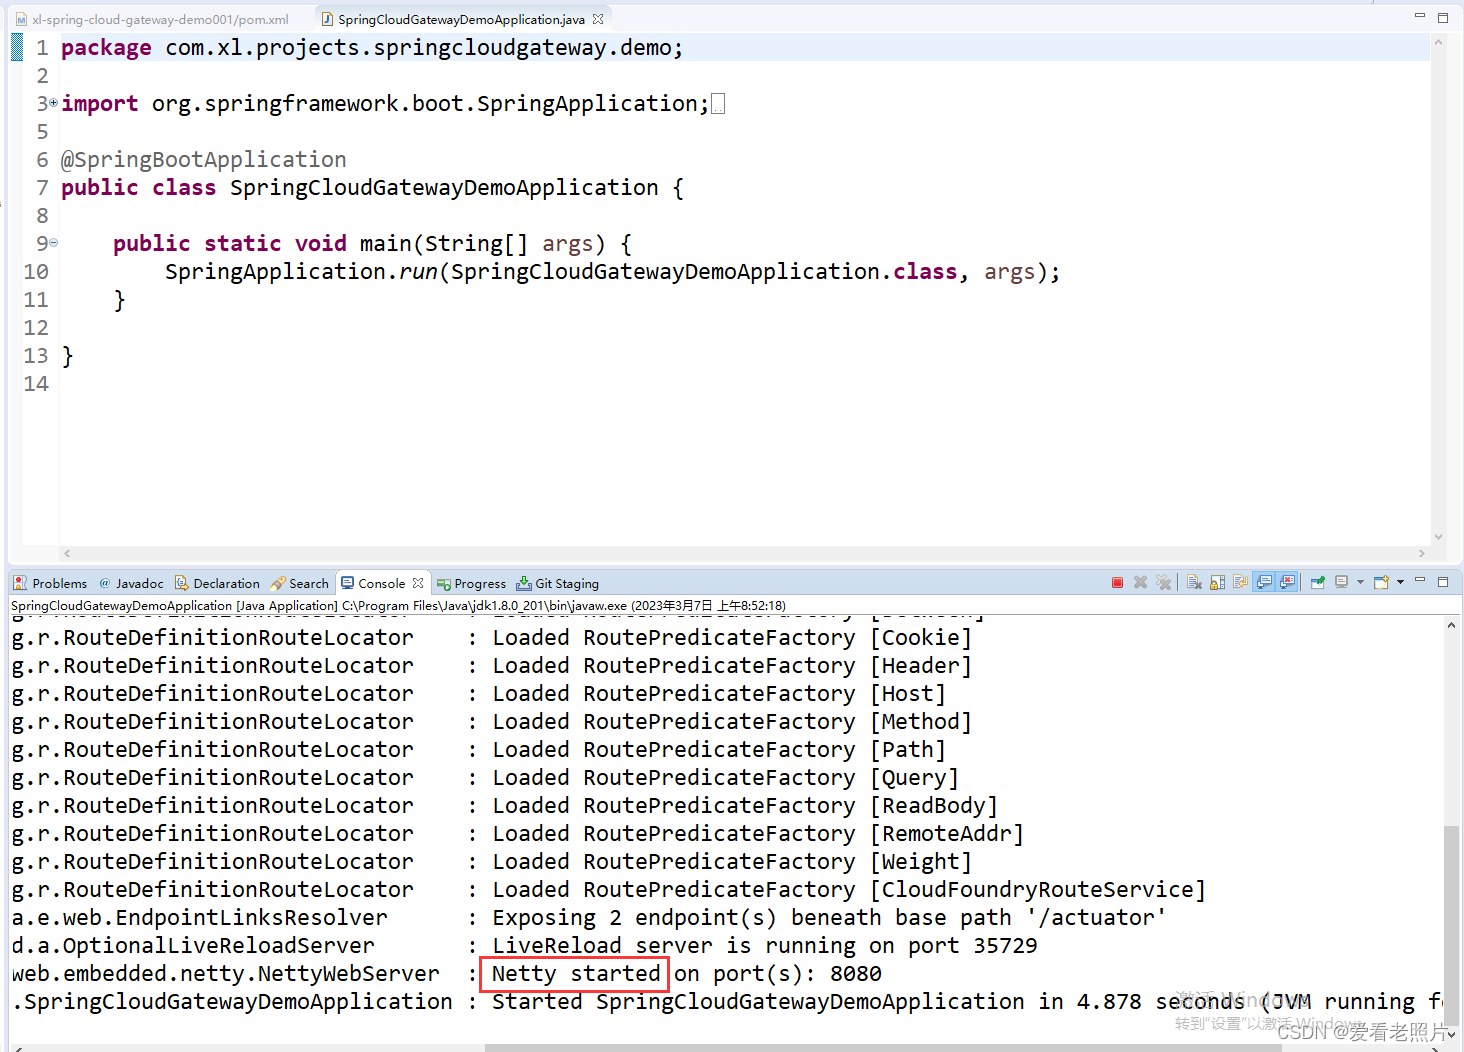
成功启动!注意:启动的是Netty,并非Tomcat!
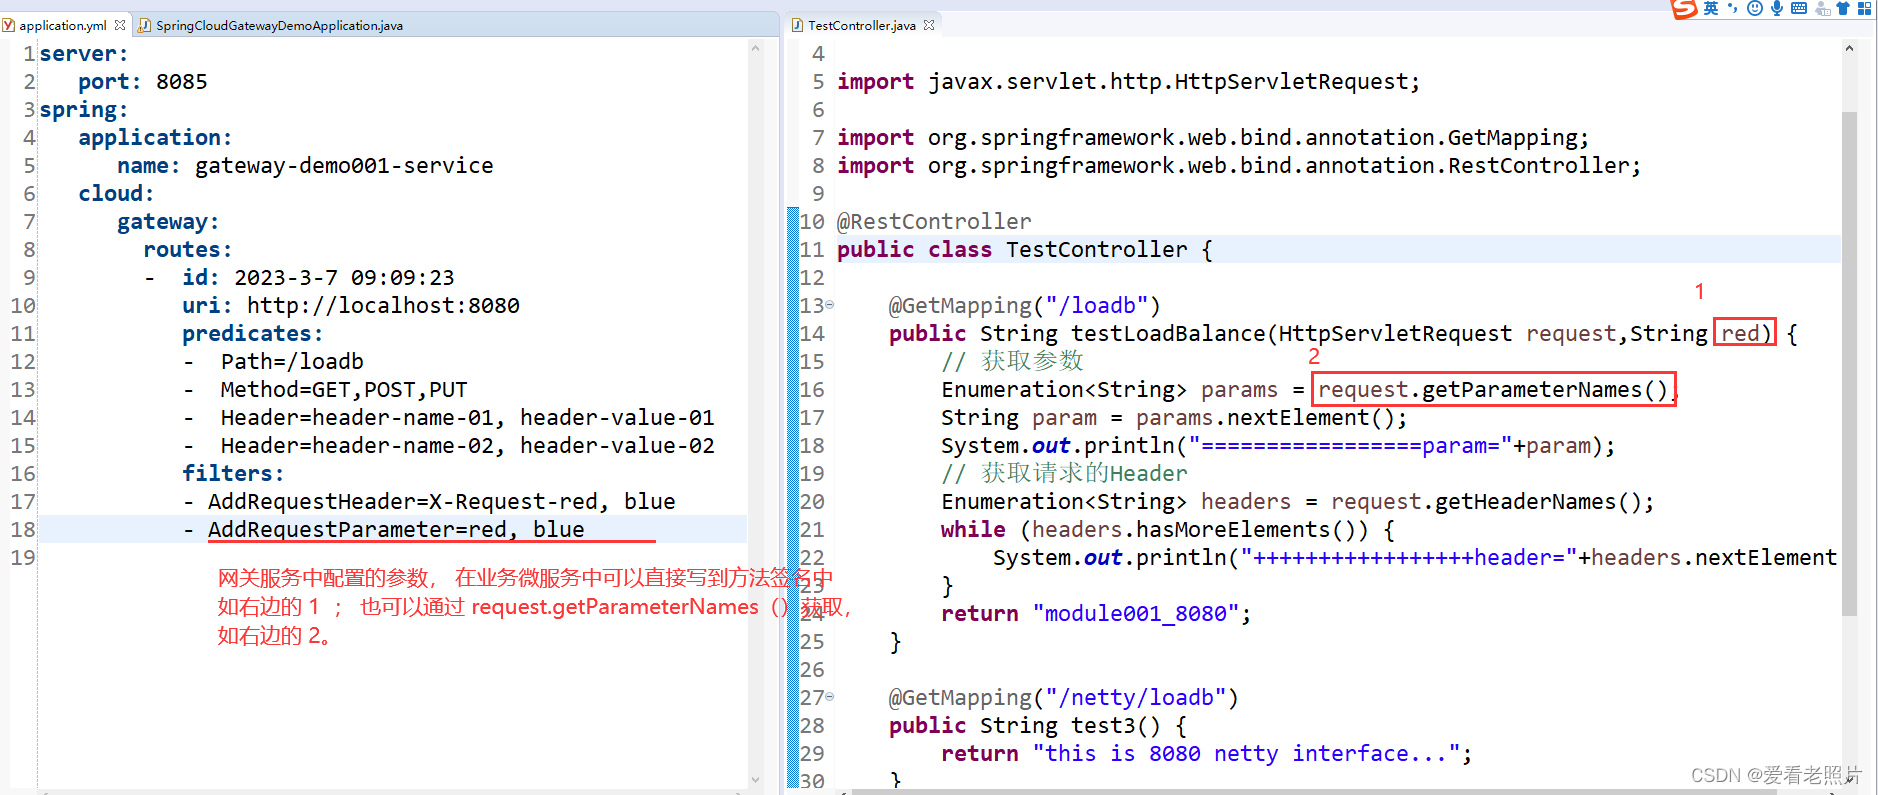
application.yml
server:
   port: 8085
spring:
   application:
      name: gateway-demo001-service
   cloud:
      gateway:
        routes:
        -  id: 2023-3-7 09:09:23
           uri: http://localhost:8080
           predicates:
           -  Path=/loadb
           -  Method=GET,PUT
           -  Header=header-name-01, header-value-01
           -  Header=header-name-02, header-value-02
           filters:
           - AddRequestHeader=X-Request-red, blue
           - AddRequestParameter=red, blue
如上配置:
- 将端口配置为8085;
- 配置4个断言:
- 1个Path=/loadb :请求须为localhost:8085/loadb
- 1个Method=GET,PUT :请求须为 GET或者PUT方式
- 1个Header : 请求时须加上一个名字为header-name-01,值为header-value-01的header
- 第2个Header: 请求时须加上一个名字为header-name-02,值为header-value-02的header
请求同时满足以上4个断言时,就会路由到另一个微服务上去,访问地址为uri+Path(http://localhost8080/loadb)
- 配置2个过滤器:
- 增加一个Header: 名称为X-Request-red,值为blue
- 增加一个请求参数:名称为red, 值为blue
准备一个微服务端口为8080,以及地址为/loadb的接口。 8080微服务代码:
package com.xl.module001.controller;

import java.util.Enumeration;

import javax.servlet.http.HttpServletRequest;

import org.springframework.web.bind.annotation.RequestMapping;
import org.springframework.web.bind.annotation.RestController;

@RestController
public class TestController {

	@RequestMapping("/loadb")
	public String testLoadBalance(HttpServletRequest request,String red) {
		// 获取参数
		Enumeration<String> params = request.getParameterNames();
		String param = params.nextElement();
		System.out.println("=================param="+param);
		// 获取请求的Header
		Enumeration<String> headers = request.getHeaderNames();
		while (headers.hasMoreElements()) {
			System.out.println("+++++++++++++++++header="+headers.nextElement());
		}
		return "module001_8080";
	}

	@GetMapping("/netty/loadb")
	public String test3() {
		return "this is 8080 netty interface...";
	}

	@GetMapping("/")
	public String test4() {
		return "this is 8080 root directory";
	}

}
启动8080服务

启动8085网关服务

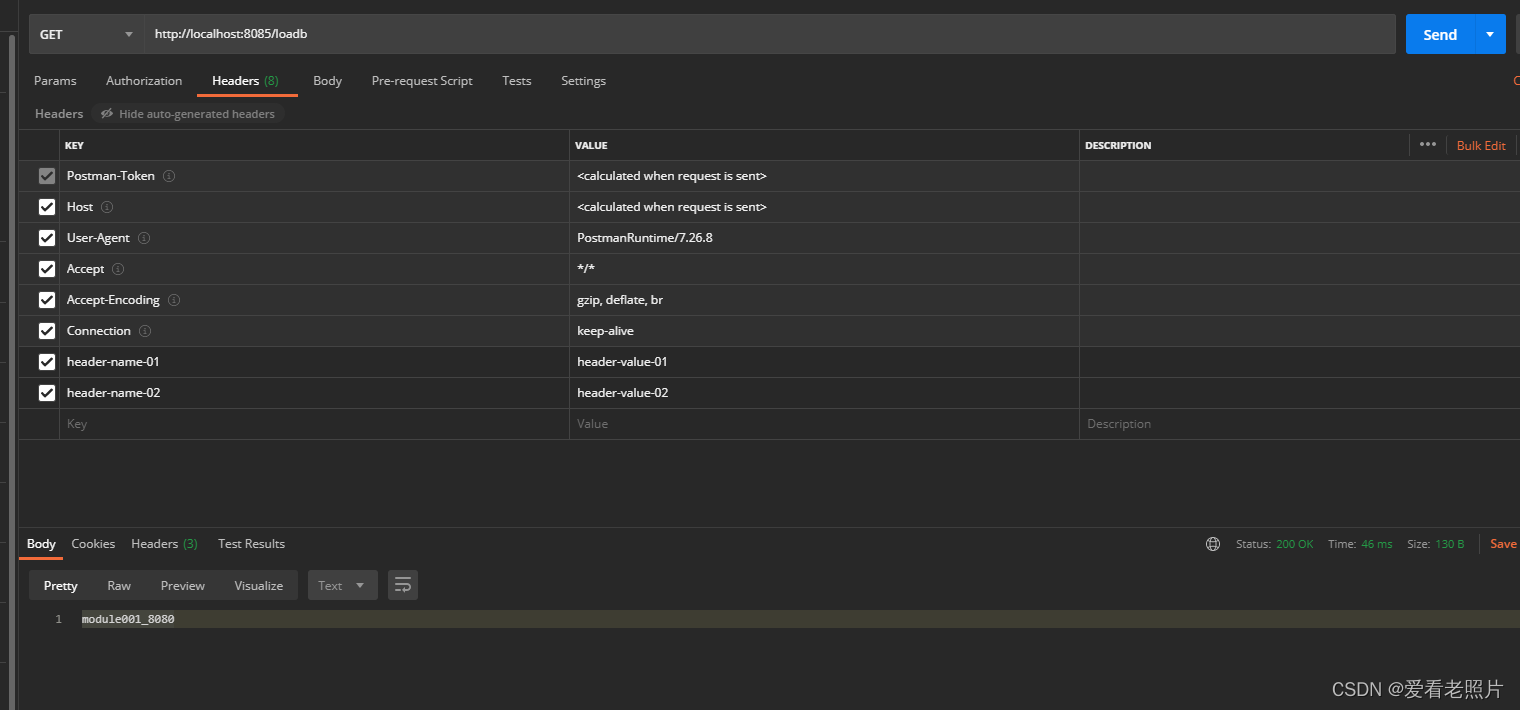
postman访问8085服务: localhost:8085/loadb
-
请求方式为 POST
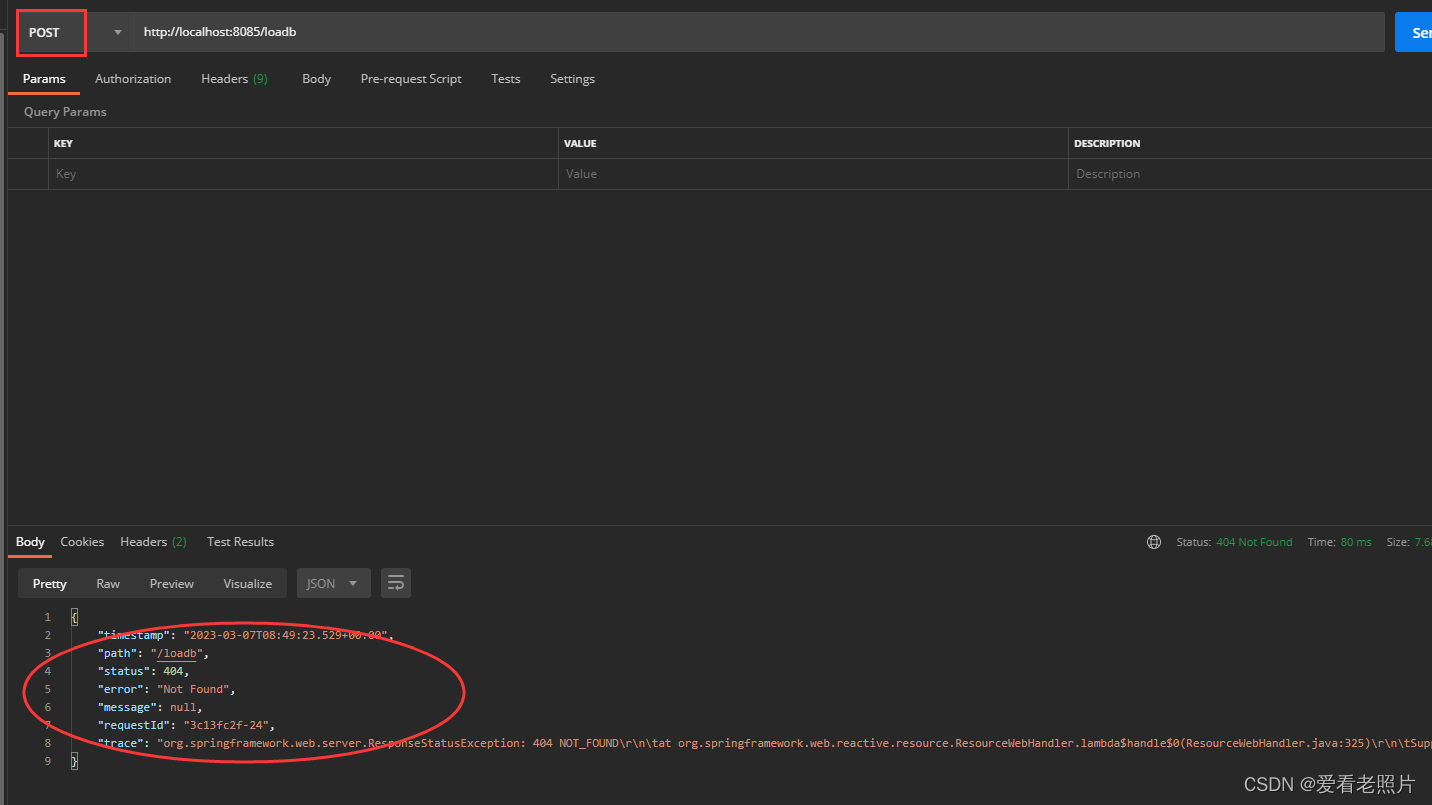
因为断言中配置了请求方式只能是 GET或者PUT,所以,POST会失败(无法路由到localhost:8085/loadb)。 -
不加Header

同理,断言加了两个Header,这里没有加Header,必然会失败。 -
满足4个断言的情况下,测试
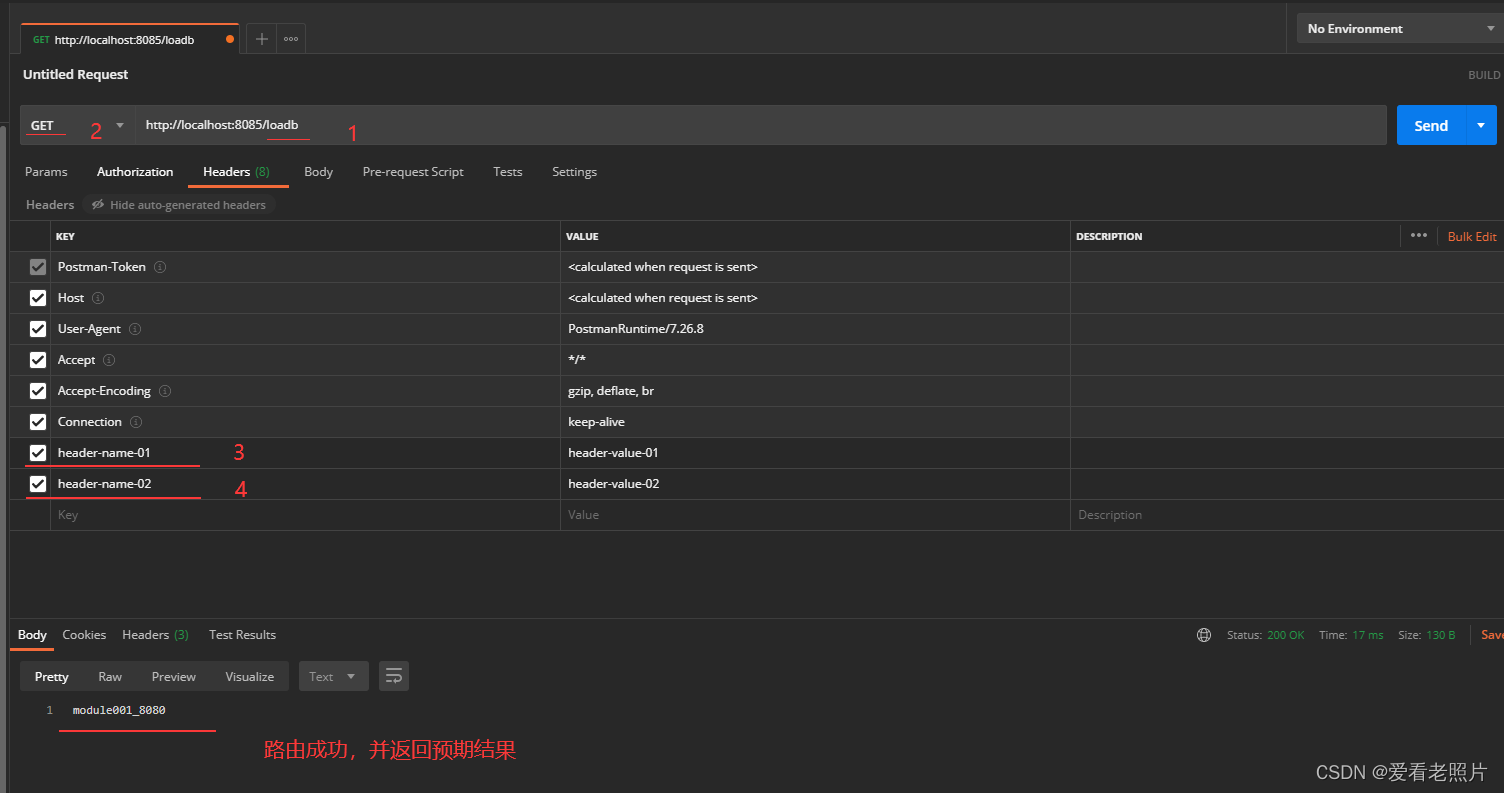
如上图,路由成功,并返回预期结果。
测试下过滤器:
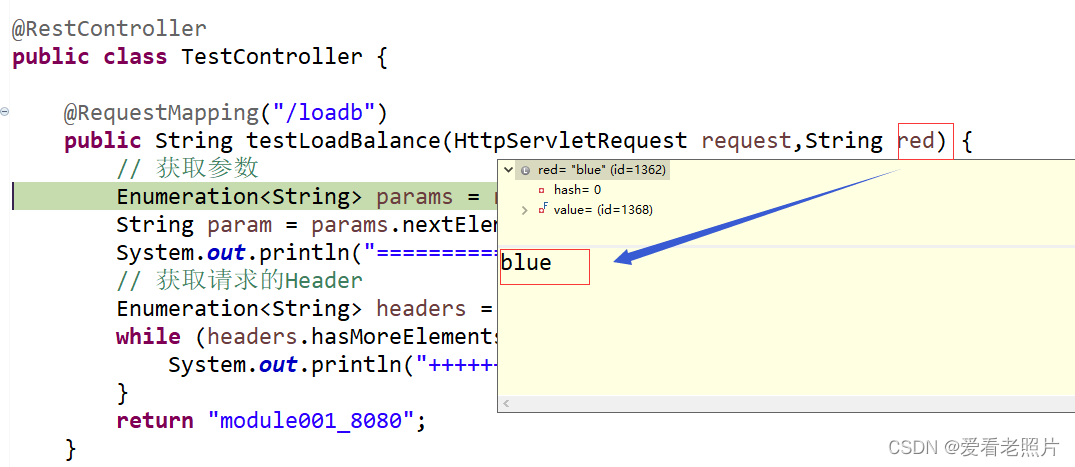
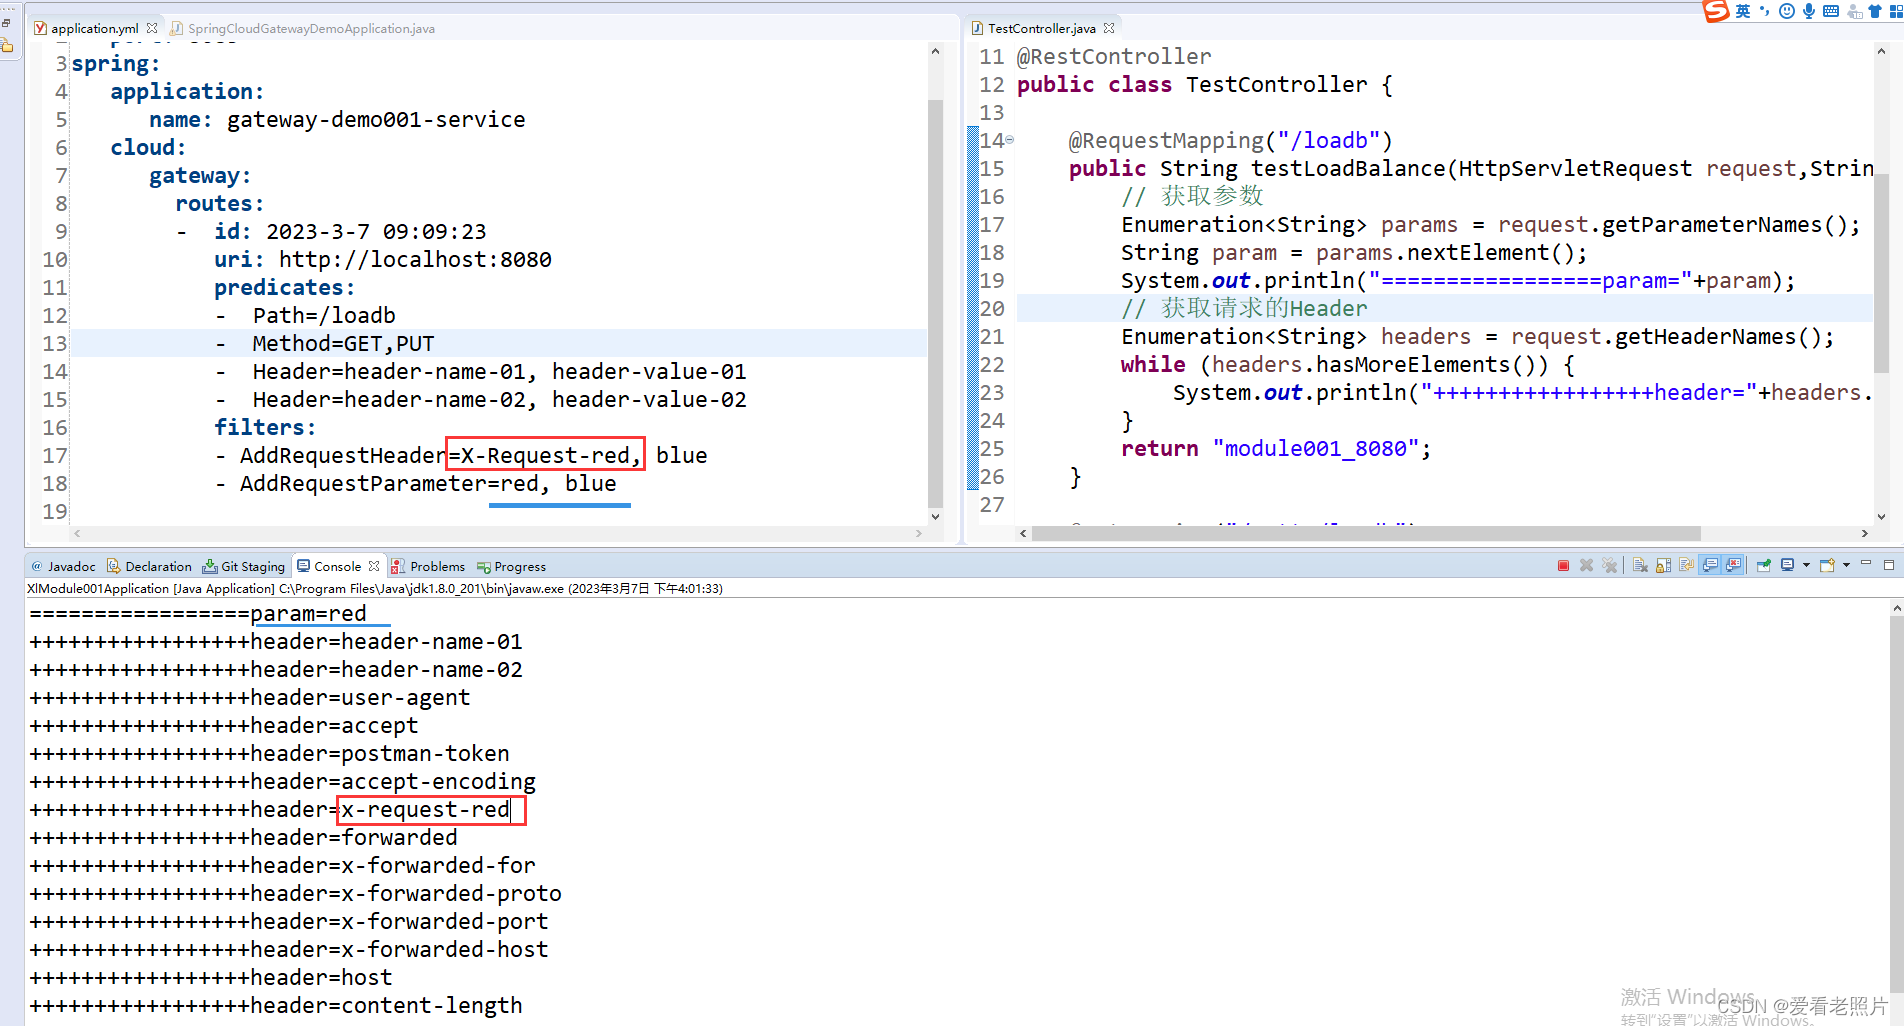
如上图,通过在8085网关中配置Header及参数,成功的路由到了8080服务中去。
路由中uri格式为:ip + 端口或者其他等价形式:域名、lb:微服务名称
测试: 配置uri时,在端口后面加上其他的路径,如:
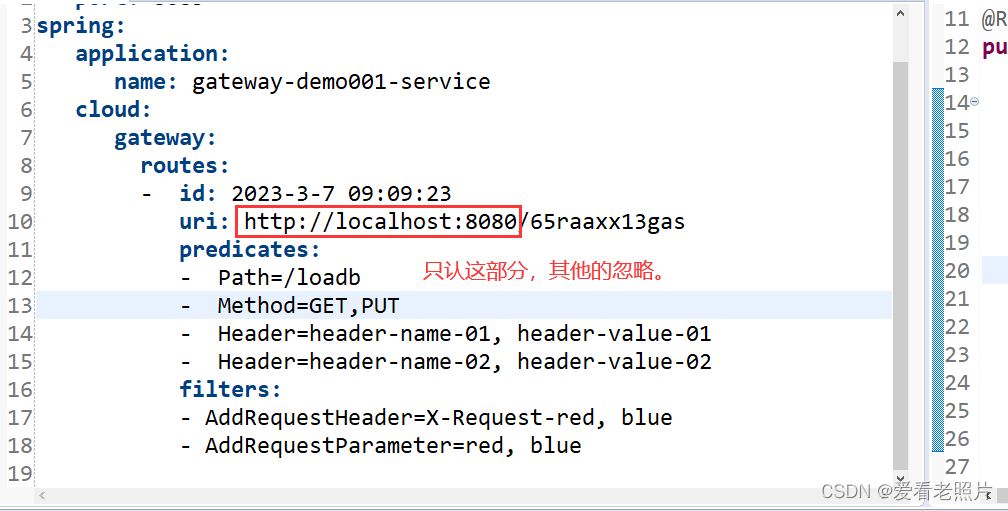
结果没影响!
Spring Cloud Gateway中配置负载均衡
- 准备3个微服务并注册到Nacos中
- Spring Cloud Gateway 网关
- Springboot 微服务1
- Springboot微服务2
Springboot 微服务
微服务1: 监听8080端口
application.properties
server.port=8080
spring.application.name=nacos-provider
spring.cloud.nacos.discovery.server-addr=127.0.0.1:8848
spring.cloud.nacos.discovery.enabled=true

spring.cloud.nacos.username=nacos
spring.cloud.nacos.password=nacos

#开启热部署
spring.devtools.restart.enabled=true
编写测试接口 /netty

package com.xl.module001.controller;

import java.util.Enumeration;

import javax.servlet.http.HttpServletRequest;

import org.springframework.web.bind.annotation.GetMapping;
import org.springframework.web.bind.annotation.RequestMapping;
import org.springframework.web.bind.annotation.RestController;

@RestController
public class TestController {

	@RequestMapping("/loadb")
	public String testLoadBalance(HttpServletRequest request,String red) {
		// 获取参数
		Enumeration<String> params = request.getParameterNames();
		String param = params.nextElement();
		System.out.println("=================param="+param);
		// 获取请求的Header
		Enumeration<String> headers = request.getHeaderNames();
		while (headers.hasMoreElements()) {
			System.out.println("+++++++++++++++++header="+headers.nextElement());
		}
		return "module001_8080";
	}

	@GetMapping("/netty")
	public String test3() {
		return "this is 8080 netty interface...";
	}

	@GetMapping("/")
	public String test4() {
		return "this is 8080 root directory";
	}

}
微服务2: 监听8081端口
application.properties
server.port=8081
spring.application.name=nacos-provider
spring.cloud.nacos.discovery.server-addr=127.0.0.1:8848
spring.cloud.nacos.discovery.enabled=true

spring.cloud.nacos.username=nacos
spring.cloud.nacos.password=nacos

#开启热部署
spring.devtools.restart.enabled=true
# endpoints
 management.endpoints.web.exposure.include=*
测试接口: /netty

package com.xl.projects.controller;

import java.util.Date;

import org.springframework.web.bind.annotation.GetMapping;
import org.springframework.web.bind.annotation.RestController;

/**
 * For Test!!!
 * @author xl
 *
 */
@RestController
public class TestProviderController {

	/**
	 * For Test!
	 * @param param
	 * @return
	 */
	@GetMapping("/provider/test")
	public String test(String param) {
		return new Date().getSeconds()+
				", this is provider return msg: current param="+param;
	}

	@GetMapping("/loadb")
	public String testLoadBalance() {
		// 本地修改第29行
		return "8081";
	}

	@GetMapping("/netty")
	public String test() {
		return "this is 8081 microService";
	}

    // 服务器修改第31行
}// 本地修改了第33行 2023年3月1日19:38:21
配置Spring Cloud Gateway 网关
添加nacos服务注册依赖:
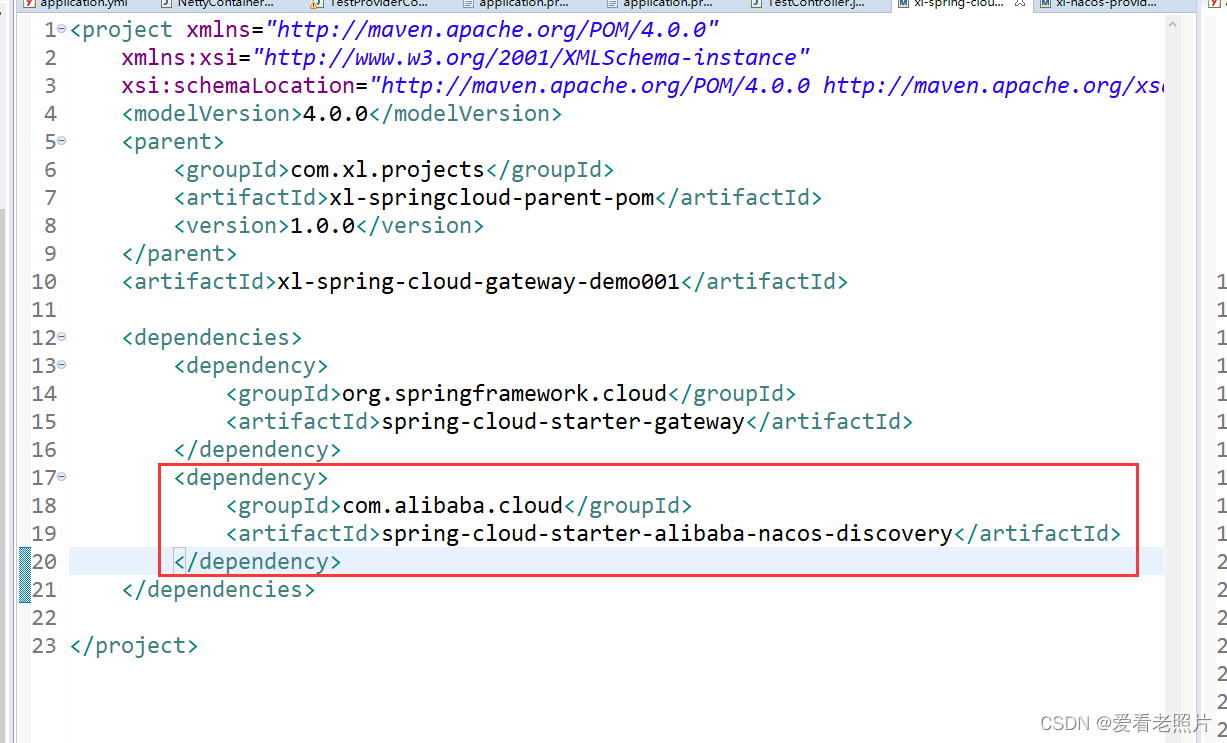
配置 application.yml
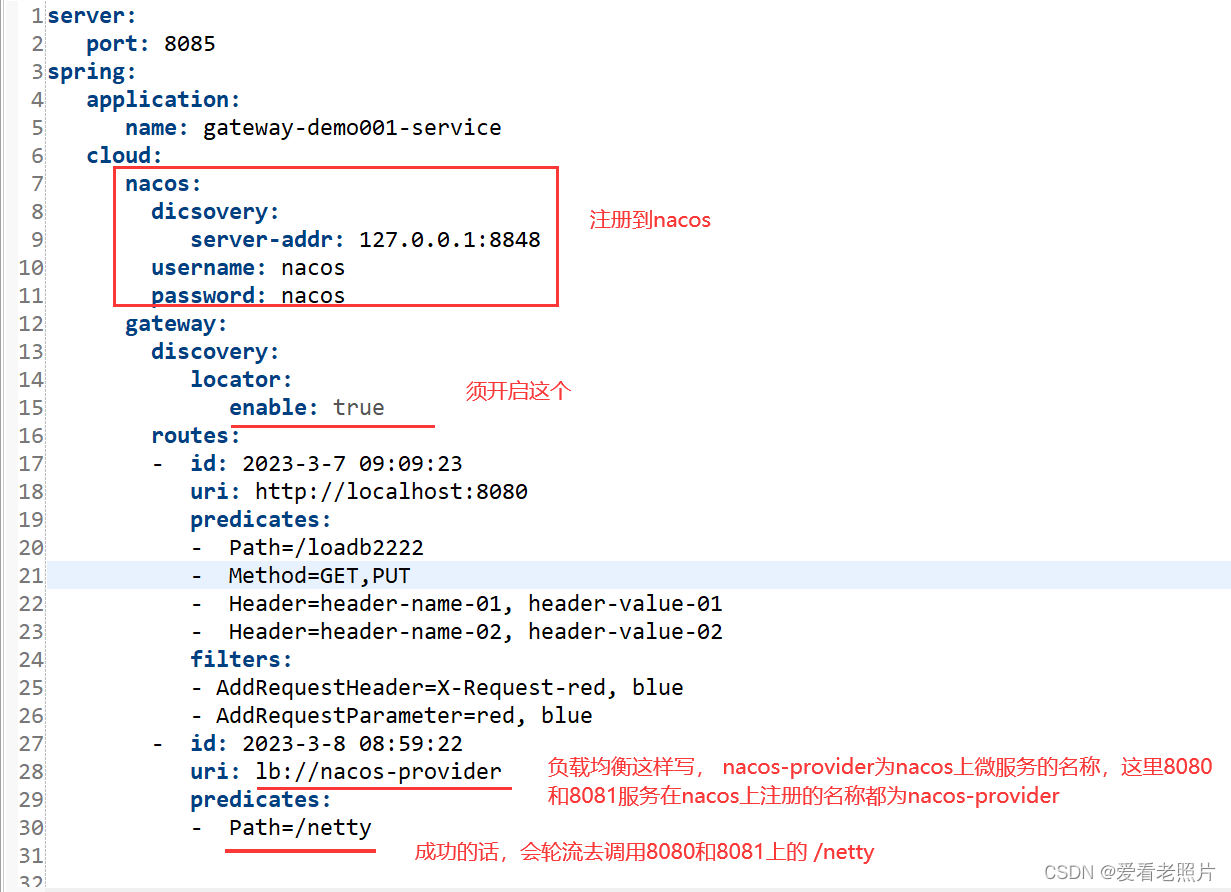
server:
   port: 8085
spring:
   application:
      name: gateway-demo001-service
   cloud:
      nacos:
        dicsovery:
           server-addr: 127.0.0.1:8848
        username: nacos
        password: nacos
      gateway:
        discovery:
           locator:
              enable: true
        routes:
        -  id: 2023-3-7 09:09:23
           uri: http://localhost:8080
           predicates:
           -  Path=/loadb2222
           -  Method=GET,PUT
           -  Header=header-name-01, header-value-01
           -  Header=header-name-02, header-value-02
           filters:
           - AddRequestHeader=X-Request-red, blue
           - AddRequestParameter=red, blue
        -  id: 2023-3-8 08:59:22
           uri: lb://nacos-provider
           predicates:
           -  Path=/netty
启动Nacos,以及3个微服务:
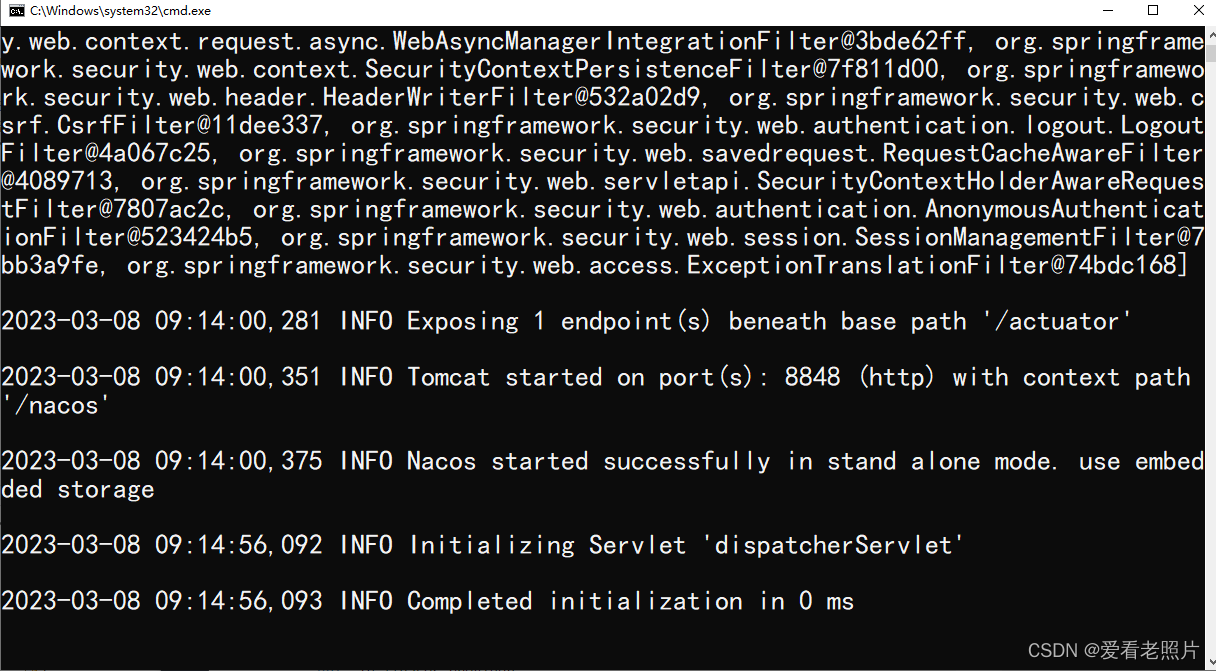
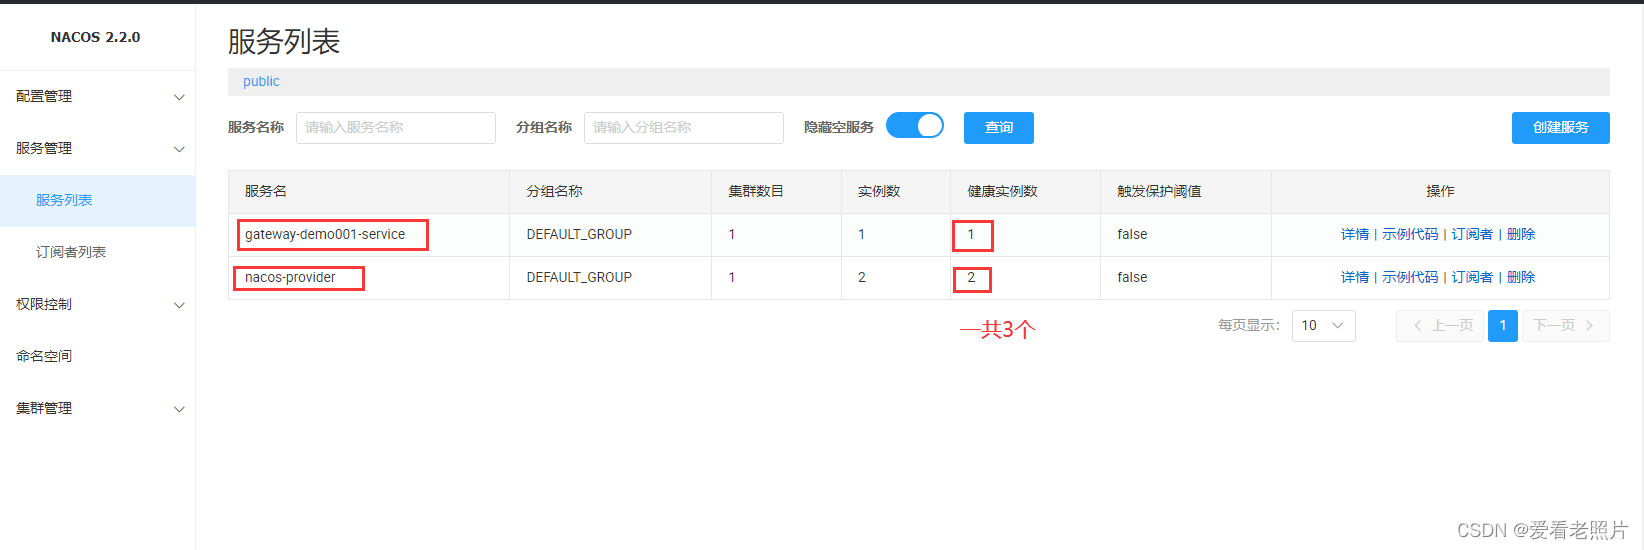
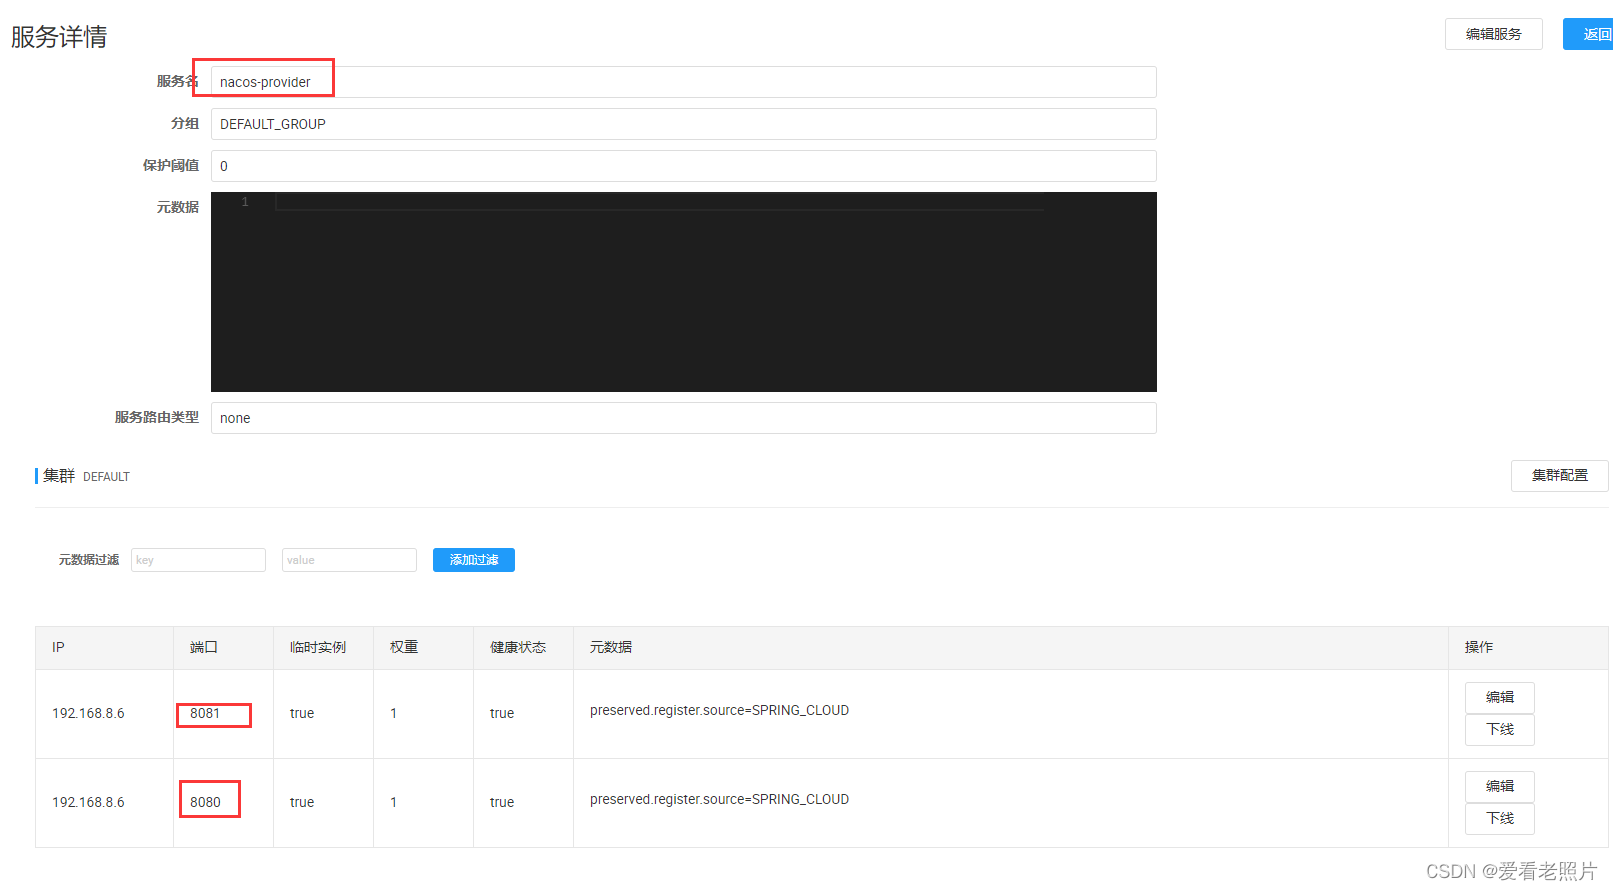
- 测试:通过网关访问 /netty,验证是否请求分摊到了 8080和8081两个服务?
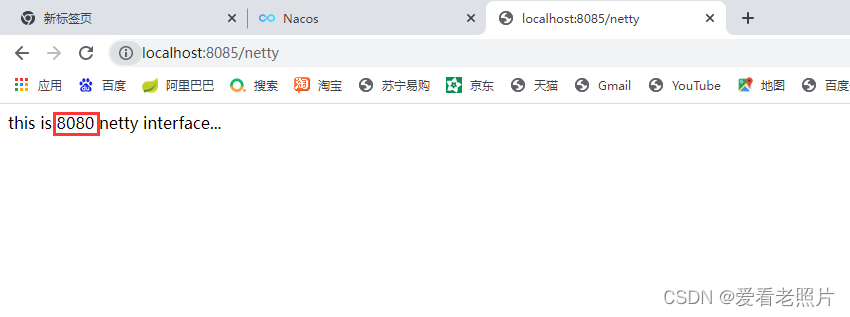
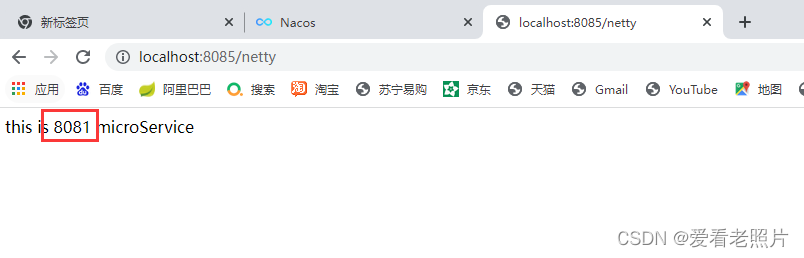
测试结果:一会8080,一会8081,符合预期
Spring Cloud Gateway顶层工作原理
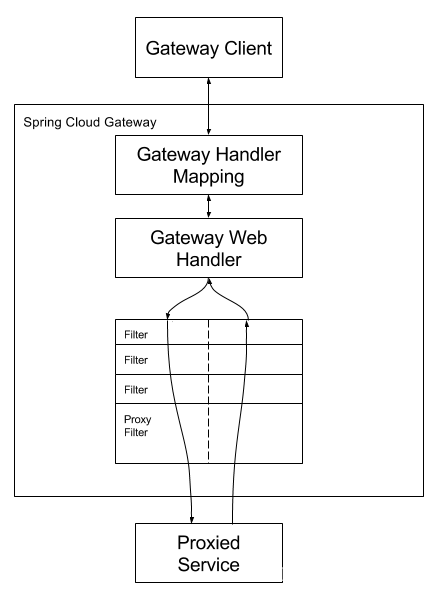
Clients make requests to Spring Cloud Gateway. If the Gateway Handler Mapping
determines that a request matches a route, it is sent to the Gateway Web Handler.
 This handler runs the request through a filter chain that is specific to the request.
 The reason the filters are divided by the dotted line is that filters can run logic
 both before and after the proxy request is sent. All “pre” filter logic is executed.
 Then the proxy request is made. After the proxy request is made, the “post” filter
 logic is run.
客户端对Spring Cloud Gateway发起请求,Gateway Handler Mapping会对请求进行处理,如果满足所有的断言,那就匹配到对应的路由。路由匹配成功后,就会将请求交给Gateway Web Handler处理,而Gateway Web Handler会给该请求加上一系列的过滤器链,过滤器可加在 代理请求 的前面或者代理请求 的后面。
3. Predicates and filters are specific to routes.
Predicates (断言)和filters (过滤器)是路由的重要组成部分。
这也引出了Spring Cloud Gateway的三大术语:
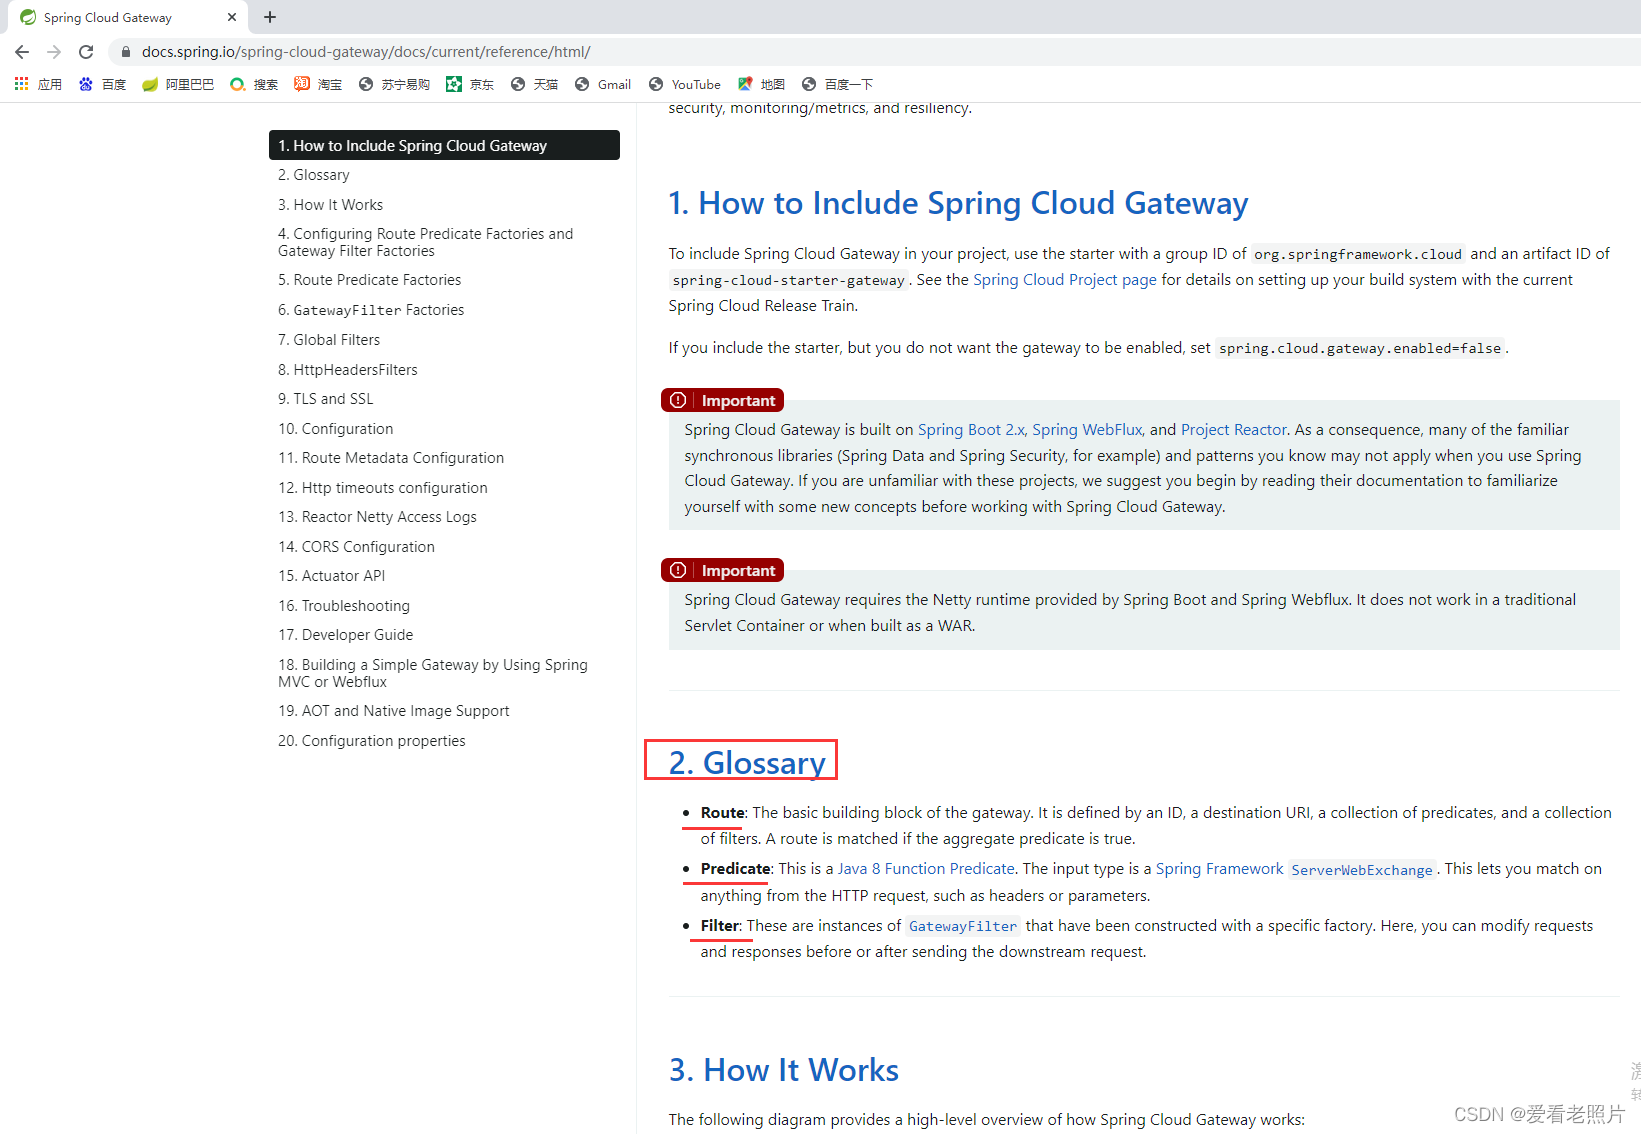
Route:
The basic building block of the gateway. It is defined by an ID, a destination URI, a collection of predicates, and a collection of filters. A route is matched if the aggregate predicate is true.
如果所有的断言都是true,那么这个路由将被匹配。
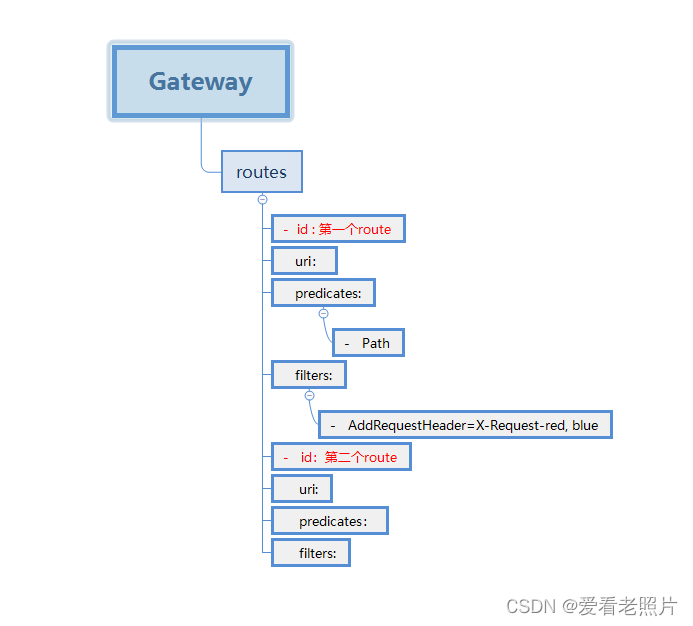
由上可知,一个路由的组成:
- id :唯一标识
- uri:格式为 http://ip:端口 或者 域名 或者 lb://服务名(负载均衡实现)
- preddcates: 复数,可配置多个,通过 符号短横杠“-”来标识每一个。
- filters:复数,可配置多个,通过 符号短横杠“-”来标识每一个。
Predicate:
This is a Java 8 Function Predicate. The input type is a Spring Framework ServerWebExchange. This lets you match on anything from the HTTP request, such as headers or parameters.
这个是JAVA8的函数式断言。输入类型是Spring框架的 ServerWebExchange。它可以匹配HTTP 请求的任何属性,如 headers 、parameters等等。
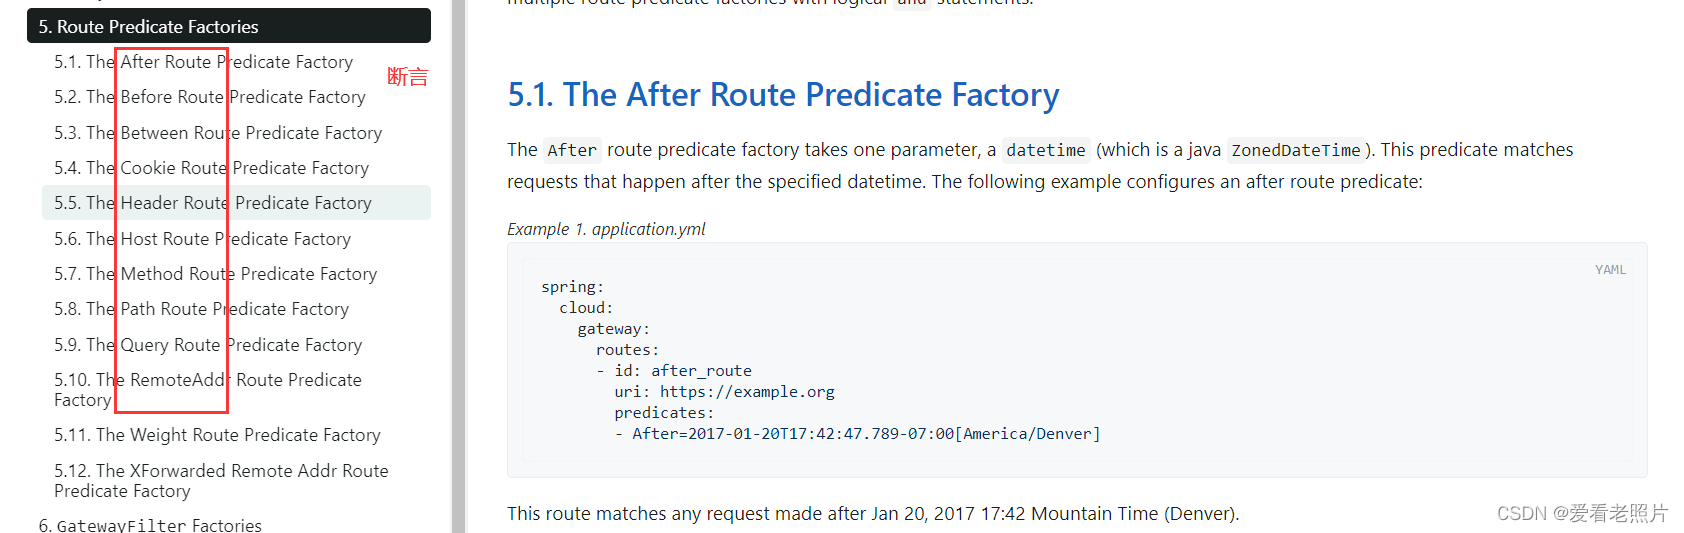
官网上对应介绍部分:
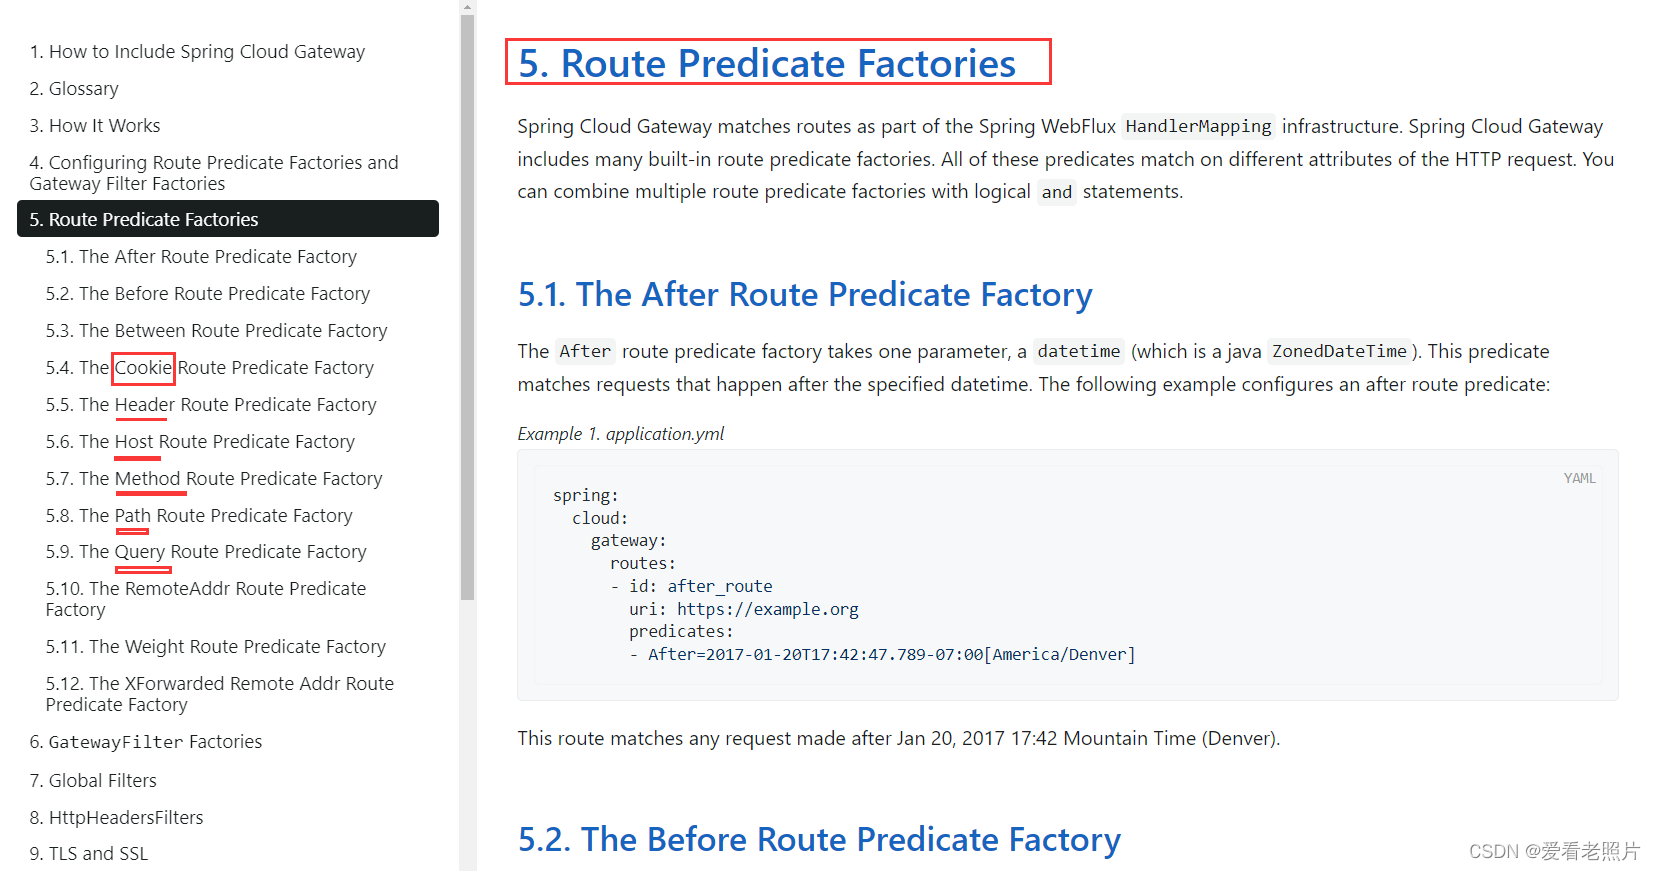
Spring Cloud Gateway matches routes as part of the Spring WebFlux HandlerMapping infrastructure.
 Spring Cloud Gateway includes many built-in route predicate factories. All of these predicates match on different attributes of the HTTP request.
 You can combine multiple route predicate factories with logical and statements.
Spring Cloud Gateway 匹配路由是Spring WebFlux HandlerMapping基础设施的一部分(一种体现)。Spring Cloud Gateway包含很多内嵌的路由断言工厂。这些断言可以匹配HTTP请求的很多属性。
例子:见上面 2 中的 “示例”。
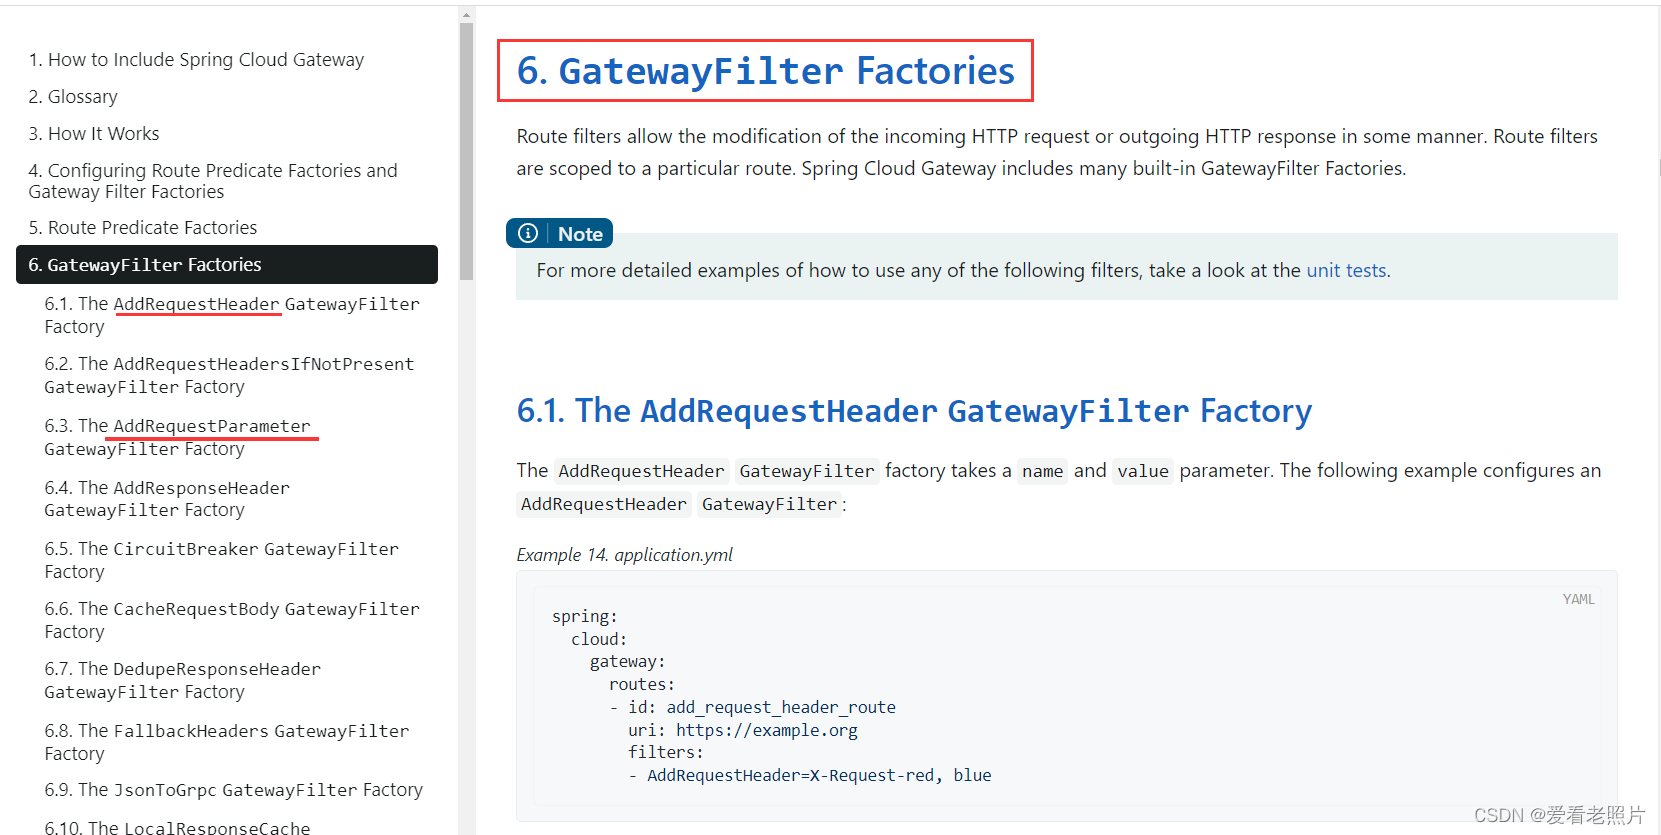
Filter:
These are instances of GatewayFilter that have been constructed with a specific factory. Here, you can modify requests and responses before or after sending the downstream request.
这些过滤器是通过指定工厂构建出来的GatewayFilter实例。可以通过这些过滤器在发送下游请求之前或者之后修改请求和响应。
官网对应介绍:
例子:见上面 2 中的 “示例”。
4 Circuit Breaker integration
Spring Cloud Gateway 整合熔断降级
为什么需要熔断降级
在分布式系统中,网关作为流量的入口,因此会有大量的请求进入网关,向其他服务发起调用,其他服务不可避免的会出现调用失败(超时、异常),失败时不能让请求堆积在网关上,需要快速失败并返回给客户端,想要实现这个要求,就必须在网关上做熔断、降级操作。
为什么在网关上请求失败需要快速返回给客户端?
因为当一个客户端请求发生故障的时候,这个请求会一直堆积在网关上,当然只有一个这种请求,网关肯定没有问题(如果一个请求就能造成整个系统瘫痪,那这个系统可以下架了),但是网关上堆积多了就会给网关乃至整个服务都造成巨大的压力,甚至整个服务宕掉。因此要对一些服务和页面进行有策略的降级,以此缓解服务器资源的的压力,以保证核心业务的正常运行,同时也保持了客户和大部分客户的得到正确的相应,所以需要网关上请求失败需要快速返回给客户端。
- 场景
网关服务A调用业务服务B时,发现服务B无法调通(比如,断电了等),这时网关服务A就应该直接返回(使用熔断的fallback机制)。
Spring Cloud专门用于处理熔断降级的网关过滤器工厂: CircuitBreaker的用法
官网介绍:
1 说明
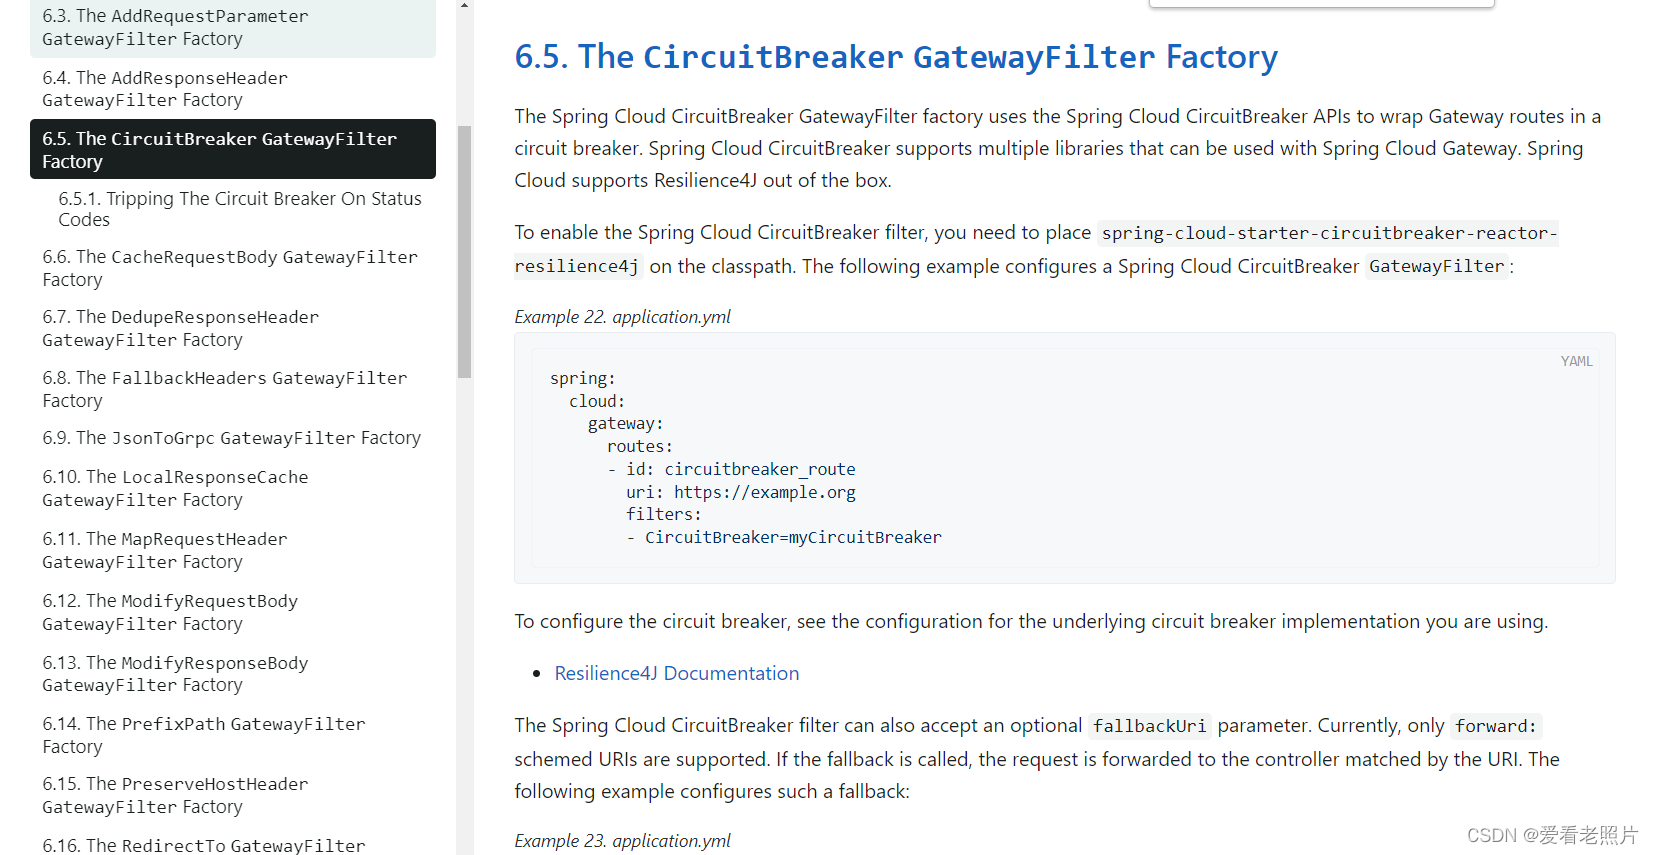
The Spring Cloud CircuitBreaker GatewayFilter factory uses the Spring Cloud CircuitBreaker APIs to wrap Gateway routes in a circuit breaker. Spring Cloud CircuitBreaker supports multiple libraries that can be used with Spring Cloud Gateway. Spring Cloud supports Resilience4J out of the box.
Spring Cloud的熔断API将网关路由包裹成一个熔断器,这就是Spring Cloud CircuitBreaker 网关过滤器工厂的做法。
Spring Cloud CircuitBreaker支持多个可用于Spring Cloud Gateway的库,其中,Spring Cloud支持对Resilience4J的开箱即用。
那么Resilience4J是什么?
- Resilience4j是一个轻量级、易于使用的容错库,其灵感来自Netflix Hystrix,但专为Java 8和函数式编程设计。
- Resilience4j提供高阶函数(decorators)来增强任何功能接口、lambda表达式或方法引用,包括断路器、速率限制器、重试或舱壁。可以在任何函数接口、lambda表达式或方法引用上使用多个装饰器。
- circuitbreaker组件实现了断路器功能,是基于内存的断路器,采用
ConcurrentHashMap来实现。 - There are two starters for the Resilience4J implementations, one for reactive applications and one for non-reactive applications.(有两个Resilience4J 的Spring Cloud Starter实现,一个是响应式的应用,一个是非响应式的应用)—摘自:https://cloud.spring.io/spring-cloud-circuitbreaker/reference/html/spring-cloud-circuitbreaker.html
org.springframework.cloud:spring-cloud-starter-circuitbreaker-resilience4j- non-reactive applications
org.springframework.cloud:spring-cloud-starter-circuitbreaker-reactor-resilience4j- reactive applications
下面马上就会用到这个org.springframework.cloud:spring-cloud-starter-circuitbreaker-reactor-resilience4j
所以,可得org.springframework.cloud:spring-cloud-starter-circuitbreaker-reactor-resilience4j是Resilience4J的一种实现
2 引入熔断器依赖,并简单测试
To enable the Spring Cloud CircuitBreaker filter, you need to place spring-cloud-starter-circuitbreaker-reactor-resilience4j on the classpath. The following example configures a Spring Cloud CircuitBreaker GatewayFilter:
spring:
  cloud:
    gateway:
      routes:
      - id: circuitbreaker_route
        uri: https://example.org
        filters:
        - CircuitBreaker=myCircuitBreaker
要使用Spring Cloud 熔断过滤器,需要引入依赖:spring-cloud-starter-circuitbreaker-reactor-resilience4j ,然后在application.yml中添加上面的配置即可开始使用:
pom.xml

<project xmlns="http://maven.apache.org/POM/4.0.0"
	xmlns:xsi="http://www.w3.org/2001/XMLSchema-instance"
	xsi:schemaLocation="http://maven.apache.org/POM/4.0.0 http://maven.apache.org/xsd/maven-4.0.0.xsd">
	<modelVersion>4.0.0</modelVersion>
	<parent>
		<groupId>com.xl.projects</groupId>
		<artifactId>xl-springcloud-parent-pom</artifactId>
		<version>1.0.0</version>
	</parent>
	<artifactId>xl-spring-cloud-gateway-demo001</artifactId>

	<dependencies>
		<dependency>
			<groupId>org.springframework.cloud</groupId>
			<artifactId>spring-cloud-starter-gateway</artifactId>
		</dependency>
		<dependency>
			<groupId>com.alibaba.cloud</groupId>
			<artifactId>spring-cloud-starter-alibaba-nacos-discovery</artifactId>
		</dependency>
		<dependency>
			<groupId>org.springframework.cloud</groupId>
			<artifactId>spring-cloud-starter-circuitbreaker-reactor-resilience4j</artifactId>
		</dependency>
	</dependencies>

</project>
application.yml

server:
port: 8085
spring:
application:
name: gateway-demo001-service
cloud:
nacos:
dicsovery:
server-addr: 127.0.0.1:8848
username: nacos
password: nacos
gateway:
discovery:
locator:
enable: true
routes:
- id: 2023-3-7 09:09:23
uri: http://localhost:8080
predicates:
- Path=/loadb2222
- Method=GET,PUT
- Header=header-name-01, header-value-01
- Header=header-name-02, header-value-02
filters:
- AddRequestHeader=X-Request-red, blue
- AddRequestParameter=red, blue
- id: 2023-3-8 08:59:22
uri: lb://nacos-provider
predicates:
- Path=/netty
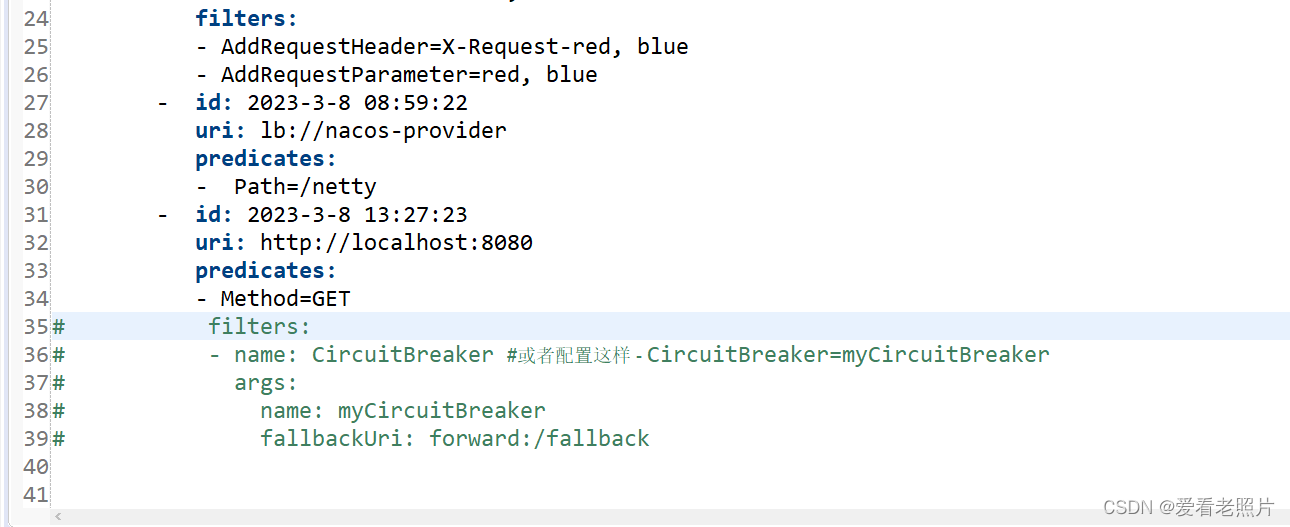
- id: 2023-3-8 13:27:23
uri: http://localhost:8080
predicates:
- Method=GET
filters:
- name: CircuitBreaker #或者配置这样 - CircuitBreaker=myCircuitBreaker
args:
name: myCircuitBreaker
# fallbackUri: forward:/fallback
其中,- name: CircuitBreaker 配置中的熔断器名称一定不能错,必须是CircuitBreaker (大小写敏感!)
演示:
- 根据yaml文件的配置, uri为http://localhost:8080,如果不启动8080服务那么,就会触发熔断器:以达到检验熔断器是否引入成功
- 启动本网关服务8085,并发送一个GET请求:
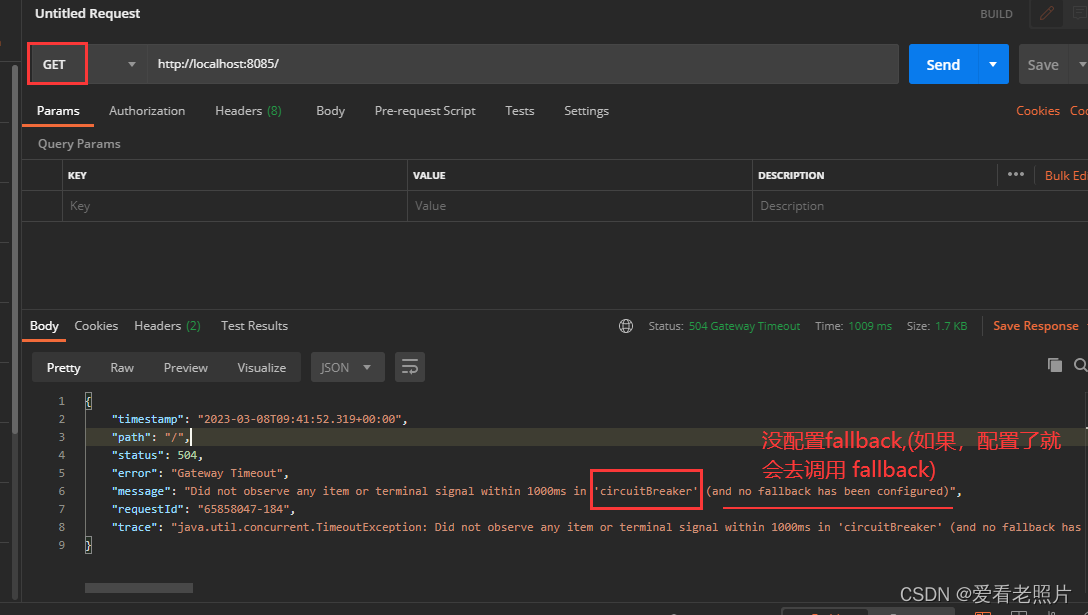
在yml中注释掉熔断相关的配置,再次测试:
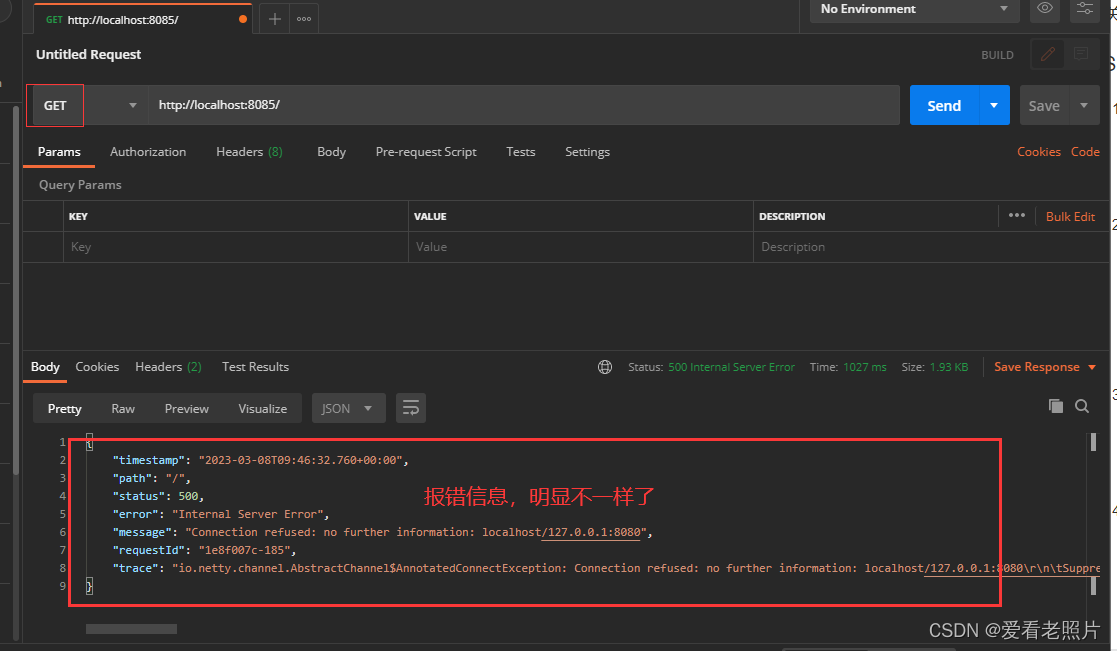
以上说明,引入熔断器,产生了作用。
3 添加fallbackuri配置
The Spring Cloud CircuitBreaker filter can also accept an optional fallbackUri parameter. Currently, only forward: schemed URIs are supported. If the fallback is called, the request is forwarded to the controller matched by the URI. The following example configures such a fallback:
spring:
  cloud:
    gateway:
      routes:
      - id: circuitbreaker_route
        uri: lb://backing-service:8088
        predicates:
        - Path=/consumingServiceEndpoint
        filters:
        - name: CircuitBreaker
          args:
            name: myCircuitBreaker
            fallbackUri: forward:/inCaseOfFailureUseThis
        - RewritePath=/consumingServiceEndpoint, /backingServiceEndpoint
目前fallbackUri中只支持使用forward:来跳转。
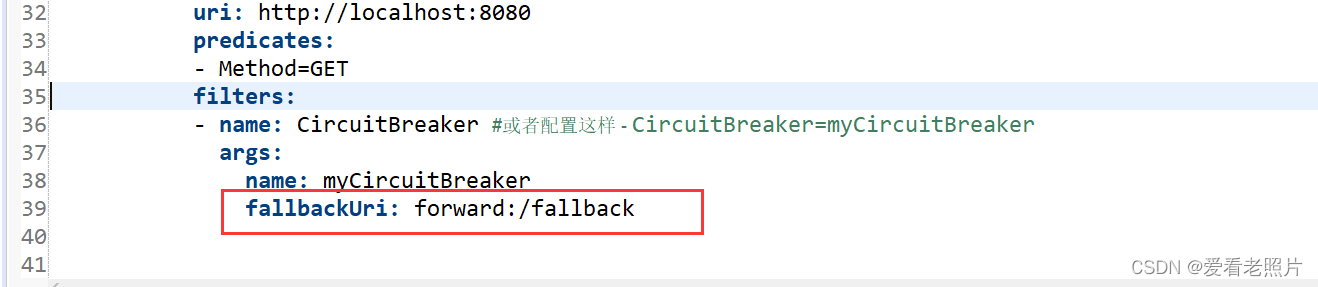
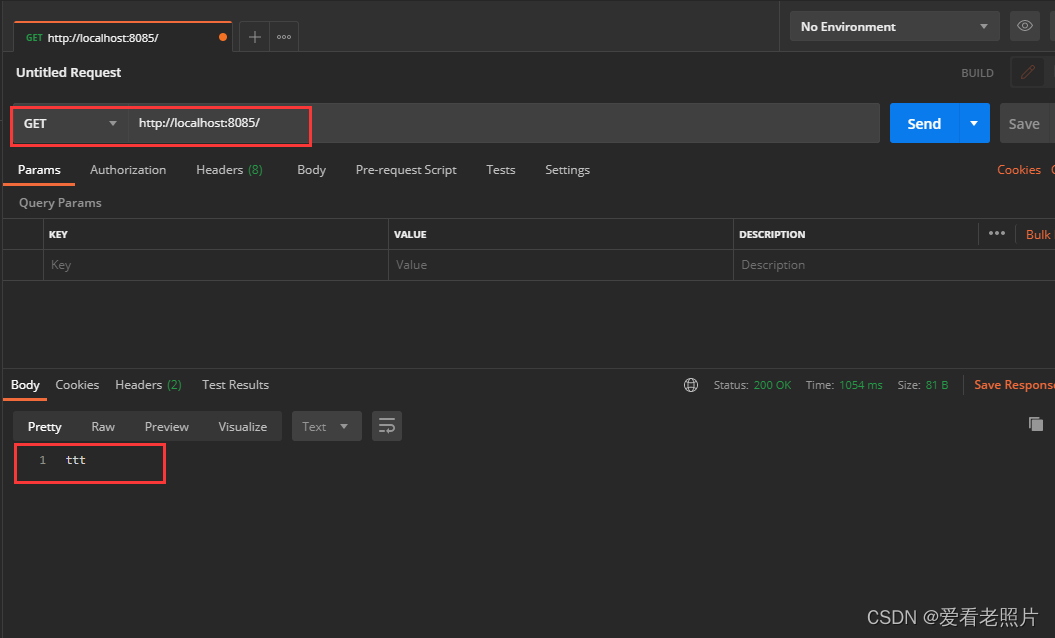
在本网关服务8085中添加一个fallback接口,同样服务8080不启动,以触发熔断机制:
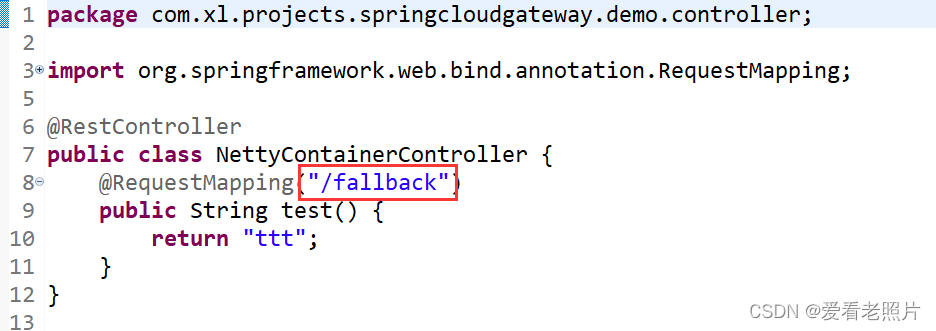
测试,成功返回“ttt”,说明fallbackUri配置生效:
4 fallbackUri添加变量
CircuitBreaker also supports URI variables in the fallbackUri. This allows more complex routing options, like forwarding sections of the original host or url path using PathPattern expression.
In the example below the call
consumingServiceEndpoint/users/1will be redirected toinCaseOfFailureUseThis/users/1.
application.yml 配置如下
spring:
  cloud:
    gateway:
      routes:
      - id: circuitbreaker_route
        uri: lb://backing-service:8088
        predicates:
        - Path=/consumingServiceEndpoint/{*segments}
        filters:
        - name: CircuitBreaker
          args:
            name: myCircuitBreaker
            fallbackUri: forward:/inCaseOfFailureUseThis/{segments}
验证,未成功!!
5 fallbakcUri可以指向自己服务的一个地址,也可以指向外部服务(通过路由转发)
The primary scenario is to use the fallbackUri to define an internal controller or handler within the gateway application. However, you can also reroute the request to a controller or handler in an external application, as follows
application.yml
spring:
  cloud:
    gateway:
      routes:
      - id: ingredients
        uri: lb://ingredients
        predicates:
        - Path=//ingredients/**
        filters:
        - name: CircuitBreaker
          args:
            name: fetchIngredients
            fallbackUri: forward:/fallback
      - id: ingredients-fallback
        uri: http://localhost:9994
        predicates:
        - Path=/fallback
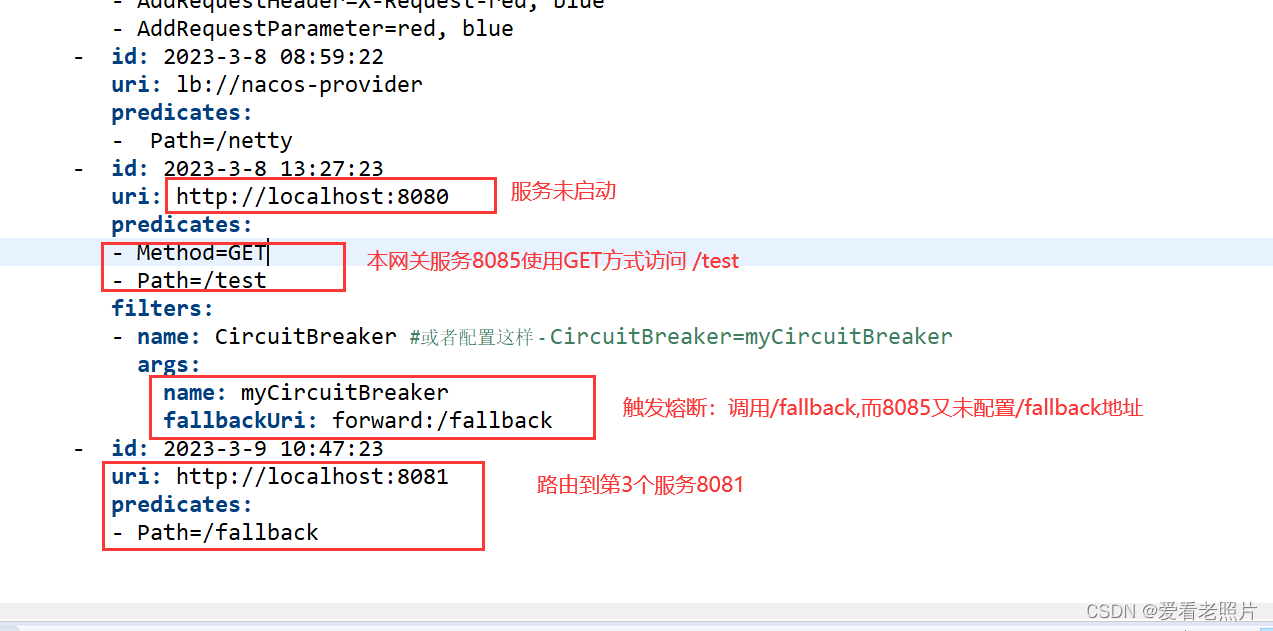
测试: localhost:8085/test
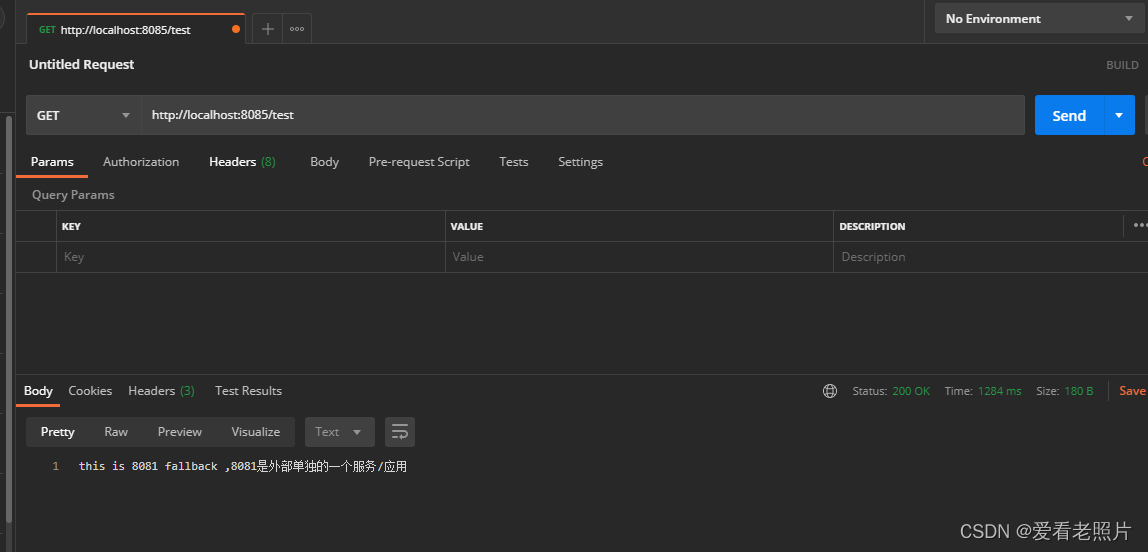
以上,符合预期。
5 Spring Cloud DiscoveryClient integration
整合Spring Cloud 服务注册和发现
参见:2 《Able to match routes on any request attribute.》之 Spring Cloud Gateway中配置负载均衡
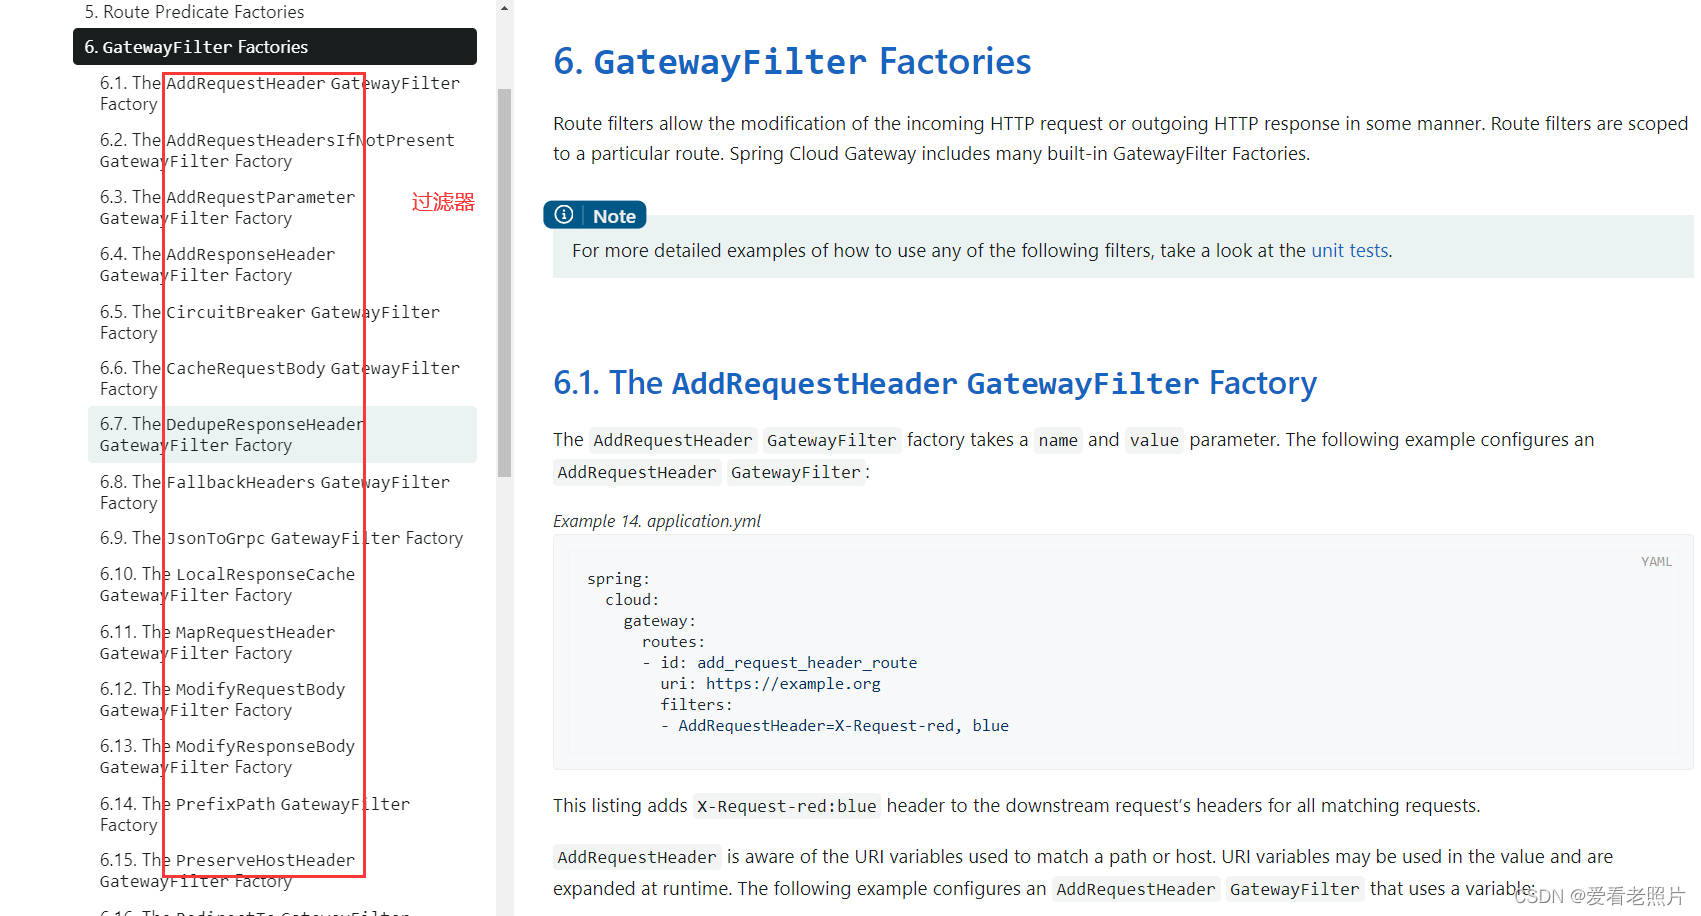
6 Easy to write Predicates and Filters
易于编写断言和过滤器
参见:以上内容有如何编写断言和过滤器,除此之外,官方还提供了以下了断言工厂和过滤器工厂:
参考:https://docs.spring.io/spring-cloud-gateway/docs/current/reference/html/
7 Request Rate Limiting
- TODO
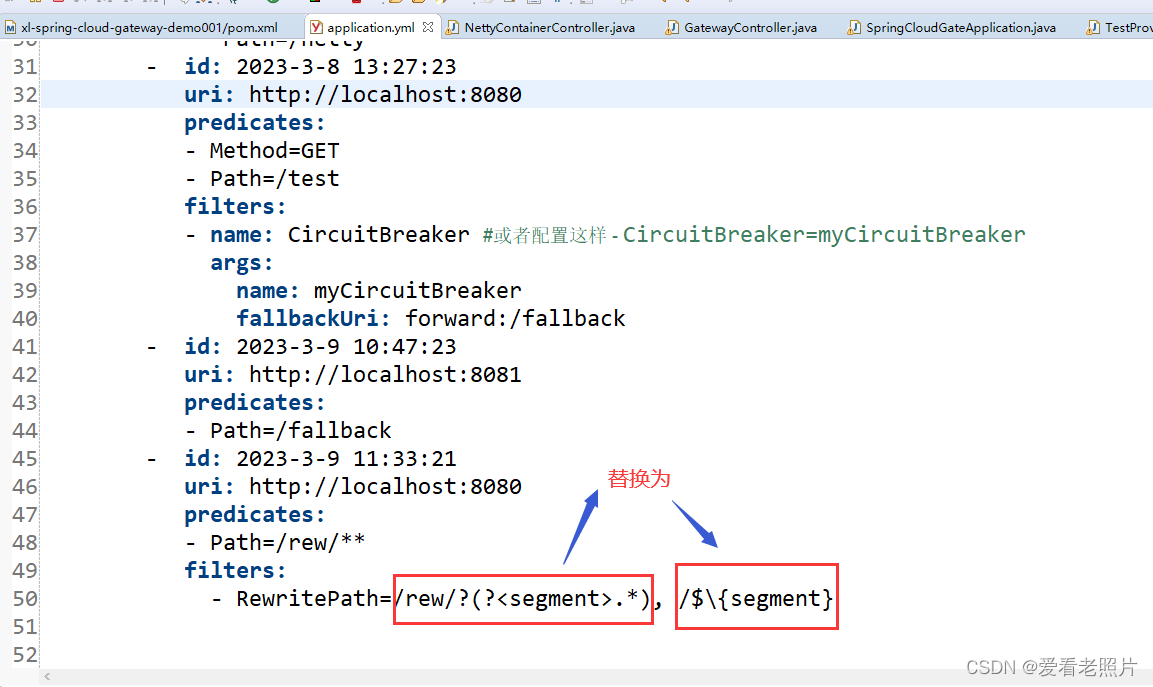
8 Path Rewriting
The RewritePath GatewayFilter factory takes a path regexp parameter and a replacement parameter. This uses Java regular expressions for a flexible way to rewrite the request path. The following listing configures a RewritePath GatewayFilter:
spring:
  cloud:
    gateway:
      routes:
      - id: rewritepath_route
        uri: https://example.org
        predicates:
        - Path=/red/**
        filters:
        - RewritePath=/red/?(?<segment>.*), /$\{segment}
For a request path of /red/blue, this sets the path to /blue before making the downstream request. Note that the $ should be replaced with $\ because of the YAML specification.
示例:
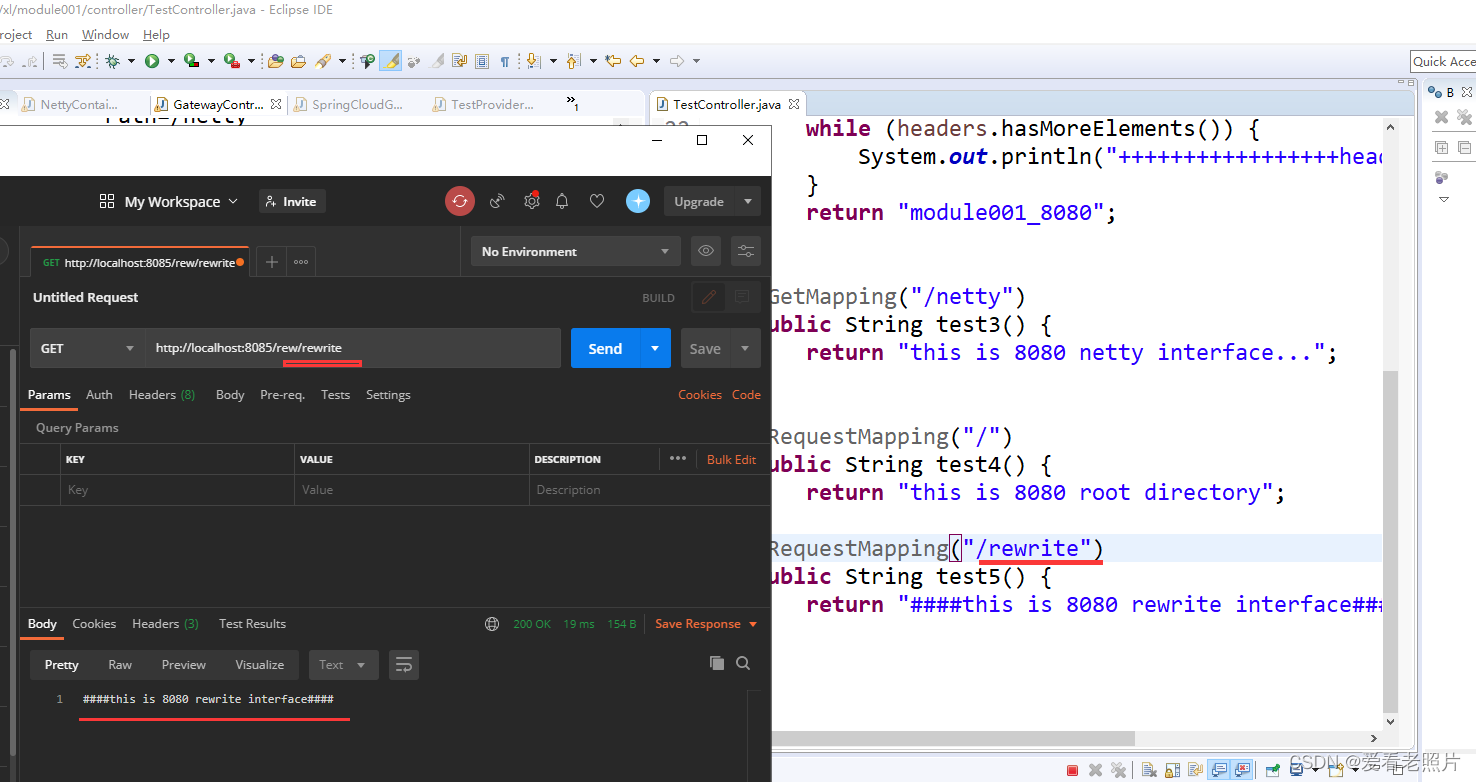
以上都是使用yaml配置文件,也可以使用java代码完成配置
package com.xl.projects;

import java.time.Duration;

import org.springframework.boot.SpringApplication;
import org.springframework.boot.autoconfigure.SpringBootApplication;
import org.springframework.cloud.circuitbreaker.resilience4j.ReactiveResilience4JCircuitBreakerFactory;
import org.springframework.cloud.circuitbreaker.resilience4j.Resilience4JConfigBuilder;
import org.springframework.cloud.client.circuitbreaker.Customizer;
import org.springframework.cloud.client.discovery.EnableDiscoveryClient;
import org.springframework.cloud.gateway.filter.ratelimit.RedisRateLimiter;
import org.springframework.cloud.gateway.route.RouteLocator;
import org.springframework.cloud.gateway.route.builder.RouteLocatorBuilder;
import org.springframework.context.annotation.Bean;
import org.springframework.security.config.web.server.ServerHttpSecurity;
import org.springframework.security.core.userdetails.MapReactiveUserDetailsService;
import org.springframework.security.core.userdetails.User;
import org.springframework.security.core.userdetails.UserDetails;
import org.springframework.security.web.server.SecurityWebFilterChain;
import org.springframework.web.bind.annotation.RequestMapping;
import org.springframework.web.bind.annotation.RestController;


@RestController
@SpringBootApplication
//@EnableDiscoveryClient
public class SpringCloudGateApplication {

	@RequestMapping("/circuitbreakerfallback")
	public String circuitbreakerfallback() {
		return "This is a fallback";
	}
	@Bean
	public RouteLocator customRouteLocator(RouteLocatorBuilder builder) {
		//@formatter:off
		return builder.routes()
				.route("path_route", r -> r.path("/get")
//						.uri("http://httpbin.org"))
						.uri("http://localhost:8089"))
//				.route("host_route", r -> r.host("*.myhost.org")
				.route("host_route", r -> r.host("localhost:8085")
						.uri("http://127.0.0.1:8080"))
//						.uri("http://www.baidu.com"))
//						.uri("http://httpbin.org"))
				.route("rewrite_route", r -> r.host("localhost:8087") // 不能加http://
						.filters(f -> f.rewritePath("/foo/(?<segment>.*)",
								"/${segment}"))
						.uri("http://localhost:8080")) // 必须要加上http://
//						.uri("http://httpbin.org"))
//						.uri("http://www.baidu.com"))
//						.filters(f -> f.rewritePath("/foo/(?<segment>.*)",
//								"/${segment}"))
//						.uri("http://httpbin.org"))
				.route("circuitbreaker_route", r -> r.host("localhost:8086")
						.filters(f -> f.circuitBreaker(c -> c.setName("slowcmd")))
								.uri("http://localhost:8079"))
				.route("circuitbreaker_fallback_route", r -> r.host("localhost:8074")
						.filters(f -> f.circuitBreaker(c -> c.setName("slowcmd").setFallbackUri("forward:/fallback")))
								.uri("http://localhost:8079"))
				.route("limit_route", r -> r.host("localhost:8088").and().path("/anything/**")
						.filters(f -> f.requestRateLimiter(c -> c.setRateLimiter(redisRateLimiter())))
					.uri("http://httpbin.org"))
				.route("websocket_route", r -> r.path("/echo")
					.uri("ws://localhost:9000"))
				.build();
		//@formatter:on

	}
	@Bean
	RedisRateLimiter redisRateLimiter() {
		return new RedisRateLimiter(1, 2);
	}

	@Bean
	SecurityWebFilterChain springWebFilterChain(ServerHttpSecurity http) throws Exception {
		return http.httpBasic().and()
				.csrf().disable()
				.authorizeExchange()
				.pathMatchers("/anything/**").authenticated()
				.anyExchange().permitAll()
				.and()
				.build();
	}

	@Bean
	public MapReactiveUserDetailsService reactiveUserDetailsService() {
		UserDetails user = User.withDefaultPasswordEncoder().username("user").password("password").roles("USER").build();
		return new MapReactiveUserDetailsService(user);
	}

	public static void main(String[] args) {
		SpringApplication.run(SpringCloudGateApplication.class, args);
	}

}
参考:
参考:


 1154
1154


 被折叠的 条评论
为什么被折叠?
被折叠的 条评论
为什么被折叠?
 到【灌水乐园】发言


