


今天学习了图像缩放的第二种方法:双线性内插值法。
数学原理
一、线性插值
这里我觉得讲的很清楚
用另一种方式记录一下自己的理解:
如图所示:
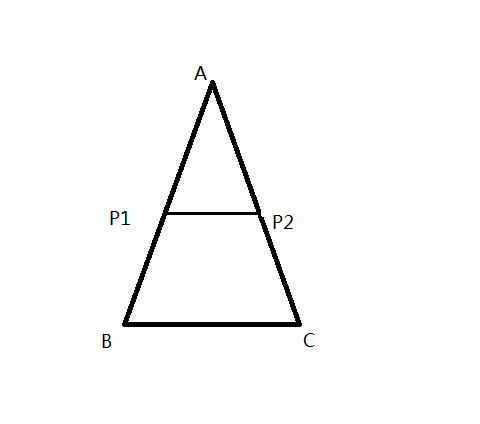
假设已知量为:
P1P2//BC,AC=2,P2C=1,AB=2.5。(这里我直接给的是长度,没有用坐标了)
这时候我们需要求出P1B的长度。
可以得到:P1B=AB*(P2C/AC)
其中P2C/AC就是插值系数,记作α。
那么上面的链接给出的定义线性插值法:是指使用连接两个已知量的直线来确定在这两个已知量之间的一个
未知量的值的方法。其中两个已知量在上图中只得就是A和B的位置(即AB的长),未知量就是P1B的长度。
注意:这里的线P1P2,可以是在三角形内部,也可以在三角形外部,当在线段内部时,叫做线性内插值。
双线性插值
假设原图像A的大小为m*n,新图像B的大小为M*N,如果我们要求B(X,Y)处的像素值:
用最近邻法可以求得B(X,Y)在A中对应的位置为:A(x,y)=(X*(m/M),Y*(N/n))。
在最近邻法中个,我们把小数部分直接剔除了。这里我们保留下来做一下处理:
x=i+u;
y=j+v;
这里的i和j分别表示xy的整数部分,uv分别表示小数部分。下面我们来看一张图:
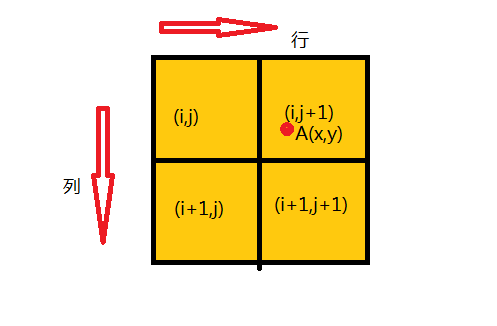
图中红点就是目标图像B(X,Y)与源图像对应的位置A(x,y),这时候我们先从行的方向来解释双线性插
值:我们发现红点的位置处于j和j+1位置的中间更偏向于j+1,在最近邻法中,我们如果用四舍五入的方法,
那么我们会直接用其中一个像素替代y=j+v的位置,这样的方法会使得缩放后的边缘很粗糙。根据线性插值
的原理我们可以把两个像素值加上一定的权值来确定出y=j+v的像素。这样可以很大程度上改善缩放后的图
片,即:
pixel B( ,Y)= pixel( ,y)=pixel( ,j)*k1+pixel( ,j+1)k2;//不考虑列方向
其中,k1,k2就是差值参数。
同样的对于行方向也有:
pixel B(X , )= pixel( x , )=pixel( i, )*k3+pixel( i+1 , )k4;//不考虑列方向
最后,我们将两个方向综合考虑,可以得到这样一种思路:
pixel B(X , Y)= pixel( x , y)=pixel( i,j )*α1+pixel( i ,j+1 )α2+pixel( i+1 ,j )α3+pixel( i+1 ,j+1 )α4;
其中
α1=k1*k3=(1-u)(1-v)
α2=k2*k3=u(1-v)
α3=k1*k4=(1-u)v
α4=k2*k4=uv
至此,可以得到缩放图形B(X,Y)处的像素值。
程序实现
/*****************************10—6*****************************
*功能:用双线性插值法对源图像进行缩放
*数学原理:
假设原图像A的大小为m*n,新图像B的大小为M*N
如果我们要求B(X,Y)处的像素值:
我们首先可以得到B(X,Y)在图像A中对应的位置(x,y)=(X*(m/M),Y*(N/n))
这个时候求得的x,y是小数值,我们可以通过这个小数值坐标找到距离最近的四个像素点,
假设x,y取下限整数后为_x,_y,小数部分为xp,yp,即x=_x+xp,y=_y+yp;
那么最近的四个点为:(_x,_y),(_x+1,_y),(_x,_y+1),(_x+1,_y+1)
四个系数分别为a = (1-xp)*(1-yp),b = (1-xp)*yp,c =xp*(1-yp),d =  xp*yp
最终,pixelB(X,Y)=a*pixelA(_x,_y)+b*pixelA(_x+1,_y)+c*(_x,_y+1)+d*(_x+1,_y+1)
************************************************************/
#include <opencv2\opencv.hpp>
#include <iostream>

using namespace std;
using namespace cv;

int main(){
    Mat image = imread("lena.jpg");//源图像

    /*缩小操作*/
    int Col_s = 2*image.cols / 3;//新的图像长宽缩小至2/3
    int Row_s = 2*image.rows / 3;

    Mat smallerImage(Row_s, Col_s, CV_8UC3);


    for (int i = 0; i < Row_s; i++){
        for (int j = 0; j < Col_s; j++){
            int x, y; float xp, yp; float a, b, c, d;
            x = i * 3 / 2;//对应坐标整数部分
            y = j * 3 / 2;
            xp = i * 3 / 2.0 - x;//对应坐标小数部分
            yp = j * 3 / 2.0 - y;
            a = (1 - xp)*(1 - yp);
            b = (1 - xp)*yp;
            c = xp*(1 - yp);
            d = xp*yp;

            smallerImage.at<Vec3b>(i, j) = a*(image.at<Vec3b>(x, y)) + b*(image.at<Vec3b>(x, y+1))
                + c*(image.at<Vec3b>(x + 1, y)) + d*(image.at<Vec3b>(x+1, y+1));
        }
    }


    /*放大操作*/
    int Col_b = 2 * image.cols ;//新的图像长宽放大2倍
    int Row_b = 2 * image.rows ;

    Mat biggerImage(Row_b, Col_b, CV_8UC3);
    int x = 0; int y = 0; float xp = 0.0; float yp = 0.0; float a = 0.0; float b = 0.0; float c = 0.0; float d = 0.0;
    for (int i = 0; i < Row_b; i++){
        for (int j = 0; j < Col_b; j++){
            x = i / 2;//对应坐标整数部分
            y = j / 2;
            xp = i / 2.0 - x;//对应坐标小数部分
            yp = j / 2.0 - y;
            a = (1 - xp)*(1 - yp);
            b = (1 - xp)*yp;
            c = xp*(1 - yp);
            d = xp*yp;

            x = x > (image.rows - 2) ? (image.rows - 2) : x;//边缘处理
            x = x < 0 ? 0 : x;
            y = y > (image.cols - 2) ? (image.cols - 2) : y;
            y = y < 0 ? 0 : y;

            biggerImage.at<Vec3b>(i, j) = a*(image.at<Vec3b>(x, y)) + b*(image.at<Vec3b>(x, y + 1))
                + c*(image.at<Vec3b>(x + 1, y)) + d*(image.at<Vec3b>(x + 1, y + 1));
        }
    }
    imshow("iamge", image);
    imshow("smallerImage", smallerImage);
    imshow("biggerImage", biggerImage);
    waitKey(0);

    return 0;

}
**这里要注意,在放大源图像时,要对边缘部分进行处理。否则会出现问题。
效果展示


话说我是没看出有啥效果不同。。。。


 894
894


 被折叠的 条评论
为什么被折叠?
被折叠的 条评论
为什么被折叠?
 到【灌水乐园】发言


