


2017/12/30
Spring框架可以利用XML文件进行IoC配置,但从2.0版本开始引入了注解的配置方式--将Bean的配置信息和Bean实现类结合在一起,可以进一步减少配置文件的代码量。
【1】导入必要的jar包

文件框架:
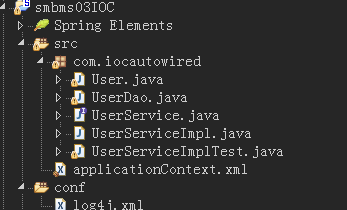
【2】新建User.java / UserDao.java / UserService.java接口 / 实现类UserServiceImpl.java :
User.java :
package com.iocautowired;

import java.util.Date;
import java.util.List;

import org.springframework.stereotype.Component;

@Component("user")
public class User {
	private Integer id;
	private String userCode;
	private String userName;
	private String userPassword;
	private Integer gender;
	private Date birthday;
	private String phone;
	private String address ;
	private Integer userRole;
	private Integer createdBy;
	private Date creationDate;
	private Integer modifyBy;
	private Date modifyDate;
	private String userRoleName;

	public String getUserRoleName() {
		return userRoleName;
	}
	public void setUserRoleName(String userRoleName) {
		this.userRoleName = userRoleName;
	}
	public Integer getId() {
		return id;
	}
	public void setId(Integer id) {
		this.id = id;
	}
	public String getUserCode() {
		return userCode;
	}
	public void setUserCode(String userCode) {
		this.userCode = userCode;
	}
	public String getUserName() {
		return userName;
	}
	public void setUserName(String userName) {
		this.userName = userName;
	}
	public String getUserPassword() {
		return userPassword;
	}
	public void setUserPassword(String userPassword) {
		this.userPassword = userPassword;
	}
	public Integer getGender() {
		return gender;
	}
	public void setGender(Integer gender) {
		this.gender = gender;
	}
	public Date getBirthday() {
		return birthday;
	}
	public void setBirthday(Date birthday) {
		this.birthday = birthday;
	}
	public String getPhone() {
		return phone;
	}
	public void setPhone(String phone) {
		this.phone = phone;
	}
	public String getAddress() {
		return address;
	}
	public void setAddress(String address) {
		this.address = address;
	}
	public Integer getUserRole() {
		return userRole;
	}
	public void setUserRole(Integer userRole) {
		this.userRole = userRole;
	}
	public Integer getCreatedBy() {
		return createdBy;
	}
	public void setCreatedBy(Integer createdBy) {
		this.createdBy = createdBy;
	}
	public Date getCreationDate() {
		return creationDate;
	}
	public void setCreationDate(Date creationDate) {
		this.creationDate = creationDate;
	}
	public Integer getModifyBy() {
		return modifyBy;
	}
	public void setModifyBy(Integer modifyBy) {
		this.modifyBy = modifyBy;
	}
	public Date getModifyDate() {
		return modifyDate;
	}
	public void setModifyDate(Date modifyDate) {
		this.modifyDate = modifyDate;
	}
	public User(Integer id, String userCode, String userName, String userPassword, Integer gender, Date birthday,
			String phone, String address, Integer userRole, Integer createdBy, Date creationDate, Integer modifyBy,
			Date modifyDate) {
		super();
		this.id = id;
		this.userCode = userCode;
		this.userName = userName;
		this.userPassword = userPassword;
		this.gender = gender;
		this.birthday = birthday;
		this.phone = phone;
		this.address = address;
		this.userRole = userRole;
		this.createdBy = createdBy;
		this.creationDate = creationDate;
		this.modifyBy = modifyBy;
		this.modifyDate = modifyDate;
	}
	public User() {
		super();
		// TODO 自动生成的构造函数存根
	}
	@Override
	public String toString() {
		return "User [id=" + id + ", userCode=" + userCode + ", userName=" + userName + ", userPassword=" + userPassword
				+ ", gender=" + gender + ", birthday=" + birthday + ", phone=" + phone + ", address=" + address
				+ ", userRole=" + userRole + ", createdBy=" + createdBy + ", creationDate=" + creationDate
				+ ", modifyBy=" + modifyBy + ", modifyDate=" + modifyDate + "]";
	}

}
UserDao.java:
package com.iocautowired;

import org.springframework.beans.factory.annotation.Autowired;
import org.springframework.stereotype.Component;

/**
 * 用户DAO类,实现UserDao接口,负责User类的持久化操作
 * */
//通过注解定义了UserDao
@Component("userdao")
public class UserDao {
	@Autowired
	private User user;

}
UserService.java接口:
package com.iocautowired;

public interface UserService {
	public void addNewUser(User user);
}
UserServiceImpl.java 实现类 :
package com.iocautowired;

import org.springframework.beans.factory.annotation.Autowired;
import org.springframework.beans.factory.annotation.Qualifier;
import org.springframework.stereotype.Service;

@Service("UserServiceImpl")
public class UserServiceImpl implements UserService{
	@Autowired
	@Qualifier("userdao")
	private UserDao dao;

	public UserServiceImpl() {}

	public UserServiceImpl(UserDao dao) {
		super();
		this.dao = dao;
	}

	@Override
	public void addNewUser(User user) {
		//dao.save(user);
		System.out.println("dao.save(user)");
	}

}
【3】写 UserServiceImplTest.java 单元测试:
package com.iocautowired;

import org.junit.Test;
import org.springframework.context.support.ClassPathXmlApplicationContext;

public class UserServiceImplTest {

	@Test
	public void test() {
		User user = new User();
		user.setUserRole(101);
		ClassPathXmlApplicationContext classPathXmlApplicationContext = new ClassPathXmlApplicationContext("applicationContext.xml");
		UserService bean1 = (UserService)classPathXmlApplicationContext.getBean("UserServiceImpl");
		bean1.addNewUser(user);
	}

}
【4】写 applicationContext.xml 配置文件:
记住要把依赖文件关系写进去(标注红色部分)
<?xml version="1.0" encoding="UTF-8"?>
<beans xmlns="http://www.springframework.org/schema/beans"
    xmlns:xsi="http://www.w3.org/2001/XMLSchema-instance"
    xmlns:aop="http://www.springframework.org/schema/aop"
    xmlns:tx="http://www.springframework.org/schema/tx"
    xmlns:context="http://www.springframework.org/schema/context"
    xsi:schemaLocation="http://www.springframework.org/schema/beans
        http://www.springframework.org/schema/beans/spring-beans-4.2.xsd
        http://www.springframework.org/schema/aop
        http://www.springframework.org/schema/aop/spring-aop-4.2.xsd
        http://www.springframework.org/schema/context
        http://www.springframework.org/schema/context/spring-context-2.5.xsd">

<!-- 下面是 com\spring\aop进行注解实现IoC配置-->
	<context:component-scan base-package="com.iocautowired"></context:component-scan>

</beans>
【5】输出结果:
dao.save(user)实例分析:
1、@Component("XXX") 的作用等效于 :<bean id="XXX" class="XXX.XX.X"></bean> ;
2、除了@Component("XXX") ,Spring还提供了:@Repository【标注DAO类】、@Service【标注业务类】、@Controller【标注控制器类】;
3、Bean的装配则提供了@Autowired注解实现,采用的是类型匹配,即容器自动查找和属性类型匹配的Bean组件,并自动注入,
4、若是容器发现有一个以上的类型匹配的Bean,则可以使用@Qualifier 指定Bean的名称。
综上,以上是一个Spring的注解IoC小Demo。


 583
583

 被折叠的 条评论
为什么被折叠?
被折叠的 条评论
为什么被折叠?
 到【灌水乐园】发言


