


这里写代码


#include <opencv2\opencv.hpp>
#include<time.h>
#include<string>
#include<vector>
#include<iostream>
#include<cv.h>
#include "opencv2/highgui/highgui.hpp"
#include <opencv2/imgproc/imgproc.hpp>
using namespace cv;
using namespace std;
ostream os;
istream is;
int main( )
{
    String cascadename = "haarcascade_frontalface_alt2.xml";
    CascadeClassifier cascade;
    cascade.load(cascadename);
    VideoCapture capture(0);
    cout << "测试点2" << endl;
    const static Scalar colors[] = { CV_RGB(0,0,255),
        CV_RGB(0,128,255),
        CV_RGB(0,255,255),
        CV_RGB(0,255,0),
        CV_RGB(255,128,0),
        CV_RGB(255,255,0),
        CV_RGB(255,0,0),
        CV_RGB(255,0,255) };
        vector<Rect>faces;
        vector<Rect>eye;
    while(1)
    {  Mat edges;
    clock_t start, finish;
    double totaltime;
    start = clock();
        //cout << "测试点3" << endl;
        Mat frame;  //定义一个Mat变量,用于存储每一帧的图像

        capture>>frame;
        //cout << "测试点3.1" << endl;
        Mat gray;
        //cout << "测试点3.2" << endl;
        boxFilter(frame, gray, -1, Size(7, 7));
        //threshold(frame, gray, 170, 255, CV_THRESH_BINARY);
        cvtColor(gray,edges,CV_BGR2GRAY);
        Mat temp;
        cout << "neicun" << sizeof(edges) << endl;
        //cout << "测试点3.3" << endl;
        equalizeHist(edges,edges);
        start = clock();
        cascade.detectMultiScale(edges,faces,1.1,3,0|CV_HAAR_DO_CANNY_PRUNING);
        finish = clock();
        totaltime = (double)(finish - start) / CLOCKS_PER_SEC;
        cout << "\n此程序的运行时间为" << totaltime << "秒!" << endl;
        if(faces.size()==0)
        {
            cout << "跳过" << endl;
            //continue;
        }
        else
        {

            int i = 0;
            for (vector<Rect>::const_iterator r = faces.begin(); r != faces.end(); r++, i++)
            {
                Point center;
                Point center2;
                Scalar color = colors[i % 8];
                center.x = cvRound(r->x);
                center.y = cvRound(r->y);
                center2.x = cvRound(r->x + r->width);
                center2.y = cvRound(r->y + r->height);
                rectangle(frame, center, center2, color);
            }
        }


        //cout << "断点7" << endl;
        cout << "测试点5" << endl;
        imshow("result", frame);
        waitKey(1);
    }
    return 0;
}
“`大概思路 先对图像进行 高斯滤波 降噪 灰度处理 均衡化处理 用Haar 方法 侦测 人脸 并画出 在画人脸是需要注意 如果detectMultiScale()函数没有检测到 定位点 就需要跳过 标记圈脸函数 detectMultiScale()的参数也需要注意 不详解。。。。。。。本人新手 能力有限 欢迎大家来 提出问题以及 我的不足。。。。再次谢谢。!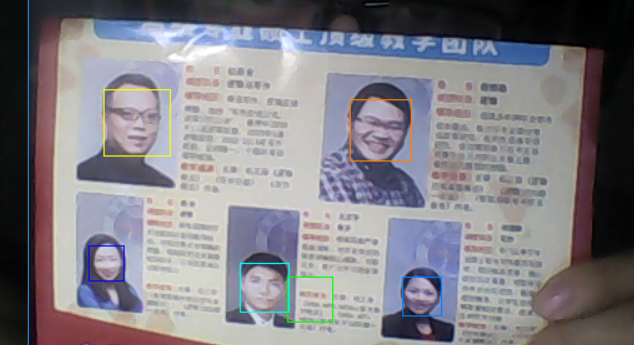


 866
866

 被折叠的 条评论
为什么被折叠?
被折叠的 条评论
为什么被折叠?
 到【灌水乐园】发言


