


本文简要记录使用 Mybatis-Plus 进行代码自动生成,可以借鉴官方文档点击,该方式可以让我们依据数据库文件,自动生成相关属性,节省我们重复创建Spring web entity controller等文件夹的时间。
条件准备
需要在项目引入 Mybatis-plus 的插件,具体参照环境配置
相关测试代码
package com.example.generator;

import com.baomidou.mybatisplus.annotation.DbType;
import com.baomidou.mybatisplus.annotation.IdType;
import com.baomidou.mybatisplus.core.exceptions.MybatisPlusException;
import com.baomidou.mybatisplus.core.toolkit.StringUtils;
import com.baomidou.mybatisplus.generator.AutoGenerator;
import com.baomidou.mybatisplus.generator.config.DataSourceConfig;
import com.baomidou.mybatisplus.generator.config.GlobalConfig;
import com.baomidou.mybatisplus.generator.config.PackageConfig;
import com.baomidou.mybatisplus.generator.config.StrategyConfig;
import com.baomidou.mybatisplus.generator.config.rules.DateType;
import com.baomidou.mybatisplus.generator.config.rules.NamingStrategy;

import java.util.Scanner;

public class CodeGenerator {
    /**
     * <p>
     * 读取控制台内容
     * </p>
     */
    public static String scanner(String tip) {
        Scanner scanner = new Scanner(System.in);
        StringBuilder help = new StringBuilder();
        help.append("请输入" + tip + ":");
        System.out.println(help.toString());
        if (scanner.hasNext()) {
            String ipt = scanner.next();
            if (StringUtils.isNotBlank(ipt)) {
                return ipt;
            }
        }
        throw new MybatisPlusException("请输入正确的" + tip + "!");
    }

    public static void main(String[] args) {
        // 代码生成器对象
        AutoGenerator mpg = new AutoGenerator();
//-Dfile.encoding=GBK
        // 全局配置
        GlobalConfig gc = new GlobalConfig();
        //String projectPath = System.getProperty("user.dir");
        gc.setOutputDir(scanner("请输入您的项目路径") + "/src/main/java");
        gc.setAuthor("lyy");
        //D:\Program\Java\JavaPro\SnnuPro\hospital-parent\hospital-base-web
        //生成之后是否打开资源管理器
        gc.setOpen(false);
        //重新生成时是否覆盖文件
        gc.setFileOverride(false);
        //%s为占位符
        //mp生成service 层代码 默认接口名称第一个字母是有 I
        gc.setServiceName("%sService");
        //设置主键生成策略
        gc.setIdType(IdType.AUTO);
        //设置Date格式
        gc.setDateType(DateType.ONLY_DATE);
        //开启实体属性 Swagger2 注解
        gc.setSwagger2(true);
        mpg.setGlobalConfig(gc);

        // 数据源配置 这里结合您自己的进行配置就行
        DataSourceConfig dsc = new DataSourceConfig();
        dsc.setUrl("jdbc:mysql://localhost:3306/test?useUnicode=true&characterEncoding=UTF-8&serverTimezone=GMT%2B8");
        // dsc.setSchemaName("public");
        dsc.setDriverName("com.mysql.cj.jdbc.Driver");
        dsc.setUsername("root");
        dsc.setPassword("123");
        //使用Mysql数据库
        dsc.setDbType(DbType.MYSQL);
        mpg.setDataSource(dsc);

        // 包配置
        PackageConfig pc = new PackageConfig();
        pc.setModuleName(scanner("请输入模块名"));
        pc.setParent("com.example");//父包名
        pc.setController("controller");//controller层名
        pc.setService("service");//service层名
        pc.setServiceImpl("service.impl");
        pc.setMapper("mapper");
        pc.setEntity("entity");
        pc.setXml("mapper");
        mpg.setPackageInfo(pc);

       /* // 自定义配置 可以不用,如果用的化 自己跟着教程来吧
        InjectionConfig cfg = new InjectionConfig() {
            @Override
            public void initMap() {
                // to do nothing
            }
        };

        // 如果模板引擎是 freemarker
        String templatePath = "/templates/mapper.xml.ftl";
        // 如果模板引擎是 velocity
        // String templatePath = "/templates/mapper.xml.vm";

        // 自定义输出配置
        List<FileOutConfig> focList = new ArrayList<>();
        // 自定义配置会被优先输出
        focList.add(new FileOutConfig(templatePath) {
            @Override
            public String outputFile(TableInfo tableInfo) {
                // 自定义输出文件名 , 如果你 Entity 设置了前后缀、此处注意 xml 的名称会跟着发生变化!!
                return projectPath + "/src/main/resources/mapper/" + pc.getModuleName()
                        + "/" + tableInfo.getEntityName() + "Mapper" + StringPool.DOT_XML;
            }
        });
        *//*
        cfg.setFileCreate(new IFileCreate() {
            @Override
            public boolean isCreate(ConfigBuilder configBuilder, FileType fileType, String filePath) {
                // 判断自定义文件夹是否需要创建
                checkDir("调用默认方法创建的目录,自定义目录用");
                if (fileType == FileType.MAPPER) {
                    // 已经生成 mapper 文件判断存在,不想重新生成返回 false
                    return !new File(filePath).exists();
                }
                // 允许生成模板文件
                return true;
            }
        });
        *//*
        cfg.setFileOutConfigList(focList);
        mpg.setCfg(cfg);

        // 配置模板
        TemplateConfig templateConfig = new TemplateConfig();

        // 配置自定义输出模板
        //指定自定义模板路径,注意不要带上.ftl/.vm, 会根据使用的模板引擎自动识别
        // templateConfig.setEntity("templates/entity2.java");
        // templateConfig.setService();
        // templateConfig.setController();

        templateConfig.setXml(null);
        mpg.setTemplate(templateConfig);*/

        // 策略配置
        StrategyConfig strategy = new StrategyConfig();
        //设置哪些表需要自动生成
        strategy.setInclude(scanner("表名,多个英文逗号分割").split(","));
        //实体类名称 驼峰命名方式
        strategy.setNaming(NamingStrategy.underline_to_camel);
        //实体列名称 驼峰命名方式
        strategy.setColumnNaming(NamingStrategy.underline_to_camel);
        //strategy.setSuperEntityClass("你自己的父类实体,没有就不用设置!");
        //设置 简化的getter setter
        strategy.setEntityLombokModel(true);
        //设置controller的api 风格 (rest风格)
        strategy.setRestControllerStyle(true);
//        // 公共父类
//        strategy.setSuperControllerClass("你自己的父类控制器,没有就不用设置!");
        /*// 写于父类中的公共字段
        strategy.setSuperEntityColumns("id");*/
        //strategy.setInclude(scanner("表名,多个英文逗号分割").split(","));
        //驼峰转连字符
        strategy.setControllerMappingHyphenStyle(true);
        //模块名称+_
        strategy.setTablePrefix(pc.getModuleName() + "_");
        mpg.setStrategy(strategy);
        //模板引擎
        //mpg.setTemplateEngine(new FreemarkerTemplateEngine());
        mpg.execute();
    }

}
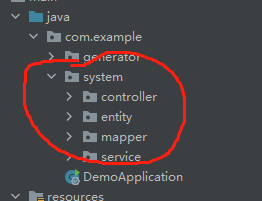
开始测试前,先看下项目目录,除了 generator 包,其他都没,下一步就是见证奇迹的时候

开始测试
运行上面的函数中的 main 函数,则在控制台中出现下面的内容,按照我的说明,逐步进行操作

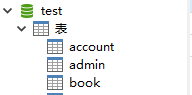
上面的那个 admin 和 account 均在我的test数据库中存在,然后直接回车 ,就可以直接创建
回车后:

成功生成

上效果,如果没有出现,则点击子项目进行 Reload from disk 即可
点开文件看看 ,发现属性自动生成

然后将 mapper 文件夹下的 xml 移动至 Resouuces 文件夹下新建的mapper文件夹中即可,方便后续操作

此处补充一些内容,当我们的数据库中如果有 demo_user,demo_infos 等,即每个表前面都有个前缀,则代码自动生成时,会自动转为 DemoUser,DemoInfos等,但我们希望我们的类为 User 和 Infos 这些,所以需要在上述的代码自动生成中加入下方的代码:
  //忽略表中生成实体类的前缀,比如
        //某些表 demo_user,demo_infos .. 则可以传入demo_ 在生成过程中可自动过滤demo_
       strategy.setTablePrefix("demo_");
添加位置,可以是任意一行

另外,可以考虑将代码生成包,直接拖至 test 文件夹,不影响上方工程的编译。


 528
528


 被折叠的 条评论
为什么被折叠?
被折叠的 条评论
为什么被折叠?
 到【灌水乐园】发言


