


# ~1~
一、pytorch 转 onnx 推理加速
01 配置
Ubuntu 16.04
python 3.6
onnx 1.6
pytorch 1.5
pycuda 2019.1.2
torchvision 0.1.8
建议详读,先安装好环境:
https://docs.nvidia.com/deeplearning/tensorrt/developer-guide/index.html#import_onnx_python
02 步骤
1. 将pytorch模型转换成onnx模型
这边用的是Darknet生成的pytoch模型
import torch
from torch.autograd import Variable
import onnx


input_name = ['input']
output_name = ['output']
input = Variable(torch.randn(1, 3, 544, 544)).cuda()
model = x.model.cuda()#x.model为我生成的模型

# model = torch.load('', map_location="cuda:0")
torch.onnx.export(model, input, 'model.onnx', input_names=input_name, output_names=output_name, verbose=True)
其中
#model = x.model.cuda()#若是不添加cuda()model = x.model
出现报错
RuntimeError: Input type (torch.cuda.FloatTensor) and weight type (torch.FloatTensor) should be the same2. 检查模型
model = onnx.load("model.onnx")onnx.checker.check_model(model)print("==> Passed")
3. 测试onnx模型使用tensorrt推理前后对比
import pycuda.autoinit
import numpy as np
import pycuda.driver as cuda
import tensorrt as trt
import torch
import os
import time
from PIL import Image
import cv2
import torchvision

filename = '000000.jpg'
max_batch_size = 1
onnx_model_path = 'yolo.onnx'

TRT_LOGGER = trt.Logger()  # This logger is required to build an engine


def get_img_np_nchw(filename):
    image = cv2.imread(filename)
    image_cv = cv2.cvtColor(image, cv2.COLOR_BGR2RGB)
    image_cv = cv2.resize(image_cv, (1920, 1080))
    miu = np.array([0.485, 0.456, 0.406])
    std = np.array([0.229, 0.224, 0.225])
    img_np = np.array(image_cv, dtype=float) / 255.
    r = (img_np[:, :, 0] - miu[0]) / std[0]
    g = (img_np[:, :, 1] - miu[1]) / std[1]
    b = (img_np[:, :, 2] - miu[2]) / std[2]
    img_np_t = np.array([r, g, b])
    img_np_nchw = np.expand_dims(img_np_t, axis=0)
    return img_np_nchw

class HostDeviceMem(object):
    def __init__(self, host_mem, device_mem):
        """Within this context, host_mom means the cpu memory and device means the GPU memory
        """
        self.host = host_mem
        self.device = device_mem

    def __str__(self):
        return "Host:\n" + str(self.host) + "\nDevice:\n" + str(self.device)

    def __repr__(self):
        return self.__str__()


def allocate_buffers(engine):
    inputs = []
    outputs = []
    bindings = []
    stream = cuda.Stream()
    for binding in engine:
        size = trt.volume(engine.get_binding_shape(binding)) * engine.max_batch_size
        dtype = trt.nptype(engine.get_binding_dtype(binding))
        # Allocate host and device buffers
        host_mem = cuda.pagelocked_empty(size, dtype)
        device_mem = cuda.mem_alloc(host_mem.nbytes)
        # Append the device buffer to device bindings.
        bindings.append(int(device_mem))
        # Append to the appropriate list.
        if engine.binding_is_input(binding):
            inputs.append(HostDeviceMem(host_mem, device_mem))
        else:
            outputs.append(HostDeviceMem(host_mem, device_mem))
    return inputs, outputs, bindings, stream


def get_engine(max_batch_size=1, onnx_file_path="", engine_file_path="", \
               fp16_mode=False, int8_mode=False, save_engine=False,
               ):
    """Attempts to load a serialized engine if available, otherwise builds a new TensorRT engine and saves it."""

    def build_engine(max_batch_size, save_engine):
        """Takes an ONNX file and creates a TensorRT engine to run inference with"""
        EXPLICIT_BATCH = 1 << (int)(trt.NetworkDefinitionCreationFlag.EXPLICIT_BATCH)
        with trt.Builder(TRT_LOGGER) as builder, \
                builder.create_network(EXPLICIT_BATCH) as network, \
                trt.OnnxParser(network, TRT_LOGGER) as parser:

            builder.max_workspace_size = 1 << 30  # Your workspace size
            builder.max_batch_size = max_batch_size
            # pdb.set_trace()
            builder.fp16_mode = fp16_mode  # Default: False
            builder.int8_mode = int8_mode  # Default: False
            if int8_mode:
                # To be updated
                raise NotImplementedError

            # Parse model file
            if not os.path.exists(onnx_file_path):
                quit('ONNX file {} not found'.format(onnx_file_path))

            print('Loading ONNX file from path {}...'.format(onnx_file_path))
            with open(onnx_file_path, 'rb') as model:
                print('Beginning ONNX file parsing')
                parser.parse(model.read())

                if not parser.parse(model.read()):
                    for error in range(parser.num_errors):
                        print(parser.get_error(error))
                    print("===========Parsing fail!!!!=================")
                else :
                    print('Completed parsing of ONNX file')

            print('Building an engine from file {}; this may take a while...'.format(onnx_file_path))

            engine = builder.build_cuda_engine(network)
            print("Completed creating Engine")

            if save_engine:
                with open(engine_file_path, "wb") as f:
                    f.write(engine.serialize())
            return engine

    if os.path.exists(engine_file_path):
        # If a serialized engine exists, load it instead of building a new one.
        print("Reading engine from file {}".format(engine_file_path))
        with open(engine_file_path, "rb") as f, trt.Runtime(TRT_LOGGER) as runtime:
            return runtime.deserialize_cuda_engine(f.read())
    else:
        return build_engine(max_batch_size, save_engine)


def do_inference(context, bindings, inputs, outputs, stream, batch_size=1):
    # Transfer data from CPU to the GPU.
    [cuda.memcpy_htod_async(inp.device, inp.host, stream) for inp in inputs]
    # Run inference.
    context.execute_async(batch_size=batch_size, bindings=bindings, stream_handle=stream.handle)
    # Transfer predictions back from the GPU.
    [cuda.memcpy_dtoh_async(out.host, out.device, stream) for out in outputs]
    # Synchronize the stream
    stream.synchronize()
    # Return only the host outputs.
    return [out.host for out in outputs]


def postprocess_the_outputs(h_outputs, shape_of_output):
    h_outputs = h_outputs.reshape(*shape_of_output)
    return h_outputs


img_np_nchw = get_img_np_nchw(filename)
img_np_nchw = img_np_nchw.astype(dtype=np.float32)

# These two modes are dependent on hardwares
fp16_mode = False
int8_mode = False
trt_engine_path = './model_fp16_{}_int8_{}.trt'.format(fp16_mode, int8_mode)
# Build an engine
engine = get_engine(max_batch_size, onnx_model_path, trt_engine_path, fp16_mode, int8_mode)
# Create the context for this engine
context = engine.create_execution_context()
# Allocate buffers for input and output
inputs, outputs, bindings, stream = allocate_buffers(engine) # input, output: host # bindings

# Do inference
shape_of_output = (max_batch_size, 1000)
# Load data to the buffer
inputs[0].host = img_np_nchw.reshape(-1)

# inputs[1].host = ... for multiple input
t1 = time.time()
trt_outputs = do_inference(context, bindings=bindings, inputs=inputs, outputs=outputs, stream=stream) # numpy data
t2 = time.time()
feat = postprocess_the_outputs(trt_outputs[0], shape_of_output)

print('TensorRT ok')
#将model改为自己的模型,此处为pytoch的resnet50,需联网下载
model = torchvision.models.resnet50(pretrained=True).cuda()
resnet_model = model.eval()

input_for_torch = torch.from_numpy(img_np_nchw).cuda()
t3 = time.time()
feat_2= resnet_model(input_for_torch)
t4 = time.time()
feat_2 = feat_2.cpu().data.numpy()
print('Pytorch ok!')


mse = np.mean((feat - feat_2)**2)
print("Inference time with the TensorRT engine: {}".format(t2-t1))
print("Inference time with the PyTorch model: {}".format(t4-t3))
print('MSE Error = {}'.format(mse))

print('All completed!')
报错:
In node -1 (importModel): INVALID_VALUE: Assertion failed: !_importer_ctx.network()->hasImplicitBatchDimension() && "This version of the ONNX parser only supports TensorRT INetworkDefinitions with an explicit batch dimension. Please ensure the network was created using the EXPLICIT_BATCH NetworkDefinitionCreationFlag."解决:
def build_engine(max_batch_size, save_engine):EXPLICIT_BATCH = 1 << (int)(trt.NetworkDefinitionCreationFlag.EXPLICIT_BATCH)with trt.Builder(TRT_LOGGER) as builder, \builder.create_network(EXPLICIT_BATCH) as network, \trt.OnnxParser(network, TRT_LOGGER) as parser:
报错:
Traceback (most recent call last):line 126, in <listcomp>[cuda.memcpy_htod_async(inp.device, inp.host, stream) for inp in inputs]pycuda._driver.LogicError: cuMemcpyHtoDAsync failed: invalid argument
解决:
def get_img_np_nchw(filename):image = cv2.imread(filename)image_cv = cv2.cvtColor(image, cv2.COLOR_BGR2RGB)image_cv = cv2.resize(image_cv, (1920, 1080))
输入的检测图像尺寸需要resize成model的input的size
改为
def get_img_np_nchw(filename):image = cv2.imread(filename)image_cv = cv2.cvtColor(image, cv2.COLOR_BGR2RGB)image_cv = cv2.resize(image_cv, (544,544))
报错
line 139, in postprocess_the_outputsh_outputs = h_outputs.reshape(*shape_of_output)ValueError: cannot reshape array of size 5780 into shape (1,1000)
解决:
#shape_of_output = (max_batch_size, 1000)#修改成自己模型ouput的大小shape_of_output = (1,20,17,17)
二、PyTorch-ONNX 精度对齐工具
精度对齐,是模型部署中重要的一个环节。在把深度学习框架模型转换成中间表示模型后,部署工程师们要做的第一件事就是精度对齐,确保模型的计算结果与之前相当。精度对齐时最常用的方法,就是使用测试集评估一遍中间表示模型,看看模型的评估指标(如准确度、相似度)是否下降。
而在 PyTorch 到 ONNX 这条部署路线上,这种精度对齐方式有一些不便:一旦我们发现 PyTorch 模型和 ONNX 模型的评估指标有了出入,我们很难去追踪精度是在哪一个模块出了问题。这是因为 PyTorch 和 ONNX 模块总是难以对应。如下面的例子所示:
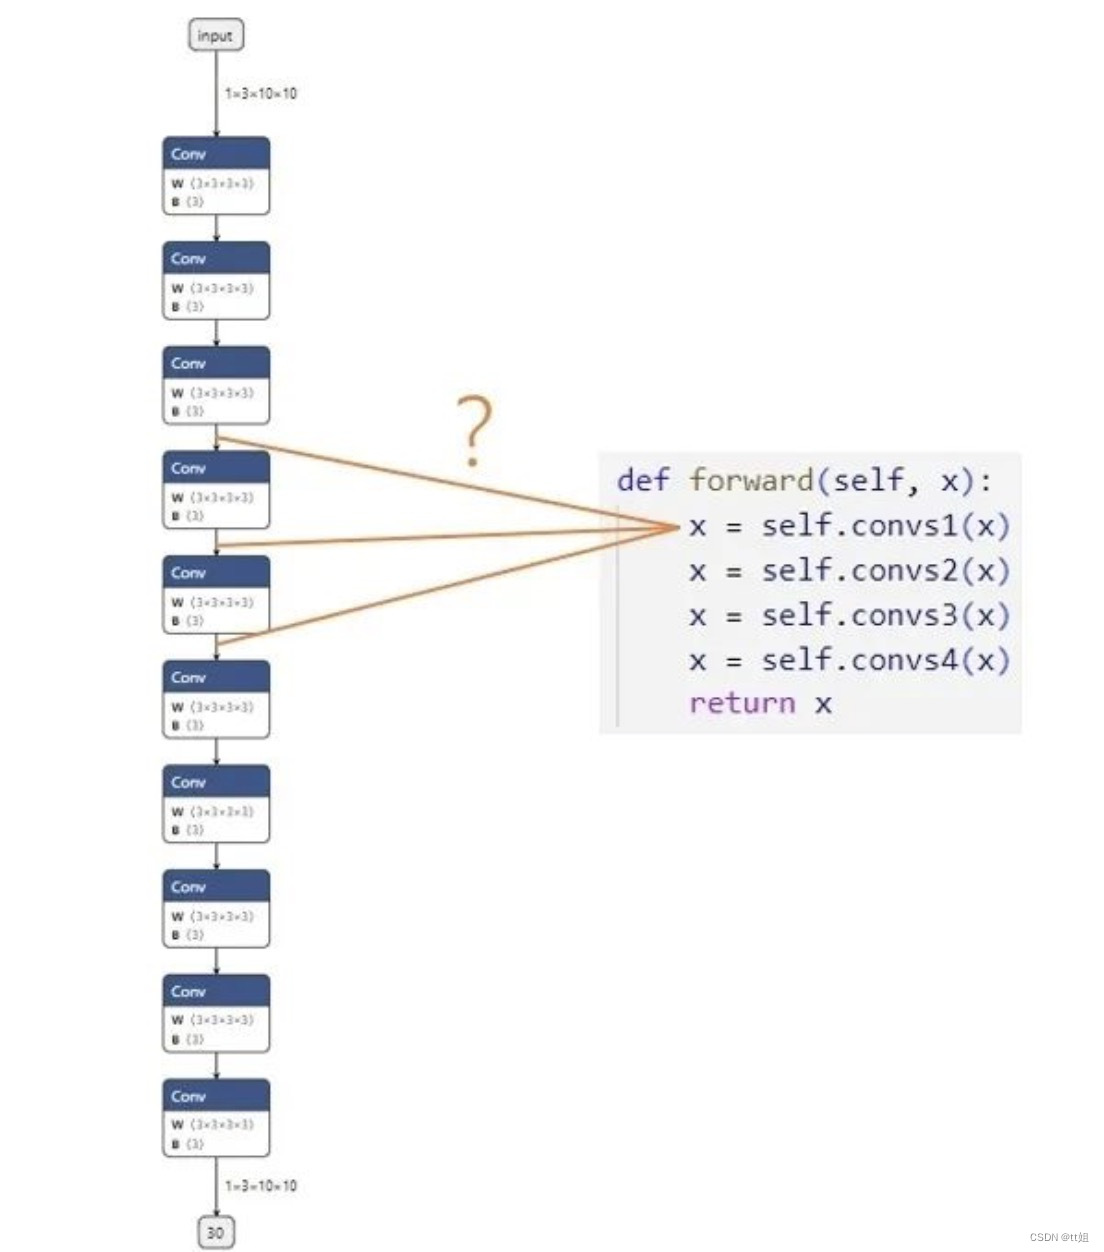
假设我们现在有一个由很多卷积块 convs1, convs2... 组成的网络,我们想对齐 PyTorch 模型和 ONNX 模型的精度。第一步,我们想比较第一个卷积块的输出 x = self.convs1(x)。模块在PyTorch 模型中的输出可以很轻松地得到,可是,这个输出究竟对应 ONNX 模型里的哪一个输出呢?在小模型里,我们或许能够通过阅读 PyTorch 模型的源码,推断出每个 ONNX 模块与 PyTorch 模块的对应关系;但是,在大模型中,我们是难以建立 PyTorch 与 ONNX 的对应关系的。延庆川北小区45孙老师 收卖废品破烂垃圾炒股 废品孙 再回收
在这篇教程中,我们就来利用自定义算子、子模型提取等工具,实现一个简单的 PyTorch-ONNX 精度对齐工具。
设计思路
为了把 PyTorch 和 ONNX 模块对应起来,我们可以使用一种储存了调试信息的自定义算子,如下图所示:
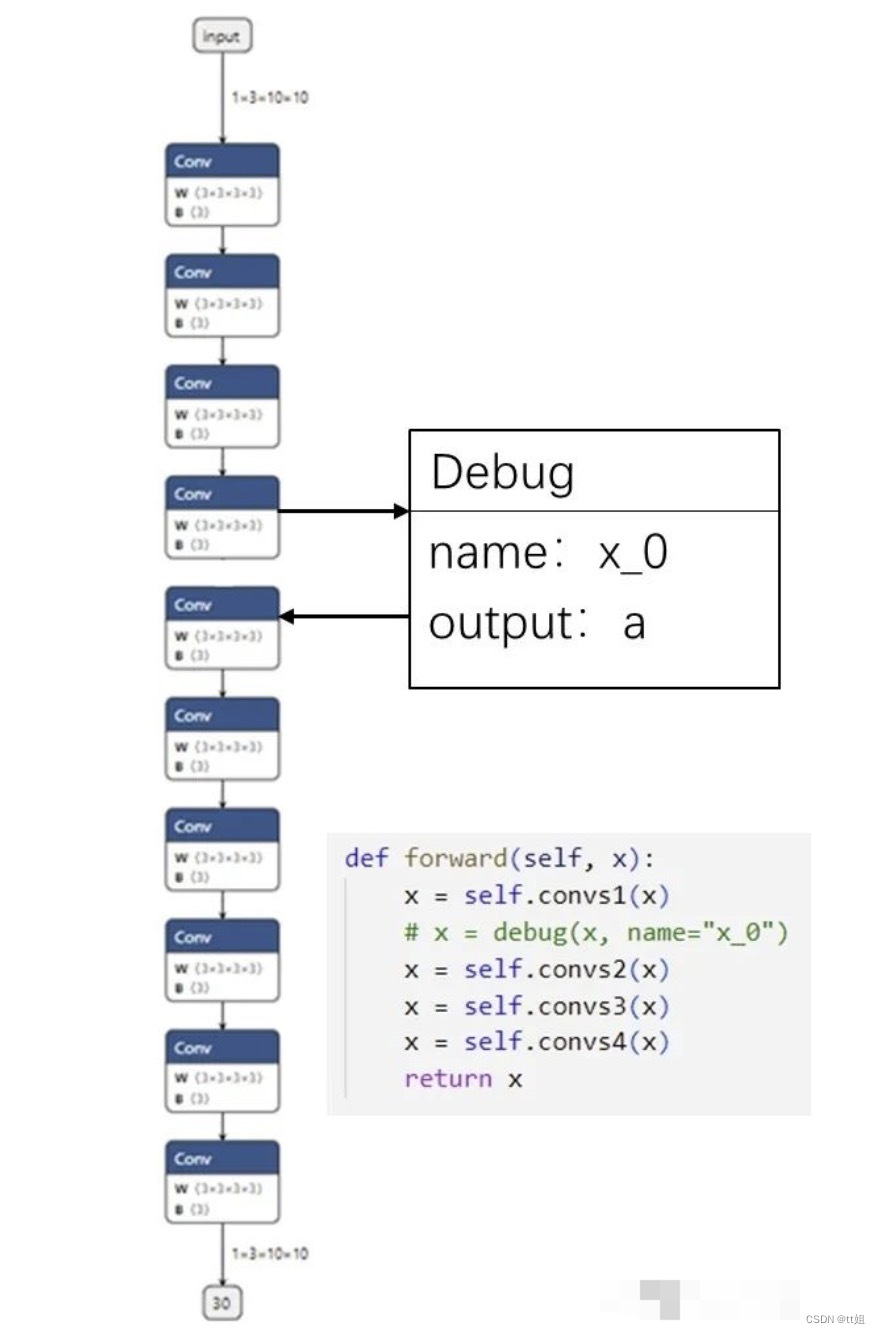
我们可以定义一个叫做 Debug 的 ONNX 算子,它有一个属性调试名 name。而由于每一个 ONNX 算子节点又自带了输出张量的名称,这样一来,ONNX 节点的输出名和调试名绑定在了一起。我们可以顺着 PyTorch 里的调试名,找到对应 ONNX 里的输出,完成 PyTorch 和 ONNX 的对应。
比如在上图的例子中,我们把第一个卷积块输出 x=self.convs1(x) 接入一个带有调试名 x_0 的调试算子。在最后生成的 ONNX 模型中,假设调试名 x_0 对应的输出张量叫做 a。知道了这一信息后,我们只需要先运行一遍 PyTorch 模型,记录第一个卷积块的输出;再运行一遍 ONNX 模型,用上篇教程中提到的截取 ONNX 中间结果的方法,记录中间张量 a 的值。这样,我们就可以对齐某 PyTorch 模块和它对应的 ONNX 模块的输出了。
代码实现
Debug 算子
首先,我们需要实现之前提到的 Debug 算子:
import torch

class DebugOp(torch.autograd.Function):
    @staticmethod
    def forward(ctx, x, name):
        return x

    @staticmethod
    def symbolic(g, x, name):
        return g.op("my::Debug", x, name_s=name)

debug_apply = DebugOp.apply
Debug 算子的调用接口有两个参数:输入张量 x 和调试名 name。为了把这个算子“伪装”成一个普通的算子,使之能正常地参与推理、构建计算图的操作,我们还是需要正确定义对输入 x 进行操作的 forward 函数。而在表示 PyTorch 与 ONNX 映射规则的 symbolic 函数里,我们要定义一个带有调试名的 ONNX 算子,并把输入的 name 传给算子。
由于 Debug 算子本身不表示任何计算,因此在 forward 函数中,直接把输入 x 返回即可。
而 symbolic 函数定义了一个新算子 my::Debug:算子有一个输入 x,一个属性 name。我们直接把算子调用接口里的 x,name 传入即可。
这里需要补充介绍算子定义函数 g.op() 的一些规范。在g.op()中,算子的属性需要以 {attibute_name}_{type}=attibute_value 这样的格式传入。其中 {attibute_name} 为属性名,{type} 指定了算子属性的数据类型。比如说我们上面的算子属性写成 name_s,实际上是定义了一个字符串类型,名字叫做 name 的属性。除了表示字符串类型的 _s 外,还有表示 float 型的 _f,表示 tensor 型的 _t。
在完成算子的定义后,我们可以通过 debug_apply = DebugOp.apply 获取算子的调用接口。这样以后就可以通过 debug_apply(x, name) 来使用这个算子了。
如果对 torch.autograd.Function 的用法不熟,欢迎回顾第四篇教程。
Debugger 类
接着,我们来实现精度对齐工具的核心——Debugger 类。这个类包含了实现精度对齐所需的所有操作。其定义如下:
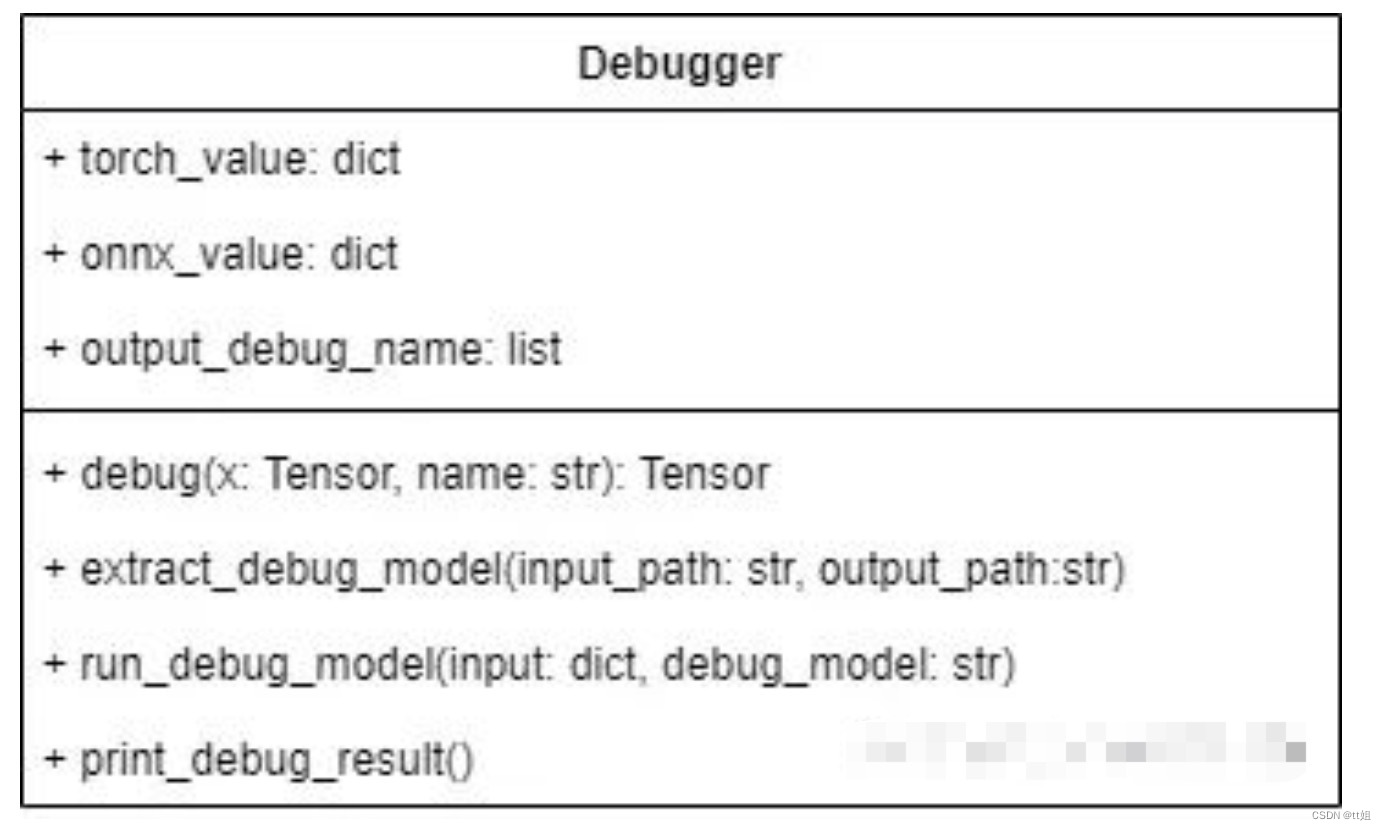
Debugger 类有三个成员变量:
-
torch_value记录了运行 PyTorch 模型后每个调试张量的值。 -
onnx_value记录了运行 ONNX 模型后每个调试张量的值。 -
output_debug_name记录了把调试张量加入 ONNX 的输出后,每个输出张量的调试名。
稍后我们会在类实现的代码里看到这些成员变量的具体用法。
Debugger 类有以下方法:
-
debug封装了之前编写好的debug_apply。该方法需要在原 PyTorch 模型中调用,可以为导出的 ONNX 模型添加 Debug 算子节点,同时记录 PyTorch 调试张量值。 -
extract_debug_model和 ONNX 的子模型提取函数的用法类似,可以把带调试节点的 ONNX 模型转化成一个可以输出调试张量的 ONNX 模型。 -
run_debug_model会使用 ONNX Runtime 运行模型,得到 ONNX 调试张量值。 -
print_debug_result会比较 PyTorch 和 ONNX 的调试张量值,输出比较的结果。
这 4 个方法会依次被调用。下面我们来具体探究一下每个方法的实现。
生成调试节点
def debug(self, x, name):
    self.torch_value[name] = x.detach().cpu().numpy()
    return debug_apply(x, name)
如前文所述,debug完成了两件事:记录 PyTorch 模型中调试张量的值、添加 Debug 节点。我们使用 self.torch_value[name] = x.detach().cpu().numpy() 把调试张量转成 numpy 格式并保存进 torch_value 词典里。之后,我们调用之前编写的 debug_apply 算子。
提取调试模型
def extract_debug_model(self, input_path, output_path):
    model = onnx.load(input_path)
    inputs = [input.name for input in model.graph.input]
    outputs = []

    for node in model.graph.node:
        if node.op_type == 'Debug':
            # 记录调试张量名
            debug_name = node.attribute[0].s.decode('ASCII')
            self.output_debug_name.append(debug_name)

            # 添加输入
            output_name = node.output[0]
            outputs.append(output_name)

            # 转换 Debug 节点为 Indentity 节点
            node.op_type = 'Identity'
            node.domain = ''
            del node.attribute[:]

    e = onnx.utils.Extractor(model)
    extracted = e.extract_model(inputs, outputs)
    onnx.save(extracted, output_path)
在 PyTorch 模型中插入 debug 方法后,我们可以得到一个包含了若干 Debug 节点的 ONNX 模型。但是,这个 ONNX 模型不是我们最终拿来执行的模型。为了得到 Debug 节点的输出(即调试张量的值),我们需要做三项处理以提取出一个可运行的调试模型:
-
记录每个调试张量的调试名,为之后对齐 PyTorch、ONNX 调试张量值做准备。
-
把所有 Debug 节点的输出加入到整个模型的输出中,这样在运行模型后就能得到这些中间节点的输出了。
-
自定义的 Debug 节点在推理引擎中是没有实现的,为了让处理后的 ONNX 模型运行起来,需要把 Debug 节点转化成可运行的 Identity (恒等)节点。
完成了这三项处理后,我们才能进行模型提取。下面,我们来看看模型提取和这几项处理是怎么实现的。
首先,看一下和模型提取有关的代码:
model = onnx.load(input_path)
inputs = [input.name for input in model.graph.input]
outputs = []

# 获取 outputs
...

# 调用提取模型 API
e = onnx.utils.Extractor(model)
extracted = e.extract_model(inputs, outputs)

# 保存模型
onnx.save(extracted, output_path)
在提取模型时,我们要准备新模型的输入和输出。输入张量 inputs 还是保持原状,而输出张量 outputs 会在之后填入 Debug 节点的输出。获取完 outputs 后,我们调用提取模型的 API,得到处理过后的模型,并保存此模型。
接着,看一下主处理逻辑:
for node in model.graph.node:
    if node.op_type == 'Debug':
        ...
为了获取和 Debug 节点相关的信息,我们需要遍历 ONNX 模型的所有节点,找出那些类型为 Debug 的节点,并对这些节点执行操作。
下面的代码实现了记录调试张量名:
debug_name = node.attribute[0].s.decode('ASCII')
self.output_debug_name.append(debug_name)
这段代码的作用是:从节点的第一个属性(即 name )中取出调试名信息,并存入 output_debug_name 中。节点第一个属性的值可以通过 node.attribute[0] 获得。由于 name 是属性是字符串,这里要用 .s 获取属性的字符串值。又由于 ONNX 是以二进制的形式保存所有数据的,这里要用 .decode('ASCII') 把二进制字符串转成一个文本字符串。
接下来的代码用于填写新模型输出 outputs:
output_name = node.output[0]
outputs.append(output_name)
node.output[0] 就是 Debug 节点的输出张量在 ONNX 里的名称。把这个名称加入新模型的输出后,只要运行新模型,就可以得到该输出张量的值了。
最后这段代码用于更改 Debug 节点的类型:
node.op_type = 'Identity'
node.domain = ''
del node.attribute[:]
为了消除 ONNX 不支持的 Debug 节点,一种比较简单的方式是直接把 Debug 节点修改成不执行任何操作的 Indentity 类型的节点。为了做这个转换,我们要先修改节点类型名 node.op_type 为Identity,再把节点的域(即命名空间)node.domain 修改成空,最后删除节点的所有属性,保证节点符合 ONNX 的规范。
回忆一下,如果一个节点的 domain 为空,这个节点就会被当成一个 ONNX 原生算子节点。
运行调试模型
在生成调试节点时,我们已经顺便记录了 PyTorch 模型调试张量的值。下一步,我们要运行调试模型,记录 ONNX 模型调试张量的值。其实现如下:
def run_debug_model(self, input, debug_model):
    sess = onnxruntime.InferenceSession(debug_model,
    providers=['CPUExecutionProvider'])
    onnx_outputs = sess.run(None, input)

    for name, value in zip(self.output_debug_name, onnx_outputs):
        self.onnx_value[name] = value
在运行调试模型前,我们要给出模型输入、模型名这两个参数。根据这些参数,run_debug_model 会调用 ONNX Runtime 的 API,对 ONNX 模型进行推理。在得到了 ONNX 模型的输出后,我们要使用上一步得到的 output_debug_name 信息,填写 onnx_value,把 ONNX 的中间运算结果绑定到调试名上。完成了这些步骤之后,我们就有足够的信息做精度对齐了。
输出调试信息
 def print_debug_result(self):
    for name in self.torch_value.keys():
        if name in self.onnx_value:
            mse = np.mean(self.torch_value[name] - self.onnx_value[name])**2)
            print(f"{name} MSE: {mse}")
最后,我们同时遍历 self.torch_value 和 self.onnx_value 这两个词典,比较同一个张量在 PyTorch 模型和 ONNX 模型里的输出。在循环体中,我们只需要使用 self.torch_value[name] 和 self.onnx_value[name] 就可以访问同一个张量在 PyTorch 里的值和在 ONNX 里的值。作为示例,这里我们可以计算二者的均方误差 mse,以此为精度对齐的依据。
整理一下,整个工具库的代码如下:
import torch
import onnx
import onnxruntime
import numpy as np

class DebugOp(torch.autograd.Function):
    @staticmethod
    def forward(ctx, x, name):
        return x

    @staticmethod
    def symbolic(g, x, name):
        return g.op("my::Debug", x, name_s=name)

debug_apply = DebugOp.apply

class Debugger():
    def __init__(self):
        super().__init__()
        self.torch_value = dict()
        self.onnx_value = dict()
        self.output_debug_name = []

    def debug(self, x, name):
        self.torch_value[name] = x.detach().cpu().numpy()
        return debug_apply(x, name)

    def extract_debug_model(self, input_path, output_path):
        model = onnx.load(input_path)
        inputs = [input.name for input in model.graph.input]
        outputs = []

        for node in model.graph.node:
            if node.op_type == 'Debug':
                debug_name = node.attribute[0].s.decode('ASCII')
                self.output_debug_name.append(debug_name)

                output_name = node.output[0]
                outputs.append(output_name)

                node.op_type = 'Identity'
                node.domain = ''
                del node.attribute[:]
        e = onnx.utils.Extractor(model)
        extracted = e.extract_model(inputs, outputs)
        onnx.save(extracted, output_path)

    def run_debug_model(self, input, debug_model):
        sess = onnxruntime.InferenceSession(debug_model,
        providers=['CPUExecutionProvider'])

        onnx_outputs = sess.run(None, input)
        for name, value in zip(self.output_debug_name, onnx_outputs):
            self.onnx_value[name] = value

    def print_debug_result(self):
        for name in self.torch_value.keys():
            if name in self.onnx_value:
                mse = np.mean(self.torch_value[name] - self.onnx_value[name])**2)
                print(f"{name} MSE: {mse}")
使用方法
实现了精度对齐工具后,我们来看看该怎么把这个工具用起来。
现在,假设我们得到了一个这样的模型:
class Model(torch.nn.Module):

    def __init__(self):
        super().__init__()
        self.convs1 = torch.nn.Sequential(torch.nn.Conv2d(3, 3, 3, 1, 1),
                                          torch.nn.Conv2d(3, 3, 3, 1, 1),
                                          torch.nn.Conv2d(3, 3, 3, 1, 1))
        self.convs2 = torch.nn.Sequential(torch.nn.Conv2d(3, 3, 3, 1, 1),
                                          torch.nn.Conv2d(3, 3, 3, 1, 1))
        self.convs3 = torch.nn.Sequential(torch.nn.Conv2d(3, 3, 3, 1, 1),
                                          torch.nn.Conv2d(3, 3, 3, 1, 1))
        self.convs4 = torch.nn.Sequential(torch.nn.Conv2d(3, 3, 3, 1, 1),
                                          torch.nn.Conv2d(3, 3, 3, 1, 1),
                                          torch.nn.Conv2d(3, 3, 3, 1, 1))

    def forward(self, x):
        x = self.convs1(x)
        x = self.convs2(x)
        x = self.convs3(x)
        x = self.convs4(x)
        return x

torch_model = Model()
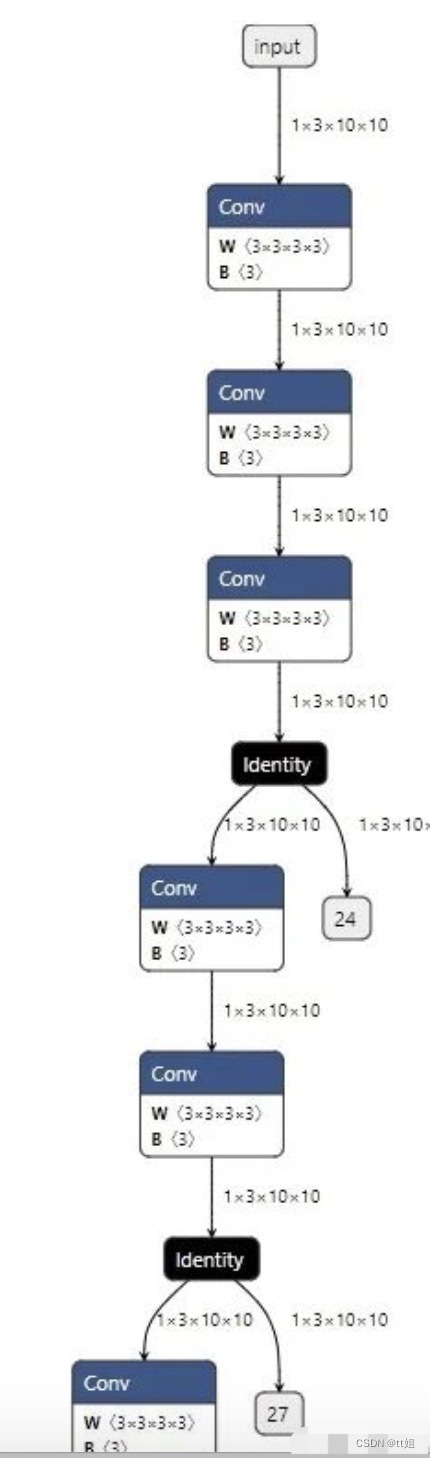
没错!这就是本文开头展示的那个全卷积网络。现在我们想对齐 convs1 至 convs4 这每一个卷积块的输出精度,该怎么使用之前写好的精度对齐工具呢?
首先,我们生成管理类 Debugger 的一个实例:
debugger = Debugger()
之后,我们要设法把 Debug 节点插入原模型:
from types import MethodType

def new_forward(self, x):
    x = self.convs1(x)
    x = debugger.debug(x, 'x_0')
    x = self.convs2(x)
    x = debugger.debug(x, 'x_1')
    x = self.convs3(x)
    x = debugger.debug(x, 'x_2')
    x = self.convs4(x)
    x = debugger.debug(x, 'x_3')
    return x

torch_model.forward = MethodType(new_forward, torch_model)
我们可以为原模型新写一个 forward 函数。在这个新的函数函数中,我们可以通过 debugger.debug 把每一个输出张量标记起来,并各取一个不重复的调试名。
有了 new_forward 函数,我们需要使用 MethodType 这个 Python API 把这个函数变成模型实例 torch_model 的一个成员方法,确保 torch_model 的 forward 函数能够被正确替换。
实现了”狸猫换太子“般巧妙的操作后,我们就可以使用 PyTorch API 导出一个带有 Debug 节点的 ONNX 模型了:
dummy_input = torch.randn(1, 3, 10, 10)
torch.onnx.export(torch_model, dummy_input, 'before_debug.onnx', input_names=['input'])
由于 torch.onnx.export 模型使用的是跟踪法,模型的 forward 函数会被执行一次, debugger.debug 操作可以把 PyTorch 模型的调试张量输出记录在 debugger.torch_value 里。
这个 before_debug.onnx 模型的部分可视化结果如下:
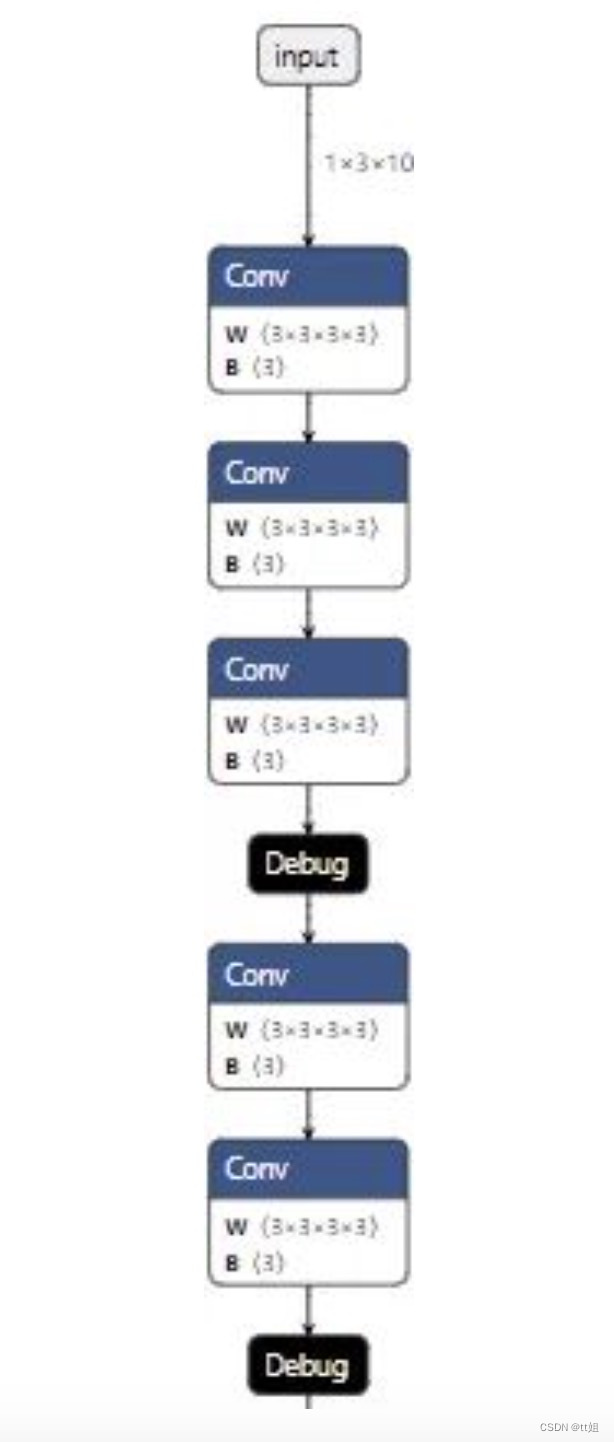
接下来,我们替换掉所有 Debug 节点,并记录每个 Debug 输出张量的 ONNX 名与调试名的对应关系:
debugger.extract_debug_model('before_debug.onnx', 'after_debug.onnx')
这步操作得到的 after_debug.onnx 模型的部分可视化结果如下:
我们可以使用下面的代码运行这个模型:
debugger.run_debug_model({'input':dummy_input.numpy()}, 'after_debug.onnx')
这样,ONNX 模型的调试张量输出会记录在 debugger.onnx_value 里。
总算,一切准备工作结束了。我们可以轻轻松松地用一行代码输出精度对齐的结果:
debugger.print_debug_result()
这个函数大致会输出以下内容:
x_0 MSE: 8.465450562766819e-16
x_1 MSE: 1.4122021817221354e-16
x_2 MSE: 6.501743508551734e-17
x_3 MSE: 1.7635199492054931e-16
这份输出表明,在这一轮精度对齐测试中,所有模块的精度误差都很小。我们几乎可以认为,ONNX 模型的运行结果等价于 PyTorch 模型的运行结果。
如果有某些模块的误差比较大,我们可以深入子模块,去加更多的 debug 节点,看看是哪一步、哪一个算子出现了问题。
总结
基于前几篇教程中的知识,本文我们介绍了一个与 PyTorch 转 ONNX 相关的实战项目。
其实,这篇教程提到的精度对齐工具还有很大的优化空间,比如:
-
现在测试输入
dummy_input不太方便管理,能不能优化它的管理逻辑? -
现在我们默认是用 ONNX Runtime 执行 ONNX 模型,可否拓展到其他后端?
-
能不能把无效的 Identity 节点从调试模型中删除?
# ~2~
将PyTorch模型转换为ONNX(Open Neural Network Exchange)格式通常涉及以下几个步骤:
1. 导入必要的库:
首先,确保你已经安装了PyTorch和ONNX Python API。你可以使用pip来安装这些库,如果它们还没有被安装的话:
pip install torch onnx2. 定义模型:
创建你的PyTorch模型。确保你的模型能够运行并且可以导出到ONNX。例如,一个简单的卷积神经网络(CNN)模型可能如下所示:
import torch
import torchvision.models as models

# 加载预训练的ResNet-18模型
model = models.resnet18(pretrained=True)
3. 设置模型为评估模式:
在导出模型之前,需要将模型设置为评估模式,这样可以禁用如Dropout和BatchNorm等训练时特有的操作。
model.eval()4. 创建示例输入:
创建一个示例输入张量,该张量的维度应该与你的模型输入相匹配。例如,对于图像分类任务,输入可能是 (batch_size, channels, height, width) 形式的张量。
dummy_input = torch.randn(1, 3, 224, 224)5. 导出模型到ONNX格式:
使用torch.onnx.export函数将模型导出到ONNX格式。你需要指定输出文件名,模型,示例输入张量,以及ONNX版本和其他可选参数。
torch.onnx.export(model,               # 模型
                  dummy_input,         # 示例输入张量
                  "resnet18.onnx",     # 输出文件名
                  export_params=True,  # 存储训练好的参数权重
                  opset_version=10,    # ONNX版本
                  do_constant_folding=True,  # 是否执行常量折叠优化
                  input_names=['input'],    # 输入节点的名称
                  output_names=['output'],  # 输出节点的名称
                  dynamic_axes={'input' : {0 : 'batch_size'},    # 可变长度的轴
                                'output' : {0 : 'batch_size'}})
6. 验证ONNX模型: 导出后,你可以使用ONNX的检查工具来验证模型是否正确。
import onnx

onnx_model = onnx.load("resnet18.onnx")
onnx.checker.check_model(onnx_model)
print('ONNX check passed')
完成上述步骤后,你的PyTorch模型就被成功地转换为了ONNX格式,可以用于在不同的平台和框架之间共享和部署。
-------
onnx相关 ~~~ 天皓智联 whaosoft aiot http://143ai.com


 3209
3209


 到【灌水乐园】发言


