


 本文介绍了如何在RecyclerView中使用自定义ItemDecoration来优雅地添加分割线,详细解析了getItemOffsets、onDraw和onDrawOver方法的用法,并提供了实践代码示例,展示了如何改变默认分割线样式以及在顶部添加字母的创新应用。
RecyclerView的用法这里就不讲了,之前加分割线是直接在Item布局加的,后来想想这种解决办法实在是太low了。对技术有追求的人当然要用更高级的办法。啊哈哈哈~
方法讲解
在此之前一定要先介绍一下方法,这样可以更方便你的理解。
我们需要编写一个类继承RecyclerView.ItemDecoration
并重写三种方法:
getItemOffsets:
这个可以简单的理解成为RecyclerView的每一个Item设置一个偏移量你可一个理解成设置了一个margin。
上图就是通过getItemOffsets方法中的 outRect.set(0, 0, 0, 100);进行设置的。
如果我们要为RecyclerView增加分割线,我们应该大致做一下的准备:
1.得到系统默认的listDivider属性,并通过它取得对应的Drawable对象。
2.测量Drawable对象的宽高。
3.根据情况判断是需要水平分割线还是垂直分割线
a.水平分割线:
outRect.set(0, 0, 0, mDivider.getIntrinsicHeight());我们应该底部预留分割线的高度。
b.垂直分割线:
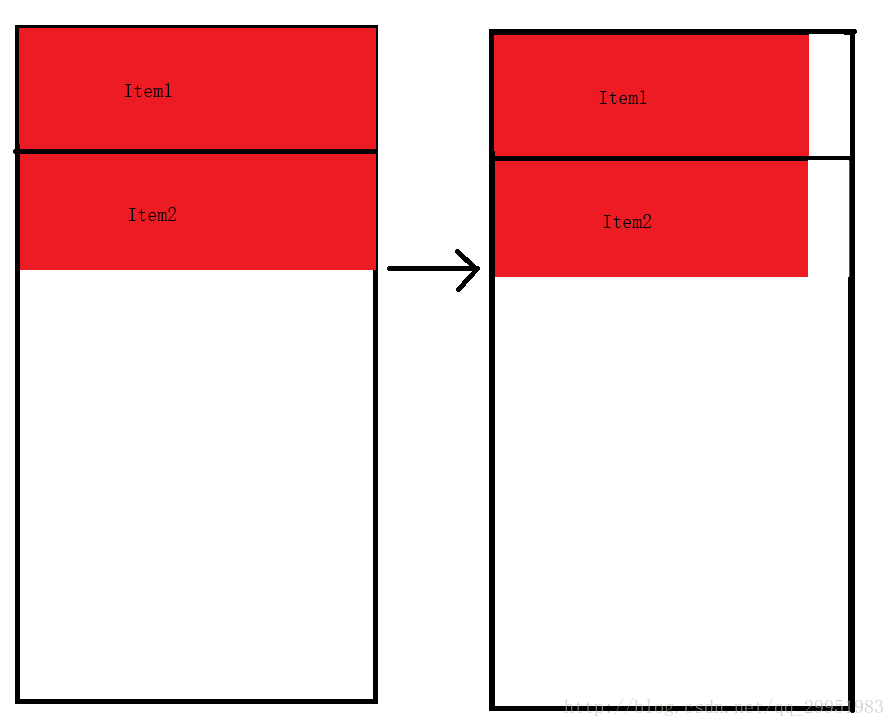
outRect.set(0, 0, mDivider.getIntrinsicWidth(), 0);我们应该右侧预留分割线的宽度。
大家可以看到了,右边空出来些东西,是不是很不美观,那当然就需要往上面画一些东西喽。我们就需要用onDraw()这个方法。
onDraw:
这个方法就是重点了,方法的参数里面有一个Canvas c的对象,了解自定义View的人都应该觉得这个方法很相似我们可以在这上面画文字、bitmap、圆等等等等。
onDrawOver:
这个方法是相对与整个视图的,不受Item的限制,比如我们可以在视图的顶部加一个悬浮的层等等。
这三个方法简单的讲到这里,下面通过实践去更深刻的理解。
代码:
class MyItemDecoration extends RecyclerView.ItemDecoration {


        private final Drawable mLine;
        private final int orientation;

        public MyItemDecoration(Context context, int orientation) {
            this.orientation = orientation;
            int[] attrs = new int[]{android.R.attr.listDivider};
            TypedArray a = context.obtainStyledAttributes(attrs);
            mLine = a.getDrawable(0);
            a.recycle();
        }

        @Override
        public void onDraw(Canvas c, RecyclerView parent, RecyclerView.State state) {
            super.onDraw(c, parent, state);
            if (orientation == RecyclerView.HORIZONTAL) {
                drawVertical(c, parent, state);
            } else if (orientation == RecyclerView.VERTICAL) {
                drawHorizontal(c, parent, state);
            }
        }

        @Override
        public void onDrawOver(Canvas c, RecyclerView parent, RecyclerView.State state) {

            super.onDrawOver(c, parent, state);
        }

        @Override
        public void getItemOffsets(Rect outRect, View view, RecyclerView parent, RecyclerView.State state) {
            super.getItemOffsets(outRect, view, parent, state);
            if (orientation == RecyclerView.HORIZONTAL) {
                //画垂直线
                outRect.set(0, 0, mLine.getIntrinsicWidth(), 0);
            } else if (orientation == RecyclerView.VERTICAL) {
                //画水平线
                outRect.set(0, 0, 0, mLine.getIntrinsicHeight());
            }
        }

        /**
         * 画垂直分割线
         */
        private void drawVertical(Canvas c, RecyclerView parent, RecyclerView.State state) {
            int childCount = parent.getChildCount();
            for (int i = 0; i < childCount; i++) {
                View child = parent.getChildAt(i);
                int left = child.getRight();
                int top = c
最低0.47元/天 解锁文章


 398
398

 被折叠的 条评论
为什么被折叠?
被折叠的 条评论
为什么被折叠?
 到【灌水乐园】发言


