


Cilium动手实验室: 精通之旅---12.Cilium Egress Gateway - Lab
1. 准备工作
LAB环境地址
https://isovalent.com/labs/cilium-egress-gateway/
1. 初始化环境
为了确保不会将任何测试 Pod 部署到 egress 节点,给kind-worker3 ,kind-worker4加上了污点和标签.
root@server:~# kubectl get nodes
NAME                 STATUS     ROLES           AGE     VERSION
kind-control-plane   NotReady   control-plane   6m26s   v1.31.0
kind-worker          NotReady   <none>          6m15s   v1.31.0
kind-worker2         NotReady   <none>          6m15s   v1.31.0
kind-worker3         NotReady   <none>          6m15s   v1.31.0
kind-worker4         NotReady   <none>          6m15s   v1.31.0
root@server:~# kubectl taint node kind-worker3 egress-gw:NoSchedule
kubectl taint node kind-worker4 egress-gw:NoSchedule
node/kind-worker3 tainted
node/kind-worker4 tainted
root@server:~# kubectl label nodes kind-worker3 egress-gw=true
kubectl label nodes kind-worker4 egress-gw=true
node/kind-worker3 labeled
node/kind-worker4 labeled
root@server:~# kubectl get nodes --show-labels
NAME                 STATUS     ROLES           AGE   VERSION   LABELS
kind-control-plane   NotReady   control-plane   10m   v1.31.0   beta.kubernetes.io/arch=amd64,beta.kubernetes.io/os=linux,kubernetes.io/arch=amd64,kubernetes.io/hostname=kind-control-plane,kubernetes.io/os=linux,node-role.kubernetes.io/control-plane=,node.kubernetes.io/exclude-from-external-load-balancers=
kind-worker          NotReady   <none>          10m   v1.31.0   beta.kubernetes.io/arch=amd64,beta.kubernetes.io/os=linux,kubernetes.io/arch=amd64,kubernetes.io/hostname=kind-worker,kubernetes.io/os=linux
kind-worker2         NotReady   <none>          10m   v1.31.0   beta.kubernetes.io/arch=amd64,beta.kubernetes.io/os=linux,kubernetes.io/arch=amd64,kubernetes.io/hostname=kind-worker2,kubernetes.io/os=linux
kind-worker3         NotReady   <none>          10m   v1.31.0   beta.kubernetes.io/arch=amd64,beta.kubernetes.io/os=linux,egress-gw=true,kubernetes.io/arch=amd64,kubernetes.io/hostname=kind-worker3,kubernetes.io/os=linux
kind-worker4         NotReady   <none>          10m   v1.31.0   beta.kubernetes.io/arch=amd64,beta.kubernetes.io/os=linux,egress-gw=true,kubernetes.io/arch=amd64,kubernetes.io/hostname=kind-worker4,kubernetes.io/os=linux
root@server:~# kubectl get nodes -o jsonpath='{range .items[*]}{.metadata.name}{"\t"}{.spec.taints}{"\n"}{end}'
kind-control-plane      [{"effect":"NoSchedule","key":"node-role.kubernetes.io/control-plane"},{"effect":"NoSchedule","key":"node.kubernetes.io/not-ready"},{"effect":"NoExecute","key":"node.kubernetes.io/not-ready","timeAdded":"2025-05-26T23:31:22Z"}]
kind-worker     [{"effect":"NoSchedule","key":"node.kubernetes.io/not-ready"}]
kind-worker2    [{"effect":"NoSchedule","key":"node.kubernetes.io/not-ready"}]
kind-worker3    [{"effect":"NoSchedule","key":"egress-gw"},{"effect":"NoSchedule","key":"node.kubernetes.io/not-ready"}]
kind-worker4    [{"effect":"NoSchedule","key":"egress-gw"},{"effect":"NoSchedule","key":"node.kubernetes.io/not-ready"}]
1.2 设置二级网络
所有 Kind 节点都连接到名为 kind 的 Docker 网络,该网络使用 172.18.0.0/16 IPv4 CIDR。
将 172.18.0.42/16 添加到 kind-worker3 同时在kind-worker4 上添加 172.18.0.43/16 :
root@server:~# docker network inspect -f '{{range.IPAM.Config}}{{.Subnet}}, {{end}}' kind
fc00:f853:ccd:e793::/64, 172.18.0.0/16,
root@server:~# docker exec kind-worker3 ip link add net0 type dummy
docker exec kind-worker3 ip a add 172.18.0.42/16 dev net0
docker exec kind-worker3 ip link set net0 up
root@server:~# docker exec kind-worker4 ip link add net0 type dummy
docker exec kind-worker4 ip a add 172.18.0.43/16 dev net0
docker exec kind-worker4 ip link set net0 up
1.3 安装Cilium
将 Cilium 安装到集群中:
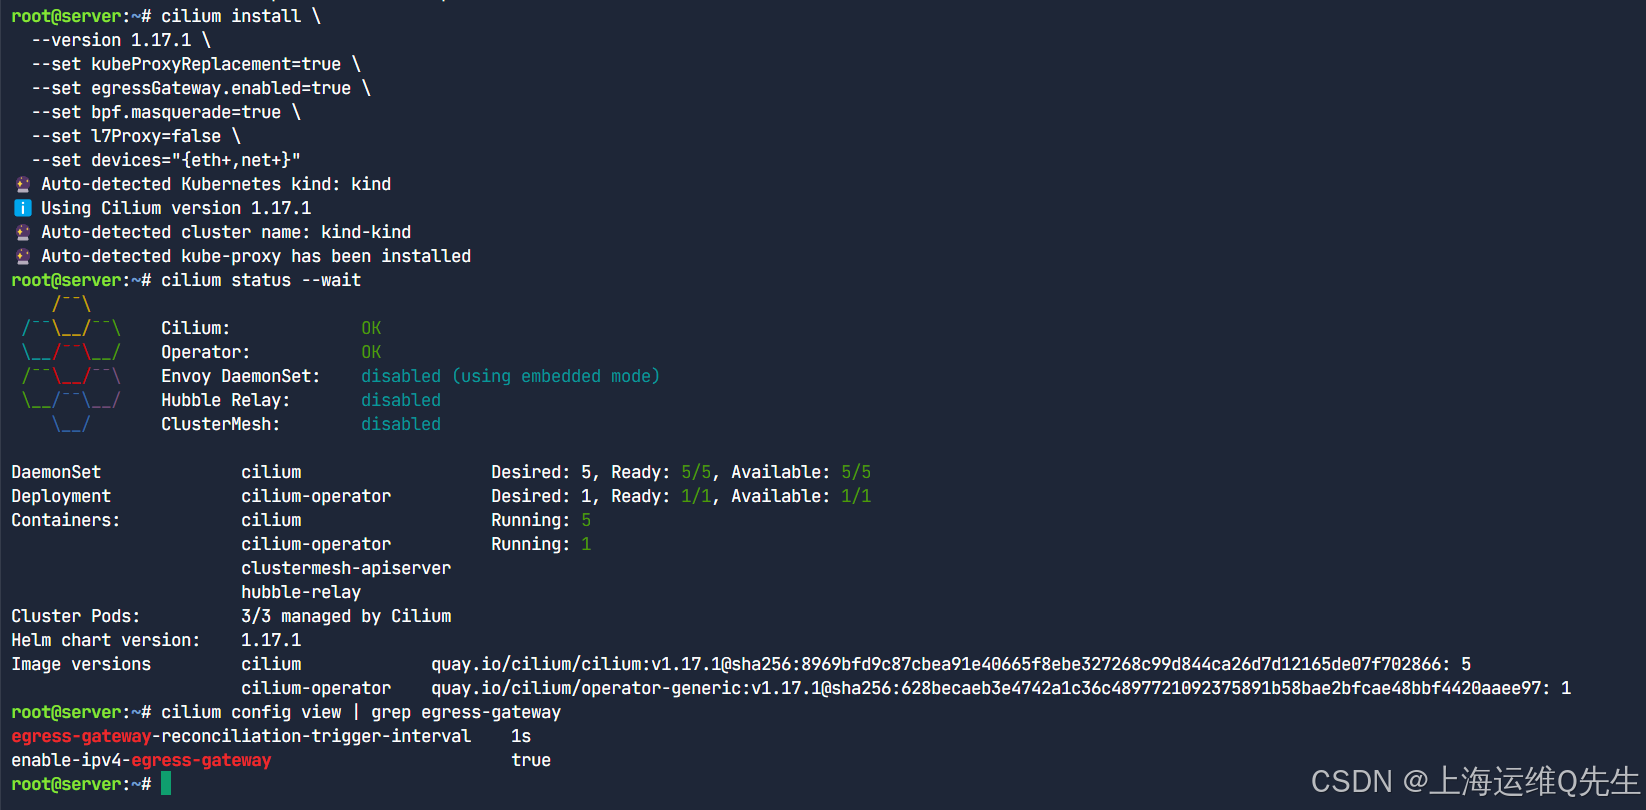
cilium install \
  --version 1.17.1 \
  --set kubeProxyReplacement=true \
  --set egressGateway.enabled=true \
  --set bpf.masquerade=true \
  --set l7Proxy=false \
  --set devices="{eth+,net+}"
等待安装就绪
cilium status --wait
验证 Egress Gateway 功能启动
cilium config view | grep egress-gateway
1.4 验证环境初始化完成
worker3上执行
CILIUM3_POD=$(kubectl -n kube-system get po -l k8s-app=cilium --field-selector spec.nodeName=kind-worker3 -o name)
kubectl -n kube-system exec -ti $CILIUM3_POD -- cilium status
worker4验证
CILIUM4_POD=$(kubectl -n kube-system get po -l k8s-app=cilium --field-selector spec.nodeName=kind-worker4 -o name)
kubectl -n kube-system exec -ti $CILIUM4_POD -- cilium status
结果:
root@server:~# CILIUM3_POD=$(kubectl -n kube-system get po -l k8s-app=cilium --field-selector spec.nodeName=kind-worker3 -o name)
kubectl -n kube-system exec -ti $CILIUM3_POD -- cilium status
Defaulted container "cilium-agent" out of: cilium-agent, config (init), mount-cgroup (init), apply-sysctl-overwrites (init), mount-bpf-fs (init), clean-cilium-state (init), install-cni-binaries (init)
KVStore:                 Disabled
Kubernetes:              Ok         1.31 (v1.31.0) [linux/amd64]
Kubernetes APIs:         ["EndpointSliceOrEndpoint", "cilium/v2::CiliumClusterwideNetworkPolicy", "cilium/v2::CiliumEndpoint", "cilium/v2::CiliumNetworkPolicy", "cilium/v2::CiliumNode", "cilium/v2alpha1::CiliumCIDRGroup", "core/v1::Namespace", "core/v1::Pods", "core/v1::Service", "networking.k8s.io/v1::NetworkPolicy"]
KubeProxyReplacement:    True   [eth0    172.18.0.5 fc00:f853:ccd:e793::5 fe80::e842:6aff:feeb:3a01 (Direct Routing), net0   172.18.0.42 fe80::5440:d5ff:fed5:920]
Host firewall:           Disabled
SRv6:                    Disabled
CNI Chaining:            none
CNI Config file:         successfully wrote CNI configuration file to /host/etc/cni/net.d/05-cilium.conflist
Cilium:                  Ok   1.17.1 (v1.17.1-d6c9f9e8)
NodeMonitor:             Listening for events on 8 CPUs with 64x4096 of shared memory
Cilium health daemon:    Ok
IPAM:                    IPv4: 2/254 allocated from 10.244.4.0/24,
IPv4 BIG TCP:            Disabled
IPv6 BIG TCP:            Disabled
BandwidthManager:        Disabled
Routing:                 Network: Tunnel [vxlan]   Host: BPF
Attach Mode:             TCX
Device Mode:             veth
Masquerading:            BPF   [eth0, net0]   10.244.4.0/24 [IPv4: Enabled, IPv6: Disabled]
Controller Status:       20/20 healthy
Proxy Status:            No managed proxy redirect
Global Identity Range:   min 256, max 65535
Hubble:                  Ok              Current/Max Flows: 234/4095 (5.71%), Flows/s: 2.66   Metrics: Disabled
Encryption:              Disabled
Cluster health:          5/5 reachable   (2025-05-26T23:48:57Z)
Name                     IP              Node   Endpoints
Modules Health:          Stopped(0) Degraded(0) OK(51)
root@server:~# CILIUM4_POD=$(kubectl -n kube-system get po -l k8s-app=cilium --field-selector spec.nodeName=kind-worker4 -o name)
kubectl -n kube-system exec -ti $CILIUM4_POD -- cilium status
Defaulted container "cilium-agent" out of: cilium-agent, config (init), mount-cgroup (init), apply-sysctl-overwrites (init), mount-bpf-fs (init), clean-cilium-state (init), install-cni-binaries (init)
KVStore:                   Disabled
Kubernetes:                Ok         1.31 (v1.31.0) [linux/amd64]
Kubernetes APIs:           ["EndpointSliceOrEndpoint", "cilium/v2::CiliumClusterwideNetworkPolicy", "cilium/v2::CiliumEndpoint", "cilium/v2::CiliumNetworkPolicy", "cilium/v2::CiliumNode", "cilium/v2alpha1::CiliumCIDRGroup", "core/v1::Namespace", "core/v1::Pods", "core/v1::Service", "networking.k8s.io/v1::NetworkPolicy"]
KubeProxyReplacement:      True   [eth0    172.18.0.4 fc00:f853:ccd:e793::4 fe80::a012:a8ff:fe00:e20b (Direct Routing), net0   172.18.0.43 fe80::3454:cff:fe9a:d0dd]
Host firewall:             Disabled
SRv6:                      Disabled
CNI Chaining:              none
CNI Config file:           successfully wrote CNI configuration file to /host/etc/cni/net.d/05-cilium.conflist
Cilium:                    Ok   1.17.1 (v1.17.1-d6c9f9e8)
NodeMonitor:               Listening for events on 8 CPUs with 64x4096 of shared memory
Cilium health daemon:      Ok
IPAM:                      IPv4: 2/254 allocated from 10.244.3.0/24,
IPv4 BIG TCP:              Disabled
IPv6 BIG TCP:              Disabled
BandwidthManager:          Disabled
Routing:                   Network: Tunnel [vxlan]   Host: BPF
Attach Mode:               TCX
Device Mode:               veth
Masquerading:              BPF   [eth0, net0]   10.244.3.0/24 [IPv4: Enabled, IPv6: Disabled]
Controller Status:         20/20 healthy
Proxy Status:              No managed proxy redirect
Global Identity Range:     min 256, max 65535
Hubble:                    Ok              Current/Max Flows: 239/4095 (5.84%), Flows/s: 2.13   Metrics: Disabled
Encryption:                Disabled
Cluster health:            4/5 reachable   (2025-05-26T23:48:56Z)
Name                       IP              Node   Endpoints
  kind-kind/kind-worker3   172.18.0.5      0/1    1/1
Modules Health:            Stopped(0) Degraded(0) OK(51)
2. 应用部署
2.1 添加Output服务
部署 Outpost 应用程序附加到 kind 网络,我们将允许的源 IP 地址作为环境变量传递。
root@server:~# docker run -d \
  --name remote-outpost \
  --network kind \
  -e ALLOWED_IP=172.18.0.42,172.18.0.43 \
   quay.io/isovalent-dev/egressgw-whatismyip:latest
Unable to find image 'quay.io/isovalent-dev/egressgw-whatismyip:latest' locally
latest: Pulling from isovalent-dev/egressgw-whatismyip
1b1cc4e04b87: Pull complete
Digest: sha256:9b0d46048e007b2ce8b47ea9dc9165fe6d1d961313379bcf7381cd3cd1b2ab32
Status: Downloaded newer image for quay.io/isovalent-dev/egressgw-whatismyip:latest
c503ced5d6be685ec06a1c23f3ab5f61c548637237c785c80375db8e8de57649
root@server:~# OUTPOST=$(docker inspect -f '{{range.NetworkSettings.Networks}}{{.IPAddress}}{{end}}' remote-outpost)
echo $OUTPOST
172.18.0.7
root@server:~# curl http://$OUTPOST:8000
Access denied. Your source IP (172.18.0.1) doesn't match the allowed IPs (172.18.0.42,172.18.0.43)
root@server:~#
Outpost 服务是从 Docker 网络类型的主机桥 IP 访问的,即 172.18.0.1。应用程序拒绝应答,因为它只接受来自 172.18.0.42 或 172.18.0.43 的请求 正如我们之前配置的那样。
2.2 部署Poller Pod
部署两艘星际飞船:一艘帝国 Tie Fighter 和一艘反叛的 X-Wing。我们将调整标签以反映他们的忠诚度
root@server:~# kubectl run tiefighter \
  --labels "org=empire,class=tiefighter" \
  --image docker.io/tgraf/netperf
kubectl run xwing \
  --labels "org=alliance,class=xwing" \
  --image docker.io/tgraf/netperf
pod/tiefighter created
pod/xwing created
root@server:~# kubectl get pod --show-labels
NAME         READY   STATUS    RESTARTS   AGE   LABELS
tiefighter   1/1     Running   0          9s    class=tiefighter,org=empire
xwing        1/1     Running   0          9s    class=xwing,org=alliance
root@server:~#
尝试从 Tie Fighter 到达前哨docker:
root@server:~# kubectl exec -ti tiefighter -- curl --max-time 2 http://$OUTPOST:8000
Access denied. Your source IP (172.18.0.6) doesn't match the allowed IPs (172.18.0.42,172.18.0.43)
root@server:~# kubectl exec -ti xwing -- curl --max-time 2 http://$OUTPOST:8000
Access denied. Your source IP (172.18.0.6) doesn't match the allowed IPs (172.18.0.42,172.18.0.43)
源 IP 是运行 Tie Fighter Pod 的节点的内部 IP。由于我们使用隧道 (VXLAN),因此流量使用节点的 IP 地址进行源 NAT 处理。使用 X-Wing 时,你会得到类似的结果。
3. 添加Egress Gateway 策略
3.1 配置Egress Gateway 策略
建一个 Egress Gateway 策略,通过出口节点将流量从 Alliance starships 路由到 Docker 网络 (172.18.0.0/16)。
使用此策略,来自标记为 org=alliance 的 Pod 的流量将通过两个出口节点(kind-worker3 和 kind-worker4),使用其额外的 IP(172.18.0.42 和 172.18.0.43 分别)。
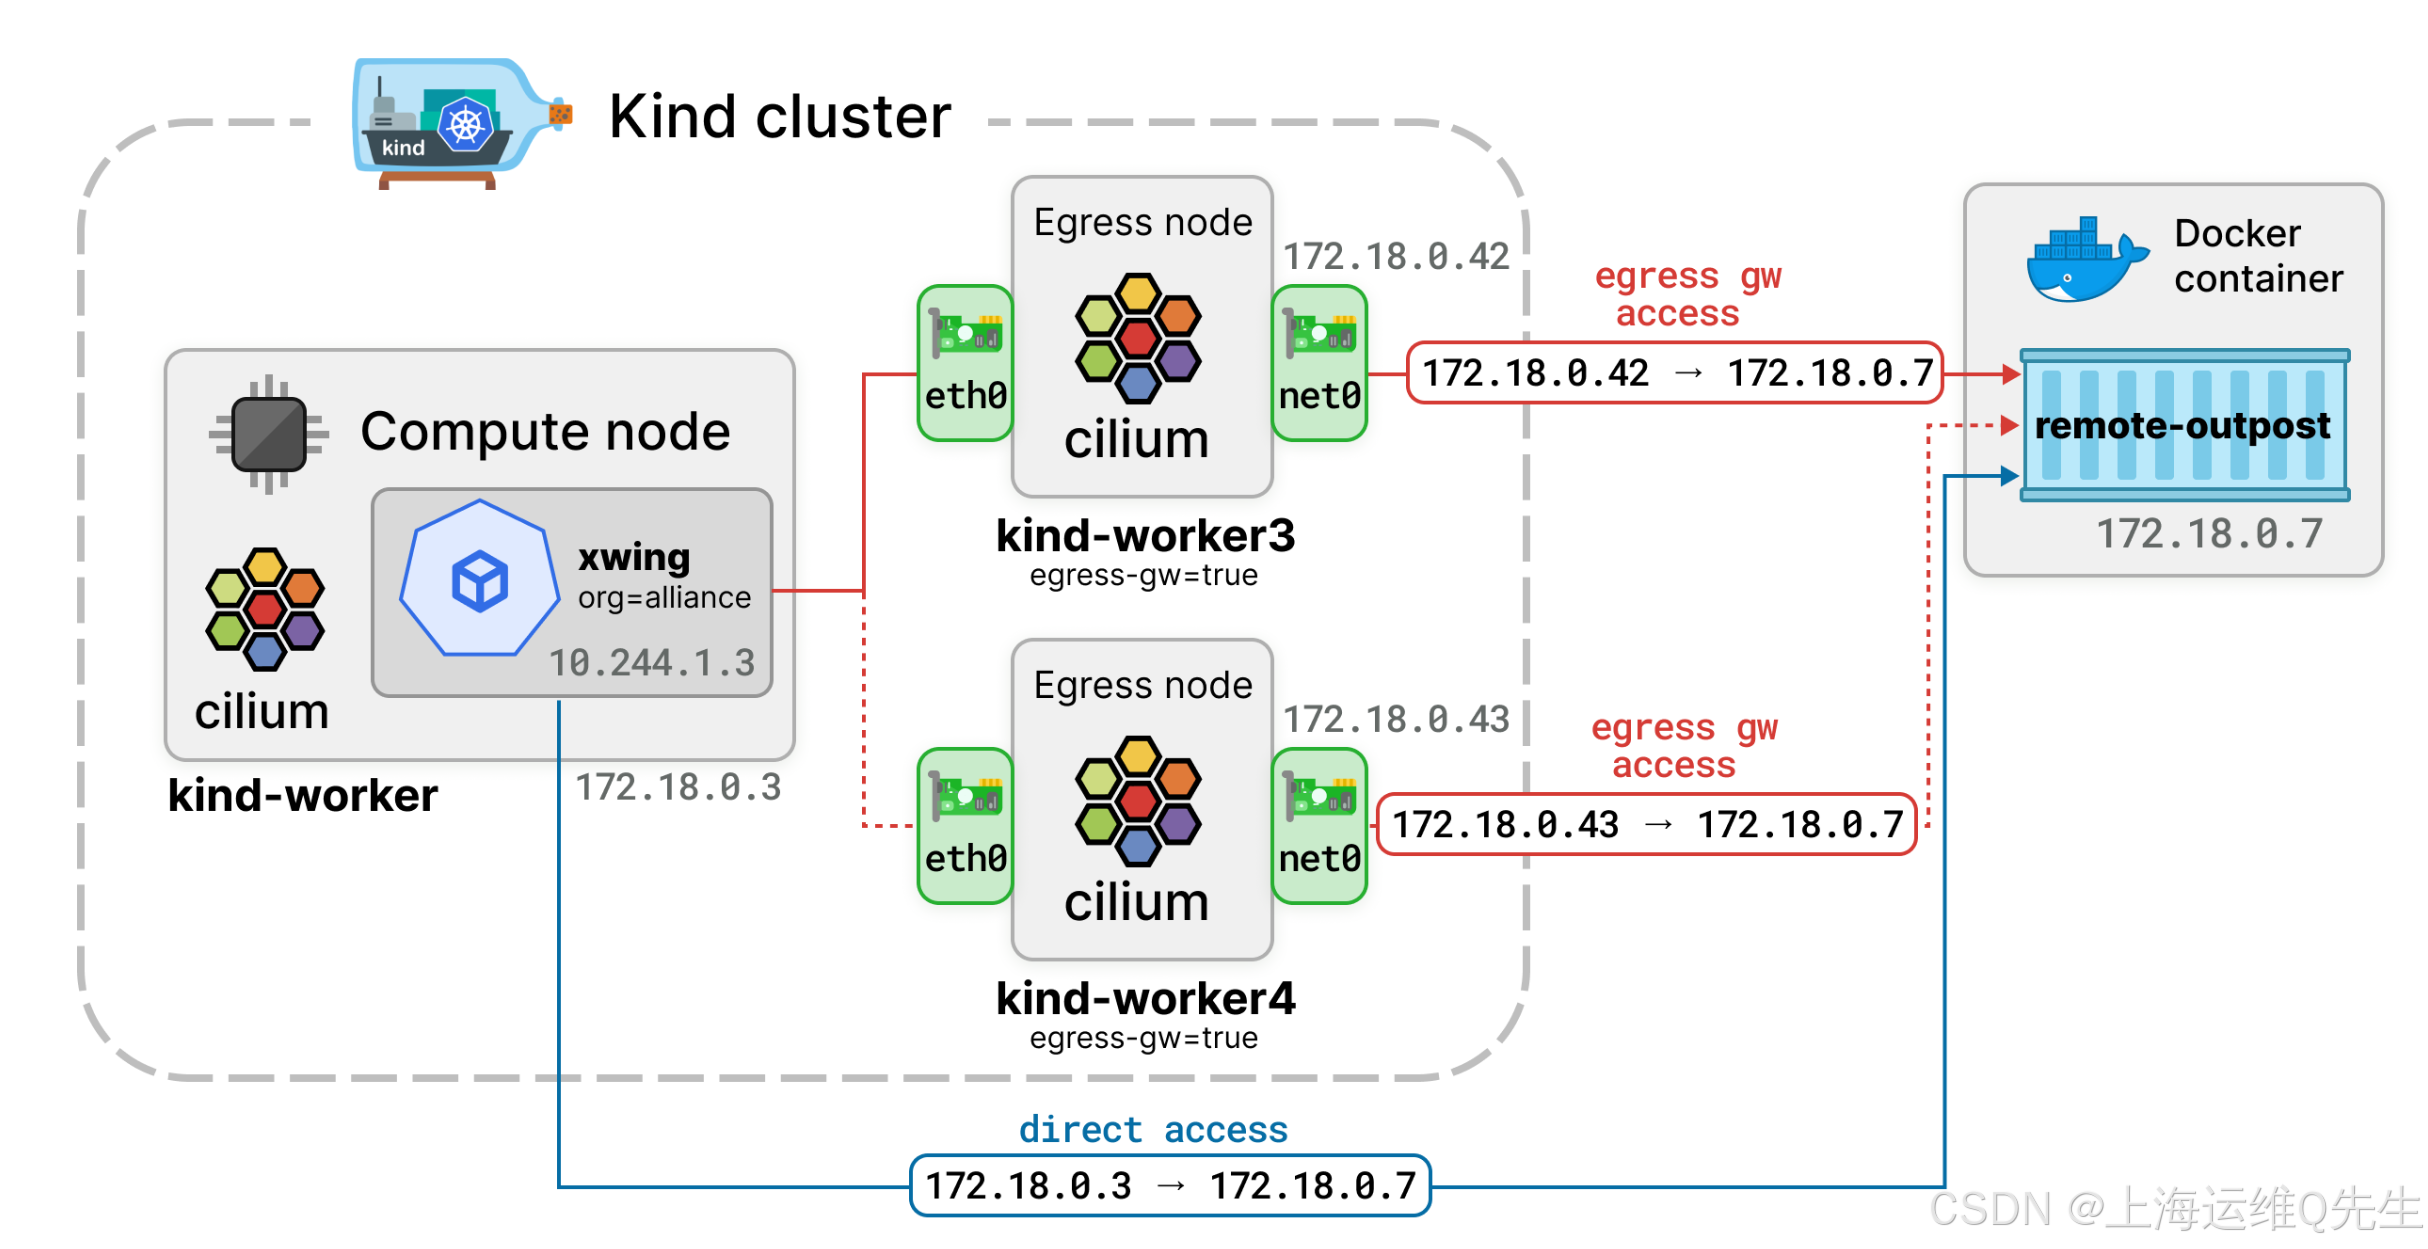
使用 egress-gw 标签来选择 egress-gw 节点。然后,Cilium 将为策略选择一个节点。
配置Egress-gateway egress-gw-policy.yaml
apiVersion: cilium.io/v2
kind: CiliumEgressGatewayPolicy
metadata:
  name: outpost
spec:
  destinationCIDRs:
  - "172.18.0.0/16"
  selectors:
  - podSelector:
      matchLabels:
        org: alliance
  egressGateway:
    nodeSelector:
      matchLabels:
        egress-gw: 'true'
    interface: net0
应用配置文件
root@server:~# kubectl apply -f egress-gw-policy.yaml
ciliumegressgatewaypolicy.cilium.io/outpost created
3.2 再次访问测试
尝试从 X-Wing pod 再次访问 Outpost 服务器
kubectl exec -ti xwing -- \
  curl --max-time 2 http://172.18.0.7:8000
现在,当流量通过两个允许的 IP 地址之一离开集群时,将接受连接。
现在再次使用 Tie Fighter 检查:
kubectl exec -ti tiefighter -- \
  curl --max-time 2 http://172.18.0.7:8000
由于 Tie Fighter Pod 与策略的选择器不匹配,它仍然通过其节点的 IP 地址访问 Outpost,这是无效的。
可以肯定的是,让我们部署另一艘联盟星际飞船,一艘 Y-Wing 测试对 Outpost 的访问:
kubectl run ywing \
  --labels "org=alliance,class=ywing" \
  --image docker.io/tgraf/netperf
测试访问
kubectl exec -ti ywing -- \
  curl --max-time 2 http://172.18.0.7:8000
它是有权访问的,因为该策略使用 org=alliance,它与 Y-Wing pod 匹配!
过程如下:
root@server:~# kubectl apply -f egress-gw-policy.yaml
ciliumegressgatewaypolicy.cilium.io/outpost created
root@server:~# kubectl exec -ti xwing -- \
  curl --max-time 2 http://172.18.0.7:8000
Access granted. Your source IP (172.18.0.42) matches an allowed IP.
root@server:~# kubectl exec -ti tiefighter -- \
  curl --max-time 2 http://172.18.0.7:8000
Access denied. Your source IP (172.18.0.6) doesn't match the allowed IPs (172.18.0.42,172.18.0.43)
root@server:~# kubectl run ywing \
  --labels "org=alliance,class=ywing" \
  --image docker.io/tgraf/netperf
pod/ywing created
root@server:~# kubectl get po ywing
NAME    READY   STATUS    RESTARTS   AGE
ywing   1/1     Running   0          15s
root@server:~# kubectl exec -ti ywing -- \
  curl --max-time 2 http://172.18.0.7:8000
Access granted. Your source IP (172.18.0.42) matches an allowed IP.
3.3 路由选择
获取运行 xwing pod 的节点:
kubectl get po xwing -o wide
找到在该节点上运行的 Cilium pod:
kubectl -n kube-system get po -l k8s-app=cilium \
  --field-selector spec.nodeName=kind-worker2
检查该 Cilium Pod 的 Egress 数据:
kubectl -n kube-system exec -ti pod/cilium-5w76l -c cilium-agent -- \
  cilium bpf egress list
可以看到如下内容的输出:
root@server:~# kubectl get po xwing -o wide
NAME    READY   STATUS    RESTARTS   AGE   IP           NODE           NOMINATED NODE   READINESS GATES
xwing   1/1     Running   0          13m   10.244.2.9   kind-worker2   <none>           <none>
root@server:~# kubectl -n kube-system get po -l k8s-app=cilium \
  --field-selector spec.nodeName=kind-worker2
NAME           READY   STATUS    RESTARTS   AGE
cilium-5w76l   1/1     Running   0          21m
root@server:~# kubectl -n kube-system exec -ti pod/cilium-5w76l -c cilium-agent -- \
  cilium bpf egress list
Source IP      Destination CIDR   Egress IP   Gateway IP
10.244.2.9     172.18.0.0/16      0.0.0.0     172.18.0.5
10.244.2.246   172.18.0.0/16      0.0.0.0     172.18.0.5
| 列 | 含义 |
|---|---|
| Source IP | 源 Pod 的 IP,在我们的例子中是 X-Wing 和 Y-Wing Pod。 |
| Destination CIDR | Egress Gateway 策略中指定的 CIDR(Docker 网络类型 )。 |
| Egress IP | 设置为 0.0.0.0, 因为该节点未配置为网关。 |
| Gateway IP | 与源和目标匹配的数据包的下一跃点的 IP,它是其中一个出口节点的 IP。 |
那么,来弄清楚哪个节点具有此 IP。
从 Cilium 输出中获取 IP 值:
GATEWAY_IP=$(kubectl -n kube-system exec -ti pod/cilium-5w76l -c cilium-agent -- cilium bpf egress list -o json | jq -r '.[0].GatewayIP')
echo $GATEWAY_IP
然后找出它附加到的节点:
EGRESS_NODE=$(kubectl get no  -o json | jq -r ".items[] | select(.status.addresses[].address==\"$GATEWAY_IP\").metadata.name")
echo $EGRESS_NODE
现在检查此节点上的 Egress Policy:
CILIUM_POD=$(kubectl -n kube-system get po -l k8s-app=cilium --field-selector spec.nodeName=$EGRESS_NODE -o name)
kubectl -n kube-system exec -ti $CILIUM_POD -c cilium-agent -- \
  cilium bpf egress list
输出结果如下:
root@server:~# GATEWAY_IP=$(kubectl -n kube-system exec -ti pod/cilium-5w76l -c cilium-agent -- cilium bpf egress list -o json | jq -r '.[0].GatewayIP')
echo $GATEWAY_IP
172.18.0.5
root@server:~# EGRESS_NODE=$(kubectl get no  -o json | jq -r ".items[] | select(.status.addresses[].address==\"$GATEWAY_IP\").metadata.name")
echo $EGRESS_NODE
kind-worker3
root@server:~# CILIUM_POD=$(kubectl -n kube-system get po -l k8s-app=cilium --field-selector spec.nodeName=$EGRESS_NODE -o name)
kubectl -n kube-system exec -ti $CILIUM_POD -c cilium-agent -- \
  cilium bpf egress list
Source IP      Destination CIDR   Egress IP     Gateway IP
10.244.2.9     172.18.0.0/16      172.18.0.42   172.18.0.5
10.244.2.246   172.18.0.0/16      172.18.0.42   172.18.0.5
此出口 IP 应与您之前从回显服务器获得的回复匹配,因为它是用于伪装该出口网关策略的流量的 IP。
3.4 出口IP
从 X 翼循环访问前哨站10次:
for i in $(seq 1 10); do
  kubectl exec -ti xwing -- \
    curl --max-time 2 http://172.18.0.7:8000
done
结果如下
root@server:~# for i in $(seq 1 10); do
  kubectl exec -ti xwing -- \
    curl --max-time 2 http://172.18.0.7:8000
done
Access granted. Your source IP (172.18.0.42) matches an allowed IP.
Access granted. Your source IP (172.18.0.42) matches an allowed IP.
Access granted. Your source IP (172.18.0.42) matches an allowed IP.
Access granted. Your source IP (172.18.0.42) matches an allowed IP.
Access granted. Your source IP (172.18.0.42) matches an allowed IP.
Access granted. Your source IP (172.18.0.42) matches an allowed IP.
Access granted. Your source IP (172.18.0.42) matches an allowed IP.
Access granted. Your source IP (172.18.0.42) matches an allowed IP.
Access granted. Your source IP (172.18.0.42) matches an allowed IP.
Access granted. Your source IP (172.18.0.42) matches an allowed IP.
可见,流量始终从同一 IP 地址离开集群,这意味着它始终使用相同的出口节点。
在 Cilium OSS 中,Egress Gateway 策略用于为流量选择一个节点,该节点将始终用于给定的流量。
3.5 小测试
4选2
Egress Gateway requires Cilium's kube-proxy replacement.
Egress Gateway implements Destination NAT.
Egress Gateway Policies cannot be applied across a whole namespace.
Egress Gateway enables connectivity between Kubernetes clusters and traditional firewall.
答案:
1. √.Cilium的Egress Gateway功能依赖于其替代`kube - proxy`的实现。Cilium使用基于eBPF的kube - proxy替换来处理服务的网络流量,包括出站流量。这种替换提供了更高的性能和灵活性,使得Egress Gateway能够有效地管理集群内Pod的出站流量。在《【Cilium 1.10 版本特性解读支持 Wireguard, BGP, Egress IP 网关, XDP》中提到,Cilium 1.10版本引入了Egress IP gateway,通过新的Kubernetes CRD,可以在数据包离开Kubernetes集群时将静态IP与流量相关联,而这需要Cilium的kube - proxy替换功能来实现
2. ×.通过Kubernetes CRD将静态IP与流量相关联
3. ×.Cilium允许通过策略在整个命名空间范围内应用Egress Gateway规则。用户可以使用Cilium的网络策略来定义哪些Pod的流量可以通过Egress Gateway转发到外部网络,这些策略可以针对整个命名空间进行配置,从而实现对整个命名空间内Pod出站流量的控制。虽然搜索结果未直接提及此内容,但结合Cilium对网络流量的管理能力以及Egress Gateway的功能特性
4. √.当将云原生应用程序与在集群之外运行的传统应用程序集成时,由于Pod IP比传统网络更具弹性,IP地址管理可能会成为一个难题。Cilium的Egress Gateway通过新的Kubernetes CRD,可以在数据包离开Kubernetes集群时将静态IP与流量相关联,使外部防火墙可以识别固定IP,并且过滤特定Pod的流量,从而实现了Kubernetes集群与传统防火墙之间的连接。例如,在《【Cilium 1.10 版本特性解读支持 Wireguard, BGP, Egress IP 网关, XDP》中给出了具体配置示例,展示了如何将default命名空间下发到外部地址192.168.33.13/32的Pod的流量,重定向到192.168.33.100的(网关)节点,体现了Egress Gateway在Kubernetes集群和传统防火墙之间的连接作用
4. Egress Gateway HA
4.1 测试Cilium的状态
root@server:~# cilium status --wait
    /¯¯\
 /¯¯\__/¯¯\    Cilium:             OK
 \__/¯¯\__/    Operator:           OK
 /¯¯\__/¯¯\    Envoy DaemonSet:    disabled (using embedded mode)
 \__/¯¯\__/    Hubble Relay:       disabled
    \__/       ClusterMesh:        disabled

DaemonSet              cilium                   Desired: 5, Ready: 5/5, Available: 5/5
Deployment             cilium-operator          Desired: 2, Ready: 2/2, Available: 2/2
Containers:            cilium                   Running: 5
                       cilium-operator          Running: 2
                       clustermesh-apiserver
                       hubble-relay
Cluster Pods:          6/6 managed by Cilium
Helm chart version:    1.17.1-cee.beta.1
Image versions         cilium             quay.io/isovalent/cilium:v1.17.1-cee.beta.1: 5
                       cilium-operator    quay.io/isovalent/operator-generic:v1.17.1-cee.beta.1: 2
Configuration:                            Unsupported feature(s) enabled: EgressGatewayHA (Limited), EgressGatewayIPv4 (Limited). Please contact Isovalent Support for more information on how to grant an exception.
root@server:~# for i in $(seq 1 10); do
  kubectl exec -ti xwing -- \
    curl --max-time 2 http://172.18.0.7:8000
done
Access granted. Your source IP (172.18.0.42) matches an allowed IP.
Access granted. Your source IP (172.18.0.42) matches an allowed IP.
Access granted. Your source IP (172.18.0.42) matches an allowed IP.
Access granted. Your source IP (172.18.0.42) matches an allowed IP.
Access granted. Your source IP (172.18.0.42) matches an allowed IP.
Access granted. Your source IP (172.18.0.42) matches an allowed IP.
Access granted. Your source IP (172.18.0.42) matches an allowed IP.
Access granted. Your source IP (172.18.0.42) matches an allowed IP.
Access granted. Your source IP (172.18.0.42) matches an allowed IP.
Access granted. Your source IP (172.18.0.42) matches an allowed IP.
流量仍通过同一节点退出。
4.2 Egress Gateway HA
清理之前配置的Egress Gateway
kubectl delete ciliumegressgatewaypolicies outpost
配置egress gateway ha
egress-gw-policy-ha.yaml
apiVersion: isovalent.com/v1
kind: IsovalentEgressGatewayPolicy
metadata:
  name: outpost-ha
spec:
  destinationCIDRs:
  - "172.18.0.0/16"
  selectors:
  - podSelector:
      matchLabels:
        org: alliance
  egressGroups:
    - nodeSelector:
        matchLabels:
          egress-gw: 'true'
      interface: net0
如果详细配置的话也可以将egressgroup配置成
egressGroups:
  - nodeSelector:
      matchLabels:
        kubernetes.io/hostname: kind-worker3
    egressIP: 172.18.0.42
  - nodeSelector:
      matchLabels:
        kubernetes.io/hostname: kind-worker4
    egressIP: 172.18.0.43
应用配置
kubectl apply -f egress-gw-policy-ha.yaml
再次测试访问
for i in $(seq 1 10); do
  kubectl exec -ti xwing -- \
    curl --max-time 2 http://172.18.0.7:8000
done
输出结果如下:
root@server:~# kubectl delete ciliumegressgatewaypolicies outpost
ciliumegressgatewaypolicy.cilium.io "outpost" deleted
root@server:~# kubectl apply -f egress-gw-policy-ha.yaml
isovalentegressgatewaypolicy.isovalent.com/outpost-ha created
root@server:~# for i in $(seq 1 10); do
  kubectl exec -ti xwing -- \
    curl --max-time 2 http://172.18.0.7:8000
done
Access granted. Your source IP (172.18.0.42) matches an allowed IP.
Access granted. Your source IP (172.18.0.42) matches an allowed IP.
Access granted. Your source IP (172.18.0.43) matches an allowed IP.
Access granted. Your source IP (172.18.0.42) matches an allowed IP.
Access granted. Your source IP (172.18.0.43) matches an allowed IP.
Access granted. Your source IP (172.18.0.43) matches an allowed IP.
Access granted. Your source IP (172.18.0.42) matches an allowed IP.
Access granted. Your source IP (172.18.0.42) matches an allowed IP.
Access granted. Your source IP (172.18.0.43) matches an allowed IP.
Access granted. Your source IP (172.18.0.43) matches an allowed IP.
现在,流量在两个出口节点之间分配,从任一 172.18.0.42 或 172.18.0.43。
4.3 故障恢复测试
从池中删除其中一个出口节点:
kubectl label node kind-worker3 egress-gw-
再次测试访问权限:
for i in $(seq 1 10); do
  kubectl exec -ti xwing -- \
    curl --max-time 2 http://172.18.0.7:8000
done
输出结果
root@server:~# kubectl label node kind-worker3 egress-gw-
node/kind-worker3 unlabeled
root@server:~# for i in $(seq 1 10); do
  kubectl exec -ti xwing -- \
    curl --max-time 2 http://172.18.0.7:8000
done
Access granted. Your source IP (172.18.0.43) matches an allowed IP.
Access granted. Your source IP (172.18.0.43) matches an allowed IP.
Access granted. Your source IP (172.18.0.43) matches an allowed IP.
Access granted. Your source IP (172.18.0.43) matches an allowed IP.
Access granted. Your source IP (172.18.0.43) matches an allowed IP.
Access granted. Your source IP (172.18.0.43) matches an allowed IP.
Access granted. Your source IP (172.18.0.43) matches an allowed IP.
Access granted. Your source IP (172.18.0.43) matches an allowed IP.
Access granted. Your source IP (172.18.0.43) matches an allowed IP.
Access granted. Your source IP (172.18.0.43) matches an allowed IP.
流量继续流经 IP 为 172.18.0.43 的 kind-worker4。您可以设置更多出口节点以提高弹性。
再次添加标签:
kubectl label node kind-worker3 egress-gw=true
并且流量再次进行负载均衡:
root@server:~# for i in $(seq 1 10); do
  kubectl exec -ti xwing -- \
    curl --max-time 2 http://172.18.0.7:8000
done
Access granted. Your source IP (172.18.0.42) matches an allowed IP.
Access granted. Your source IP (172.18.0.43) matches an allowed IP.
Access granted. Your source IP (172.18.0.42) matches an allowed IP.
Access granted. Your source IP (172.18.0.42) matches an allowed IP.
Access granted. Your source IP (172.18.0.42) matches an allowed IP.
Access granted. Your source IP (172.18.0.43) matches an allowed IP.
Access granted. Your source IP (172.18.0.43) matches an allowed IP.
Access granted. Your source IP (172.18.0.43) matches an allowed IP.
Access granted. Your source IP (172.18.0.43) matches an allowed IP.
Access granted. Your source IP (172.18.0.43) matches an allowed IP.
流量又恢复到 172.18.0.42 和 172.18.0.43
4.4 小测试
×	Egress Gateway HA is available in Cilium OSS
×	Egress Gateway HA uses the same CRDs as Egress Gateway
√	Egress Gateway HA lets you specify multiple node selectors per policy
√	Egress Gateway HA uses a load-balancing algorithm
这个没啥好分析了
5. 静态IP分配
5.1 新的Outpost
启动一个新的 Outpost(称为 remote-outpost-2),它将接受 172.18.0.84 和 172.18.0.85:
docker run -d \
  --name remote-outpost-2 \
  --network kind \
  -e ALLOWED_IP=172.18.0.84,172.18.0.85 \
   quay.io/isovalent-dev/egressgw-whatismyip:latest
获取此新 Outpost 的 IP:
OUTPOST2=$(docker inspect -f '{{range.NetworkSettings.Networks}}{{.IPAddress}}{{end}}' remote-outpost-2)
echo $OUTPOST2
让我们使用当前配置向它发出请求:
for i in $(seq 1 10); do
  kubectl exec -ti xwing -- \
    curl --max-time 2 http://$OUTPOST2:8000
done
返回的结果:
root@server:~# docker run -d \
  --name remote-outpost-2 \
  --network kind \
  -e ALLOWED_IP=172.18.0.84,172.18.0.85 \
   quay.io/isovalent-dev/egressgw-whatismyip:latest
393747b2f7cb73f78c5c59d6a86e26a08a183c69b09bc36f2141edd5866a6339
root@server:~# OUTPOST2=$(docker inspect -f '{{range.NetworkSettings.Networks}}{{.IPAddress}}{{end}}' remote-outpost-2)
echo $OUTPOST2
172.18.0.8
root@server:~# for i in $(seq 1 10); do
  kubectl exec -ti xwing -- \
    curl --max-time 2 http://$OUTPOST2:8000
done
Access denied. Your source IP (172.18.0.43) doesn't match the allowed IPs (172.18.0.84,172.18.0.85)
Access denied. Your source IP (172.18.0.42) doesn't match the allowed IPs (172.18.0.84,172.18.0.85)
Access denied. Your source IP (172.18.0.42) doesn't match the allowed IPs (172.18.0.84,172.18.0.85)
Access denied. Your source IP (172.18.0.43) doesn't match the allowed IPs (172.18.0.84,172.18.0.85)
Access denied. Your source IP (172.18.0.43) doesn't match the allowed IPs (172.18.0.84,172.18.0.85)
Access denied. Your source IP (172.18.0.42) doesn't match the allowed IPs (172.18.0.84,172.18.0.85)
Access denied. Your source IP (172.18.0.42) doesn't match the allowed IPs (172.18.0.84,172.18.0.85)
Access denied. Your source IP (172.18.0.43) doesn't match the allowed IPs (172.18.0.84,172.18.0.85)
Access denied. Your source IP (172.18.0.42) doesn't match the allowed IPs (172.18.0.84,172.18.0.85)
Access denied. Your source IP (172.18.0.42) doesn't match the allowed IPs (172.18.0.84,172.18.0.85)
这些请求被 Outpost 拒绝,因为它们来自当前配置的出口 IP 地址:172.18.0.42 和 172.18.0.43。
5.2 配置出口IPAM
修改配置文件 egress-gw-policy-ha.yaml
apiVersion: isovalent.com/v1
kind: IsovalentEgressGatewayPolicy
metadata:
  name: outpost-ha
spec:
  destinationCIDRs:
  - "172.18.0.0/16"
  selectors:
  - podSelector:
      matchLabels:
        org: alliance
  # add the following two lines
  egressCIDRs:
    - "172.18.0.84/31"
  egressGroups:
    - nodeSelector:
        matchLabels:
          egress-gw: 'true'
    # Comment folling line
    #   interface: net0
配置生效
kubectl apply -f egress-gw-policy-ha.yaml
5.3 测试访问
root@server:~# for i in $(seq 1 10); do
  kubectl exec -ti xwing -- \
    curl --max-time 2 http://$OUTPOST2:8000
done
Access granted. Your source IP (172.18.0.85) matches an allowed IP.
Access granted. Your source IP (172.18.0.85) matches an allowed IP.
Access granted. Your source IP (172.18.0.84) matches an allowed IP.
Access granted. Your source IP (172.18.0.84) matches an allowed IP.
Access granted. Your source IP (172.18.0.84) matches an allowed IP.
Access granted. Your source IP (172.18.0.85) matches an allowed IP.
Access granted. Your source IP (172.18.0.84) matches an allowed IP.
Access granted. Your source IP (172.18.0.84) matches an allowed IP.
Access granted. Your source IP (172.18.0.85) matches an allowed IP.
Access granted. Your source IP (172.18.0.84) matches an allowed IP.
现在,所有出口请求都通过 172.18.0.84 或 172.18.0.85
5.4 小测试
4选1
Egress Gateway IPAM requires BGP
Egress Gateway IPAM requires to assign IPs by hand
√	Egress Gateway IPAM clashes with manual interface specification
Only one CIDR can be specified per Egress Gateway rule
6. 拓扑感知Egress
6.1 标签
此时,我们在 egressGroups 中有两个网关节点,并且出口流量在这两个节点之间进行负载均衡。在某些情况下,可能需要优先将流量转发到组中的某些网关节点,具体取决于它们的物理位置。
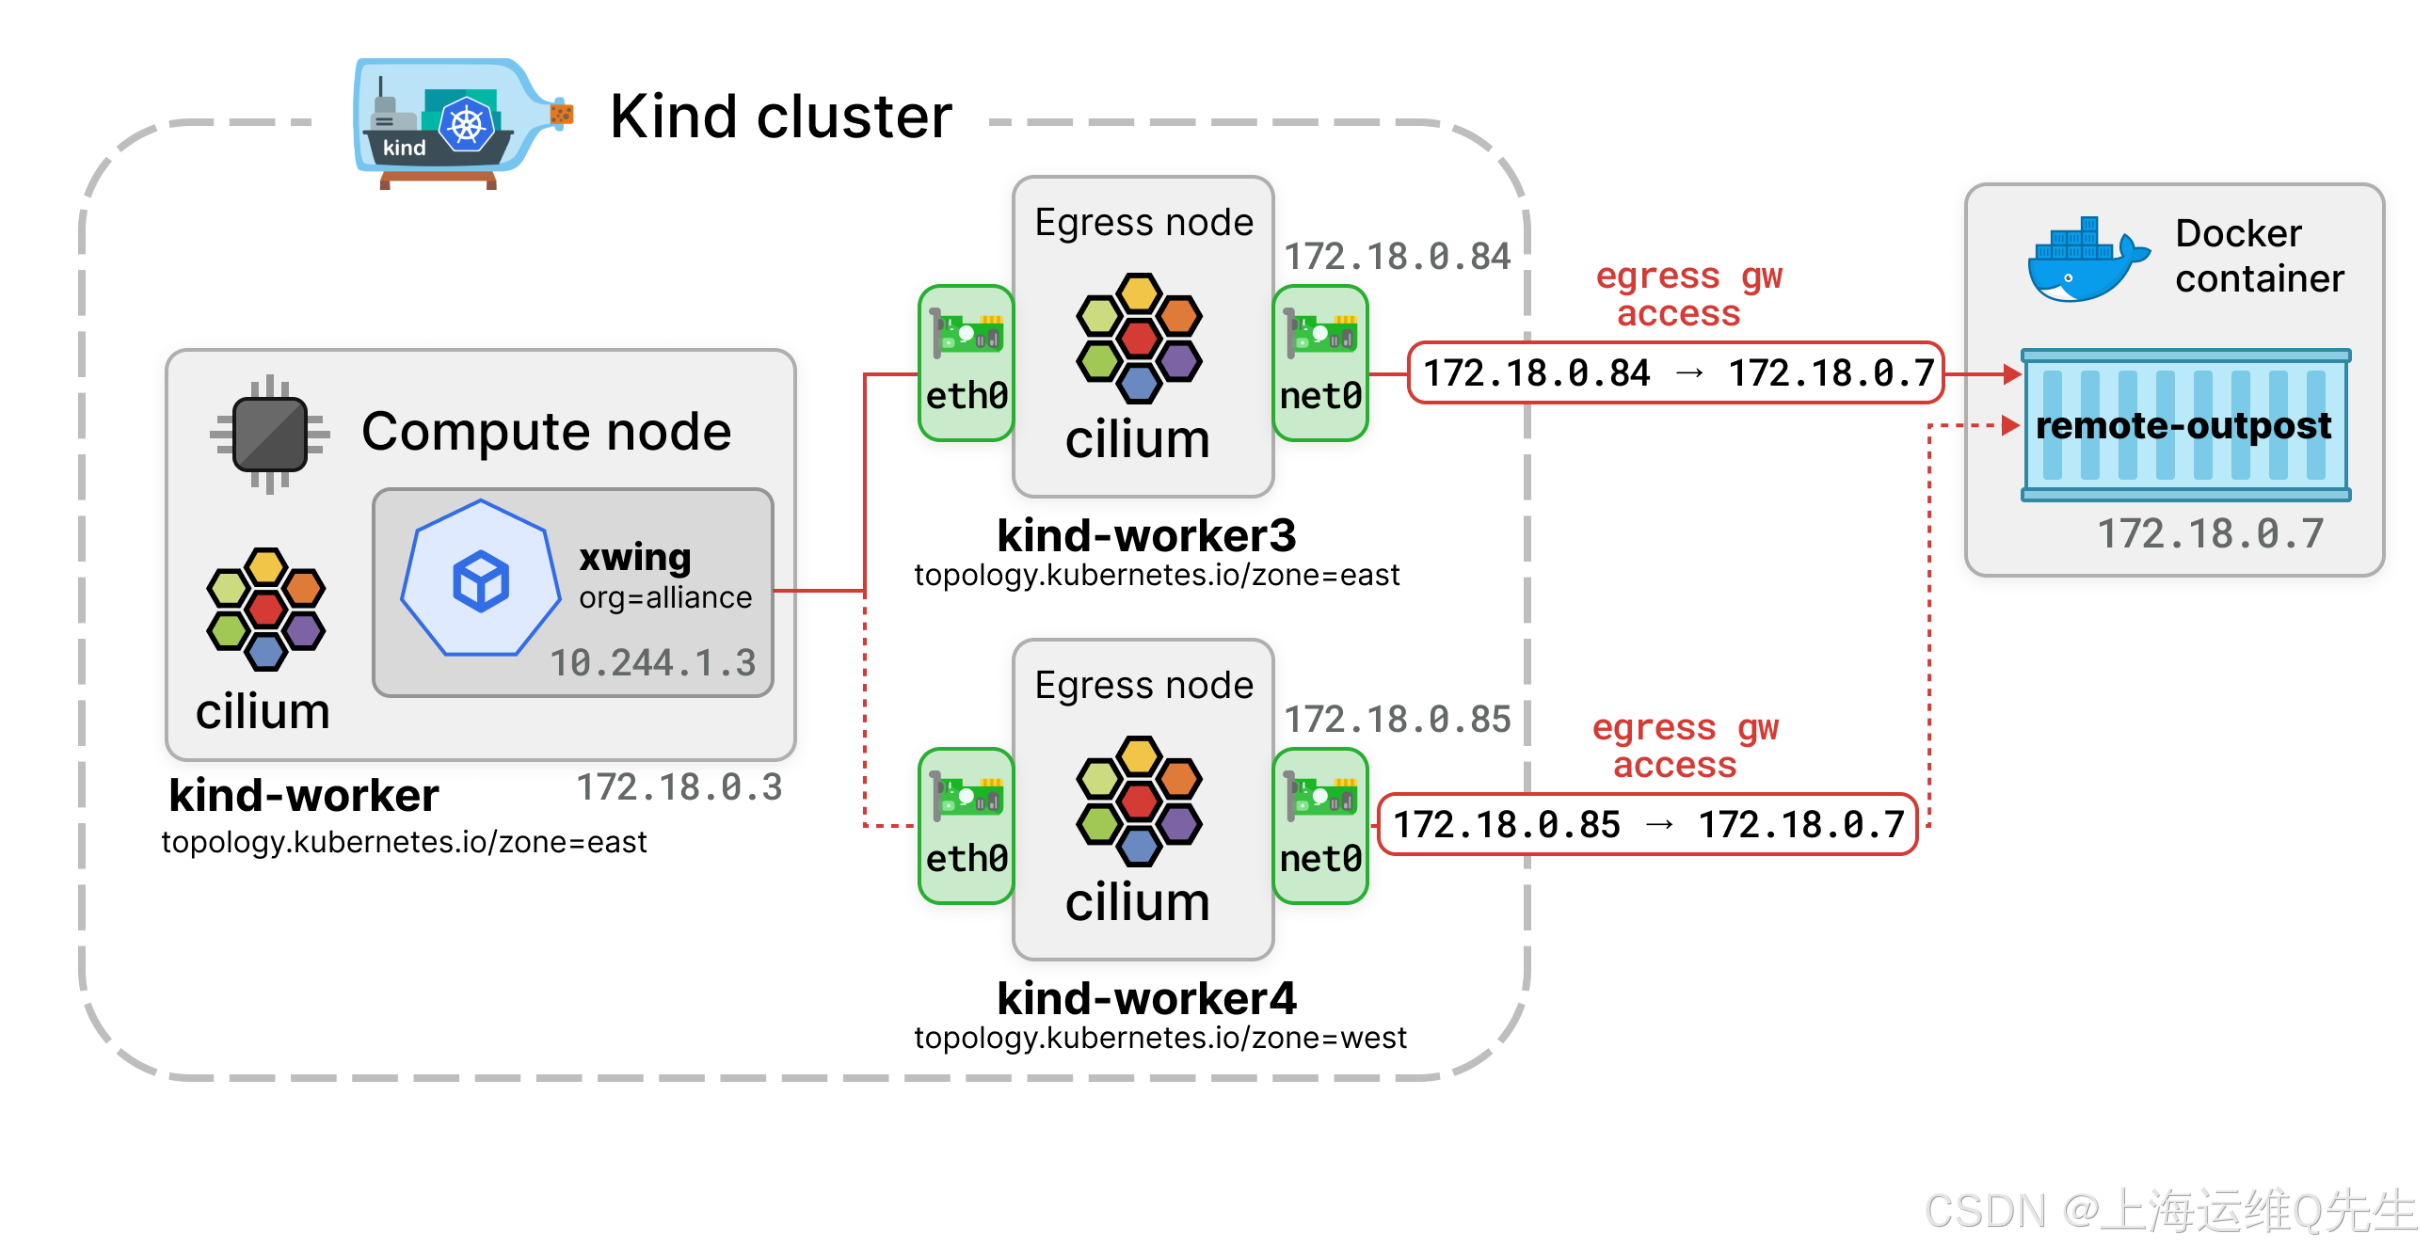
| Node | Role | Availability Zone |
|---|---|---|
| kind-worker | compute | east |
| kind-worker3 | egress | east |
| kind-worker2 | compute | west |
| kind-worker4 | egress | west |
将以上标签分配给对应节点
kubectl label node kind-worker topology.kubernetes.io/zone=east
kubectl label node kind-worker3 topology.kubernetes.io/zone=east

kubectl label node kind-worker2 topology.kubernetes.io/zone=west
kubectl label node kind-worker4 topology.kubernetes.io/zone=west
验证标签:
kubectl get no --show-labels | \
  grep --color topology.kubernetes.io/zone=
检查 IsovalentEgressGatewayPolicy CRD 中 azAffinity 值
kubectl explain isovalentegressgatewaypolicies.spec.azAffinity
输出结果如下:
root@server:~# kubectl label node kind-worker topology.kubernetes.io/zone=east
kubectl label node kind-worker3 topology.kubernetes.io/zone=east

kubectl label node kind-worker2 topology.kubernetes.io/zone=west
kubectl label node kind-worker4 topology.kubernetes.io/zone=west
node/kind-worker labeled
node/kind-worker3 labeled
node/kind-worker2 labeled
node/kind-worker4 labeled
root@server:~# kubectl get no --show-labels | \
  grep --color topology.kubernetes.io/zone=
kind-worker          Ready    <none>          78m   v1.31.0   beta.kubernetes.io/arch=amd64,beta.kubernetes.io/os=linux,kubernetes.io/arch=amd64,kubernetes.io/hostname=kind-worker,kubernetes.io/os=linux,topology.kubernetes.io/zone=east
kind-worker2         Ready    <none>          78m   v1.31.0   beta.kubernetes.io/arch=amd64,beta.kubernetes.io/os=linux,kubernetes.io/arch=amd64,kubernetes.io/hostname=kind-worker2,kubernetes.io/os=linux,topology.kubernetes.io/zone=west
kind-worker3         Ready    <none>          78m   v1.31.0   beta.kubernetes.io/arch=amd64,beta.kubernetes.io/os=linux,egress-gw=true,kubernetes.io/arch=amd64,kubernetes.io/hostname=kind-worker3,kubernetes.io/os=linux,topology.kubernetes.io/zone=east
kind-worker4         Ready    <none>          78m   v1.31.0   beta.kubernetes.io/arch=amd64,beta.kubernetes.io/os=linux,egress-gw=true,kubernetes.io/arch=amd64,kubernetes.io/hostname=kind-worker4,kubernetes.io/os=linux,topology.kubernetes.io/zone=west
root@server:~# kubectl explain isovalentegressgatewaypolicies.spec.azAffinity
GROUP:      isovalent.com
KIND:       IsovalentEgressGatewayPolicy
VERSION:    v1

FIELD: azAffinity <string>
ENUM:
    disabled
    localOnly
    localOnlyFirst
    localPriority

DESCRIPTION:
    AZAffinity controls the AZ affinity of the gateway nodes to the source pods
    and allows to select or prefer local (i.e. gateways in the same AZ of a
    given pod) gateways.

    4 modes are supported:
    - disabled: no AZ affinity
    - localOnly: only local gateway nodes will be selected
    - localOnlyFirst: only local gateways nodes will be selected until at least
    one gateway is available in the AZ.
      When no more local gateways are available, gateways from different AZs
    will be used
    - localPriority: local gateways will be picked up first to build the list of
    active gateways.
      This mode is supposed to be used in combination with maxGatewayNodes
6.2 修改配置
编辑 egress-gw-policy-ha.yaml 文件。将 azAffinity 参数添加到spec中,以便首先选择本地网关,然后仅在所有本地网关都不可用时回退到其他区域中的网关:
apiVersion: isovalent.com/v1
kind: IsovalentEgressGatewayPolicy
metadata:
  name: outpost-ha
spec:
  # add the following line
  azAffinity: localOnlyFirst
  destinationCIDRs:
  - "172.18.0.0/16"
  selectors:
  - podSelector:
      matchLabels:
        org: alliance
  egressCIDRs:
    - "172.18.0.84/31"
  egressGroups:
    - nodeSelector:
        matchLabels:
          egress-gw: 'true'
生效配置
kubectl apply -f egress-gw-policy-ha.yaml
确认生成的
root@server:~# kubectl apply -f egress-gw-policy-ha.yaml
isovalentegressgatewaypolicy.isovalent.com/outpost-ha configured
root@server:~# kubectl get isovalentegressgatewaypolicies outpost-ha -o yaml | yq
apiVersion: isovalent.com/v1
kind: IsovalentEgressGatewayPolicy
metadata:
annotations:
kubectl.kubernetes.io/last-applied-configuration: |
{"apiVersion":"isovalent.com/v1","kind":"IsovalentEgressGatewayPolicy","metadata":{"annotations":{},"name":"outpost-ha"},"spec":{"azAffinity":"localOnlyFirst","destinationCIDRs":["172.18.0.0/16"],"egressCIDRs":["172.18.0.84/31"],"egressGroups":[{"nodeSelector":{"matchLabels":{"egress-gw":"true"}}}],"selectors":[{"podSelector":{"matchLabels":{"org":"alliance"}}}]}}
creationTimestamp: "2025-05-27T01:28:08Z"
generation: 3
name: outpost-ha
resourceVersion: "2662"
uid: ef9df8ca-655d-465e-8148-2d7a2d21fe95
spec:
azAffinity: localOnlyFirst
destinationCIDRs:
- 172.18.0.0/16
egressCIDRs:
- 172.18.0.84/31
egressGroups:
- nodeSelector:
matchLabels:
egress-gw: "true"
selectors:
- podSelector:
matchLabels:
org: alliance
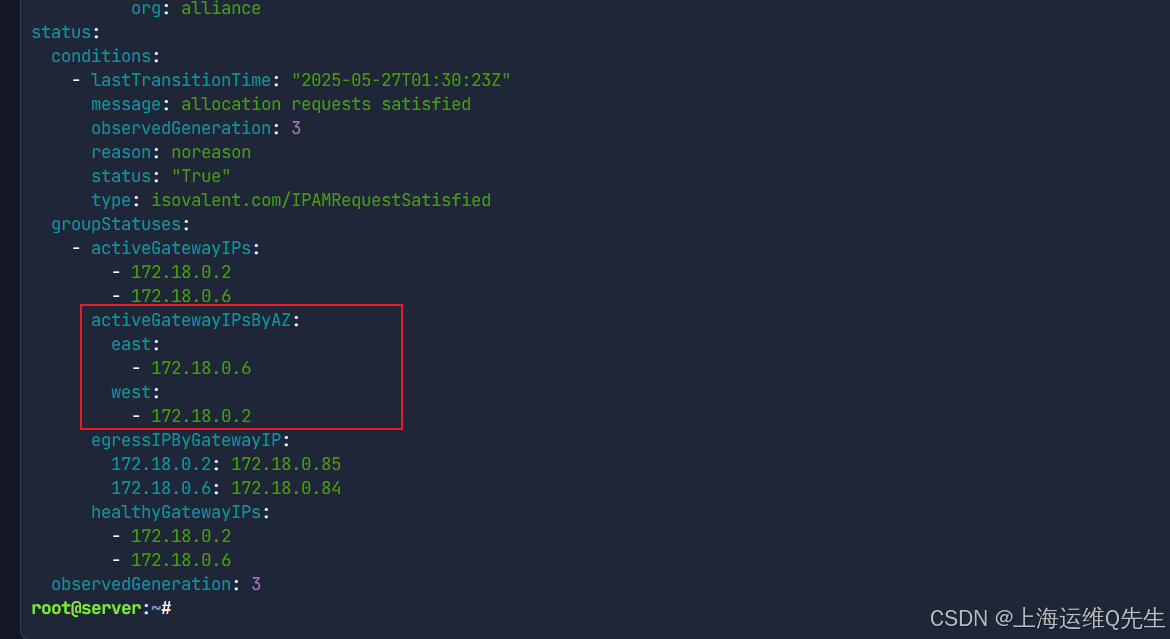
status:
conditions:
- lastTransitionTime: "2025-05-27T01:30:23Z"
message: allocation requests satisfied
observedGeneration: 3
reason: noreason
status: "True"
type: isovalent.com/IPAMRequestSatisfied
groupStatuses:
- activeGatewayIPs:
- 172.18.0.2
- 172.18.0.6
activeGatewayIPsByAZ:
east:
- 172.18.0.6
west:
- 172.18.0.2
egressIPByGatewayIP:
172.18.0.2: 172.18.0.85
172.18.0.6: 172.18.0.84
healthyGatewayIPs:
- 172.18.0.2
- 172.18.0.6
observedGeneration: 3
特别注意的是IPAM的动态IP
6.3 测试
让我们找出 X-Wing 吊舱正在运行的区域。首先,确定它正在运行的节点:
kubectl get po xwing -o wide
接下来,检查该节点的区域:
kubectl get no kind-worker2 --show-labels | \
  grep --color topology.kubernetes.io/zone=
查找与该区域中的出口节点关联的出口 IP:
docker exec kind-worker4 ip -br add show dev net0
验证来自 X-Wing 的出口流量是否通过该本地网关离开。以下命令的结果应返回您刚刚检索的 IP:
for i in $(seq 1 10); do
  kubectl exec -ti xwing -- \
    curl --max-time 2 http://172.18.0.8:8000
done
得到的输出结果:
root@server:~# kubectl get po xwing -o wide
NAME    READY   STATUS    RESTARTS   AGE   IP             NODE           NOMINATED NODE   READINESS GATES
xwing   1/1     Running   0          11m   10.244.2.112   kind-worker2   <none>           <none>
root@server:~# kubectl get no kind-worker2 --show-labels | \
  grep --color topology.kubernetes.io/zone=
kind-worker2   Ready    <none>   14m   v1.31.0   beta.kubernetes.io/arch=amd64,beta.kubernetes.io/os=linux,kubernetes.io/arch=amd64,kubernetes.io/hostname=kind-worker2,kubernetes.io/os=linux,topology.kubernetes.io/zone=west
root@server:~# docker exec kind-worker4 ip -br add show dev net0
net0             UNKNOWN        172.18.0.43/16 fe80::879:b0ff:feed:c647/64
root@server:~# for i in $(seq 1 10); do
  kubectl exec -ti xwing -- \
    curl --max-time 2 http://172.18.0.8:8000
done
Access granted. Your source IP (172.18.0.85) matches an allowed IP.
Access granted. Your source IP (172.18.0.85) matches an allowed IP.
Access granted. Your source IP (172.18.0.85) matches an allowed IP.
Access granted. Your source IP (172.18.0.85) matches an allowed IP.
Access granted. Your source IP (172.18.0.85) matches an allowed IP.
Access granted. Your source IP (172.18.0.85) matches an allowed IP.
Access granted. Your source IP (172.18.0.85) matches an allowed IP.
Access granted. Your source IP (172.18.0.85) matches an allowed IP.
Access granted. Your source IP (172.18.0.85) matches an allowed IP.
Access granted. Your source IP (172.18.0.85) matches an allowed IP.
6.4 弹性
本地网关将继续使用,直到它变得不可用,在这种情况下,所有流量都会故障转移到其他可用区中的网关。这可以通过临时暂停 egress gateway 节点来模拟:
docker pause kind-worker4
再次测试访问并观察出口 IP 如何变化:
for i in $(seq 1 10); do
  kubectl exec -ti xwing -- \
    curl --max-time 2 http://172.18.0.8:8000
done
流量将继续流经另一个可用区,直到至少一个本地网关已恢复:
docker unpause kind-worker4
再次测试:流量应再次流经本地网关:
for i in $(seq 1 10); do
  kubectl exec -ti xwing -- \
    curl --max-time 2 http://172.18.0.8:8000
done
以上的输出结果:
root@server:~# for i in $(seq 1 10); do
  kubectl exec -ti xwing -- \
    curl --max-time 2 http://172.18.0.8:8000
done
Access granted. Your source IP (172.18.0.85) matches an allowed IP.
Access granted. Your source IP (172.18.0.85) matches an allowed IP.
Access granted. Your source IP (172.18.0.85) matches an allowed IP.
Access granted. Your source IP (172.18.0.85) matches an allowed IP.
Access granted. Your source IP (172.18.0.85) matches an allowed IP.
Access granted. Your source IP (172.18.0.85) matches an allowed IP.
Access granted. Your source IP (172.18.0.85) matches an allowed IP.
Access granted. Your source IP (172.18.0.85) matches an allowed IP.
Access granted. Your source IP (172.18.0.85) matches an allowed IP.
Access granted. Your source IP (172.18.0.85) matches an allowed IP.
root@server:~# docker pause kind-worker4
kind-worker4
root@server:~# for i in $(seq 1 10); do
  kubectl exec -ti xwing -- \
    curl --max-time 2 http://172.18.0.8:8000
done
Access granted. Your source IP (172.18.0.85) matches an allowed IP.
Access granted. Your source IP (172.18.0.85) matches an allowed IP.
Access granted. Your source IP (172.18.0.85) matches an allowed IP.
Access granted. Your source IP (172.18.0.85) matches an allowed IP.
Access granted. Your source IP (172.18.0.85) matches an allowed IP.
Access granted. Your source IP (172.18.0.85) matches an allowed IP.
Access granted. Your source IP (172.18.0.85) matches an allowed IP.
Access granted. Your source IP (172.18.0.85) matches an allowed IP.
Access granted. Your source IP (172.18.0.85) matches an allowed IP.
Access granted. Your source IP (172.18.0.85) matches an allowed IP.
root@server:~# docker unpause kind-worker4
kind-worker4
root@server:~# for i in $(seq 1 10); do
  kubectl exec -ti xwing -- \
    curl --max-time 2 http://172.18.0.8:8000
done
Access granted. Your source IP (172.18.0.84) matches an allowed IP.
Access granted. Your source IP (172.18.0.84) matches an allowed IP.
Access granted. Your source IP (172.18.0.84) matches an allowed IP.
Access granted. Your source IP (172.18.0.84) matches an allowed IP.
Access granted. Your source IP (172.18.0.84) matches an allowed IP.
Access granted. Your source IP (172.18.0.84) matches an allowed IP.
Access granted. Your source IP (172.18.0.84) matches an allowed IP.
Access granted. Your source IP (172.18.0.84) matches an allowed IP.
Access granted. Your source IP (172.18.0.84) matches an allowed IP.
Access granted. Your source IP (172.18.0.84) matches an allowed IP.
6.5 小测试
√	Topology is defined by the 'topology.kubernetes.io/zone' label
×	Topology label is applied to Pods
×	Egress Gateway Topology-aware Routing is available in Cilium OSS
√	Egress Gateway Topology-aware Routing can help with optimising latency and reducing cross-zone traffic costs
7. 最终测试
7.1 要求
在一场战斗中,反抗军联盟决定在他们偏远的前哨为千年隼提供庇护。
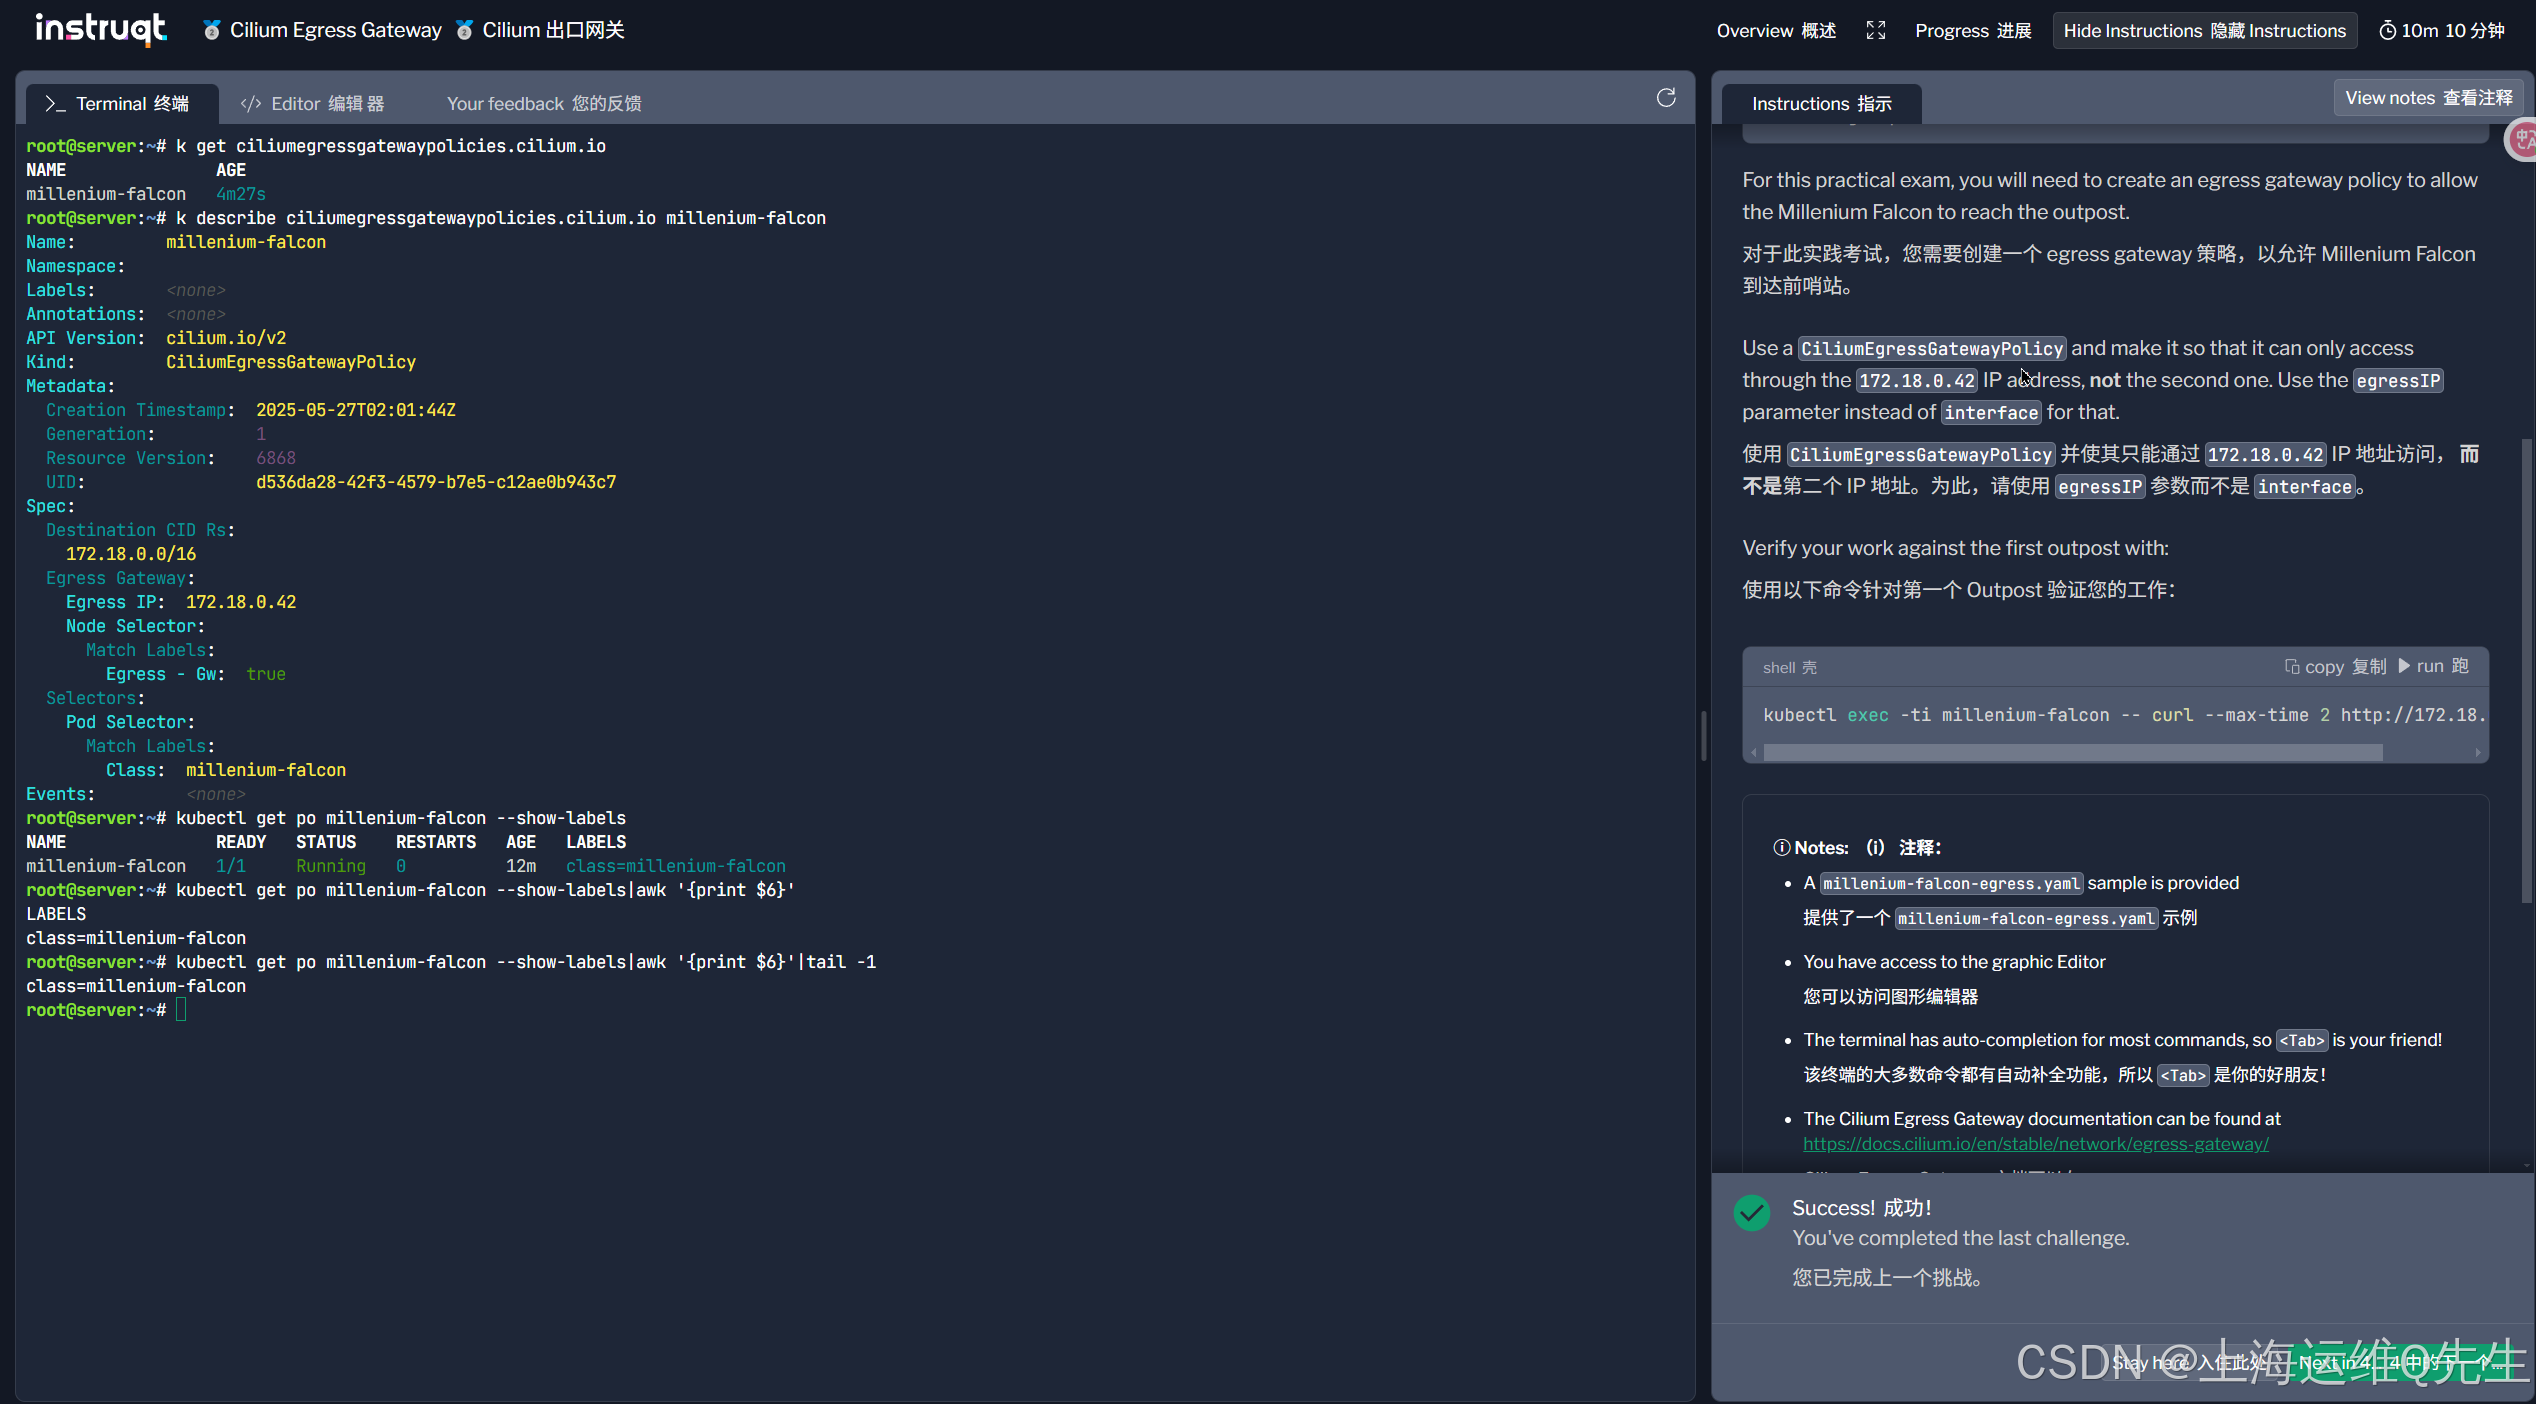
A millenium-falcon pod has been deployed to the default namespace.
millenium-falcon pod 已部署到默认命名空间。
使用以下方法检查它及其标签:
kubectl get po millenium-falcon --show-labels
对于此实践考试,您需要创建一个 egress gateway 策略,以允许 Millenium Falcon 到达前哨站。
使用 CiliumEgressGatewayPolicy 并使其只能通过 172.18.0.42 IP 地址访问, 而不是第二个 IP 地址。为此,请使用 egressIP 参数而不是 interface。
使用以下命令针对第一个 Outpost 验证您的工作:
kubectl exec -ti millenium-falcon -- curl --max-time 2 http://172.18.0.7:8000
7.2 解题
获取信息1(spec.selectors.podSelector.matchLabels):
root@server:~# kubectl get po millenium-falcon --show-labels|awk '{print $6}'|tail -1
class=millenium-falcon
获取信息2(spec.egressGateway.nodeSelector.matchLabels.egress-gw:)
root@server:~# k get ciliumegressgatewaypolicies.cilium.io
NAME               AGE
millenium-falcon   4m27s
root@server:~# k describe ciliumegressgatewaypolicies.cilium.io millenium-falcon
Name:         millenium-falcon
Namespace:
Labels:       <none>
Annotations:  <none>
API Version:  cilium.io/v2
Kind:         CiliumEgressGatewayPolicy
Metadata:
  Creation Timestamp:  2025-05-27T02:01:44Z
  Generation:          1
  Resource Version:    6868
  UID:                 d536da28-42f3-4579-b7e5-c12ae0b943c7
Spec:
  Destination CID Rs:
    172.18.0.0/16
  Egress Gateway:
    Egress IP:  172.18.0.42
    Node Selector:
      Match Labels:
        Egress - Gw:  true
  Selectors:
    Pod Selector:
      Match Labels:
        Class:  millenium-falcon
Events:         <none>
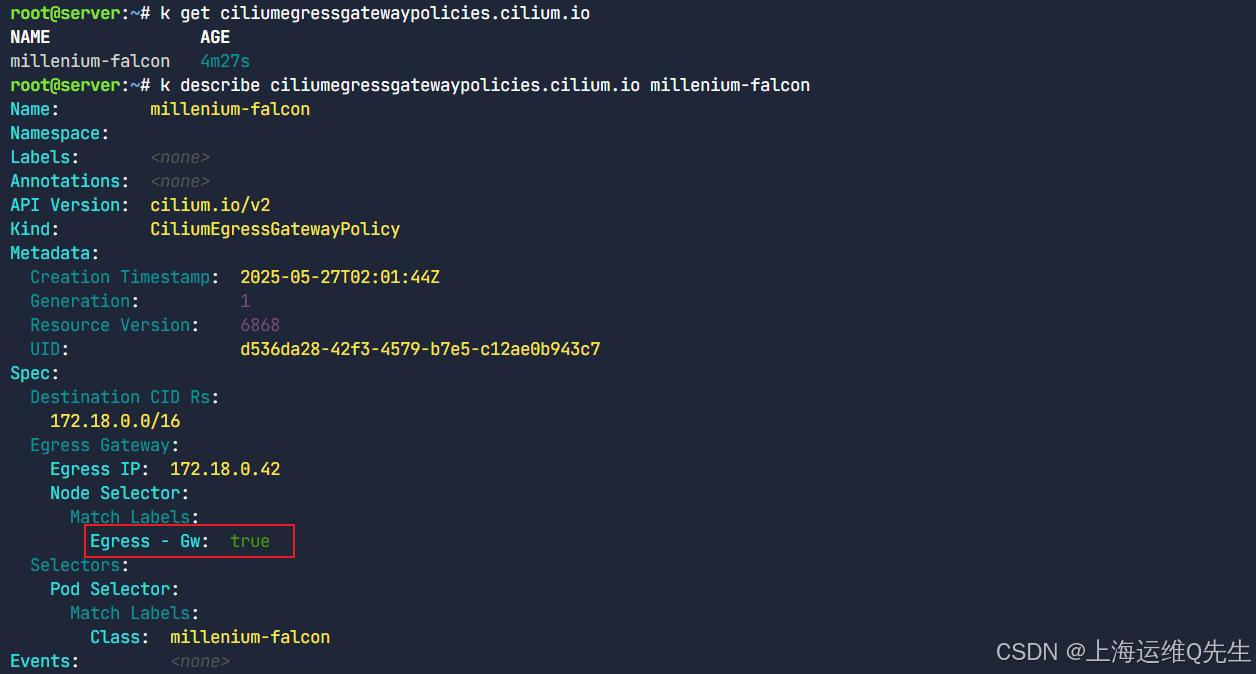
信息3 egressIP,题目中已经给了,是172.18.0.42
编辑millenium-falcon-egress.yaml
apiVersion: cilium.io/v2
kind: CiliumEgressGatewayPolicy
metadata:
  name: millenium-falcon
spec:
  destinationCIDRs:
  - "172.18.0.0/16"
  selectors:
  - podSelector:
      matchLabels:
        # 通过 kubectl get po millenium-falcon --show-labels 获取
        class: millenium-falcon
  egressGateway:
    nodeSelector:
      matchLabels:
        egress-gw: 'true'
    egressIP: 172.18.0.42
部署并测试
root@server:~# kubectl get po millenium-falcon --show-labels
NAME               READY   STATUS    RESTARTS   AGE     LABELS
millenium-falcon   1/1     Running   0          5m54s   class=millenium-falcon
root@server:~# k apply -f millenium-falcon-egress.yaml
ciliumegressgatewaypolicy.cilium.io/millenium-falcon created
root@server:~# kubectl exec -ti millenium-falcon -- curl --max-time 2 http://172.18.0.7:8000
Access granted. Your source IP (172.18.0.42) matches an allowed IP.
root@server:~#
新徽章获取!


 2513
2513

 被折叠的 条评论
为什么被折叠?
被折叠的 条评论
为什么被折叠?
 到【灌水乐园】发言


