


有关美的空调的ESP8266的红外控制库,适用于Arduino平台,需配合IRremoteESP8266库使用。
文件基于IRremoteESP8266库文件编写。
个人网站上的文章www.songzx.top/esp8266
具体代码请访问https://github.com/GYSS1204/IRsendMeidi_ESP8266-RN02S-Midea
说明
对Arduino中IRremoteESP8266库美的空调控制的补充,主要依赖于IRremoteESP8266库的sendData()函数来实现数据的发送。
需配合Arduino中的IRremoteESP8266库使用。
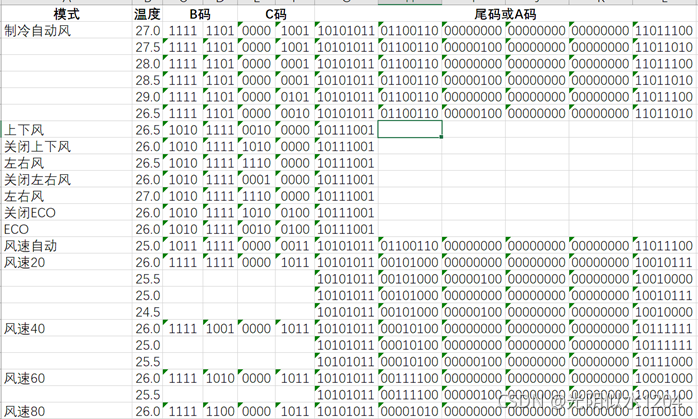
主要控制采取的实际数据来源于美的空调RN02S13遥控器,空调型号为美的冷静星。
可以控制的参数:温度(精确到0.5),模式,风速,开关机,定时,扫风,ECO,防直吹。
文件为库文件,直接将文件夹IRsendMeidi放入ArduinoIDE的库文件夹中即可。
参数设置
• 温度设置,17-30,分辨率0.5
• 设置模式,0自动,1制冷,2制热,3抽湿,4送风
• 设置风速,0自动,1为20%,2为40%,3为60%,4为80%,5为100%
• ECO,扫风,防直吹,参数1为打开,参数0为关闭。
使用逻辑分析仪采集到的数据。
代码
IRsendMeidi.h文件
#include <Arduino.h>
#ifndef  IRSENDMEIDI_H_
#define  IRSENDMEIDI_H_

class IRsendMeidi{
  public:
  void begin_2(); //初始化,放入void setup()中
  explicit IRsendMeidi(uint8_t ir_led);
  void setCodeTime(int marks,int one_spaces,int zero_spaces, int l_marks, int l_spaces, int s_spaces);
  //设置发送码的高低电平时间
  void setTemps(float Temps1);  //设置温度
  void setModes(int Modes1);    //设置模式
  void setFanSpeeds(int FanSpeeds1);   //设置风速
  void setEco(bool Eco);  //开关ECO
  void setPowers(bool Powers);  //开关空调
  void setZBPL(int khz);   //设置载波频率
  void setSwingUD(bool SwingUD);  //开关上下扫风
  void setSwingLR(bool SwingLR);  //开关左右扫风
  void setFZC(bool FZC);   //开关防直吹
  void setTimers(float Timers);  //设置定时
  void Send_Code(uint8_t A, uint8_t B,uint8_t C);  //ABC码发送
};
#endif
IRsendMeidi.cpp文件
/*
 * 美的空调遥控器RN02S13红外发射控制库,需配合IRremoteESP8266库使用。
 * 可以控制的参数:温度(精确到0.5),模式,风速,开关机,定时,扫风,ECO,防直吹。
 * 作者:光阴似水1204
 * 了解更多请访问www.songzx.top
 * 时间:2021年9月17日
 */
#include <Arduino.h>
#include "IRsendMeidi.h"
#include <IRremoteESP8266.h>
#include <IRsend.h>
int ZBPL = 38;         //设置红外发射载波频率默认值,单位kHz
float Temps = 26;      //设置温度默认值,17-30,分辨率0.5
int Modes = 0;         //设置模式默认值,0自动,1制冷,2制热,3抽湿,4送风
int FanSpeeds = 0;     //设置风速默认值,0自动,1为20%,2为40%,3为60%,4为80%,5为100%
bool Temp01 = 0;       //设置默认发射温度小数位,1为0.5,0为0
int Marks = 500;       //标记位时间单位us
int One_Space = 1600;  //1位高电平时间
int Zero_Space = 550;  //0位高电平时间
int L_Mark = 4400;     //引导位低电平时间
int L_Space = 4400;    //引导位高电平时间
int S_Space = 5220;    //间隔位高电平时间
uint8_t D_1 = 0xAB, D_2 = 0x66, D_3 = 0x00, D_4 = 0x00, D_5 = 0x00, D_6 = 0xDC;
uint8_t A,B,C,B_1 = 0xF, B_2, C_1 = 0x1, C_2 = 0xB;
uint8_t kIrLed = 4;  // ESP8266 GPIO pin to use. Recommended: 4 (D2).

IRsend irsend(kIrLed);  // Set the GPIO to be used to sending the message.

void Lead_Code();       //定义引导码发送函数
void Stop_Code();       //定义分隔码发送函数
void Send_Byte(uint8_t data1, int nbit1, bool msb);   //定义发送原始数据的函数,data1(数据),nbit1(数据二进制位数),msb(数据发送顺序,1为低位先发,0为高位先发)

void Send_Code_S(uint8_t A, uint8_t B, uint8_t C, uint8_t D_1, uint8_t D_2,  uint8_t D_3, uint8_t D_4, uint8_t D_5, uint8_t D_6);
//定时用的数据发送函数,因为定时发送的数据C码的反码位置为固定的11111111,所以引入该函数,C的反码位置为固定的0xFF

void Send_Code_L(uint8_t A, uint8_t B, uint8_t C, uint8_t D_1, uint8_t D_2,  uint8_t D_3, uint8_t D_4, uint8_t D_5, uint8_t D_6);
//正常的发送数据的函数,用来发送长码

void if_D6(int fs);  //计算风速数据的函数,因为风速数据的D_6和温度是否有0.5位相关联。

void Send_Meidi(bool Code_State);  //发送长码数据的函数,1为正常发送,0为C反码固定为0xFF的发送。

void IRsendMeidi::begin_2(){   //初始化IRsend.begin的函数,需写入到主程序的void setup()中。
  irsend.begin();
}

void IRsendMeidi::setCodeTime(int  marks,int one_spaces,int zero_spaces, int l_marks, int l_spaces, int s_spaces){
   Marks = marks;
   One_Space = one_spaces;
   Zero_Space = zero_spaces;
   L_Mark = l_marks;
   L_Space = l_spaces;
   S_Space = s_spaces;
}


IRsendMeidi::IRsendMeidi(uint8_t ir_led){  //返回发射信号的引脚

  kIrLed = ir_led;
}

void IRsendMeidi::setZBPL(int khz){ //定义红外发射的载波频率

  ZBPL = khz;
}

void IRsendMeidi::setTemps(float Temps1){  //设置空调温度

  Temps = Temps1;
  int temp2 = floor(Temps);
  float temp_f = Temps - temp2;
  if(temp_f == 0.5){

    Temp01 = 1;
    D_3 = 0x04;

  }
  else {

    Temp01 = 0;
    D_3 = 0x00;
  }
  if_D6(FanSpeeds);
  switch(temp2){
    case 17: C_2 = 0x0; break;
    case 18: C_2 = 0x8; break;
    case 19: C_2 = 0xC; break;
    case 20: C_2 = 0x4; break;
    case 21: C_2 = 0x6; break;
    case 22: C_2 = 0xE; break;
    case 23: C_2 = 0xA; break;
    case 24: C_2 = 0x2; break;
    case 25: C_2 = 0x3; break;
    case 26: C_2 = 0xB; break;
    case 27: C_2 = 0x9; break;
    case 28: C_2 = 0x1; break;
    case 29: C_2 = 0x5; break;
    case 30: C_2 = 0xD; break;
  }
  Send_Meidi(1);
}


void IRsendMeidi::setModes(int Modes1){  //设置空调模式。
  Modes = Modes1;
  B_1 = 0xF;
  switch(Modes){
    case 0: C_1 = 0x1; B_2 = 0x8; break; //auto
    case 1: C_1 = 0x0; B_2 = 0xB; break; //cool
    case 2: C_1 = 0x3; B_2 = 0xB; break; //hot
    case 3: C_1 = 0x2; B_2 = 0x8; break; //choushi
    case 4: C_1 = 0x2; B_2 = 0xB; C_2 = 0x7; break; //songfeng
  }
  Send_Meidi(1);
}

void IRsendMeidi::setFanSpeeds(int FanSpeeds1){  //设置空调风速。

  FanSpeeds = FanSpeeds1;
  B_1 = 0xF;
  if_D6(FanSpeeds);
  Send_Meidi(1);
}


void IRsendMeidi::setEco(bool Eco){    //开关ECO模式
  if(Eco == 1){
  Send_Code(0xB9, 0xAF ,0x24);
  }
  if(Eco == 0){
  Send_Code(0xB9, 0xAF ,0xA4);
  }
}

void IRsendMeidi::setPowers(bool Powers){   //开关空调

  if(Powers == 1){
    B_1 = 0xF;
        setTemps(Temps);
  }
  else{
  Send_Code(0XB2, 0xDE, 0x07);
  }
}

void IRsendMeidi::setSwingUD(bool SwingUD){  //开关上下扫风

  if(SwingUD == 1){
    Send_Code(0xB9, 0xAF ,0x20);
  }
  if(SwingUD == 0){
    Send_Code(0xB9, 0xAF ,0xA0);
  }
}

void IRsendMeidi::setSwingLR(bool SwingLR){   //开关左右扫风

  if(SwingLR == 1){
    Send_Code(0xB9, 0xAF ,0xE0);
  }
  if(SwingLR == 0){
    Send_Code(0xB9, 0xAF ,0x10);
  }
}


void IRsendMeidi::setFZC(bool FZC){    //开关防直吹

  if(FZC == 1){
    Send_Code(0xB9, 0xAF ,0xDA);
  }
  if(FZC == 0){
    Send_Code(0xB9, 0xAF ,0x3A);
  }
}


void IRsendMeidi::setTimers(float Timers){    //设置定时

  uint8_t C_1_t = C_1;
  int Timers1 = floor(Timers);
  float Timers_f = Timers - Timers1;
  switch(Timers1){
    case 0: B_1 = 0x8; B_2 = 0x5; C_1 = 0x0; break;
    case 1: if(Timers_f == 0){
    B_1 = 0xC; B_2 = 0x5; C_1 = 0x0;}
  else {
    B_1 = 0xA; B_2 = 0x5; C_1 = 0x0;}
  break;
    case 2: if(Timers_f == 0){
    B_1 = 0xE; B_2 = 0x5; C_1 = 0x0;}
  else {
    B_1 = 0x9; B_2 = 0x5; C_1 = 0x0;}
  break;
   case 3: if(Timers_f == 0){
    B_1 = 0xD; B_2 = 0x5; C_1 = 0x0;}
  else {
    B_1 = 0xB; B_2 = 0x5; C_1 = 0x0;}
  break;
   case 4: if(Timers_f == 0){
    B_1 = 0xF; B_2 = 0x5; C_1 = 0x0;}
  else {
    B_1 = 0x8; B_2 = 0xD; C_1 = 0x0;}
  break;
   case 5: if(Timers_f == 0){
    B_1 = 0xC; B_2 = 0xD; C_1 = 0x0;}
  else {
    B_1 = 0xA; B_2 = 0xD; C_1 = 0x0;}
  break;
   case 6: if(Timers_f == 0){
    B_1 = 0xE; B_2 = 0xD; C_1 = 0x0;}
  else {
    B_1 = 0x9; B_2 = 0xD; C_1 = 0x0;}
  break;
   case 7: if(Timers_f == 0){
    B_1 = 0xD; B_2 = 0xD; C_1 = 0x0;}
  else {
    B_1 = 0xB; B_2 = 0xD; C_1 = 0x0;}
  break;
   case 8: if(Timers_f == 0){
    B_1 = 0xF; B_2 = 0xD; C_1 = 0x0;}
  else {
    B_1 = 0x8; B_2 = 0x5; C_1 = 0x8;}
  break;
   case 9: if(Timers_f == 0){
    B_1 = 0xC; B_2 = 0x5; C_1 = 0x8;}
  else {
    B_1 = 0xA; B_2 = 0x5; C_1 = 0x8;}
  break;
   case 10: B_1 = 0xE; B_2 = 0x5; C_1 = 0x8; break;
   case 11: B_1 = 0xD; B_2 = 0x5; C_1 = 0x8; break;
   case 12: B_1 = 0xF; B_2 = 0x5; C_1 = 0x8; break;
   case 13: B_1 = 0xC; B_2 = 0xD; C_1 = 0x8; break;
   case 14: B_1 = 0xE; B_2 = 0xD; C_1 = 0x8; break;
   case 15: B_1 = 0xD; B_2 = 0xD; C_1 = 0x8; break;
   case 16: B_1 = 0xF; B_2 = 0xD; C_1 = 0x8; break;
   case 17: B_1 = 0xC; B_2 = 0x5; C_1 = 0x4; break;
   case 18: B_1 = 0xE; B_2 = 0x5; C_1 = 0x4; break;
   case 19: B_1 = 0xD; B_2 = 0x5; C_1 = 0x4; break;
   case 20: B_1 = 0xF; B_2 = 0x5; C_1 = 0x4; break;
   case 21: B_1 = 0xC; B_2 = 0xD; C_1 = 0x4; break;
   case 22: B_1 = 0xE; B_2 = 0xD; C_1 = 0x4; break;
   case 23: B_1 = 0xD; B_2 = 0xD; C_1 = 0x4; break;
   case 24: B_1 = 0xF; B_2 = 0xD; C_1 = 0x4; break;
  }
  Send_Meidi(0);
  C_1 = C_1_t;

}

void IRsendMeidi::Send_Code(uint8_t AC, uint8_t BC,uint8_t CC){  //发送ABC码的函数

  Lead_Code();
  Send_Byte(AC,8,1);
  Send_Byte(~AC,8,1);
  Send_Byte(BC,8,0);
  Send_Byte(~BC,8,0);
  Send_Byte(CC,8,0);
  Send_Byte(~CC,8,0);
  Stop_Code();
  Lead_Code();
  Send_Byte(AC,8,1);
  Send_Byte(~AC,8,1);
  Send_Byte(BC,8,0);
  Send_Byte(~BC,8,0);
  Send_Byte(CC,8,0);
  Send_Byte(~CC,8,0);
  Stop_Code();
}


void Send_Code_S(uint8_t AC, uint8_t BC,uint8_t CC,uint8_t D1C,uint8_t D2C, uint8_t D3C,uint8_t D4C,uint8_t D5C,uint8_t D6C){

  Lead_Code();
  Send_Byte(AC,8,1);
  Send_Byte(~AC,8,1);
  Send_Byte(BC,8,0);
  Send_Byte(~BC,8,0);
  Send_Byte(CC,8,0);
  Send_Byte(0xFF,8,0);
  Stop_Code();
  Lead_Code();
  Send_Byte(AC,8,1);
  Send_Byte(~AC,8,1);
  Send_Byte(BC,8,0);
  Send_Byte(~BC,8,0);
  Send_Byte(CC,8,0);
  Send_Byte(0xFF,8,0);
  Stop_Code();
  Lead_Code();
  Send_Byte(D1C,8,0);
  Send_Byte(D2C,8,0);
  Send_Byte(D3C,8,0);
  Send_Byte(D4C,8,0);
  Send_Byte(D5C,8,0);
  Send_Byte(D6C,8,0);
  Stop_Code();
}


void Send_Code_L(uint8_t AC, uint8_t BC,uint8_t CC,uint8_t D1C,uint8_t D2C, uint8_t D3C,uint8_t D4C,uint8_t D5C,uint8_t D6C){

  Lead_Code();
  Send_Byte(AC,8,1);
  Send_Byte(~AC,8,1);
  Send_Byte(BC,8,0);
  Send_Byte(~BC,8,0);
  Send_Byte(CC,8,0);
  Send_Byte(~CC,8,0);
  Stop_Code();
  Lead_Code();
  Send_Byte(AC,8,1);
  Send_Byte(~AC,8,1);
  Send_Byte(BC,8,0);
  Send_Byte(~BC,8,0);
  Send_Byte(CC,8,0);
  Send_Byte(~CC,8,0);
  Stop_Code();
  Lead_Code();
  Send_Byte(D1C,8,0);
  Send_Byte(D2C,8,0);
  Send_Byte(D3C,8,0);
  Send_Byte(D4C,8,0);
  Send_Byte(D5C,8,0);
  Send_Byte(D6C,8,0);
  Stop_Code();
}

void Send_Meidi(bool Code_State){   //发送长码数据的函数,1为正常发送,0为C反码固定为0xFF的发送。

  A = 0xB2;
  B = (B_1<<4) + B_2;
  C = (C_1<<4) + C_2;

  if(Code_State == 1){
    Send_Code_L( A, B, C, D_1, D_2, D_3, D_4, D_5, D_6);

  }
  if(Code_State == 0){
    Send_Code_S(A,  B,  C, D_1, D_2, D_3, D_4, D_5, D_6);
  }
}
void Lead_Code(){  //引导码函数定义

  irsend.enableIROut(ZBPL);
  irsend.sendData(L_Mark,L_Space,450,450,1,1,1);
}

void Stop_Code(){   //间隔码函数定义

  irsend.enableIROut(ZBPL);
  irsend.sendData(450,450,Marks,S_Space,0,1,1);
}

void Send_Byte(uint8_t data1, int nbit1, bool msb){  //数据发送函数定义

  irsend.enableIROut(ZBPL);
  irsend.sendData(Marks,One_Space,Marks,Zero_Space,data1,nbit1,msb);  //使用IRsend库里的数据发送函数,具体使用方法可以查看IRsend库里的注释
}

void if_D6(int fs){  //计算风速数据的函数

  switch(fs){
    case 0: B_2 = 0xD; D_2 = 0x66; if(Temp01 == 0){
      D_6 = 0xDC;}
      else D_6 = 0xDA;
      break;                  //auto
    case 1: B_2 = 0xF; D_2 = 0x28; if(Temp01 == 0){
      D_6 = 0x97;}
      else D_6 = 0x90;
      break; //20
    case 2: B_2 = 0x9; D_2 = 0x14; if(Temp01 == 0){
      D_6 = 0x97;}
      else D_6 = 0xB8;
      break; //40
    case 3: B_2 = 0xA; D_2 = 0x3C; if(Temp01 == 0){
      D_6 = 0x88;}
      else D_6 = 0x8C;
      break; //60
    case 4: B_2 = 0xC; D_2 = 0x0A; if(Temp01 == 0){
      D_6 = 0xA4;}
      else D_6 = 0xA2;
      break; //80
    case 5: B_2 = 0xC; D_2 = 0x26; if(Temp01 == 0){
      D_6 = 0xDC;}
      else D_6 = 0xDA;
      break; //100
  }
}
示例代码请访问个人github页面下载。
因编程水平不高,代码有写的不好的地方,不喜勿喷。
所有数据都是我使用逻辑分析仪从遥控器上面采集的,并且手动把二进制转换成十六进制,难免会有出现错误的情况,若遇到问题,请反馈给我。
对美的编码形式的问题可以参考这篇文章
https://blog.csdn.net/weixin_42204837/article/details/109263771


 1202
1202

 被折叠的 条评论
为什么被折叠?
被折叠的 条评论
为什么被折叠?
 到【灌水乐园】发言


