


安装一些刚需软件:不懂请自行查询
安装一些需要的软件命令
yum install wget vim net-tools bash* lrzsz tree nmapnc lsof telnet -y刷新命令
source /usr/share/bash-completion/bash_completionecho source /usr/share/bash-completion/bash_completion >> ~/.bashrc继续安装软件
yum -y install iptables-services && systemctl start iptables && systemctl enable iptables配置yum源 NGINX、MySQL、PHP源
添加Redhat扩展软件源
yum install epel* -y下载NGINX源安装脚本
wget http://www.atomicorp.com/installers/atomicsh ./atomicMySQL源
rpm -Uvh http://dev.mysql.com/get/mysql57-community-release-el7-9.noarch.rpmPHP源
yum install -y \
https://repo.ius.io/ius-release-el7.rpm \
https://dl.fedoraproject.org/pub/epel/epel-release-latest-7.noarch.rpm
清除旧yum缓存并重新加载
yum clean allyum makecache fastyum repolist安装NGINX
查看当前仓库是否有NGINX的软件包
yum list | grep nginx安装NGINX
yum install nginx -y启动NGINX并设置开机自启动
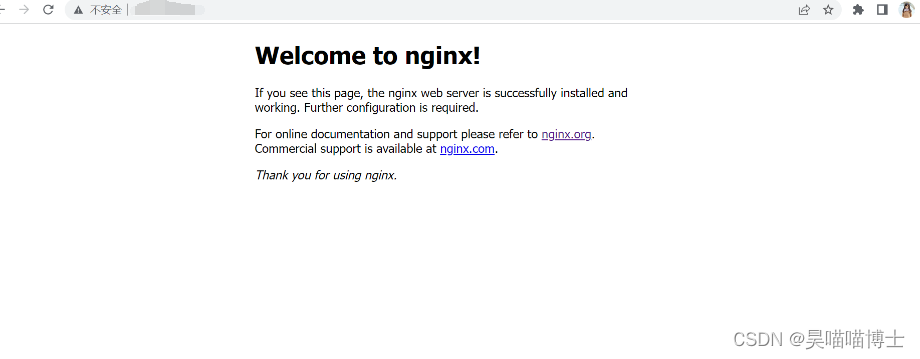
systemctl start nginx && systemctl enable nginx验证NGINX是否启动成功,出现如下图代码安装成功
如果访问不到,请前去查看防火墙(可以先尝试执行关闭防火墙之后,再去访问是否可以,如果可以说明防火墙没有配置对外开放的80端口。)关于防火墙命令请看此文章
liunx 防火墙(firewalld 和 iptables)_lunx防火墙-CSDN博客
到了这一步说明nginx已经可以访问了,请点击如下链接去安装php版本,更加详细,安装之后再回来继续下面的命令
centos7 安装php82-CSDN博客
到了这一步,需要将php和nginx关联起来,否则你无法访问php
备份NGINX配置文件(找到你安装的nginx路径)
cp -rp /etc/nginx/nginx.conf{,.bak}编辑NGINX文件
vim /etc/nginx/conf.d/default.conf
       location / {
           root   /usr/share/nginx/html;
          index index.php  index.html index.htm;# 添加index.php
      }

     # 去掉注释: 进入视图模式安装ctrl v,向下选中#,按d删除注释符
      location ~ \.php$ {
          root           html;
          fastcgi_pass   127.0.0.1:9000;
          fastcgi_index  index.php;
          fastcgi_param  SCRIPT_FILENAME  /usr/share/nginx/html$fastcgi_script_name;# 修改目录
          include        fastcgi_params;
      }
重启NGINX
systemctl restart nginx.service配置PHP(查询自己的php.ini文件,切记是你当前使用的版本的php.ini)
cp -rp /etc/opt/remi/php82/php.ini{,.bak}编辑php.ini
vim /etc/php.ini文件末尾添加
cgi.fix_pathinfo = 1重启nginx生效
systemctl restart nginx.service重启php生效
systemctl restart php82-php-fpm.service浏览器访问验证 。出现如下图,代表以上配置全部成功

安装MySQL
yum -y install mysql-community-server --nogpgcheck验证安装是否成功
mysql -V出现如下图代表mysql安装成功
![]()
启动mysql
systemctl start mysqld && systemctl enable mysqld && systemctl daemon-reload查看当前密码
grep 'temporary password' /var/log/mysqld.log出现如下图,密码

执行
mysql_secure_installation出现如下图步骤
Enter password for user root:	# 输入:%l/fqdPU*12O
New password: 		# 输入两次新密码

Re-enter new password: 	# 输入两次新密码

Change the password for root ? ((Press y|Y for Yes, any other key for No) : yes	# 是否修改当前的密码

Do you wish to continue with the password provided?(Press y|Y for Yes, any other key for No) : no # 是否使用提供的密码

Remove anonymous users? (Press y|Y for Yes, any other key for No) : yes	# 是否移除匿名用户

Disallow root login remotely? (Press y|Y for Yes, any other key for No) : no	# 不允许root用户远程登录

Remove test database and access to it? (Press y|Y for Yes, any other key for No) : yes	# 删除测试数据库

Reload privilege tables now? (Press y|Y for Yes, any other key for No) : yes	# 是否立刻刷新权限列表
设置MySQL字符串列表
$ vim /etc/my.cnf
[mysqld]
character-set-server=utf8

[client]
default-character-set=utf8

# 重启MySQL
systemctl start mysqld && systemctl enable mysqld && systemctl daemon-reload

# 开启MySQL的root用户远程连接
$ mysql -uroot -p
$ GRANT ALL PRIVILEGES ON *.* TO 'root'@'%' IDENTIFIED BY 'Admin@123' WITH GRANT OPTION;
$ FLUSH PRIVILEGES;


 379
379


 被折叠的 条评论
为什么被折叠?
被折叠的 条评论
为什么被折叠?
 到【灌水乐园】发言


