


Linux环境MySQL、Hive、Sqoop安装(不全)
环境
CentOS7 2009
MySQL 5.7.28
Hive 3.1.2
Sqoop 1.4.6
说在前面
本文档为本人笔记备份,有很多缺失、错误,如有疏漏请指出,见谅
Mysql安装
1. 检查环境
rpm -qa | grep mariadb
|管道符 左边的输入是右边的输出
如果上述命令返回有结果,那么进行mariadb的卸载
rpm -e --nodeps mariadb-libs
2. 解压安装包
tar -xf mysql-5.7.28-1.el7.x86_64.rpm-bundle.tar
3. 进行rpm安装
-
安装commin包
rpm -ivh mysql-community-common-5.7.28-1.el7.x86_64.rpm -
安装libs包
rpm -ivh mysql-community-libs-5.7.28-1.el7.x86_64.rpm --nodeps --force -
安装libs-compat包
rpm -ivh mysql-community-libs-compat-5.7.28-1.el7.x86_64.rpm -
安装client包
rpm -ivh mysql-community-client-5.7.28-1.el7.x86_64.rpm -
安装server包
rpm -ivh mysql-community-server-5.7.28-1.el7.x86_64.rpm --nodeps --force删除当前目录下的所有文件、目录
rm -rf ./*
4. 初始化mysql
mysqld --initialize --user=mysql
-
查看临时密码
cat /var/log/mysqld.log
eNIO1;JPf:5K
5. 启动mysql
systemctl start mysqld
-
查询mysql状态
systemctl status mysqld -
关闭mysql
systemctl stop mysqld
6. 使用root用户登录mysql
mysql -uroot -p
eNIO1;JPf:5K
7. 修改root用户密码为123456
set password=password("123456");
8. 修改root用户访问的IP限制
-
查询root用户的ip限制
select host from mysql.user where user='root' -
修改host权限
update mysql.user set host='%' where user='root'; -
刷新权限
flush privileages;
HIVE安装
1. 解压移动安装包
mv ./apache-hive-3.1.2-bin/* /opt/softs/hive3.1.2/
2. 配置环境变量
vim /etc/profile
#HIVE_HOME
export HIVE_HOME=/opt/softs/hive3.1.2/
export PATH=$PATH:$HIVE_HOME/bin
3. 处理添加jar包依赖
-
mysql连接包,添加到/opt/softs/hive3.1.2/lib下
-
修改log4j日志依赖
mv log4j-slf4j-impl-2.10.0.jar log4j-slf4j-impl-2.10.0.jar.bak -
修改guava版本
cd $HADOOP_HOME/share/hadoop/common/lib
cp guava-27.0-jre.jar /opt/softs/hive3.1.2/lib/
# 修改旧版本为bak
mv guava-19.0.jar guava-19.0.jar.bak
4. 配置文件
-
hive-site.xml
<configuration> <property> <!-- jdbc 连接的 URL hostname根据实际进行修改 --> <name>javax.jdo.option.ConnectionURL</name> <value>jdbc:mysql://bigdata01:3306/hive?createDatabaseIfNotExist=true&useSSL=false&useUnicode=true&characterEncoding=UTF-8</value> </property> <!-- jdbc 连接的 Driver--> <property> <name>javax.jdo.option.ConnectionDriverName</name> <value>com.mysql.jdbc.Driver</value> </property> <!-- jdbc 连接的 username--> <property> <name>javax.jdo.option.ConnectionUserName</name> <value>root</value> </property> <!-- jdbc 连接的 password root密码根据实际修改--> <property> <name>javax.jdo.option.ConnectionPassword</name> <value>123456</value> </property> <!-- Hive 默认在 HDFS 的工作目录 --> <property> <name>hive.metastore.warehouse.dir</name> <value>/user/hive/warehouse</value> </property> <!-- 指定 hiveserver2 连接的 host hive的安装host根据实际进行修改 --> <property> <name>hive.server2.thrift.bind.host</name> <value>bigdata01</value> </property> <!-- 指定 hiveserver2 连接的端口号 --> <property> <name>hive.server2.thrift.port</name> <value>10000</value> </property> <!-- yarn作业获取到的hiveserver2用户都为hive用户 --> <property> <name>hive.server2.enable.doAs</name> <value>false</value> </property> <!-- hiveserver2的高可用参数,开启此参数可以提高hiveserver2的启动速度 --> <property> <name>hive.server2.active.passive.ha.enable</name> <value>true</value> </property> </configuration> -
修改hadoop的core-site.x
<!-- 安装hive时 在hadoop中core-site.xml中添加如下配置 --> <!-- 从任何主机登录的root用户可以伪装成一个属于任何group的用户 --> <property> <name>hadoop.proxyuser.root.hosts</name> <value>*</value> </property> <property> <name>hadoop.proxyuser.root.groups</name> <value>*</value> </property> ` 传输到另外两台 ```shell scp core-site.xml root@bigdata02:/opt/softs/hadoop3.1.3/etc/hadoop/ -
初始化hive的元数据
schematool -dbType mysql -initSchema -
查看hive日志
tail -500f /tmp/root/hive.log
Hive相关命令
1. 启动方式
-
使用hive命令
hive -
使用hiveserver2
- 首先使用hiveserver2命令
cd $HIVE_HOME/bin hiveserver2- 新开一个窗口,执行beeline命令
beeline -u jdbc:hive2://bigdata01:10000 -root -
进阶启动
nohup hiveserver2 1>/opt/softs/hive3.1.2/log/hive.log 2>/opt/softs/hive3.1.2/log/hive_err.log & beeline -u jdbc:hive2://bigdata01:10000 -rootnohup:放置在命令开头,表示命令不挂起,关闭窗口也会保持服务运行1:表示标准日志输出2:表示错误日志输出&:表示命令在后台运行,不占用窗口的显示
2. Hive命令
-
命令行模式
1.1 hive命令行
# 打印hive命令的参数信息
hive -H
# 执行简单的sql语句 hive -e "show databases;"# 执行文件中的sql语句 hive -f /opt/sql/sqltest.sql# 在hive命令中新建hive键值对变量 hive --hivevar mykey="myvalue"1.2 beeline命令行
首先需要启动hiveserver2
# 执行简单的sql语句
beeline -u jdbc:hive2://bigdata01:10000 -root -e "show databases";
# 执行文件中的sql语句 beeline -u jdbc:hive2://bigdata01:10000 -root -f /opt/sql/sqltest.sql# 在beeline命令中新建hive键值对变量 beeline -u jdbc:hive2://bigdata01:10000 -root --hivevar mykey="myvalue" -
交互模式
2.1 beeline交互模式
# 查询所有数据库
show databases;
# 调用函数 # 查询当前所在的数据库 select current_database();# 执行hdfs命令 # 查询hdfs根路径 dfs -ls /;# 执行文件中的sql语句 source /opt/sql/sqltest.sql;# 在当前session种去除INPO信息 set hive.server2/logging.operation.level=NONE;
Hive参数设置
# 在beeline或者hive命令行中执行set命令
# 查看当前hive的所有参数
set;

# 查询具体的参数
set mapred.reduce.tasks;

# 对具体的参数值进行设置
set mapred.reduce.tasks=10;

# 设置参数的作用域
set > hive-site.xml > hive-default.xml
Hive表相关操作
默认内部表存储路径:/user/hive/warehouse
通用建表语句
CREATE [EXTERNAL] TABLE [IF NOT EXISTS] table_name
  [(col_name data_type [COMMENT COL_COMMENT],.....)]
  [COMMENT table_comment]
  [PARTITIONED BY (col_name data_type [COMMENT col_comment],....)]
  [CLUSTERED BY (col_name,col_name,....)]
  [SORTED BY (col_name [ASC|DESC],...)] INFO num_buckets BUCKETS]
  [ROW FORMAT DELIMITED FIELDS TERMINATED BY ',']
  [STORED AS file_format]
  [LOCATION hdfs_path]
1. 内部表
1.1 创建内部表
# 可以不做这步,但要确保建表时指定了数据库名
use test
create table if not exists test.emp1(
    emp_id int,
    emp_name string,
    department_id int
)
stored as textfile
;
hive下没法执行这样多条语句,所以我们通过执行sql文件来创建。
cd /opt/sql
vim create_emp1.sql
# 将上面的语句粘贴进去
在beeline命令行中执行sql文件
source /opt/sql/create_emp1.sql;
查看表是否在数据库里
show tables;
查询表的建表信息
show create table test.emp1;
查看表的类型信息
desc formatted test.emp1;
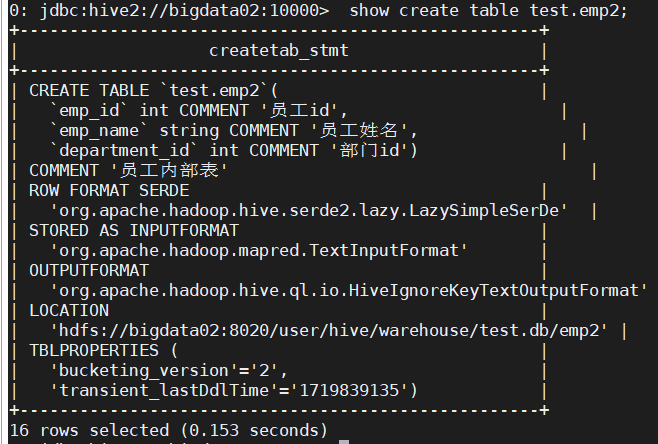
1.2 创建带注释的内部表emp2
create table if not exists test.emp2(
    emp_id int comment "员工id",
    emp_name string comment "员工姓名",
    department_id int comment "部门id"
)
comment "员工内部表"
stored as textfile
;
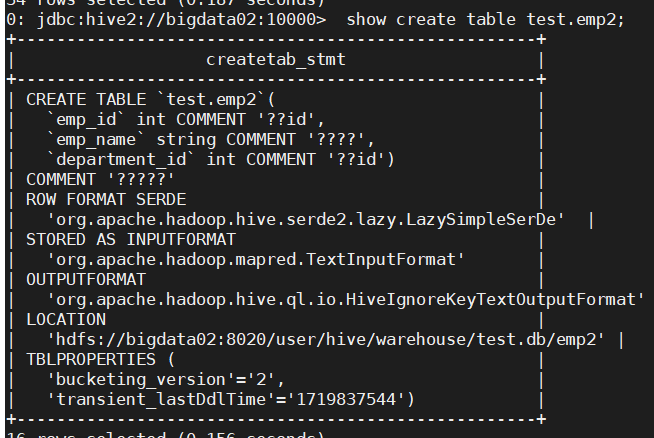
查看建表信息后发现中文注释部分是?,所以要调整编码格式
调整MySQL中Hive的编码格式
可以在navicat连接虚拟机mysql后执行以下语句
##1.登录mysql 执行如下命令 然后重启mysql
#修改字段注释字符集
alter table hive.COLUMNS_V2 modify column COMMENT varchar(256) character set utf8;
#修改表注释字符集
alter table hive.TABLE_PARAMS modify column PARAM_VALUE varchar(20000) character set utf8;
#修改分区参数,支持分区建用中文表示
alter table hive.PARTITION_PARAMS modify column PARAM_VALUE varchar(20000) character set utf8;
alter table hive.PARTITION_KEYS modify column PKEY_COMMENT varchar(20000) character set utf8;
##2. 在hive-site.xml配置文件中修改如下配置(提前配置好了不用改)
<property>
<name>javax.jdo.option.ConnectionURL</name>
<value>jdbc:mysql://bigdata01:3306/hive?createDatabaseIfNotExist=true&useSSL=false&useUnicode=true&characterEncoding=UTF-8</value>
<description>JDBC connect string for a JDBC metastore</description>
</property>
成功后重启mysql
systemctl restart mysqld
先前的emp2表注释部分改不回来了,需要删表重建
drop table test.emp2;
重新建表,重新查看emp2表建表信息
1.3 创建指定列分隔符的员工内部表emp3
create table if not exists test.emp3(
    emp_id int comment "员工id",
    emp_name string comment "员工姓名",
    department_id int comment "部门id"
)
comment "员工内部表"
row format delimited fields terminated by ','
stored as textfile
;
# 查看建表信息
show create table test.emp3;
# 查看emp3表类型信息
desc formatted test.emp3;
2. 外部表
external
2.1 创建部门外部表
create external table if not exists test.dept(
	dept_id int comment "部门id",
	dept_name string comment "部门名称"
)
comment "部门外部表"
row format delimited fields terminated by ','
stored as textfile
location "/hive_external_table/test.db/dept"
;
同时会在hdfs创建location指定的路径文件夹
外部表的数据和表是相互独立的
3. 分区表
partitioned
3.1 创建销售静态分区表
create external table if not exists test.sale_static(
	sale_id int comment "销售id",
	goods_id int comment "商品id",
	sale_count int comment "销售数量"
)
comment "销售静态分区表"
partitioned by(year string, month string, day string)
row format delimited fields terminated by ','
stored as textfile
;
3.2 创建销售动态分区表
create external table if not exists test.sale_dynamic(
	sale_id int comment "销售id",
	goods_id int comment "商品id",
	sale_count int comment "销售数量"
)
comment "销售动态分区表"
partitioned by(year string, month string, day string)
row format delimited fields terminated by ','
stored as textfile
;
数据加载
通用的数据加载命令
load data [local] inpath '数据文件路径' [overwrite] into table dbname.tablename
[partition(分区字段1=分区值1,分区字段2=分区值2...)];
外部表加载数据
-
使用load data命令(本地源数据会消失,本质是移动数据文件)
-
将数据直接上传到外部表在hdfs上的路径
hdfs dfs -put /opt/file/init_dept_data.txt /hive_external_table/test.db/dept
静态分区表加载数据
# 追加模式 数据文件保存在Linux文件系统中,若存在于hdfs,去掉`local`
load data local inpath '/opt/file/init_sale_static_data.txt' into table test.sale_static partition(year='2024',month='07',day='01');

# 重写模式
load data local inpath '/opt/file/init_sale_static_data.txt' overwrite into table test.sale_static partition(year='2024',month='07',day='02');
动态分区表加载数据
-
创建一张前置表
create external table if not exists test.sale_pre( sale_id int comment "销售id", goods_id int comment "商品id", sale_count int comment "销售数量", year string comment "年", month string comment "月", day string comment "日" ) comment "销售前置表,用于向动态分区表插入数据" row format delimited fields terminated by ',' stored as textfile ; -
向前置表中加载数据
load data local inpath '/opt/file/init_sale_pre_data.txt' overwrite into table test.sale_pre; -
将前置表中的数据插入到动态分区表中
-- true: 开启动态分区 false: 关闭动态分区
set hive.exec.dynamic.partition=true;

-- strict;表示严格模式(插入分区表时必须指定静态分区) nonstrict: 非严格模式(插入分区表时不需要指定静态分区)
set hive.exec.dynamic.partition.mode=nonstrict;
使用insert语句将将前置表中的数据插入到动态分区表中
set hive.exec.dynamic.partition=true;
set hive.exec.dynamic.partition.mode=nonstrict;
insert into table test.sale_dynamic partition(year, month, day)
select
	sale_id,
	goods_id,
	sale_count,
	year as year,
	month,
	day
from test.sale_pre;
Hive内置函数
-
查询Hive的内置函数列表
show functions; -
查询具体函数的使用描述
desc function extended (函数名)
1. 字符串函数
1.1 字符串的拆分:split()
select split('hello,java;hi,bigdata','[,;]');
-
获取拆分后的元素
-- 通过索引获取对应元素,从0开始
select split('hello,java;hi,bigdata','[,;]')[0];
1.2 字符串的拼接:concat()
select concat('abc','def','opq');
-
根据指定的分隔符拼接字符串:concat_ws()
-- concat_ws(string seq,string str1,string str2 ... string strN)

select concat_ws('.','www','baidu','com');
1.3 字符串的截取:substr()
-- 字符串的起始索引位置为1,从索引位置为5的字符开始截取,截取到字符串的结尾
select substr('facebook',5); -- book

-- 起始索引位置为负数,表示从字符串的末尾位置开始向前找到截取索引位置绝对值的索引位置开始截取
select substr('facebook',-5); -- ebook

select substr('facebook',5,2); -- bo

-- substring()函数的使用和substr()函数一致
1.4 查询指定字符串出现的位置:instr()
-- int instr(string str,string substr):在字符串str中查找substr字符串首次出现的索引位置,不存在则返回0

select instr('facebook', 'b') -- 5
select instr('facebook', 'u') -- 0
1.5 获取字符串的长度:length()
select length('facebook');
1.6 将字符串中的小写字母转换成大写:upper()
select upper('facebook');
1.7 将字符串中的大写字母转换成小写:lower()
select lower('FACEBOOK');
1.8 去除字符串中的空格:trim()
-- 能够去除字符串左右的空格
-- 无法去除字符串间的空格
select trim('    face    book    ');

-- ltrim():去除字符串左侧的空格
-- rtrim():去除字符串右侧的空格
1.9 对字符串及逆行替换:regexp_replace()
-- string regexp_replace(string str,string regex,strign replacestr)
-- 将字符串str符合正则表达式的字符串替换为replacestr

select regexp_replace('foobar','oo|ar',''); -- fb
select regexp_replace('foobar','oo','ee'); -- feebar
1.10 对于json字符串进行元素提取:get_json_object()
{"name": "BeJson", "age": 18}

-- string get_json_object('{"name": "BeJson", "age": 18}', '$.json体中的key');

select get_json_object('{"name": "BeJson", "age": 18}', '$.name');
2. 类型转换函数:cast()
-- newtype cast(attr as newtype):将字段attr转换成newtype
-- 将字符串'1'转成double类型
select cast('1' as double);
3. 数值函数
3.1 对浮点数进行四舍五入:round()
-- 根据浮点数中的小数第一位进行四舍五入,返回一个整数
select round(12.3456); -- 12
select round(12.789); -- 13
3.2 对浮点数进行向下取整:floor()
select floor(1.1); -- 1
select floor(1.9); -- 1
select floor(-1.9); -- -2
select floor(-1.1); -- -2
3.3 对浮点数进行向上取整:ceil()
select floor(1.1); -- 2
select floor(1.9); -- 2
select floor(-1.9); -- -1
select floor(-1.1); -- -1
3.4 获取数值的绝对值:abs()
select abs(-1.1); -- 1.1
3.5 获取一个随机数:rand()
-- 获取一个0-1之间的浮点随机数
select rand();
-- 输入一个种子数,如果中子数固定,则获取的浮点随机数也是固定的
select rand(10);
4. 聚合函数
sum()
count()
max()
min()
avg()
Hive自定义函数注册
1. 上传jar包到/opt/jar目录下
2. 在beeline或者hive命令行中添加jar包
# add jar jar包路径
add jar /opt/jar/hive_udf_function-1.0-SNAPSHOT.jar;
3. 进行自定义函数的注册
3.1 临时注册
- 当前session有效
- 对于所有的数据库都可用
# create temporary function 自定义函数 as '自定义函数的全包路径'

create temporary function MyUDF as 'com.edu.just.hive.function.udf.MyUDF';
create temporary function MyUDTF as 'com.edu.just.hive.function.udtf.MyUDTF';
create temporary function MyUDAF as 'com.edu.just.hive.function.udaf.MyUDAF';

# 调用自定义函数
select MyUDF('abcdefg');
select MyUDTF('1:a;2:b;3:c')
select MyUDAF(score) from school.score_info
3.2 永久注册
-
只能在当前数据库使用,切换数据库会报错
# 在hdfs上创建目录 hdfs dfs -mkdir /hive_function_jar # 赋权 hdfs dfs -chmod 777 /hive_function_jar # 上传jar包 hdfs dfs -put /opt/jar/hive_udf_function-1.0-SNAPSHOT.jar /hive_function_jar # 切换到要注册永久函数的数据库 use school; # 注册永久函数的命令 # create function 自定义函数名 as '自定义函数的全包路径' using jar 'jar在hdfs上的路径'; create function MyUDAF as 'com.edu.just.hive.function.udaf.MyUDAF' using jar 'hdfs:///hive_function_jar/hive_udf_function-1.0-SNAPSHOT.jar'; -
删除永久函数
drop function MyUDAF;
3.3 作业
-
定义UDF函数,判断传入的int类型的值是奇还是偶 奇数返回1 偶数返回2
public class EvenOrOddUDF extends UDF {

    public int evaluate(int inputInt) {
        return inputInt % 2 == 0 ? 2 : 1;
    }
}
create function EvenOrOddUDF as 'com.edu.just.hive.function.udf.EvenOrOddUDF' using jar 'hdfs:///hive_function_jar/hive_udf_function-1.0-SNAPSHOT.jar';
-
定义UDF函数,判断传入的int类型的数字是否是水仙花数(每个位上的数字的 n 次幂之和等于它本身), 如果是水仙花数 返回true 否则返回false
public class NarcissisticNumUDF extends UDF {

    public boolean evaluate(int inputInt) {
        if (inputInt < 10) {
            return false;
        }

        int sum = 0;
        String inputStr = Integer.toString(inputInt);
        int length = inputStr.length();

        for (char digit : inputStr.toCharArray()) {
            int digitInt = Integer.parseInt(digit + "");
            sum += (int) Math.pow(digitInt, length);
        }
        return sum == inputInt;
    }
}
create function NarcissisticNumUDF as 'com.edu.just.hive.function.udf.NarcissisticNumUDF' using jar 'hdfs:///hive_function_jar/hive_udf_function-1.0-SNAPSHOT.jar';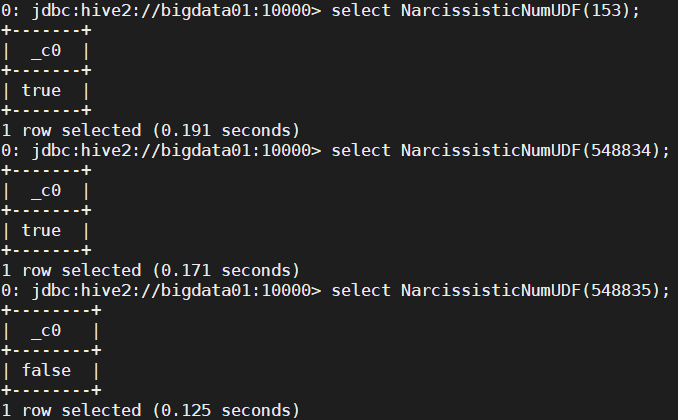
sqoop安装
#解压完重命名、移动

vim /etc/profile

# 环境变量添加以下内容

#SQOOP_HOME
export SQOOP_HOME=/opt/softs/sqoop1.4.6/
export PATH=$PATH:$SQOOP_HOME/bin

# 配置文件
cd /opt/softs/sqoop1.4.6/conf
mv sqoop-env-template.sh sqoop-env.sh
vim sqoop-env.sh

# 添加以下
export HADOOP_COMMON_HOME=/opt/softs/hadoop3.1.3
export HADOOP_MAPRED_HOME=/opt/softs/hadoop3.1.3
export HIVE_HOME=/opt/softs/hive3.1.2

#将mysql驱动包复制进lib目录下
检测是否安装完成
sqoop help
检测是否能连接mysql
cd $SQOOP_HOME/bin
sqoop list-databases --connect jdbc:mysql://bigdata01:3306/ --username root --password 12346
sqoop导入数据
(修改hive表分隔符)
ALTER TABLE table_name SET SERDEPROPERTIES ('field.delim' = ',' , 'serialization.format'=',');
sqoop import \
--connect jdbc:mysql://bigdata01:3306/mall \
--username root \
--password 123456 \
--table t_user_info \
--num-mappers 1 \
--hive-import \
--fields-terminated-by "," \
--hive-overwrite \
--hive-table mall_bigdata.ods_user_info

sqoop import \
--connect jdbc:mysql://bigdata01:3306/mall \
--username root \
--password 123456 \
--table t_access_log \
--num-mappers 1 \
--hive-import \
--fields-terminated-by '\t' \
--hive-overwrite \
--hive-table mall_bigdata.ods_access_log

sqoop import \
--connect jdbc:mysql://bigdata01:3306/ranjyaa_take_out \
--username root \
--password 123456 \
--table user \
--num-mappers 1 \
--hive-import \
--fields-terminated-by "," \
--hive-overwrite \
--hive-table ranjyaa_take_out_bigdata.ods_user_info
-- 补全用户信息表中的关于用户的所在国家名称,所在省份名称,所在城市名称

create table if not exists mall_bigdata.tmp_dwd_user_info
as
select user_id, user_name, sex, age, country_name, province_name, city_name
from (select user_id,
             user_name,
             sex,
             age,
             country_code,
             province_code,
             city_code
      from mall_bigdata.ods_user_info) t1
         left join
     (select country_code,
             country_name
      from dim_country_info) t2
     on t1.country_code = t2.country_code
         left join (select province_code,
                           province_name,
                           country_code
                    from dim_province_info) t3
                   on t1.province_code = t3.province_code and t1.country_code = t3.country_code
         left join (select city_code,
                           city_name,
                           province_code
                    from dim_city_info) t4
                   on t1.city_code = t4.city_code and t1.province_code = t4.province_code
;

-- 补全订单表的用户名称和商品名称
-- 过滤中国用户的订单记录

create table if not exists mall_bigdata.dwd_sale_order_detail
as
select sale_id,
       t1.user_id,
       user_name,
       sex,
       age,
       country_name,
       province_name,
       city_name,
       t1.goods_id,
       goods_name,
       price,
       sale_count,
       total_price,
       create_time
from (select sale_id,
             user_id,
             goods_id,
             price,
             sale_count,
             total_price,
             create_time
      from ods_sale_order) t1
         left join (select user_id,
                           user_name,
                           sex,
                           age,
                           country_name,
                           province_name,
                           city_name
                    from tmp_dwd_user_info) t2 on t1.user_id = t2.user_id
         left join (select goods_id,
                           goods_name
                    from dim_goods_info) t3 on t1.goods_id = t3.goods_id
where country_name = "中国";

-- 删除临时表
drop table if exists mall_bigdata.tmp_dwd_user_info;
-- 切换数据库
use mall_bigdata;

-- 计算不同城市的销售总额
drop table mall_bigdata.dws_sale_order_city_total;

create table if not exists mall_bigdata.dws_sale_order_city_total
as
select city_name, sum(dwd_sale_order_detail.total_price) total_price
from dwd_sale_order_detail
group by city_name
;
use mall_bigdata;

-- 提取用户浏览日志表中的商品信息,补全商品的类型
-- 再根据商品类型的不同,计算用户对于不同商品类型的浏览次数
create table if not exists mall_bigdata.dws_view_goods_type_count
as
select type_name, count(type_name) as view_goods_type_count
from (select get_json_object(ods_access_log.log_str, '$.productId') as product_id
      from mall_bigdata.ods_access_log) t1
         inner join (select goods_id,
                            type_name
                     from mall_bigdata.dim_goods_type) t2
                    on t1.product_id = t2.goods_id
group by type_name
;
sqoop导出数据
sqoop export \
--connect jdbc:mysql://bigdata01:3306/result \
--username root \
--password 123456 \
--table  t_city_sale_total \
--num-mappers 1 \
--export-dir /user/hive/warehouse/mall_bigdata.db/dws_sale_order_city_total \
--input-fields-terminated-by  "\001"
编辑mysql字符集配置
数据中包含中文,导出时是乱码,需要修改字符集
# 关闭mysql
systemctl stop mysqld

# 编辑my.conf
vim /etc/my.cnf

# 添加如下内容

[client]
default-character-set=utf8

[mysqld]
character-set-server=utf8
collation-server=utf8_general_ci

# 启动mysql
systemctl start mysqld

# 登录mysql,查看状态
mysql -uroot -p
mysql>status
(不用看)项目要求:建表初始化脚本,建表命令,hive执行脚本
7日有效订单量
order表
| 日期 | 有效订单 | 总订单 | 订单完成率 |
|---|---|---|---|
| 2024-06-07 | 7 | 19 | 36.8% |
7日用户统计
用户表
| 日期 | 新增用户 | 总用户 |
|---|---|---|
| 2024-06-07 | 1 | 10 |
7日总营业额
订单表
| 日期 | 总营业额 |
|---|---|
| 2024-06-07 | 200.0 |
7日销量排行
订单表、订单明细表
| 菜品名 | 销售量 |
|---|---|
| 回锅肉 | 10 |
最终效果:
名词解释:
一开始看到老师给的初始数据:
我都傻了,怎么这么多奇奇怪怪的前缀,一定又是我不知道的大数据相关的知识,遂百度
以下是某csdn博主的:
ODS:
数据从源表拉过来,进行etl,比如mysql 映射到hive,那么到了hive里面就是ods层。
ETL:对数据源中的数据,进行抽取、洗净、传输等操作
在源数据装入这一层时,要进行诸如去噪(例如有一条数据中人的年龄是 300 岁,这种属于异常数据,就需要提前做一些处理)、去重(例如在个人资料表中,同一 ID 却有两条重复数据,在接入的时候需要做一步去重)、字段命名规范等一系列操作。
DW:
数据仓库层(DW),是数据仓库的主体.在这里,从 ODS 层中获得的数据按照主题建立各种数据模型。这一层和维度建模会有比较深的联系。
1. DWD(Data Warehouse Detail)数据明细层
2. DWM(Data WareHouse Middle)数据中间层
3. DWS(Data WareHouse Servce)数据服务层
DIM:
相当于常量信息吧
高基数维度数据:一般是用户资料表、商品资料表类似的资料表。数据量可能是千万级或者上亿级别。
**低基数维度数据:一般是配置表,比如枚举值对应的中文含义,或者日期维表。**数据量可能是个位数或者几千几万。
比较:
- DWS:轻度汇总层,从ODS层中对用户的行为做一个初步的汇总,抽象出来一些通用的维度:时间、ip、id,并根据这些维度做一些统计值,比如用户每个时间段在不同登录ip购买的商品数等。这里做一层轻度的汇总会让计算更加的高效,在此基础上如果计算仅7天、30天、90天的行为的话会快很多。我们希望80%的业务都能通过我们的DWS层计算,而不是ODS。
- DWD:这一层主要解决一些数据质量问题和数据的完整度问题。比如用户的资料信息来自于很多不同表,而且经常出现延迟丢数据等问题,为了方便各个使用方更好的使用数据,我们可以在这一层做一个屏蔽。(汇总多个表)
- DIM:这一层比较单纯,举个例子就明白,比如国家代码和国家名、地理位置、中文名、国旗图片等信息就存在DIM层中。
- TMP:每一层的计算都会有很多临时表,专设一个DWTMP层来存储我们数据仓库的临时表。
| ------ | ------ |
| 回锅肉 | 10 |
最终效果:
[外链图片转存中…(img-cRImYnRs-1721661975687)]
名词解释:
一开始看到老师给的初始数据:
[外链图片转存中…(img-4hjoYcWG-1721661975688)]
我都傻了,怎么这么多奇奇怪怪的前缀,一定又是我不知道的大数据相关的知识,遂百度
以下是某csdn博主的:
ODS:
数据从源表拉过来,进行etl,比如mysql 映射到hive,那么到了hive里面就是ods层。
ETL:对数据源中的数据,进行抽取、洗净、传输等操作
在源数据装入这一层时,要进行诸如去噪(例如有一条数据中人的年龄是 300 岁,这种属于异常数据,就需要提前做一些处理)、去重(例如在个人资料表中,同一 ID 却有两条重复数据,在接入的时候需要做一步去重)、字段命名规范等一系列操作。
DW:
数据仓库层(DW),是数据仓库的主体.在这里,从 ODS 层中获得的数据按照主题建立各种数据模型。这一层和维度建模会有比较深的联系。
1. DWD(Data Warehouse Detail)数据明细层
2. DWM(Data WareHouse Middle)数据中间层
3. DWS(Data WareHouse Servce)数据服务层
DIM:
相当于常量信息吧
高基数维度数据:一般是用户资料表、商品资料表类似的资料表。数据量可能是千万级或者上亿级别。
**低基数维度数据:一般是配置表,比如枚举值对应的中文含义,或者日期维表。**数据量可能是个位数或者几千几万。
比较:
- DWS:轻度汇总层,从ODS层中对用户的行为做一个初步的汇总,抽象出来一些通用的维度:时间、ip、id,并根据这些维度做一些统计值,比如用户每个时间段在不同登录ip购买的商品数等。这里做一层轻度的汇总会让计算更加的高效,在此基础上如果计算仅7天、30天、90天的行为的话会快很多。我们希望80%的业务都能通过我们的DWS层计算,而不是ODS。
- DWD:这一层主要解决一些数据质量问题和数据的完整度问题。比如用户的资料信息来自于很多不同表,而且经常出现延迟丢数据等问题,为了方便各个使用方更好的使用数据,我们可以在这一层做一个屏蔽。(汇总多个表)
- DIM:这一层比较单纯,举个例子就明白,比如国家代码和国家名、地理位置、中文名、国旗图片等信息就存在DIM层中。
- TMP:每一层的计算都会有很多临时表,专设一个DWTMP层来存储我们数据仓库的临时表。
- [外链图片转存中…(img-GUMi8Hs4-1721661975688)]
[外链图片转存中…(img-tRq28ONQ-1721661975688)]


 520
520

 被折叠的 条评论
为什么被折叠?
被折叠的 条评论
为什么被折叠?
 到【灌水乐园】发言


