


1. Introduction
This document was created to give a general walkthrough of setting up an automation test environment for WebLab mobile and web applications.
2. Initial setup
2.1. Software prerequisites
IntelliJ IDEA
Java: JDK 1.8
Maven
Android SDK
Node.js
Appium
2.2. Intellij IDEA
Download Intellij IDEA and install, check if it is working properly.
Install plugins in Intellij IDEA
Cucumber for Java

2.3. Java: JDK 1.8
2.3.1. Download Java
Download JDK1.8 and install, check if it is working properly.
https://www.oracle.com/java/technologies/downloads/#java8-mac
2.4. Android studio
2.4.1. Download Android studio package from
https://developer.android.com/studio#downloads
http://www.android-studio.org/index.php/download/hisversion
2.4.2 Install studio
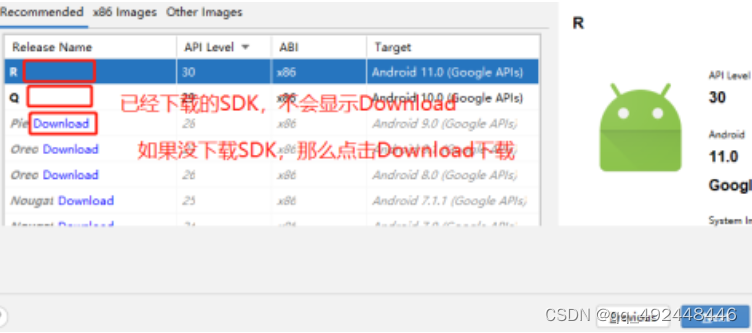
2.4.3 Install virtual device
Open studio,click the button

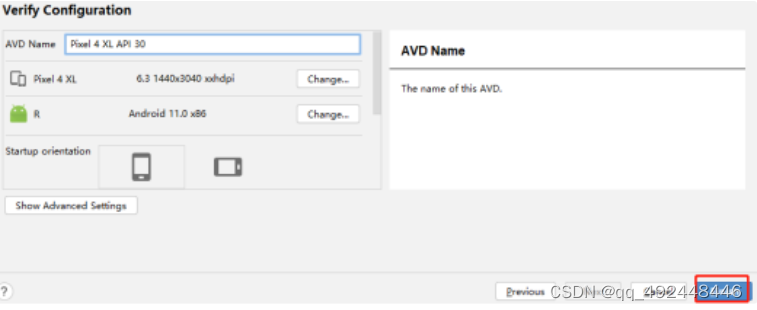
Click the button as below to create Virtual device
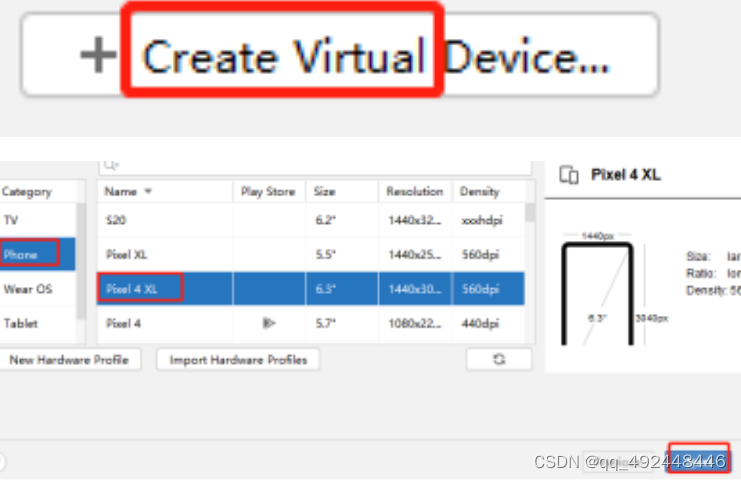
Click Finish Button
start virtual device

When virtual device start success, the Android SDK is ready

2.4.4 verify success
command——adb——Return,
adb devices
Check whether a device is connected
3. Appium Install and setup
3.1. Install node.js
Download node.js , check if it is working properly
3.2.Install Appium
Download Appium and install, check if it is working properly.
https://appium.io/downloads.html
4.Mac set environment
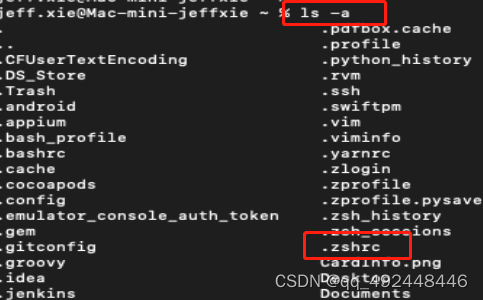
4.1 Edit enviroment file .zhsrc
vi ~/.zshrc
4.2 Enviroment content
export ANDROID_HOME=/Users/jeff.xie/Downloads/sdk
export MAVEN_HOME=/Users/jeff.xie/Documents/apache-maven-3.8.4
export JAVA_HOME=/Library/Java/JavaVirtualMachines/jdk1.8.0_311.jdk/Contents/Home
export PATH=${PATH}:$ANDROID_HOME/tools:$ANDROID_HOME/platform-tools:$ANDROID_HOME/emulator:$JAVA_HOME/bin:$MAVEN_HOME/bin
export PATH=${PATH}:${ANDROID_HOME}/platform-tools
export PATH=${PATH}:${ANDROID_HOME}/build-tools
export PATH=${PATH}:${ANDROID_HOME}/tools
export PATH=${PATH}:/Users/jeff.xie/Documents/allure-2.17.2/bin
export PATH=${PATH}:/usr/local/lib/node_modules
export PATH=${PATH}:/usr/local/lib/node_modules/appium
export PATH=${PATH}:/usr/local/lib/node_modules/appium/bin
# Add RVM to PATH for scripting. Make sure this is the last PATH variable change.
export PATH="$PATH:$HOME/.rvm/bin"
PATH="/Library/Frameworks/Python.framework/Versions/3.10/bin:${PATH}"
export PATH
alias python="/Library/Frameworks/Python.framework/Versions/3.10/bin/python3.10
4.Git install
brew install git
git -version

5. Maven
Download Maven and set environment variable
https://maven.apache.org/download.cgi
Donwloand Maven and Allure from sharepoint
搭建IOS自动化
1.macOS相关库安装
Mac电脑如何快速安装Homebrew
/bin/zsh -c "$(curl -fsSL https://gitee.com/cunkai/HomebrewCN/raw/master/Homebrew.sh)"
安装libimobiledevice
brew install libimobiledevice
使用本机与苹果iOS设备的服务进行通信的库。
安装ideviceinstaller
brew install ideviceinstaller
获取设备udid、安装app、卸载app、获取bundleid
安装carthage
brew install carthage
第三方库管理工具。
安装ios-deploy
brew install ios-deploy
ios-deploy 不依赖于XCODE,进行安装和调试IOS应用程序。
安装node & npm
brew install node
brew install npm
sudo npm install -g cnpm --registry=https://registry.npm.taobao.org
appium-doctor
npm install -g appium-doctor
验证appium环境
appium-doctor
2.XCode
Xcode 是iOS开发环境,可以到app store 下载安装。
3.配置WebDriverAgent
1)打开xcode,并且在xcode路径中打开WebDriverAgent, 其路径如下所示,下载xcode后就会有这个路径,有可能这个路径是在/user/jeff.xie/document路径下
/Users/jeff.xie/node_modules/appium/node_modules/appium-webdriveragent/WebDriverAgentRunner
创建账户如下图所示,并配置相关信息
配置账户
配置手机版本
配置 welab bank app bundle ID: welab.bank.mobile.stage
配置完成后,需要进行build
build之后需要执行product > Test
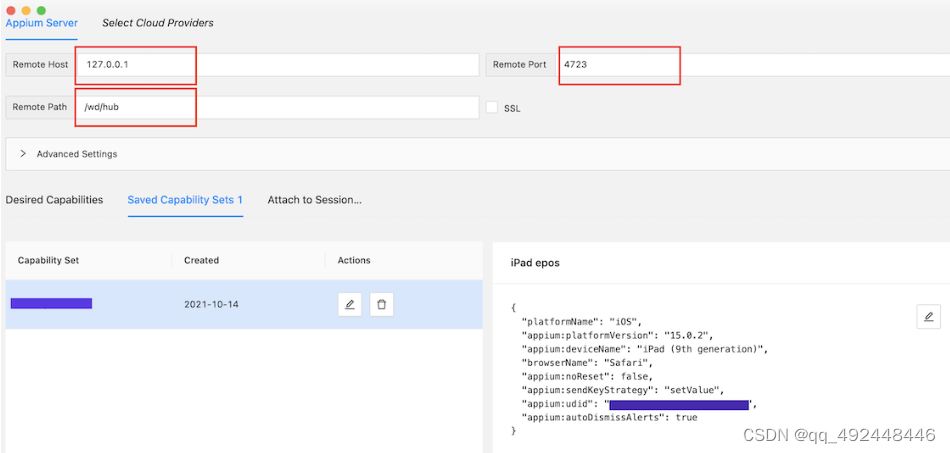
最后打appium-desktop,启动appium server,然后在Appium Inspector配置手机信息,启动后就可以开始定位元素
{
"platformName": "iOS",
"appium:platformVersion": "14.6",
"appium:deviceName": "iPhone Jeff",
"appium: bundleId": "welab.bank.mobile.stage",
"appium:automationName": "XCUITest",
"appium:udid": "00008030-000A09C81A43802E"
}
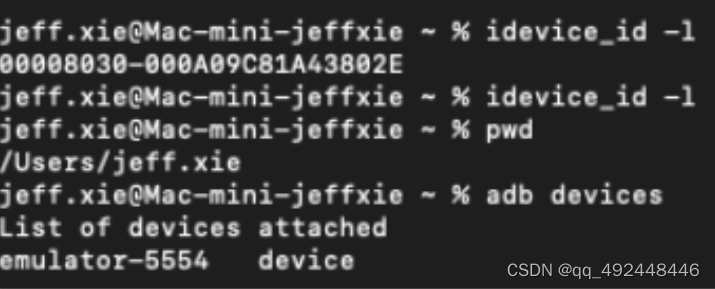
查看手机的udid,查看android模拟器的name


 3208
3208


 被折叠的 条评论
为什么被折叠?
被折叠的 条评论
为什么被折叠?
 到【灌水乐园】发言


