


demo.gif
如图,这个动画的是如何做的呢?
分析:
- 1.环形进度指示器,根据下载进度来更新它
- 2.扩展环,向内向外扩展这个环,中间扩展的时候,去掉这个遮盖
一.环形进度指示器
1.自定义View继承UIView,命名为CircularLoaderView.swift,此View将用来保存动画的代码
2.创建CAShapeLayer
let circlePathLayer = CAShapeLayer()
let circleRadius: CGFloat = 20.03.初始化CAShapeLayer
    // 两个初始化方法都调用configure方法
    override init(frame: CGRect) {
        super.init(frame: frame)
        configure()
    }

    required init?(coder aDecoder: NSCoder) {
        super.init(coder : aDecoder)
        configure()
    }


    // 初始化代码来配置这个shape layer:
    func configure(){
        circlePathLayer.frame = bounds;
        circlePathLayer.lineWidth = 2.0
        circlePathLayer.fillColor = UIColor.clearColor().CGColor
        circlePathLayer.strokeColor = UIColor.redColor().CGColor
        layer.addSublayer(circlePathLayer)
        backgroundColor = UIColor.whiteColor()
        // 初始化属性,后面用来监听图片下载进度
        progress = 0.0
    }
4.设置环形进度条的矩形frame
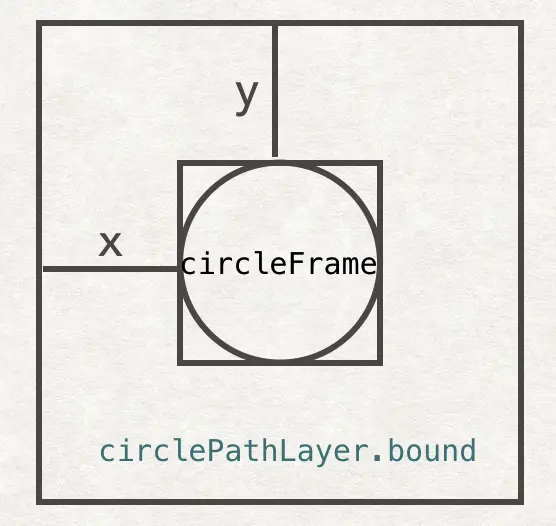
    // 小矩形的frame
    func circleFrame() -> CGRect {
        var circleFrame = CGRect(x: 0, y: 0, width: 2*circleRadius, height: 2*circleRadius)
        circleFrame.origin.x = CGRectGetMidX(circlePathLayer.bounds) - CGRectGetMidX(circleFrame)
        circleFrame.origin.y = CGRectGetMidY(circlePathLayer.bounds) - CGRectGetMidY(circleFrame)
        return circleFrame
}可以参考下图,理解这个circleFrame
Snip20160705_3.png
5.每次自定义的这个view的size改变时,你都需要重新计算circleFrame,所以要将它放在一个独立的方法,方便调用
// 通过一个矩形(正方形)绘制椭圆(圆形)路径
func circlePath() -> UIBezierPath {
    return UIBezierPath(ovalInRect: circleFrame())
}
6.由于layers没有autoresizingMask这个属性,你需要在layoutSubviews方法中更新circlePathLayer的frame来恰当地响应view的size变化
override func layoutSubviews() {
    super.layoutSubviews()

    circlePathLayer.frame = bounds
    circlePathLayer.path = circlePath().CGPath
}7.给CircularLoaderView.swift文件添加一个CGFloat类型属性,自定义的setter和getter方法,setter方法验证输入值要在0到1之间,然后赋值给layer的strokeEnd属性。
var progress : CGFloat{
    get{
        return circlePathLayer.strokeEnd
    }

    set{
        if (newValue > 1) {
            circlePathLayer.strokeEnd = 1
        }else if(newValue < 0){
            circlePathLayer.strokeEnd = 0
        }else{
            circlePathLayer.strokeEnd = newValue
        }
    }
}8.利用SDWebImage,在image下载回调方法中更新progress.
此处是自定义ImageView,在storyboard中拖个ImageView,设置为自定义的ImageView类型,在这个ImageView初始化的时候就会调用下面的代码
class CustomImageView: UIImageView {

    // 创建一个实例对象
    let progressIndicatorView = CircularLoaderView(frame: CGRectZero)

    required init?(coder aDecoder: NSCoder) {
        super.init(coder: aDecoder)

        addSubview(progressIndicatorView)
        progressIndicatorView.frame = bounds

        // 注意写法
        progressIndicatorView.autoresizingMask = [.FlexibleWidth , .FlexibleHeight]

        let url = NSURL(string: "http://www.raywenderlich.com/wp-content/uploads/2015/02/mac-glasses.jpeg")

        // 注意到block使用weak self引用 – 这样能够避免retain cycle
        self.sd_setImageWithURL(url, placeholderImage: nil, options: .CacheMemoryOnly, progress: { [weak self](reseivdSize, expectedSize) -> Void in
            self!.progressIndicatorView.progress = CGFloat(reseivdSize) / CGFloat(expectedSize)

            }) { [weak self](image, error, _, _) -> Void in
            // 下载完毕后,执行的动画
            self?.progressIndicatorView.reveal()
        }
    }
}
二.扩展这个环
仔细看,此处是两个动画一起执行,1是向外扩展2.是向内扩展.但可以用一个Bezier path完成此动画,需要用到组动画.
- 1.增加圆的半径(path属性)来向外扩展
- 2.同时增加line的宽度(lineWidth属性)来使环更加厚和向内扩展
func reveal() {
    // 背景透明,那么藏着后面的imageView将显示出来
    backgroundColor = UIColor.clearColor()
    progress = 1.0

    // 移除隐式动画,否则干扰reveal animation
    circlePathLayer.removeAnimationForKey("strokenEnd")

    // 从它的superLayer 移除circlePathLayer ,然后赋值给super的layer mask
    circlePathLayer.removeFromSuperlayer()
    // 通过这个这个circlePathLayer 的mask hole动画 ,image 逐渐可见
    superview?.layer.mask = circlePathLayer

    // 1 求出最终形状
    let center = CGPoint(x:CGRectGetMidX(bounds),y: CGRectGetMidY(bounds))
    let finalRadius = sqrt((center.x*center.x) + (center.y*center.y))
    let radiusInset = finalRadius - circleRadius
    let outerRect = CGRectInset(circleFrame(), -radiusInset, -radiusInset)
    // CAShapeLayer mask最终形状
    let toPath = UIBezierPath(ovalInRect: outerRect).CGPath


    // 2 初始值
    let fromPath = circlePathLayer.path
    let fromLineWidth = circlePathLayer.lineWidth

    // 3 最终值
    CATransaction.begin()
    // 防止动画完成跳回原始值
    CATransaction.setValue(kCFBooleanTrue, forKey: kCATransactionDisableActions)
    circlePathLayer.lineWidth = 2 * finalRadius
    circlePathLayer.path = toPath
    CATransaction.commit()

    // 4 路径动画,lineWidth动画
    let lineWidthAnimation = CABasicAnimation(keyPath: "lineWidth")
    lineWidthAnimation.fromValue = fromLineWidth
    lineWidthAnimation.toValue = 2*finalRadius
    let pathAnimation = CABasicAnimation(keyPath: "path")
    pathAnimation.fromValue = fromPath
    pathAnimation.toValue = toPath

    // 5 组动画
    let groupAnimation = CAAnimationGroup()
    groupAnimation.duration = 1
    groupAnimation.timingFunction = CAMediaTimingFunction(name: kCAMediaTimingFunctionEaseInEaseOut)
    groupAnimation.animations = [pathAnimation ,lineWidthAnimation]
    groupAnimation.delegate = self
    circlePathLayer.addAnimation(groupAnimation, forKey: "strokeWidth")
}
photo-loading-diagram.png
三.监听动画的结束
// 移除mask
override func animationDidStop(anim: CAAnimation, finished flag: Bool) {
    superview?.layer.mask = nil;
}示例下载地址github
原文地址 Rounak Jain
参考地址
文/船长_(简书作者)
原文链接:http://www.jianshu.com/p/a9d7e39c7312
著作权归作者所有,转载请联系作者获得授权,并标注“简书作者”。
原文链接:http://www.jianshu.com/p/a9d7e39c7312
著作权归作者所有,转载请联系作者获得授权,并标注“简书作者”。


 3385
3385


 被折叠的 条评论
为什么被折叠?
被折叠的 条评论
为什么被折叠?
 到【灌水乐园】发言


