目录
1、搭建环境
1.1、依赖
省略了mysql mybatis等依赖包
<!--shiro 整合spring-->
<dependency>
    <groupId>org.apache.shiro</groupId>
    <artifactId>shiro-spring</artifactId>
    <version>1.7.1</version>
</dependency>
<!--log4j-->
<dependency>
    <groupId>log4j</groupId>
    <artifactId>log4j</artifactId>
    <version>1.2.17</version>
</dependency>
<!--shiro-thymeleaf整合-->
<dependency>
    <groupId>com.github.theborakompanioni</groupId>
    <artifactId>thymeleaf-extras-shiro</artifactId>
    <version>2.0.0</version>
</dependency>
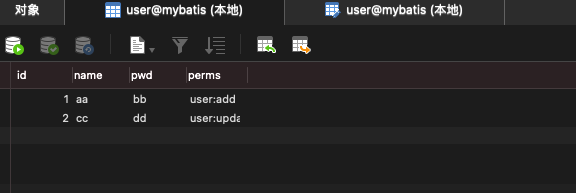
1.2、创建mysql数据库

1.3、创建实体类映射类
@Data
@AllArgsConstructor
@NoArgsConstructor
public class User {

    private int id;
    private String name;
    private String pwd;
    private String perms;

}
2、基础配置
2.1、编写配置文件
@Configuration
public class ShiroConfig {

    /*整合ShiroDialect 用来整合Thymeleaf*/
    @Bean
    public ShiroDialect getShiroDialect(){
        return new ShiroDialect();
    }

    //1.创建realm对象 1
    @Bean
    public UserRealm userRealm() {
        return new UserRealm();
    }

    //2.DafaultWebSecurityManager
    @Bean
    public DefaultWebSecurityManager getDefaultWebSecurityManager(@Qualifier("userRealm") UserRealm userRealm) {
        DefaultWebSecurityManager defaultWebSecurityManager = new DefaultWebSecurityManager();
        //关联UserRealm
        defaultWebSecurityManager.setRealm(userRealm);
        return defaultWebSecurityManager;
    }

    //3.ShiroFilterFactoryBean
    @Bean
    public ShiroFilterFactoryBean getShiroFilterFactoryBean(@Qualifier("getDefaultWebSecurityManager") DefaultWebSecurityManager defaultWebSecurityManager) {

        ShiroFilterFactoryBean bean = new ShiroFilterFactoryBean();
        //关联安全管理器
        bean.setSecurityManager(defaultWebSecurityManager);
        //添加shiro的内置过滤器
        /**
         * anno:无需认证就可以访问
         * authc:必须认证了才能访问
         * user:必须拥有 记住我 功能才能用
         * perms:拥有对某个资源权限才能使用
         * role:拥有某个角色才能访问
         */
//        filterMap.put("/user/add", "authc");//add 页面无需权限
//        filterMap.put("/user/edit", "authc");//编辑页面需要登录
        LinkedHashMap<String, String> filterMap = new LinkedHashMap<>();
        filterMap.put("/user/*", "authc");
        //授权,正常情况下,没有授权会跳转到登录页面
        filterMap.put("/user/*","perms[user:add]");

        bean.setFilterChainDefinitionMap(filterMap);
        //设置登录页面
        bean.setLoginUrl("/toLogin");
        //未授权跳转的页面
        bean.setUnauthorizedUrl("/noauth");
        return bean;
    }
}
2.2、创建授权认证了类
public class UserRealm extends AuthorizingRealm {
    @Autowired
    UserService userService;
}
2.2.1、授权方法
//授权
@Override
protected AuthorizationInfo doGetAuthorizationInfo(PrincipalCollection principalCollection) {

    System.out.println("执行了授权方法");
    SimpleAuthorizationInfo info = new SimpleAuthorizationInfo();
    //拿到当前登录的这个对象
    Subject subject = SecurityUtils.getSubject();
    User cuurentUser = (User) subject.getPrincipal();
    //设置当前用户的权限 当然也可以授权角色
    info.addStringPermission(cuurentUser.getPerms());
    return info;
}
2.2.2、认证方法
//认证
@Override
protected AuthenticationInfo doGetAuthenticationInfo(AuthenticationToken authenticationToken) throws AuthenticationException {

    System.out.println("执行了认证方法");
    UsernamePasswordToken userToken = (UsernamePasswordToken)authenticationToken;

    //连接真实等数据库
    User user = userService.queryUserByName(userToken.getUsername());
    //判断是否有这个账户
    if(user==null){
        return null;//UnknowAccountException
    }
    Subject currentSubject = SecurityUtils.getSubject();
    Session session = currentSubject.getSession();
    session.setAttribute("loginUser",user);
    //可以加密: MD5 MD5盐值加密

    //密码认证,shiro自动做  通过这里传递到doGetAuthorizationInfo
    return new SimpleAuthenticationInfo(user,user.getPwd(),"");
}
3、编写业务代码
3.1、持久层查询用户信息
<select id="queryUserByName" resultType="cn.qileyun.shirospringboot.pojo.User" parameterType="String">
     select * from user where name=#{name}
</select>
3.2、业务层直接调用
@Override
public User queryUserByName(String name) {
    return userMapper.queryUserByName(name);
}
3.3、控制层
3.3.1、首页、新增、修改页面
@RequestMapping({"/", "index"})
public String toIndex(Model model) {
    model.addAttribute("msg", "hello shiro");
    return "index";
}

@RequestMapping("/user/add")
public String add() {
    return "user/add";
}

@RequestMapping("/user/edit")
public String edit() {
    return "user/edit";
}
3.3.2、登录页面
bean.setLoginUrl("/toLogin");
@RequestMapping("/toLogin")
public String toLogin() {
    return "login";
}
3.3.3、登录器
@RequestMapping("/login")
public String login(String username, String password,Model model) {
    //获取当前用户
    Subject subject = SecurityUtils.getSubject();
    //封装用户对登录数据
    UsernamePasswordToken token = new UsernamePasswordToken(username, password);
    //执行登录等方法,如果没有异常说明登录成功
    try {
        subject.login(token);

        return "index";
    } catch (UnknownAccountException e) {
        model.addAttribute("msg","用户名错误");
        return "login";
    }catch (IncorrectCredentialsException e){
        model.addAttribute("msg","密码错误");
        return "login";
    }

}
3.3.4、未授权用户跳转页面
bean.setUnauthorizedUrl("/noauth");
@RequestMapping("/noauth")
@ResponseBody
public String unauthorized(){
 	return "未授权无法访问页面";
}
3.4、视图层代码
3.4.1、首页
<!DOCTYPE html>
<html xmlns:th="http://www.thymeleaf.org"
      xmlns:shiro="http://www.pollix.at/thymeleaf/shiro" >

<head>
    <meta charset="UTF-8">
    <title>Title</title>
</head>
<body>
<h1>首页</h1>
<!--通过session判断是否登录-->
<p th:if="${session.loginUser==null}">
    <a th:href="@{/toLogin}">登录</a>
</p>
<p th:text="${msg}"></p>

<hr>
<!--判断是否有权限-->
<div shiro:hasPermission="user:add">

    <a th:href="@{/user/add}">add</a>
</div>
<!--判断用户是否有admin权限-->
<div shiro:hasRole="admin">
    <a th:href="@{/user/edit}">edit</a>
</div>
</body>
</html>
3.4.2、登录页面
<!DOCTYPE html>
<html lang="en">
<head>
    <meta charset="UTF-8">
    <title>Title</title>
</head>
<body>
<p th:text="${msg}"></p>
<form th:action="@{/login}">
    <p>用户名:<input type="text" name="username"></p>
    <p>密码:<input type="text" name="password"></p>
    <p><input type="submit"></p>
</form>
</body>
</html>


 1214
1214


 被折叠的 条评论
为什么被折叠?


