


作者前言
之前都是用centos,因了解到centos要停止更新、红帽要闭源等消息。还是切换其他的开源系统,避免后续的使用受到影响。第一次使用ubuntu很不习惯,配置文件和命令对比centos有些都不太一样。所以就想写个文章把ubuntu的操作做个笔记。
持续更新中......
目录
一、简介
Ubuntu是一个以桌面应用为主的Linux发行版操作系统
Ubuntu是一个以桌面应用为主的Linux操作系统,其名称来自非洲南部祖鲁语或豪萨语的“ubuntu”一词,意思是“人性”“我的存在是因为大家的存在”,是非洲传统的一种价值观。
Ubuntu 是是由南非人马克·沙特尔沃思(Mark Shuttleworth)创办的基于Debian Linux的操作系统,是由由全球化的专业开发团队(Canonical Ltd)打造的。
以下都是基于ubuntu20的系统配置
二、查看系统版本
ubuntu系统有两种版本,一种是LTS,另一种是正常版本。
长期支持版本(LTS)通常每两年发布一次,支持周期为5年,而正常版本每年发布两次,支持周期为9个月。
centos是查看/etc/centos-release文件
ubuntu是查看/etc/os-release文件
方法1:
cat /etc/os-release

方法2:
uname -a

方法3: 可以查看ubuntu版本
lsb_release -a

方法4:
cat /etc/issue

#在ubuntu图形化界面的终端输入以下命令,可打开ubuntu的任务管理器
gnome-system-monitor
三、ubuntu用户
ubuntu在安装系统时必须创建普通用户,使用root权限时都是用sudo后输入密码。所以平常看到ubuntu执行命令时都会加上sudo,因为在ubuntu中,通过默认的设置,root用户是被禁用的,这是为了提高系统的安全性和防止操作系统的误操作。
安装系统创建的普通用户具备sudo权限,可以通过sudo权限配置root用户。
#切换为root账户
sudo su -
sudo su 切换为root用户,不携带当前环境变量
sudo su - 切换为root用户,携带当前环境变量

#解锁root账户
1、先给root账号配置密码
sudo passwd root
2、然后修改配置文件
sudo vim /etc/ssh/sshd_config
找到PermitRootLogin no,将其修改为:
PermitRootLogin yes
3、保存后重启sshd服务
sudo systemctl restart sshd
四、ubuntu配置网络
网络命令还是可以使用nmcli进行配置
通过nmcli con add 添加的配置文件在/etc/NetworkManager/system-connections/目录下
#查看网络连接信息
nmcli con show
NAME                UUID                                  TYPE      DEVICE
Wired connection 1  880526ce-c240-38e9-adf6-441115ac8472  ethernet  ens33


#修改为固定的私有ip
nmcli con modify "Wired connection 1"  ipv4.method manual ipv4.address 192.168.10.xxx/24 ipv4.gateway 192.168.10.1 ipv4.dns 8.8.8.8

#重启网络连接
nmcli con down "Wired connection 1"
nmcli con up  "Wired connection 1"
五、配置本地DNS
centos的DNS配置在 /etc/resolv.conf中,但是ubuntu的是动态生成的,配置完重启就没了。
ubuntu的DNS配置是通过resolvconf服务进行管理的,dns的配置是从/etc/resolvconf/resolv.conf.d/head中加载而来,所以每次修改resolv.conf重启后都会失效
先安装resolvconf包
sudo apt-get install resolvconf -y

配置本地dns服务器
vim /etc/resolvconf/resolv.conf.d/head
nameserver 8.8.8.8

#重新加载配置文件
resolvconf -u
六、ubuntu无法使用ssh命令连接
报错: ssh: connect to host 192.168.xxx.xxx port 22: Connection refused
大部分的问题是因为ubuntu没有安装sshd服务,所以导致连接不上。
sudo apt-get install openssh-server
七、ubuntu使用vi时有问题
默认是没有装vim的,先使用vi作为过渡时,按上下左右键时,会输入A、B、C、D。使用起来和不舒服。
原因是ubuntu系统自带的 vi 不完整,安装完整的vim就可以了
方法1:
在insert模式中,按上下左右箭头时会出现ABCD,进入末行模式:
:set term=cons25
#这个方法每次都要修改
可以在当前的home目录下创建一个.vimrc文件,相当于是写入到该用户的全局变量
在里面写入:
set nocompatible


方法2:建议采用这种方式
安装vim完整包,使用vim就没有这个情况了
sudo apt-get install vim-gtk
八、使用配置ubuntu的apt源
centos是通过yum管理源,ubuntu是通过apt管理源
ubuntu源的配置文件路径是/etc/apt/sources.list
配置本地源
1、创建挂载目录并挂载镜像
mkdir -p /cdrom
mkdir /dev/sr0 /cdrom

2、备份源文件
mv /etc/apt/sources.list /etc/apt/sources.list.bak

3、编写本地源
vim /etc/apt/sources.list
#本地源格式deb file:///挂载路径
deb file:///cdrom lunar main restricted

4、更新apt
apt update
更换apt-get源
1、先备份原有源
sudo cp /etc/apt/sources.list /etc/apt/sources.list.bak

2、更改apt源,
#通常APT仓库应该包含 dists、pool 等目录
#本地镜像源路径正确:确认你的本地镜像源路径正确无误,并且该路径下存在有效的APT仓库结构。通常,一个APT仓库应该包含 dists、pool 等目录。
仓库结构完整:检查本地镜像源是否包含所有必要的文件,特别是 dists/focal-security/Release 和 dists/focal-security/InRelease 文件。
权限设置正确:确保你有权限访问本地镜像源路径。
vim /etc/apt/sources.list
#替换默认的http://archive.ubuntu.com/为mirrors.aliyun.com
deb http://二进制包仓库网址
deb-src http://二进制包的源码库网址

阿里云的镜像:
https://developer.aliyun.com/mirror/?spm=5176.28055625.J_4VYgf18xNlTAyFFbOuOQe.225.e939154a8O7Cyv&scm=20140722.M_9489626._.V_1

deb https://mirrors.aliyun.com/ubuntu/ focal main restricted universe multiverse
deb-src https://mirrors.aliyun.com/ubuntu/ focal main restricted universe multiverse
deb https://mirrors.aliyun.com/ubuntu/ focal-security main restricted universe multiverse
deb-src https://mirrors.aliyun.com/ubuntu/ focal-security main restricted universe multiverse
deb https://mirrors.aliyun.com/ubuntu/ focal-updates main restricted universe multiverse
deb-src https://mirrors.aliyun.com/ubuntu/ focal-updates main restricted universe multiverse
# deb https://mirrors.aliyun.com/ubuntu/ focal-proposed main restricted universe multiverse
# deb-src https://mirrors.aliyun.com/ubuntu/ focal-proposed main restricted universe multiverse
deb https://mirrors.aliyun.com/ubuntu/ focal-backports main restricted universe multiverse
deb-src https://mirrors.aliyun.com/ubuntu/ focal-backports main restricted universe multiverse


3、更新源
sudo apt-get update
九、apt常用命令
apt-get命令
#安装包
sudo apt-get install 包名

#出现签名认证失败的时候,可以采取这种方法
apt-get install 包名 -y --allow-unauthenticated

#安装指定版本的包
sudo apt-get install 包名=版本

#重新安装包
sudo apt-get install 包名 --reinstall
sudo apt-get reinstall

#更新apt软件源
sudo apt-get update

#升级所有已安装的软件包
sudo apt-get upgrade

#仅升级指定的包
sudo apt-get upgrade 包名 --only-upgrade

#删除包
sudo apt-get remove 包名

#删除包以及包的配置文件
sudo apt-get remove 包名--purge

#清理下载的包文件
sudo apt-get clean

#自动清理不再使用的依赖、库文件
sudo apt autoremove

#查看包的依赖
sudo rdepends 包名

#查看已安装的包
apt list --installed

#查看可以更新的包
sudo apt list --upgradeable

#检查是否有损坏的依赖
sudo apt-get check

#安装相关的编译环境
sudo apt-get build-dep 包名


#apt-upgrade命令增强版。除了升级现有的软件包外,还会安装和删除些软件包以满足一些依赖关系。该命令包括一个智能冲突解决功能,可确保首先升级关键软件包,而牺牲那些被认为具有较低优先级的软件包。
apt-get dist-upgrade

#添加存储库,是一个用于向APT添加存储库的命令。它允许用户添加PPA源,以便从该源安装软件包。
#添加的源被写入到/etc/apt/sources.list文件或/etc/apt/sources.list.d/目录下的单独文件中。
sudo add-apt-repository "deb https://mirrors.ustc.edu.cn/docker-ce/linux/ubuntu/$(lsb_release -cs) stable"
sudo apt-add-repository "deb https://mirrors.ustc.edu.cn/docker-ce/linux/ubuntu/$(lsb_release -cs) stable"
apt-cache命令
#搜索包
sudo apt-cache search 包名

#查看包的信息
sudo apt-cache show 包名
apt-mark命令
#设置包自动安装更新
sudo apt-mark auto 包名

#设置包保持版本,禁止更新
sudo apt-mark hold 包名

#解除禁止更新
sudo apt-mark unhold 包名

#列出不更新的软件包
sudo apt-mark showhold
软件密钥管理工具apt-key
#apt-key adv命令从密钥服务器获取并添加GPG密钥。
sudo apt-key adv --keyserver keyserver.ubuntu.com --recv-keys 密钥ID

#列出已添加的GPG密钥
sudo apt-key list

#删除GPG密钥
sudo apt-key del 密钥ID

#更新本地trusted数据库
sudo apt-key update

#查找过期秘钥信息
apt-key list | grep expired

#更新密钥
sudo apt-key add /path/to/new-key.gpg

#删除过期密钥
sudo apt-key del <key-id>
方法1:使用apt-mirror搭建本地源
1、环境准备
#安装apt-mirror包
apt-get install -y apt-mirror

#创建软件源存储目录
!!!注意下载的软件总和会很多,多预留点空间
mkdir /apt-mirror
2、修改配置文件
#先备份原文件
cp /etc/apt/mirror.list /etc/apt/mirror.list.bak

【修改apt-mirror的配置文件】
vim /etc/apt/mirror.list

【原始如下】
############# config ##################
#
# set base_path    /var/spool/apt-mirror
#
# set mirror_path  $base_path/mirror
# set skel_path    $base_path/skel
# set var_path     $base_path/var
# set cleanscript $var_path/clean.sh
# set defaultarch  <running host architecture>
# set postmirror_script $var_path/postmirror.sh
# set run_postmirror 0
set nthreads     20
set _tilde 0
#
############# end config ##############

deb http://archive.ubuntu.com/ubuntu artful main restricted universe multiverse
deb http://archive.ubuntu.com/ubuntu artful-security main restricted universe multiverse
deb http://archive.ubuntu.com/ubuntu artful-updates main restricted universe multiverse
#deb http://archive.ubuntu.com/ubuntu artful-proposed main restricted universe multiverse
#deb http://archive.ubuntu.com/ubuntu artful-backports main restricted universe multiverse

deb-src http://archive.ubuntu.com/ubuntu artful main restricted universe multiverse
deb-src http://archive.ubuntu.com/ubuntu artful-security main restricted universe multiverse
deb-src http://archive.ubuntu.com/ubuntu artful-updates main restricted universe multiverse
#deb-src http://archive.ubuntu.com/ubuntu artful-proposed main restricted universe multiverse
#deb-src http://archive.ubuntu.com/ubuntu artful-backports main restricted universe multiverse

clean http://archive.ubuntu.com/ubuntu
~


【修改步骤】
修改1:取消注释,指定软件源存储目录
# set base_path    /var/spool/apt-mirror
set base_path    /apt-mirror

修改2: 修改国内镜像源,deb开头的参数
deb https://mirrors.aliyun.com/ubuntu/ focal main restricted universe multiverse
deb-src https://mirrors.aliyun.com/ubuntu/ focal main restricted universe multiverse
deb https://mirrors.aliyun.com/ubuntu/ focal-security main restricted universe multiverse
deb-src https://mirrors.aliyun.com/ubuntu/ focal-security main restricted universe multiverse
deb https://mirrors.aliyun.com/ubuntu/ focal-updates main restricted universe multiverse
deb-src https://mirrors.aliyun.com/ubuntu/ focal-updates main restricted universe multiverse
# deb https://mirrors.aliyun.com/ubuntu/ focal-proposed main restricted universe multiverse
# deb-src https://mirrors.aliyun.com/ubuntu/ focal-proposed main restricted universe multiverse
deb https://mirrors.aliyun.com/ubuntu/ focal-backports main restricted universe multiverse
deb-src https://mirrors.aliyun.com/ubuntu/ focal-backports main restricted universe multiverse

修改3:修改清理的远程仓库地址
clean https://mirror.aliyun.com/ubuntu


【其他注释】
clean http://archive.ubuntu.com/ubuntu
这一行用于指定在镜像完成后要清理的远程仓库地址。apt-mirror 在完成镜像后,可以清理远程仓库中不再需要的文件,以节省本地存储空间。这里的地址 http://archive.ubuntu.com/ubuntu 指向 Ubuntu 的主仓库。
可以修改为

set nthreads 20
设置用于下载文件的线程数。

set _tilde 0
这个选项与如何处理 URL 中的波浪线(~)字符有关。设置为 0 可能是为了禁用或避免某种特定的 URL 处理。具体的行为和影响可能取决于 apt-mirror 的版本和配置上下文。

#注释掉的参数解释:
base_path: 镜像存储的基础路径。
mirror_path: 实际的镜像文件存储位置。
skel_path: 骨架目录,通常包含每个镜像的初始目录结构。
var_path: 用于存储变量和脚本的目录。
cleanscript: 清理脚本的路径,用于在镜像完成后执行清理任务。
defaultarch: 默认的架构,通常设置为运行主机的架构。
postmirror_script: 镜像完成后执行的脚本路径。
run_postmirror: 是否运行 postmirror_script 的标志。
3、开始下载
sudo apt-mirror
下载完就可以进软件源下载目录查看
4、修改sources.list文件
#先备份原文件
sudo cp /etc/apt/sources.list /etc/apt/sources.list.bak

#修改配置文件参数
deb file:///apt-mirror/ubuntu/ focal main restricted

#注释
源仓库链接写有dists的路径
源链接后面写dists目录下的二级目录,需要包含有release文件
目录之间用空格隔开
focal是dists目录下的二级目录,版本号
main restricted 是focal下面的组件目录
根据镜像目录的实际内容来调整这些值
5、更新apt仓库源
sudo apt update
方法2:通过rsync配置本地镜像源
【下载】
rsync -avH -P rsync://cn.rsync.archive.ubuntu.com/ubuntu ${target_path}
例如拉取清华源到/apt-mirror目录
rsync -avH -P rsync://mirrors.tuna.tsinghua.edu.cn/ubuntu /apt-mirror
#等待下载完成就可以了

【修改sources.list文件】
#先备份原文件
sudo cp /etc/apt/sources.list /etc/apt/sources.list.bak
#修改sources.list文件参数
vim /etc/apt/sources.list
deb file:///apt-mirror/ubuntu/ focal main restricted

#注释
源仓库链接写有dists的路径
源链接后面写dists目录下的二级目录,需要包含有release文件
目录之间用空格隔开
focal是dists目录下的二级目录,版本号
main restricted 是focal下面的组件目录
根据镜像目录的实际内容来调整这些值


#更新apt仓库源
sudo apt update
十、ubuntu的防火墙
centos的防火墙通过iptables/firewalld进行管理
ubuntu通过ufw/firewalld进行管理
ubuntu使用的防火墙名为UFW(Uncomplicated Fire Wall),是一个iptable的管理工具。
开启防火墙的状态后,只有系统允许的才能被其他主机访问。
如果未安装需要先安装
sudo apt update
sudo apt install ufw
#查看防火墙的状态
sudo ufw status
inactive是关闭,active是开启

#查看防火墙当前状态的详细信息
sudo ufw status verbose

#取消防火墙自启动
sudo ufw disable

#设置防火墙开机自启动
sudo ufw enable

#重启防火墙
sudo ufw reload

#重置ufw防火墙配置
sudo ufw reset

#显示防火墙报告
sudo ufw show raw

#放通所有
sudo ufw default deny incoming

#放通端口
sudo ufw allow 端口号/(tcp或udp)

#放通协议
sudo ufw allow 协议

#删除放通的端口
sudo ufw delete allow 端口号/(tcp或udp)

#删除放通的协议
sudo ufw delete allow 协议

#拒绝所有
sudo ufw default deny incoming

#拒绝端口
sudo ufw deny 端口号/(tcp或udp)

#拒绝协议
sudo ufw deny 协议
十一、ubuntu修改密码
在centos可以echo “密码” | passwd --stdin 用户名
在ubuntu和debian不能使用命令–stdin
passwd 用户名
十二、无法使用ssh远程登录root
ssh root@ip 登录失败,设置ssh配置文件增加PermitRootLogin = yes参数也失败
1、首先要安装ssh包
sudo apt-get install openssh-server ssh -y

2、设置密码
passwd root

3、修改配置文件
vim /etc/gdm3/custom.conf
# [Security] 下添加一下行
AllowRoot=true
#修改AutomaticLogin
AutomaticLogin=root

vim /etc/pam.d/gdm-password
注释这行
#auth   required        pam_succeed_if.so user != root quiet_success

vim /etc/pam.d/gdm-autologin
注释这行
#auth   required        pam_succeed_if.so user != root quiet_success


vim /root/.profile
注释代码
#mesg n 2> /dev/null || true
添加代码
tty -s && mesg n || true

vim /etc/ssh/sshd_config
修改
PermitRootLogin prohibit-password
为
PermitRootLogin yes
#yes是允许root登入,no是不允许root登入,without-password是停止使用root账号的密码验证,forced-commands-onlyy是允许用公匙法验证root账号登入,prohibit-password是禁止密码

4、重启服务
systemctl restart ssh

就可以正常远程登录root了
十三、ubuntu配置定时任务
centos的服务是crond
ubuntu的服务名是cron
一样使用crontab命令
-u 指定用户
-e 编辑当前用户的定时任务
-r 删除所有当前用户的定时任务
-l 列出当前用户的定时任务
-h 查看帮助
编辑时可能变成GNU nano 4.8的编辑器,不会用
#选择编辑器
select-editor

根据系统列出来的编辑器序号选择编辑器
再使用crontab就正常了
十四、ubuntu搭建nfs
centos安装nfs的包是nfs-utils
ubunut安装是nfs-common nfs-kernel-server portmap
NFS的端口是通过 RPC (Remote Procedure Call,中文意思远程过程调用)服务/协议来实现
#服务端
sudo apt-get install -y nfs-kernel-server nfs-common portmap

#客户端
sudo apt-get install -y nfs-common portmap


【服务端配置】
#创建共享目录
mkdir /share

#编辑配置文件
vim /etc/exports
/share 192.168.0.0/24(rw)
目录	ip/域名/网段	  参数

#参数
`no_root_squash`不转换root用户 普通用户不能不转换
`all_squash` 所有用户都会被转换
`anonuid=975` 转换的用户的id `anongid=973`转换的组的id
rw	读写权限
ro	只读权限
async异步传输,缓存数据会丢了
sync同步传输


#重新加载配置文件
exportfs  -rv```

#查看共享目录
showmount -e localhost

#启动服务
systemctl start nfs-server && systemctl enable --now nfs-server

【客户端配置】
#安装所需软件包
sudo apt-get install -y nfs-common portmap

#启动服务
systemctl start nfs-server && systemctl enable --now nfs-server

#创建共享目录挂载点
mkdir /public

#编辑永久挂载
vim /etc/fstab
192.168.1.1:/shares /public nfs rw,sync 0 0

#挂载
mount -a

#查询
df -Th
十五、 http服务
centos使用的是httpd包
ubuntu使用的是apache2
在大部分 Linux 发行版中,Apache HTTP Server 软件包的名称被命名为 “httpd”,它是 Apache HTTP Server 的缩写。因为 “httpd” 是该软件的主要执行程序的名称,代表 “HyperText Transfer Protocol Daemon”,守护进程用于处理 HTTP 请求。
然而,在某些特定的 Linux 发行版中,特别是基于 Debian 的发行版(如 Ubuntu),Apache HTTP Server 软件包的名称被命名为 “apache2”。这是因为在这些发行版中,Apache HTTP Server 2.x 版本被广泛使用,因此将软件包命名为 “apache2” 来区分于早期版本的 “apache”。
因此,总结起来,Apache2 和 httpd 包本质上是同一个软件,只是在不同的发行版中的命名方式略有不同。无论是使用 “apache2” 还是 “httpd”,它们都指的是 Apache HTTP Server,都提供相同的功能和特性。
yum install httpd -y
apt-get insatll apache2 -y
十六、安装在虚拟机,图形界面无法自动适应
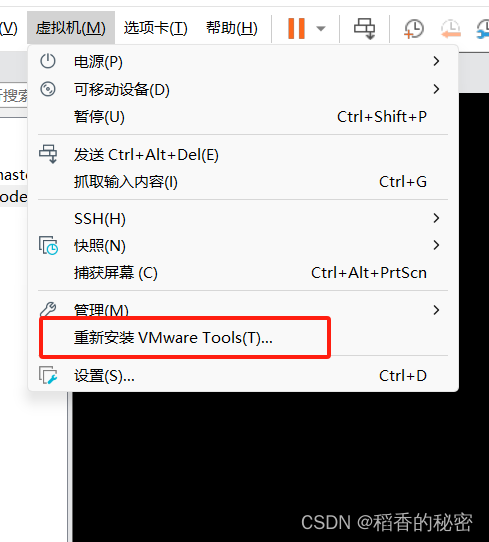
原因:没有安装vm-tools工具包
在虚拟机点击重新安装VMware Tools
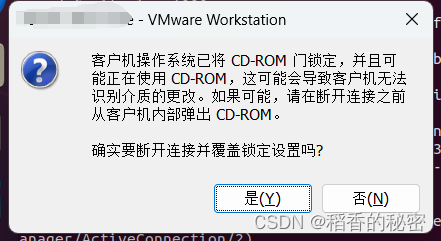
如果弹出这个界面,点击是,会自动将使用的ISO换成VM-Tools的路径
虚拟机的下方会出现提示,找到vmware tools的虚拟驱动地址,然后运行vmware.install.pl文件

lsblk 命令查看驱动挂载的位置
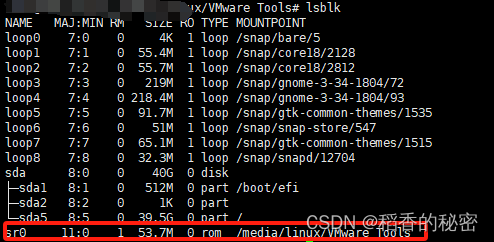
cd /media/linux/Vmare Tools目录
ll 查看目录下的文件
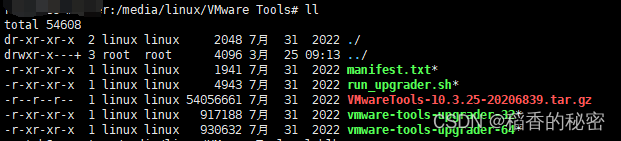
找到VMwareTools开头,tar.gz结尾的文件,并复制到其他目录, 例如/root

cp VMwareTools-10.3.25-20206839.tar.gz  /root
cd /root


解压缩
tar -zxf VMwareTools-10.3.25-20206839.tar.gz
解压缩后会有一个vmware开头的目录

进入目录 cd vmware-tools-distrib/
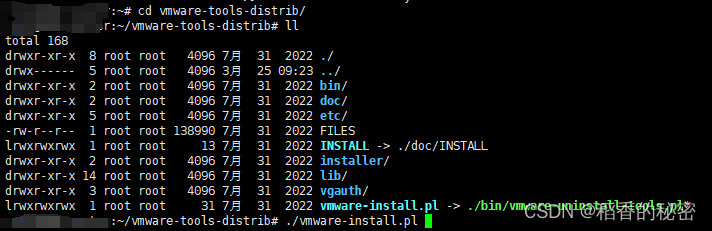
安装过程会有一个安装交互,一般默认即可,看到yes/no的均输入y,其他的直接回车
root@host:~/vmware-tools-distrib# ./vmware-install.pl
open-vm-tools packages are available from the OS vendor and VMware recommends
using open-vm-tools packages. See http://kb.vmware.com/kb/2073803 for more
information.
Do you still want to proceed with this installation? [no] y

INPUT: [y]

Creating a new VMware Tools installer database using the tar4 format.

Installing VMware Tools.

In which directory do you want to install the binary files?
[/usr/bin]

INPUT: [/usr/bin]  default

What is the directory that contains the init directories (rc0.d/ to rc6.d/)?
[/etc]

INPUT: [/etc]  default

What is the directory that contains the init scripts?
[/etc/init.d]

INPUT: [/etc/init.d]  default

In which directory do you want to install the daemon files?
[/usr/sbin]

INPUT: [/usr/sbin]  default

In which directory do you want to install the library files?
[/usr/lib/vmware-tools]

INPUT: [/usr/lib/vmware-tools]  default

The path "/usr/lib/vmware-tools" does not exist currently. This program is
going to create it, including needed parent directories. Is this what you want?
[yes] y

INPUT: [y]

In which directory do you want to install the documentation files?
[/usr/share/doc/vmware-tools]

INPUT: [/usr/share/doc/vmware-tools]  default

The path "/usr/share/doc/vmware-tools" does not exist currently. This program
is going to create it, including needed parent directories. Is this what you
want? [yes] y

INPUT: [y]

The installation of VMware Tools 10.3.25 build-20206839 for Linux completed
successfully. You can decide to remove this software from your system at any
time by invoking the following command: "/usr/bin/vmware-uninstall-tools.pl".

Before running VMware Tools for the first time, you need to configure it by
invoking the following command: "/usr/bin/vmware-config-tools.pl". Do you want
this program to invoke the command for you now? [yes] y

INPUT: [y]

Initializing...

Segmentation fault (core dumped)

Making sure services for VMware Tools are stopped.

Stopping VMware Tools services in the virtual machine:
   Guest operating system daemon:                                      done
   VMware User Agent (vmware-user):                                    done
   Unmounting HGFS shares:                                             done
   Guest filesystem driver:                                            done


The installation status of vmsync could not be determined.
Skippinginstallation.

The installation status of vmci could not be determined. Skippinginstallation.

The installation status of vsock could not be determined. Skippinginstallation.


The installation status of vmxnet3 could not be determined.
Skippinginstallation.

The installation status of pvscsi could not be determined.
Skippinginstallation.

The installation status of vmmemctl could not be determined.
Skippinginstallation.

The VMware Host-Guest Filesystem allows for shared folders between the host OS
and the guest OS in a Fusion or Workstation virtual environment.  Do you wish
to enable this feature? [yes] y

INPUT: [y]

The vmxnet driver is no longer supported on kernels 3.3 and greater. Please
upgrade to a newer virtual NIC. (e.g., vmxnet3 or e1000e)

The vmblock enables dragging or copying files between host and guest in a
Fusion or Workstation virtual environment.  Do you wish to enable this feature?
[yes] y

INPUT: [y]


Skipping configuring automatic kernel modules as no drivers were installed by
this installer.


Disabling timer-based audio scheduling in pulseaudio.

Do you want to enable Guest Authentication (vgauth)? [yes] y

INPUT: [y]


Detected X server version 1.20.13


Distribution provided drivers for Xorg X server are used.

Skipping X configuration because X drivers are not included.


Skipping rebuilding initrd boot image for kernel as no drivers to be included
in boot image were installed by this installer.

The configuration of VMware Tools 10.3.25 build-20206839 for Linux for this
running kernel completed successfully.

You must restart your X session before any mouse or graphics changes take
effect.

To enable advanced X features (e.g., guest resolution fit, drag and drop, and
file and text copy/paste), you will need to do one (or more) of the following:
1. Manually start /usr/bin/vmware-user
2. Log out and log back into your desktop session
3. Restart your X session.

Found VMware Tools CDROM mounted at /media/linux/VMware Tools. Ejecting device
/dev/sr0 ...
Enjoy,

--the VMware team
安装后,虚拟机已自适应桌面大小

十七、apt命令不会自动安装依赖
apt-get install 不能自动安装依赖,安装新的包时,提示Unmet dependencies问题。
解决方法一:
原因:包损坏,或者安装/更新时中断

#先清理缓存并更新源
sudo apt-get clean
apt-get update

#修复损坏的包
apt --fix-broken install

#更新升级
apt-get upgrade

#自动清理不再使用的依赖、库文件
apt autoremove

#更新软件
apt-get dist-upgrade


解决方法二:
原因:自己的apt源配置错了版本,是老版本导致一直安装不了依赖
修改/etc/apt/sources.list文件里的源

apt-get clean
apt-get update
十八、apt-get install packages 时报错
E: Could not get lock /var/lib/dpkg/lock-frontend. It is held by process 8626 (unattended-upgr)
N: Be aware that removing the lock file is not a solution and may break your system.
E: Unable to acquire the dpkg frontend lock (/var/lib/dpkg/lock-frontend), is another process using it?
原因:
dpkg包管理器的前端锁文件/var/lib/dpkg/lock-frontend正被进程号为8626的进程占用

#先查看进程是否存在。
ps -p 进程id(例如上面的8626)

#如果进程不存在,可能是因为系统崩溃或者未正常关闭导致锁文件没释放。在这种情况下,可以尝试删除锁文件:
sudo rm /var/lib/dpkg/lock-frontend

#如果进程仍在运行,等待该进程结束或使用安全地终止它。
sudo kill -9 进程id
十九、 Ubuntu的selinux
selinux有三种模式
disabled 未启动
permissive 对白名单外的访问记录,不会拒绝
enforcing 对于白名单之外的访问全部拒绝并记录
更改selinux需要重启系统。


 3042
3042


 被折叠的 条评论
为什么被折叠?
被折叠的 条评论
为什么被折叠?
 到【灌水乐园】发言


