


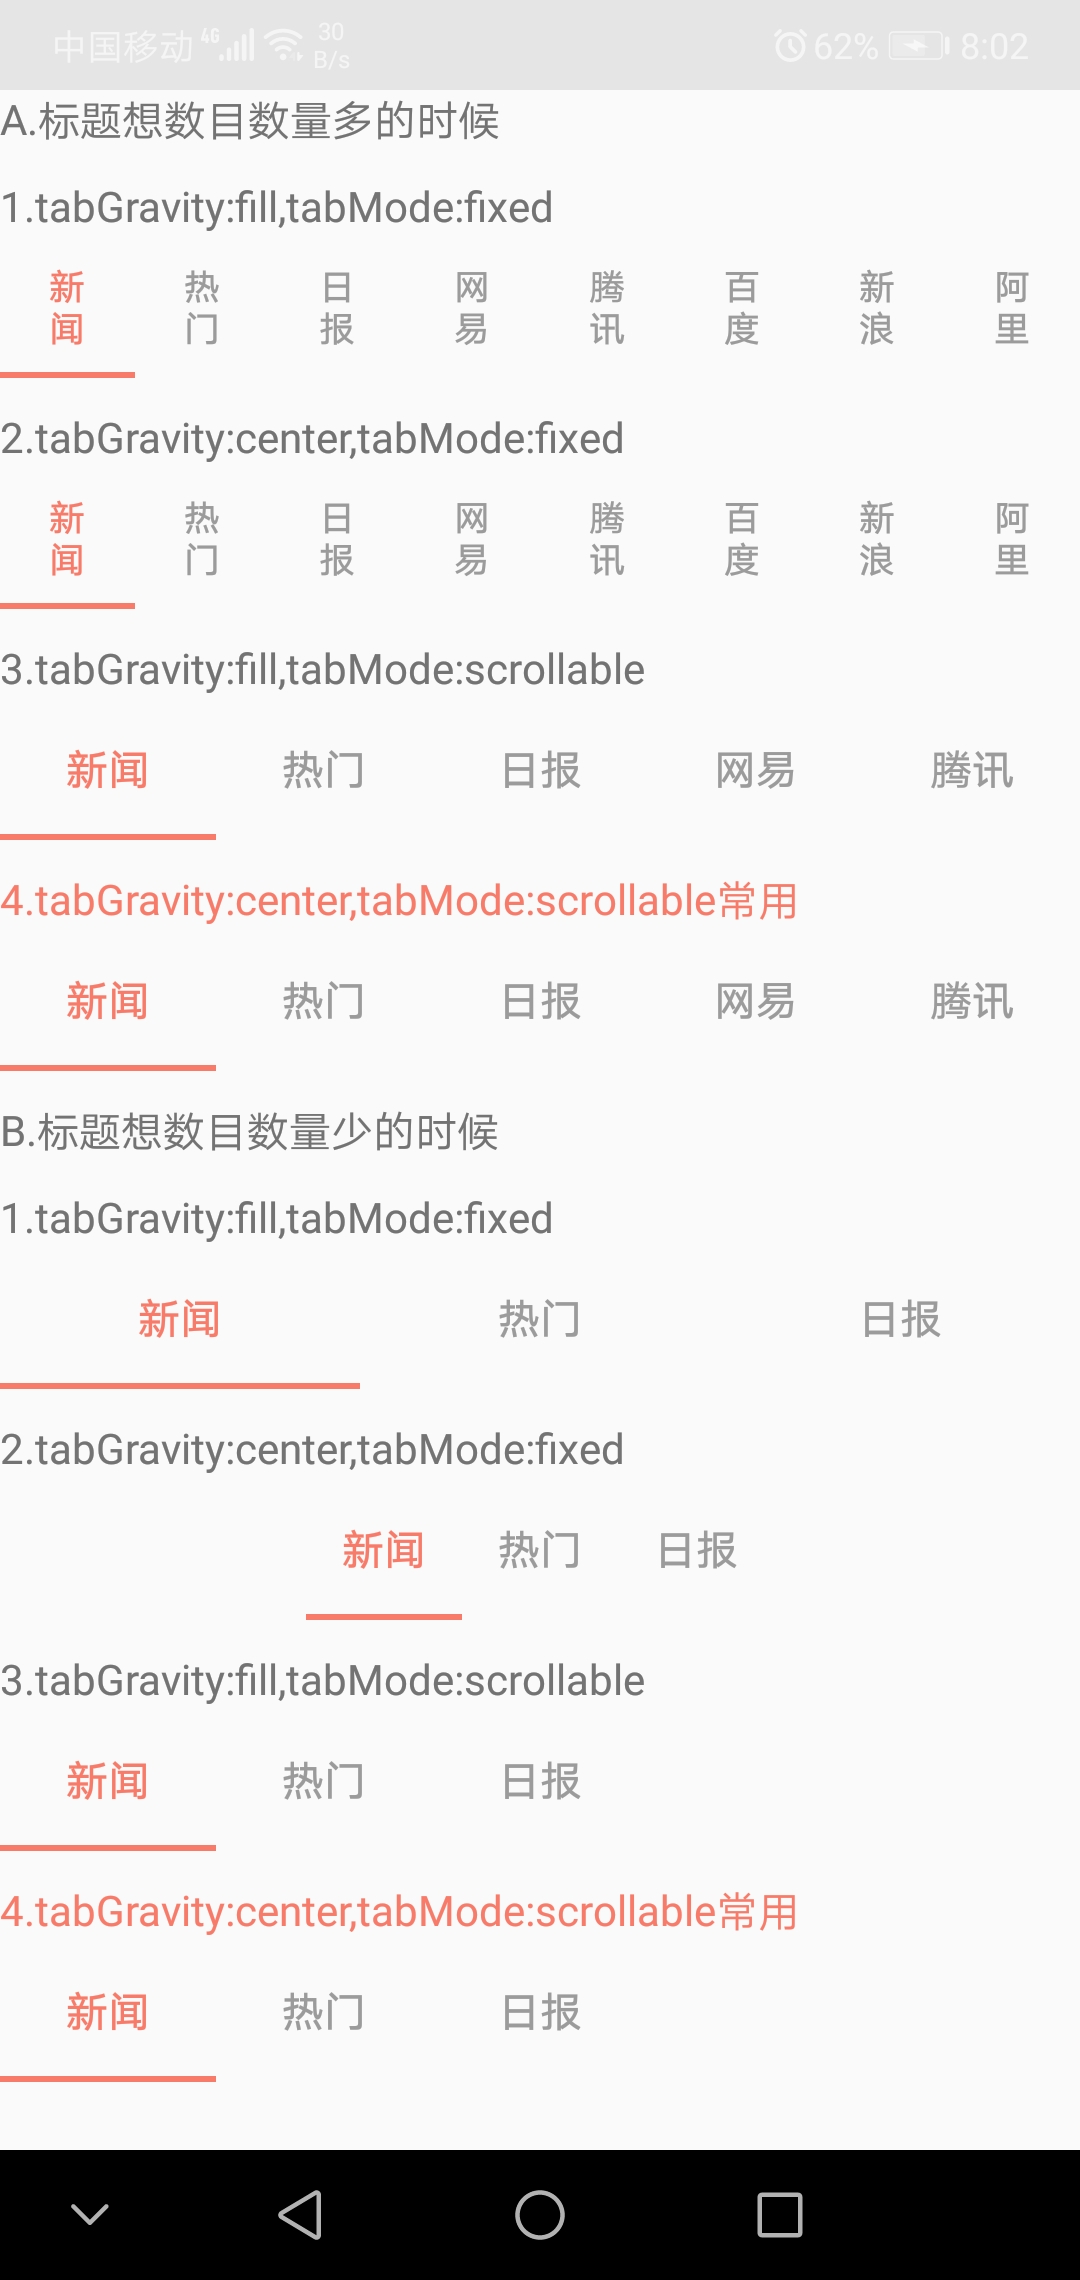
1.Tablayout的tabMode和tabGravity的使用
效果图:
代码:
TablayoutActivity.Java
activity_tablayout.xml
2.Tablayout的tab数目数量少时自定义指示器长度
效果图:
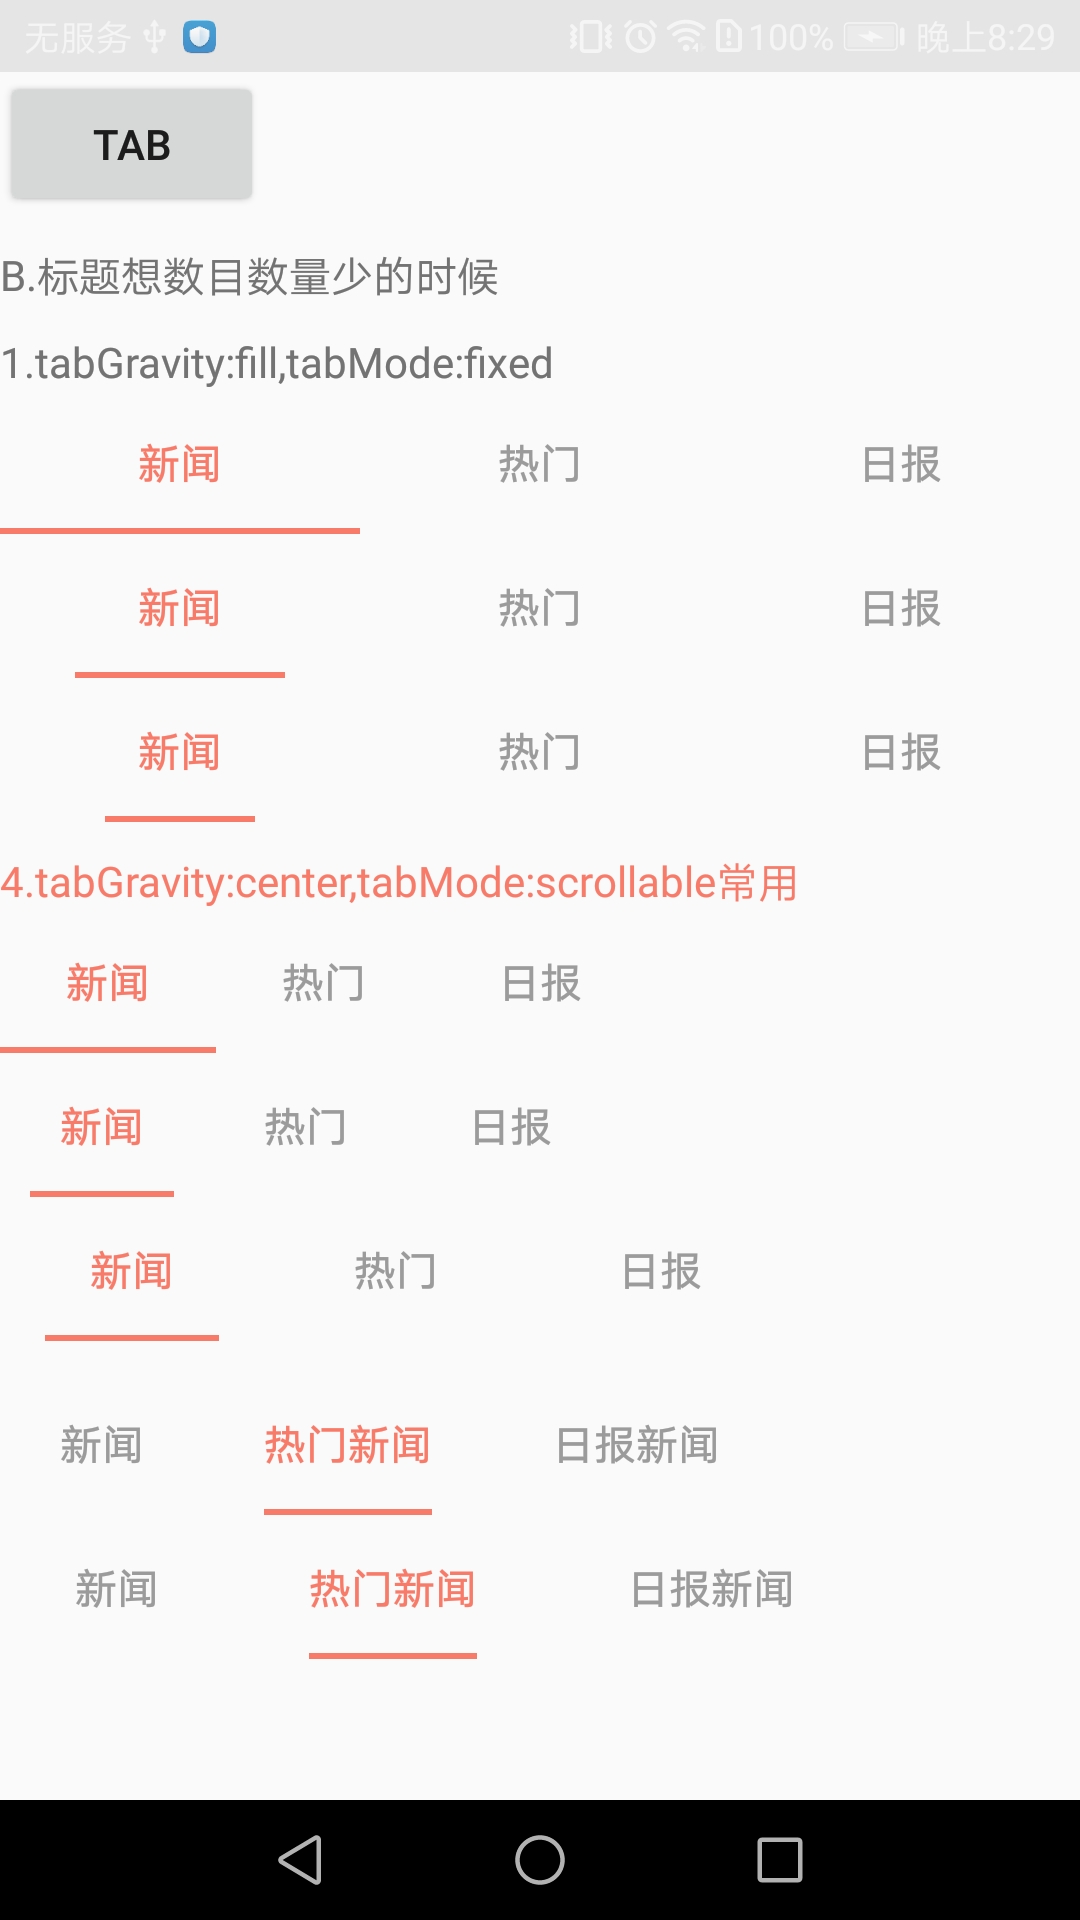
如果要指示器长度和tab文字长度一样长,在java文件第119行设置tabview的宽度的时候不要加上左右边距即可
MainActivity.java文件
public class MainActivity extends AppCompatActivity {

    @Override
    protected void onCreate(@Nullable Bundle savedInstanceState) {
        super.onCreate(savedInstanceState);
        setContentView(R.layout.activity_main);

        final TabLayout id_tabl_one_s = (TabLayout) findViewById(R.id.id_tab_one_fill_fixed);
        id_tabl_one_s.addTab(id_tabl_one_s.newTab().setText("新闻"));
        id_tabl_one_s.addTab(id_tabl_one_s.newTab().setText("热门"));
        id_tabl_one_s.addTab(id_tabl_one_s.newTab().setText("日报"));

        final TabLayout id_tabl_one_s1 = (TabLayout) findViewById(R.id.id_tab_one_fill_fixed1);
        id_tabl_one_s1.addTab(id_tabl_one_s1.newTab().setText("新闻"));
        id_tabl_one_s1.addTab(id_tabl_one_s1.newTab().setText("热门"));
        id_tabl_one_s1.addTab(id_tabl_one_s1.newTab().setText("日报"));

        final TabLayout id_tabl_one_s2 = (TabLayout) findViewById(R.id.id_tab_one_fill_fixed2);
        id_tabl_one_s2.addTab(id_tabl_one_s2.newTab().setText("新闻"));
        id_tabl_one_s2.addTab(id_tabl_one_s2.newTab().setText("热门"));
        id_tabl_one_s2.addTab(id_tabl_one_s2.newTab().setText("日报"));


        setIndicator(id_tabl_one_s1, 25, 25);
        setIndicator(id_tabl_one_s2, 35, 35);


        TabLayout id_tabl_four_s = (TabLayout) findViewById(R.id.id_tab_four_center_scrollable);
        id_tabl_four_s.addTab(id_tabl_four_s.newTab().setText("新闻"));
        id_tabl_four_s.addTab(id_tabl_four_s.newTab().setText("热门"));
        id_tabl_four_s.addTab(id_tabl_four_s.newTab().setText("日报"));


        TabLayout id_tabl_four_s1 = (TabLayout) findViewById(R.id.id_tab_four_center_scrollable1);
        id_tabl_four_s1.addTab(id_tabl_four_s1.newTab().setText("新闻"));
        id_tabl_four_s1.addTab(id_tabl_four_s1.newTab().setText("热门"));
        id_tabl_four_s1.addTab(id_tabl_four_s1.newTab().setText("日报"));

        TabLayout id_tabl_four_s2 = (TabLayout) findViewById(R.id.id_tab_four_center_scrollable2);
        id_tabl_four_s2.addTab(id_tabl_four_s2.newTab().setText("新闻"));
        id_tabl_four_s2.addTab(id_tabl_four_s2.newTab().setText("热门"));
        id_tabl_four_s2.addTab(id_tabl_four_s2.newTab().setText("日报"));


        setTabLayoutWidth(id_tabl_four_s1, 10, 10);
        setTabLayoutWidth(id_tabl_four_s2, 15, 15);

    }


    /**
     * 反射指示器变短
     */
    public void setIndicator(TabLayout tabs, int leftDip, int rightDip) {
        tabs.post(() -> {
            Class<?> tabLayout = tabs.getClass();
            Field tabStrip = null;
            try {
                tabStrip = tabLayout.getDeclaredField("mTabStrip");
            } catch (NoSuchFieldException e) {
                e.printStackTrace();
            }

            tabStrip.setAccessible(true);
            LinearLayout llTab = null;
            try {
                llTab = (LinearLayout) tabStrip.get(tabs);
            } catch (IllegalAccessException e) {
                e.printStackTrace();
            }

            int left = (int) TypedValue.applyDimension(TypedValue.COMPLEX_UNIT_DIP, leftDip, Resources.getSystem().getDisplayMetrics());
            int right = (int) TypedValue.applyDimension(TypedValue.COMPLEX_UNIT_DIP, rightDip, Resources.getSystem().getDisplayMetrics());


            //直接获取子view改变宽度
            for (int i = 0; i < llTab.getChildCount(); i++) {
                View child = llTab.getChildAt(i);
                child.setPadding(0, 0, 0, 0);
                LinearLayout.LayoutParams params = new LinearLayout.LayoutParams(0, LinearLayout.LayoutParams.MATCH_PARENT, 1);
                params.leftMargin = left;
                params.rightMargin = right;
                child.setLayoutParams(params);
                child.invalidate();
            }
        });
    }

    /**
     * 反射拿到文字的属性对指示器进行操作
     */
    public void setTabLayoutWidth(TabLayout tabLayout, int leftDip, int rightDip) {
        tabLayout.post(() -> {
            try {
                //拿到tabLayout的mTabStrip属性
                LinearLayout mTabStrip = (LinearLayout) tabLayout.getChildAt(0);
                for (int i = 0; i < mTabStrip.getChildCount(); i++) {
                    View tabView = mTabStrip.getChildAt(i);

                    //拿到tabView的mTextView属性  tab的字数不固定一定用反射取mTextView
                    Field mTextViewField = tabView.getClass().getDeclaredField("mTextView");
                    mTextViewField.setAccessible(true);
                    TextView mTextView = (TextView) mTextViewField.get(tabView);
                    tabView.setPadding(0, 0, 0, 0);

                    //因为我想要的效果是字多宽线就多宽,所以测量mTextView的宽度
                    int width = 0;
                    width = mTextView.getWidth();
                    if (width == 0) {
                        mTextView.measure(0, 0);
                        width = mTextView.getMeasuredWidth();
                    }

                    int left = (int) TypedValue.applyDimension(TypedValue.COMPLEX_UNIT_DIP, leftDip, Resources.getSystem().getDisplayMetrics());
                    int right = (int) TypedValue.applyDimension(TypedValue.COMPLEX_UNIT_DIP, rightDip, Resources.getSystem().getDisplayMetrics());

                    //设置tab左右间距 注意这里不能使用Padding 因为源码中线的宽度是根据 tabView的宽度来设置的
                    LinearLayout.LayoutParams params = (LinearLayout.LayoutParams) tabView.getLayoutParams();
                    params.width = width + left + right;   //如果只是width就是指示器和文字长度一样长
                    params.leftMargin = left;
                    params.rightMargin = right;
                    tabView.setLayoutParams(params);
                    tabView.invalidate();
                }

            } catch (NoSuchFieldException e) {
                e.printStackTrace();
            } catch (IllegalAccessException e) {
                e.printStackTrace();
            }
        });

    }
}
activity_main.xml布局文件
<LinearLayout xmlns:android="http://schemas.android.com/apk/res/android"
xmlns:app="http://schemas.android.com/apk/res-auto"
xmlns:tools="http://schemas.android.com/tools"
android:layout_width="match_parent"
android:layout_height="match_parent"
android:orientation="vertical"
tools:context=".MainActivity">
<!--所有 TabLayout layout_width设置为match_parent的情况下-->
<Button
android:id="@+id/btn_tab"
android:layout_width="wrap_content"
android:layout_height="wrap_content"
android:visibility="gone"
android:text="tab" />
<TextView
android:layout_width="wrap_content"
android:layout_height="wrap_content"
android:layout_marginTop="10dp"
android:text="B.标题想数目数量少的时候" />
<TextView
android:layout_width="wrap_content"
android:layout_height="wrap_content"
android:layout_marginTop="10dp"
android:text="1.tabGravity:fill,tabMode:fixed" />
<android.support.design.widget.TabLayout
android:id="@+id/id_tab_one_fill_fixed"
android:layout_width="match_parent"
android:layout_height="wrap_content"
app:tabGravity="fill"
app:tabIndicatorColor="@color/colorAccent"
app:tabMode="fixed"
app:tabSelectedTextColor="@color/colorAccent"
app:tabTextColor="@color/c_9b9b9b" />
<android.support.design.widget.TabLayout
android:id="@+id/id_tab_one_fill_fixed1"
android:layout_width="match_parent"
android:layout_height="wrap_content"
app:tabGravity="fill"
app:tabIndicatorColor="@color/colorAccent"
app:tabMode="fixed"
app:tabSelectedTextColor="@color/colorAccent"
app:tabTextColor="@color/c_9b9b9b" />
<android.support.design.widget.TabLayout
android:id="@+id/id_tab_one_fill_fixed2"
android:layout_width="match_parent"
android:layout_height="wrap_content"
app:tabGravity="fill"
app:tabIndicatorColor="@color/colorAccent"
app:tabMode="fixed"
app:tabSelectedTextColor="@color/colorAccent"
app:tabTextColor="@color/c_9b9b9b" />
<!-------------------------------------------------------->
<TextView
android:layout_width="wrap_content"
android:layout_height="wrap_content"
android:layout_marginTop="10dp"
android:text="4.tabGravity:center,tabMode:scrollable常用"
android:textColor="@color/colorAccent" />
<android.support.design.widget.TabLayout
android:id="@+id/id_tab_four_center_scrollable"
android:layout_width="match_parent"
android:layout_height="wrap_content"
app:tabGravity="center"
app:tabIndicatorColor="@color/colorAccent"
app:tabMode="scrollable"
app:tabSelectedTextColor="@color/colorAccent"
app:tabTextColor="@color/c_9b9b9b" />
<android.support.design.widget.TabLayout
android:id="@+id/id_tab_four_center_scrollable1"
android:layout_width="match_parent"
android:layout_height="wrap_content"
app:tabGravity="center"
app:tabIndicatorColor="@color/colorAccent"
app:tabMode="scrollable"
app:tabSelectedTextColor="@color/colorAccent"
app:tabTextColor="@color/c_9b9b9b" />
<android.support.design.widget.TabLayout
android:id="@+id/id_tab_four_center_scrollable2"
android:layout_width="match_parent"
android:layout_height="wrap_content"
app:tabGravity="center"
app:tabIndicatorColor="@color/colorAccent"
app:tabMode="scrollable"
app:tabSelectedTextColor="@color/colorAccent"
app:tabTextColor="@color/c_9b9b9b" />
</LinearLayout>


 1460
1460

 被折叠的 条评论
为什么被折叠?
被折叠的 条评论
为什么被折叠?
 到【灌水乐园】发言


